1 背景
ELK是三个开源软件的缩写,分别表示:Elasticsearch , Logstash, Kibana , 它们都是开源软件。新增了一个FileBeat,它是一个轻量级的日志收集处理工具(Agent),Filebeat占用资源少,适合于在各个服务器上搜集日志后传输给Logstash。
这是一个最简单的架构图:
filebeat ==> logstash ==> elasticsearch ==> kibana

-
资源准备
下载部署包地址:https://www.elastic.co/cn/downloads/past-releases#elasticsearch
注:elk全家桶各个应用版本需一致
-
java版本
java版本要求jdk1.8+,查看版本:
java -version -
创建用户
elk需要用非root用户部署,因此需要创建一个账号用于部署
useradd elk修改目录的权限,给elk赋权
chown elk:elk /data/software/elk -R
2 elasticsearch
Elasticsearch是一个开源的分布式、RESTful 风格的搜索和数据分析引擎
elasticsearch默认端口为9200
2.1 下载安装
- 解压安装包到指定目录/data/software/elk
tar -vxf elasticsearch-7.15.2-linux-x86_64.tar.gz -C /data/software/elk
2.2 配置文件
-
修改conf下elasticsearch.yml配置文件
-
设置ip地址,任意网络均可访问
取消注释:
network.host: 0.0.0.0 -
修改节点名称,每个节点必须都是唯一
node.name: appops-ykm-es1 -
是否为集群主节点
node.master: true -
配置集群成员
discovery.zen.ping.unicast.hosts: ["173.16.11.45","173.16.11.18"]
-
-
修改conf下jvm.options配置文件
-
修改启动配置要求
调整Xms和Xmx为1g:
-Xms1g-Xmx1g
-
-
修改系统配置/etc/sysctl.conf
-
添加:
vm.max_map_count = 655360修改完后重启使配置生效:
sysctl -p
-
2.3 服务部署启用
在bin目录下启动elasticsearch(需在非root用户下启动)
./elasticsearch -d
-d为后台启动
检查服务:
ps -ef | grep elasticsearch
启用成功后可以访问 http://localhost:9200 查看信息,出现如下信息则启用成功

2.4 设置CA认证
-
停止应用
ps -ef | grep elasticsearch | grep -v grep | awk '{print $2}' | xargs kill -9 -
在elasticsearch目录下生成证书
./bin/elasticsearch-certutil ca
./bin/elasticsearch-certutil cert --ca elastic-stack-ca.p12./bin/elasticsearch-keystore add xpack.security.transport.ssl.keystore.secure_password
./bin/elasticsearch-keystore add xpack.security.transport.ssl.truststore.secure_password -
把bin下生成的两个文件复制到config目录下,并修改权限
cp ./bin/elastic-certificates.p12 ./config
cp ./bin/elastic-stack-ca.p12 ./configchmod 600 ./config/elastic-certificates.p12
chmod 600 ./config/elastic-stack-ca.p12 -
同步ca证书到elasticsearch集群其他节点并变更配置(集群)
vim ./config/elasticsearch.ymlxpack.security.enabled: true xpack.security.transport.ssl.enabled: true xpack.security.transport.ssl.verification_mode: certificate xpack.security.transport.ssl.keystore.path: elastic-certificates.p12 xpack.security.transport.ssl.truststore.path: elastic-certificates.p12 -
启动elasticsearch集群所有节点
./bin/elasticsearch -d -
密码初始化
bin/elasticsearch-setup-passwords interactivefuture versions of Elasticsearch will require Java 11; your Java version from [/data/sdk/jdk1.8.0_201/jre] does not meet this requirement Initiating the setup of passwords for reserved users elastic,apm_system,kibana,kibana_system,logstash_system,beats_system,remote_monitoring_user. You will be prompted to enter passwords as the process progresses. Please confirm that you would like to continue [y/N]y # 输入y Enter password for [elastic]: # 输入设置密码 Reenter password for [elastic]: # 再次输入重新设置密码 # 其它不设置项目直接按Enter跳过 -
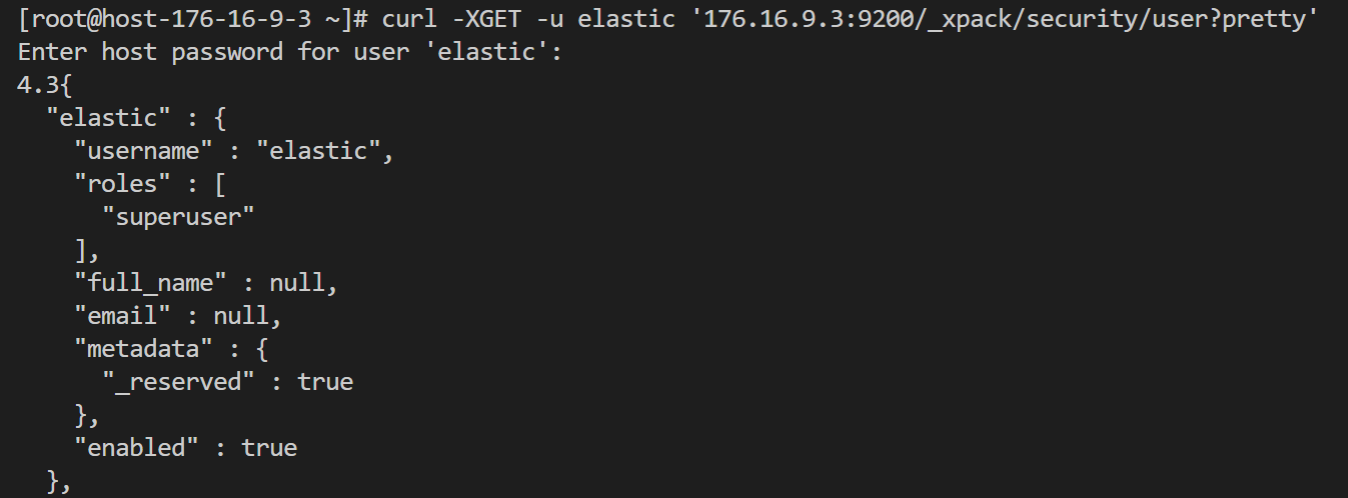
验证密码是否设置成功
curl -XGET -u elastic 'localhost:9200/_xpack/security/user?pretty'输入密码后可以正常返回数据则配置成功,配置后账号为elastic
2.5 常用命令
-
查看集群状态
curl -XGET --user elastic:password http://localhost:9200/_cluster/health?pretty -
查看node整体信息
curl -XGET --user elastic:password localhost:9200/_cat/nodes?v -
集群node详细信息
curl -XGET --user elastic:password localhost:9200/_nodes/process?pretty -
空间检查
curl --user elastic:password http://localhost:9200/_cat/allocation?v -
查看索引
curl -XGET --user elastic:password "http://127.0.0.1:9200/_cat/indices?v&pretty"
2.6 索引管理
可以通过设置定时任务定时删除已过期索引
-
编写shell脚本
vim del_index.sh#!/bin/bash deletetime=$(date -d "30 days ago" +%Y.%m.%d) # 删除30天以前的日志 for i in `curl -XGET --user elastic:password "http://127.0.0.1:9200/_cat/indices?v&pretty" | awk '{print $3}' | grep $deletetime` do echo $deletetime curl -XDELETE --user elastic:password "http://127.0.0.1:9200/$i?pretty" done -
Linux添加定时任务
crontab -e10 9 */1 * * sh /data/software/elk/elasticsearch/del_index.sh # 每天9:10定时执行删除 -
查看定时任务
crontab -l
2.7 报错处理
2.7.1 bootstrp checks failed
报错信息:

解决方案:
修改elasticsearch.yml
vim ./config/elasticsearch.yml
取消注释:cluster.initial_master_nodes: ["node-1", "node-2"]
2.7.2 GeoIp
报错信息:
[ERROR][o.e.i.g.GeoIpDownloader  ] [node_elastic] exception during geoip databases update
java.net.UnknownHostException: geoip.elastic.co
        at sun.nio.ch.NioSocketImpl.connect(NioSocketImpl.java:567) ~[?:?]
解决方案:
此版本将GeoIp功能默认开启了采集。在默认的启动下是会去官网的默认地址下获取最新的Ip的GEO信息
在elasticsearch.yml中添加配置 ingest.geoip.downloader.enabled: false
2.7.3 fatal error
报错信息:
fatal error in thread [elasticsearch[node_elastic]]
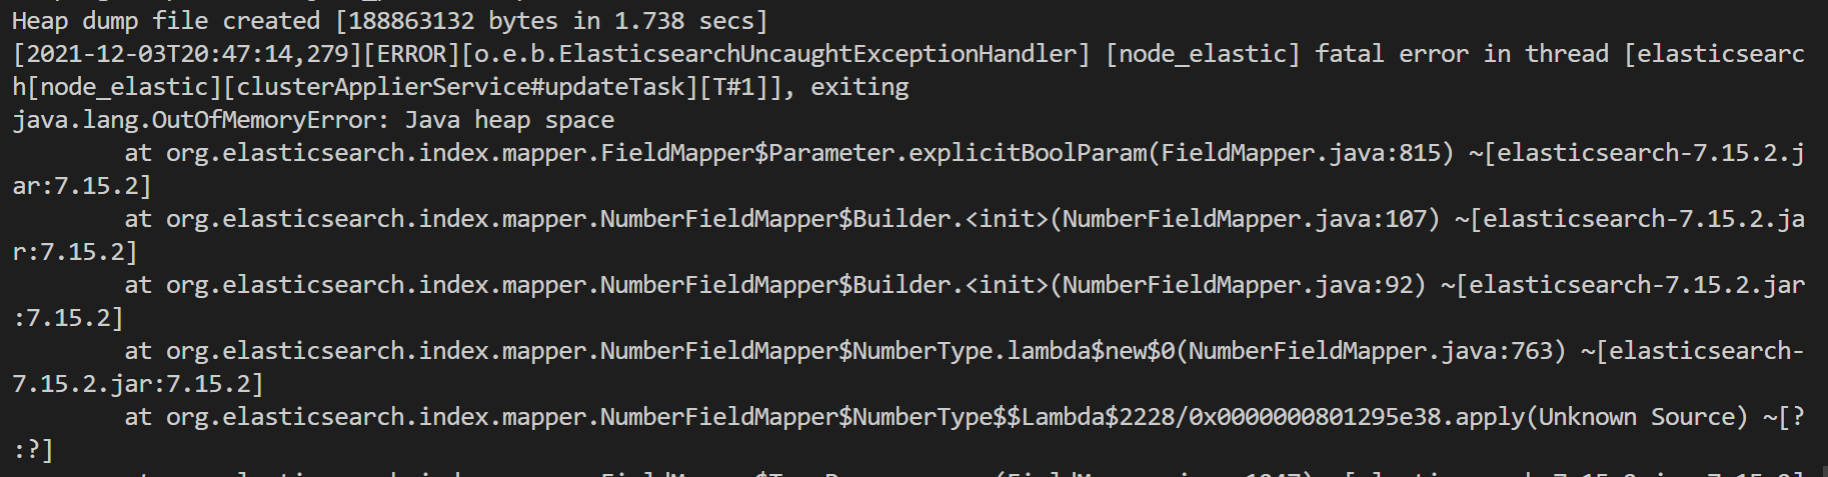
解决方案:
内存设置过小,需修改config目录下的jvm.options,把参数调大
-Xms2g
-Xmx2g
2.7.4 uncaught exception
报错信息:
uncaught exception in thread [main] org.elasticsearch.bootstrap.StartupException
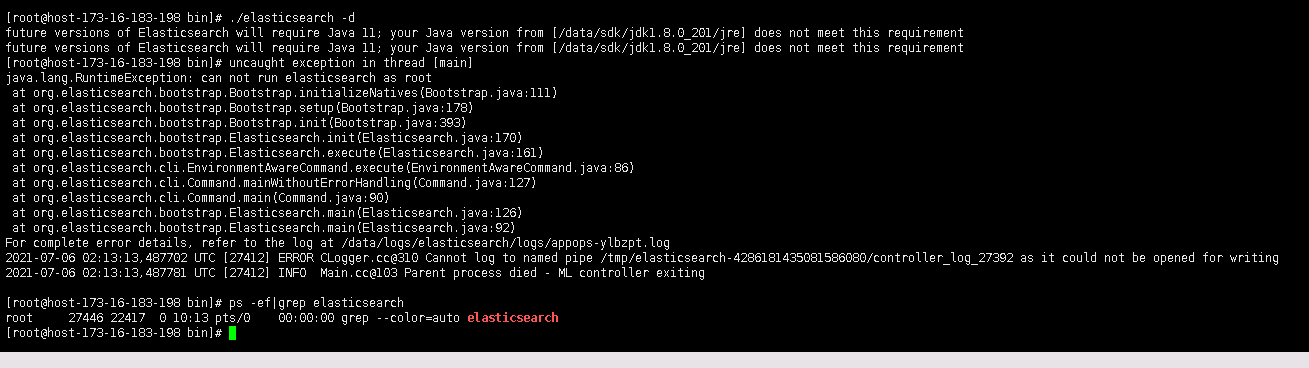
解决方案:
不能用root用户启动,切换成其它非root用户
su elk