部署逻辑卷的目的是实现用户对硬盘资源进行动态调整。(实现???)
部署LVM时,需要逐个配置物理劵、卷组和逻辑卷。
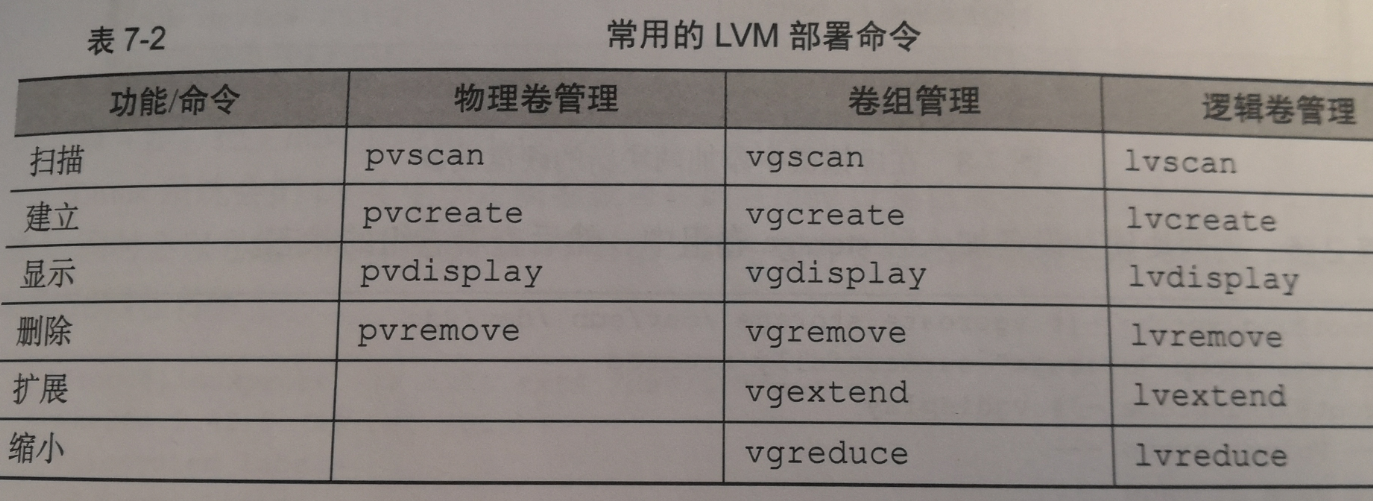
常用的LVM部署命令见下图:(linux就该这么学p145)
部署逻辑卷
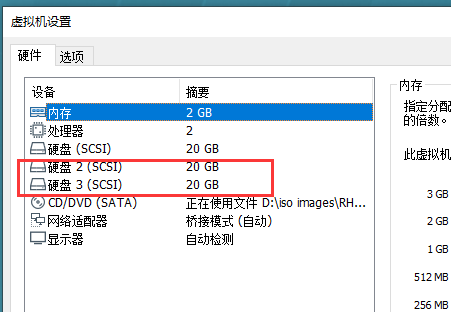
1、首先添加两块硬盘
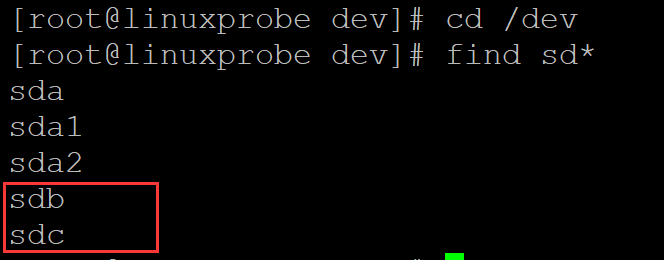
[root@linuxprobe dev]# cd /dev
[root@linuxprobe dev]# find sd*
sda
sda1
sda2
sdb
sdc
2、对这两块硬盘进行创建物理劵的操作,可以将该操作理解为让硬盘支持LVM技术,或者理解成把硬盘设备加入到LVM技术可用的硬件资源池中(配置物理劵)
[root@linuxprobe dev]# pvcreate /dev/sdb /dev/sdc
  Physical volume "/dev/sdb" successfully created
  Physical volume "/dev/sdc" successfully created
3、对这两块硬盘进行卷组合并,卷组名称可以由用户来定义(配置卷组)
[root@linuxprobe dev]# vgcreate vgtest1 /dev/sdb /dev/sdc ## 把两块硬盘设备加入到卷组中
Volume group "vgtest1" successfully created
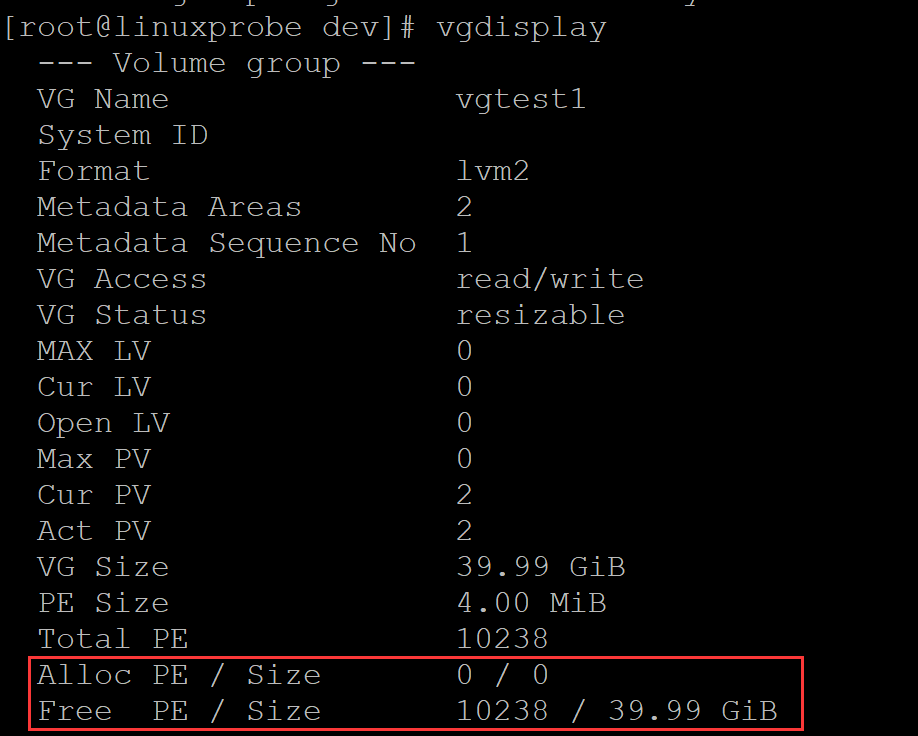
[root@linuxprobe dev]# vgdisplay ## 查看卷组
--- Volume group ---
VG Name vgtest1
System ID
Format lvm2
Metadata Areas 2
Metadata Sequence No 1
VG Access read/write
VG Status resizable
MAX LV 0
Cur LV 0
Open LV 0
Max PV 0
Cur PV 2
Act PV 2
VG Size 39.99 GiB
PE Size 4.00 MiB
Total PE 10238
Alloc PE / Size 0 / 0
Free PE / Size 10238 / 39.99 GiB
……………………
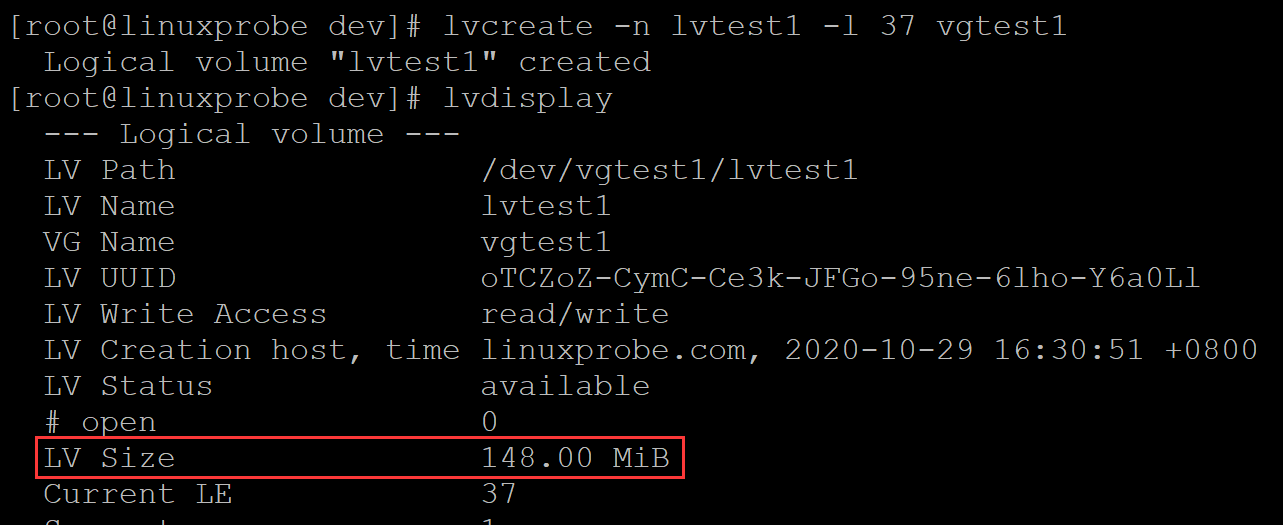
4、把合并后的卷组切割出一个约为150MB的逻辑卷设备(配置逻辑卷)
[root@linuxprobe dev]# lvcreate -n lvtest1 -l 37 vgtest1  ## 切割出一个约为150MB的逻辑卷设备,-n 指定名称,-l 37 默认单位,默认单位为4MB,37*4=148MB
  Logical volume "lvtest1" created
[root@linuxprobe dev]# lvdisplay  ## 显示逻辑卷详细信息
  --- Logical volume ---
  LV Path                /dev/vgtest1/lvtest1
  LV Name                lvtest1
  VG Name                vgtest1
  LV UUID                oTCZoZ-CymC-Ce3k-JFGo-95ne-6lho-Y6a0Ll
  LV Write Access        read/write
  LV Creation host, time linuxprobe.com, 2020-10-29 16:30:51 +0800
  LV Status              available
  # open                 0
  LV Size                148.00 MiB
  Current LE             37
………………
5、把生成的逻辑卷进行格式化
[root@linuxprobe dev]# mkfs.ext4 /dev/vgtest1/lvtest1  ## 格式化
mke2fs 1.42.9 (28-Dec-2013)
Filesystem label=
OS type: Linux
Block size=1024 (log=0)
Fragment size=1024 (log=0)
Stride=0 blocks, Stripe width=0 blocks
38000 inodes, 151552 blocks
7577 blocks (5.00%) reserved for the super user
First data block=1
Maximum filesystem blocks=33816576
19 block groups
8192 blocks per group, 8192 fragments per group
2000 inodes per group
Superblock backups stored on blocks:
        8193, 24577, 40961, 57345, 73729

Allocating group tables: done
Writing inode tables: done
Creating journal (4096 blocks): done
Writing superblocks and filesystem accounting information: done
6、将逻辑卷设备挂载
[root@linuxprobe dev]# df -h  ## 查看当前挂载情况
Filesystem             Size  Used Avail Use% Mounted on
/dev/mapper/rhel-root   18G  2.9G   15G  17% /
devtmpfs               985M     0  985M   0% /dev
tmpfs                  994M   80K  994M   1% /dev/shm
tmpfs                  994M  8.8M  986M   1% /run
tmpfs                  994M     0  994M   0% /sys/fs/cgroup
/dev/sda1              497M  119M  379M  24% /boot
/dev/sr0               3.5G  3.5G     0 100% /run/media/root/RHEL-7.0 Server.x86_64
[root@linuxprobe dev]# mkdir /linuxprobe  ## 创建挂载点
[root@linuxprobe dev]# mount /dev/vgtest1/lvtest1 /linuxprobe  ## 挂载
[root@linuxprobe dev]# df -h  ## 查看挂载
Filesystem                   Size  Used Avail Use% Mounted on
/dev/mapper/rhel-root         18G  2.9G   15G  17% /
devtmpfs                     985M     0  985M   0% /dev
tmpfs                        994M   80K  994M   1% /dev/shm
tmpfs                        994M  8.8M  986M   1% /run
tmpfs                        994M     0  994M   0% /sys/fs/cgroup
/dev/sda1                    497M  119M  379M  24% /boot
/dev/sr0                     3.5G  3.5G     0 100% /run/media/root/RHEL-7.0 Server.x86_64
/dev/mapper/vgtest1-lvtest1  140M  1.6M  128M   2% /linuxprobe
7、设为开机自动挂载
[root@linuxprobe dev]# cat /etc/fstab  ## 查看配置文件

#
# /etc/fstab
# Created by anaconda on Wed Oct 28 20:19:08 2020
#
# Accessible filesystems, by reference, are maintained under '/dev/disk'
# See man pages fstab(5), findfs(8), mount(8) and/or blkid(8) for more info
#
/dev/mapper/rhel-root   /                       xfs     defaults        1 1
UUID=2f2c5a2f-df13-4b36-99c3-9edd1b976d40 /boot                   xfs     defaults        1 2
/dev/mapper/rhel-swap   swap                    swap    defaults        0 0
[root@linuxprobe dev]#  echo -e "/dev/vgtest1/lvtest1\t/linuxprobe\text4\tdefaults\t0\t0" >> /etc/fstab  ## 修改配置文件
[root@linuxprobe dev]# cat /etc/fstab  ## 查看配置文件

#
# /etc/fstab
# Created by anaconda on Wed Oct 28 20:19:08 2020
#
# Accessible filesystems, by reference, are maintained under '/dev/disk'
# See man pages fstab(5), findfs(8), mount(8) and/or blkid(8) for more info
#
/dev/mapper/rhel-root   /                       xfs     defaults        1 1
UUID=2f2c5a2f-df13-4b36-99c3-9edd1b976d40 /boot                   xfs     defaults        1 2
/dev/mapper/rhel-swap   swap                    swap    defaults        0 0
/dev/vgtest1/lvtest1    /linuxprobe     ext4    defaults        0       0