插件
简述
MyBatis 在四大对象的创建过程中,都会有插件进行介入。插件可以利用动态代理机制一层层的包装目标对象,而实现目标对象执行目标方法之前进行拦截效果。MyBatis 允许在已映射语句执行过程中的某一点进行拦截调用。
public class Configuration {
    // 创建的时候不是直接返回的,要经过插件的层层包装
    public Xxx newXxx(...) {
        Xxx xxx = new Xxx(...);
        xxx = (Xxx) interceptorChain.pluginAll(xxx);
    }
}
·················································
public class InterceptorChain {
    public Object pluginAll(Object target) {
        for (Interceptor interceptor : interceptors) {
            // [插件机制] 用插件为 target(四大对象) 创建代理对象
            target = interceptor.plugin(target);
        }
        return target;
    }
}
默认情况下,MyBatis 允许插件来拦截的方法调用包括:
[Executor] update, query, flushStatements, commit, rollback, getTransaction, close, isClosed
[ParameterHandler] getParameterObject, setParameters
[ResultSetHandler] handleResultSets, handleOutputParameters
[StatementHandler] prepare, parameterize, batch, update, query
插件开发步骤
实现 Interceptor 接口
public interface Interceptor {
  // 拦截目标对象的目标方法的执行
  Object intercept(Invocation invocation) throws Throwable;
  // 包装目标对象。包装:为目标对象创建代理对象
  Object plugin(Object target);
    // 将插件注册时的 <property> 属性设置进来
  void setProperties(Properties properties);
}
为 target 创建动态代理
public class Plugin implements InvocationHandler {
  // 目标对象
  private Object target;
  // 包装目标对象的插件
  private Interceptor interceptor;
  // 插件签名(要拦截的方法)
  private Map<Class<?>, Set<Method>> signatureMap;

  private Plugin(Object target, Interceptor interceptor
          , Map<Class<?>, Set<Method>> signatureMap) {
    this.target = target;
    this.interceptor = interceptor;
    this.signatureMap = signatureMap;
  }

  public static Object wrap(Object target, Interceptor interceptor) {
    Map<Class<?>, Set<Method>> signatureMap = getSignatureMap(interceptor);
    Class<?> type = target.getClass();
    Class<?>[] interfaces = getAllInterfaces(type, signatureMap);
    if (interfaces.length > 0) { // 是插件签名声明的类型,返回其动态代理对象
      return Proxy.newProxyInstance(
          type.getClassLoader(),
          interfaces,
          new Plugin(target, interceptor, signatureMap));
    }
    return target; // 不是的,就直接返回目标对象
  }

  @Override
  public Object invoke(Object proxy, Method method, Object[] args) throws Throwable {
    try {
      Set<Method> methods = signatureMap.get(method.getDeclaringClass());
      if (methods != null && methods.contains(method)) {
        // 若调用 @Signature 声明的方法,则直接来到代理这儿
        // ===== ↓↓↓↓↓ Step Into ↓↓↓↓↓ =====> #1.3[1]
        return interceptor.intercept(new Invocation(target, method, args));
      }
      return method.invoke(target, args);
    } catch (Exception e) {
      throw ExceptionUtil.unwrapThrowable(e);
    }
  }

  private static Map<Class<?>, Set<Method>> getSignatureMap(Interceptor interceptor) {
    Intercepts interceptsAnnotation = interceptor.getClass().getAnnotation(Intercepts.class);
    // issue #251
    if (interceptsAnnotation == null) {
      throw new PluginException("No @Intercepts annotation was found in interceptor "
              + interceptor.getClass().getName());
    }
    Signature[] sigs = interceptsAnnotation.value();
    Map<Class<?>, Set<Method>> signatureMap = new HashMap<Class<?>, Set<Method>>();
    for (Signature sig : sigs) {
      Set<Method> methods = signatureMap.get(sig.type());
      if (methods == null) {
        methods = new HashSet<Method>();
        signatureMap.put(sig.type(), methods);
      }
      try {
        Method method = sig.type().getMethod(sig.method(), sig.args());
        methods.add(method);
      } catch (NoSuchMethodException e) {
        throw new PluginException("Could not find method on "
                + sig.type() + " named " + sig.method() + ". Cause: " + e, e);
      }
    }
    return signatureMap;
  }

  private static Class<?>[] getAllInterfaces(Class<?> type
          , Map<Class<?>, Set<Method>> signatureMap) {
    Set<Class<?>> interfaces = new HashSet<Class<?>>();
    while (type != null) {
      for (Class<?> c : type.getInterfaces()) {
        if (signatureMap.containsKey(c)) {
          interfaces.add(c);
        }
      }
      type = type.getSuperclass();
    }
    return interfaces.toArray(new Class<?>[interfaces.size()]);
  }

}
编写插件签名
@Intercepts
@Retention(RetentionPolicy.RUNTIME)
@Target(ElementType.TYPE)
public @interface Intercepts {
    Signature[] value();
}
@Signature
@Retention(RetentionPolicy.RUNTIME)
@Target(ElementType.TYPE)
public @interface Signature {

    // 要拦截四大对象的哪一个
    Class<?> type();

    // 拦截哪个方法
    String method();

    // 方法的参数列表(有的方法可能会有方法重载)
    Class<?>[] args();
}
注册插件
注册到全局配置文件中。
<configuration>
	<!-- properties -->

	<!-- 注册插件 -->
    <plugins>
        <plugin interceptor="cn.edu.nuist.plugins.MyFirstPlugin">
            <property name="username" value="root"/>
            <property name="password" value="shaw"/>
        </plugin>
    </plugins>

    <!-- ... -->
</configuration>
自定义插件
MyFirstPlugin
// 完成插件签名:告诉 MyBatis 该插件用来拦截哪个对象的哪个方法
@Intercepts({
    @Signature(
        type = StatementHandler.class,
        method = "parameterize",
        args = java.sql.Statement.class
    )
})
public class MyFirstPlugin implements Interceptor {

    @Override // 拦截目标对象的目标方法
    public Object intercept(Invocation invocation) throws Throwable {
        System.out.println("=====>[MyFirstPlugin] before intercept");
        // ------------------------------------------------------------
                                  编写插件功能
        // ------------------------------------------------------------
        // 执行目标方法
        Object result = invocation.proceed();
        System.out.println("=====>[MyFirstPlugin] after intercept");
        return result; // "放行"
    }

    @Override // 包装目标对象。包装:为目标对象创建代理对象
    public Object plugin(Object target) {
        System.out.println("=====>[MyFirstPlugin] before plugin: " + target);
        // 借助 Plugin 类的 wrap() 使用当前 Interceptor 包装目标对象
        // ===== ↓↓↓↓↓ Step Into ↓↓↓↓↓ =====> #1.2.2[2]
        Object wrap = Plugin.wrap(target, this);
        // 为当前 target 创建的动态代理
        System.out.println("=====>[MyFirstPlugin] after plugin: " + wrap);
        return wrap;
    }

    @Override // 将插件注册时的 <property> 属性设置进来
    public void setProperties(Properties properties) {
        System.out.println("=====>[MyFirstPlugin] setProperties");
        System.out.println(properties);
    }
}
插件功能举例:动态的改变 SQL 运行的参数,如查询 1 号 teacher,则返回 3 号 teacher。
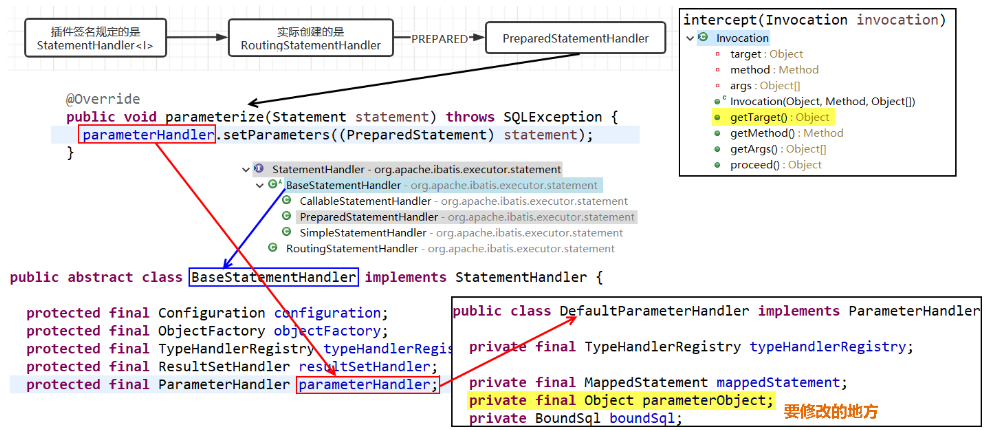
@Override
public Object intercept(Invocation invocation) throws Throwable {
    // 1. 拿到 target 元数据
    MetaObject metaObject = SystemMetaObject.forObject(invocation.getTarget());
    System.out.println("SQL 语句用的参数:"
            + metaObject.getValue("parameterHandler.parameterObject"));
    // 2. 修改 SQL 参数
    metaObject.setValue("parameterHandler.parameterObject", 3);
    // 3. 执行目标方法
    return invocation.proceed();
}
执行流程
单插件
以自定义插件 MyFirstPlugin 为例
打印控制台:
=====>[MyFirstPlugin] setProperties: {password=shaw, username=root}
=====>[MyFirstPlugin] before plugin: org.apache.ibatis.executor.CachingExecutor@71c3b41
=====>[MyFirstPlugin] after plugin: org.apache.ibatis.executor.CachingExecutor@71c3b41
=====>[MyFirstPlugin] before plugin:
    org.apache.ibatis.scripting.defaults.DefaultParameterHandler@1f97cf0d
=====>[MyFirstPlugin] after plugin:
    org.apache.ibatis.scripting.defaults.DefaultParameterHandler@1f97cf0d
=====>[MyFirstPlugin] before plugin:
    org.apache.ibatis.executor.resultset.DefaultResultSetHandler@2e222612
=====>[MyFirstPlugin] after plugin:
    org.apache.ibatis.executor.resultset.DefaultResultSetHandler@2e222612
=====>[MyFirstPlugin] before plugin:
    org.apache.ibatis.executor.statement.RoutingStatementHandler@61386958
=====>[MyFirstPlugin] after plugin:
    org.apache.ibatis.executor.statement.RoutingStatementHandler@61386958($Proxy7)
DEBUG 09-19 09:13:23,609 ==>  Preparing: SELECT * FROM teacher WHERE tid = ?
=====>[MyFirstPlugin] before intercept
=====>[MyFirstPlugin] after intercept
DEBUG 09-19 09:53:34,568 ==> Parameters: 1(Integer)
DEBUG 09-19 09:53:34,582 <==      Total: 1
Teacher [...]
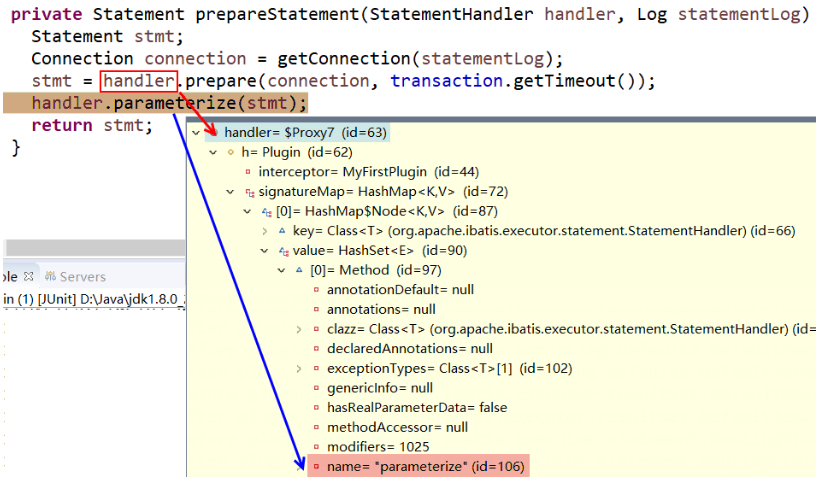
执行流程:
- 程序启动,加载 MyBatis 全局配置文件,载入插件,为插件属性赋值:
setProperties(...) - 调用 Mapper 查询方法,创建四大组件 → #1.1
- 因为就配置了一个插件,所以现象就是 MyFirstPlugin 对四大组件挨个尝试 plugin → #1.3[2]
- 程序若调用了【插件签名】中声明的方法,则直接进入 #1.2.2[3]:proxy.invoke()
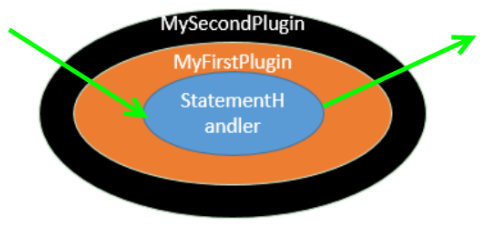
多插件
MySecondPlugin 与 MyFirstPlugin 拦截同一个方法。
配置顺序如下:
<plugins>
    <plugin interceptor="cn.edu.nuist.plugins.MyFirstPlugin">
        <property name="username" value="root"/>
        <property name="password" value="shaw"/>
    </plugin>
    <plugin interceptor="cn.edu.nuist.plugins.MySecondPlugin"></plugin>
</plugins>
打印控制台:
=====>[MyFirstPlugin] setProperties: {password=shaw, username=root}
=====>[MySecondPlugin] setProperties: {}
=====>[MyFirstPlugin]
    before plugin: org.apache.ibatis.executor.CachingExecutor@6b09bb57
=====>[MyFirstPlugin]
    after plugin: org.apache.ibatis.executor.CachingExecutor@6b09bb57
=====>[MySecondPlugin]
    before plugin: org.apache.ibatis.executor.CachingExecutor@6b09bb57
=====>[MySecondPlugin]
    after plugin: org.apache.ibatis.executor.CachingExecutor@6b09bb57
=====>[MyFirstPlugin]
    before plugin: org.apache.ibatis.scripting.defaults.DefaultParameterHandler@49fc609f
=====>[MyFirstPlugin]
    after plugin: org.apache.ibatis.scripting.defaults.DefaultParameterHandler@49fc609f
=====>[MySecondPlugin]
    before plugin: org.apache.ibatis.scripting.defaults.DefaultParameterHandler@49fc609f
=====>[MySecondPlugin]
    after plugin: org.apache.ibatis.scripting.defaults.DefaultParameterHandler@49fc609f
=====>[MyFirstPlugin]
    before plugin: org.apache.ibatis.executor.resultset.DefaultResultSetHandler@22a67b4
=====>[MyFirstPlugin]
    after plugin: org.apache.ibatis.executor.resultset.DefaultResultSetHandler@22a67b4
=====>[MySecondPlugin]
    before plugin: org.apache.ibatis.executor.resultset.DefaultResultSetHandler@22a67b4
=====>[MySecondPlugin]
    after plugin: org.apache.ibatis.executor.resultset.DefaultResultSetHandler@22a67b4
=====>[MyFirstPlugin]
    before plugin: org.apache.ibatis.executor.statement.RoutingStatementHandler@3b084709
=====>[MyFirstPlugin]
    after plugin: org.apache.ibatis.executor.statement.RoutingStatementHandler@3b084709
=====>[MySecondPlugin]
    before plugin: org.apache.ibatis.executor.statement.RoutingStatementHandler@3b084709
=====>[MySecondPlugin]
    after plugin: org.apache.ibatis.executor.statement.RoutingStatementHandler@3b084709
DEBUG ==>  Preparing: SELECT * FROM teacher WHERE tid = ?
=====>[MySecondPlugin] before intercept
=====>[MyFirstPlugin] before intercept
=====>[MyFirstPlugin] after intercept
=====>[MySecondPlugin] after intercept
DEBUG ==> Parameters: 1(Integer)
DEBUG <==      Total: 1
Teacher [...]
执行流程:
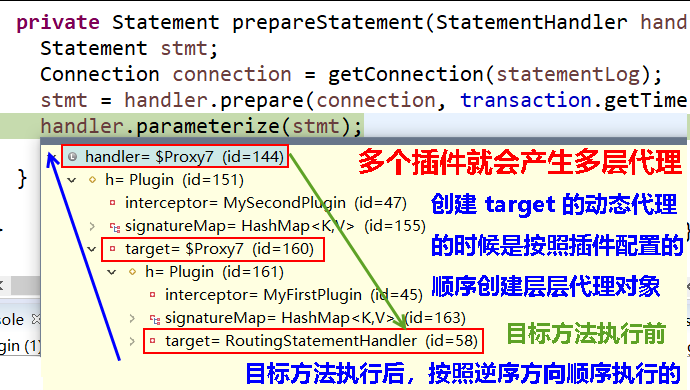
handler.parameterize(stmt) → Plugin.invoke() → return interceptor.intercept(...)- Step Into 会进入 MySecondPlugin 的 interceptor 方法,在方法体中调用
invocation.proceed() - Step Into 会进入 MyFirstPlugin 的 interceptor 方法,此时,再在方法体中调用
invocation.proceed(),才是真正进入目标对象的目标方法
分页插件 PageHelper
PageHelper 是 MyBatis 中非常方便的第三方分页插件。
- 导入相关包 pagehelper-x.x.x.jar 和 jsqlparser-0.9.5.jar
- 在 MyBatis 全局配置文件中配置分页插件
<plugins> <plugin interceptor="com.github.pagehelper.PageInterceptor"></plugin> </plugins> - 使用 PageHelper 提供的方法进行分页
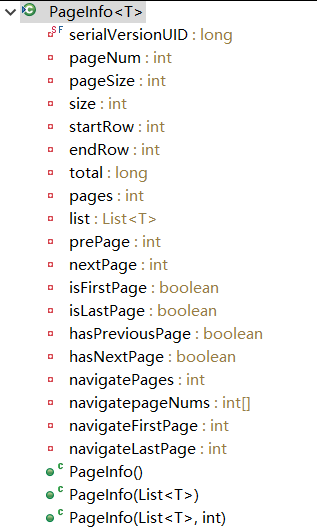
@RequestMapping("/getAllTeachers") public String getAllTeachers(Model model , @RequestParam(value="pageNum", defaultValue = "1")Integer pageNum) { // 获取第 pageNum 页,默认每页 10 条 PageHelper.startPage(pageNum, 10); // 这个查询就是一个分页查询! List<Teacher> list = teacherService.getAllTeachers(); // 用 PageInfo 对结果集进行包装 PageInfo<Teacher> pageInfo = new PageInfo<>(list, 5); // 构造器param2: 连续显示多少页 2 3 4 5 6 // int[] nums = pageInfo.getNavigatepageNums(); model.addAttribute("pageInfo", pageInfo); return "success"; } - 可以使用更强大的 PageInfo 封装返回结果
- peek 源码
public abstract class PageMethod {
    protected static final ThreadLocal<Page> LOCAL_PAGE = new ThreadLocal<Page>();

    /**
     * 设置 Page 参数
     *
     * @param page
     */
    protected static void setLocalPage(Page page) {
        LOCAL_PAGE.set(page);
    }

    /**
     * 开始分页
     *
     * @param pageNum  页码
     * @param pageSize 每页显示数量
     * @param count    是否进行count查询
     */
    public static <E> Page<E> startPage(int pageNum, int pageSize, boolean count) {
        Page<E> page = new Page<E>(pageNum, pageSize, count);
        setLocalPage(page);
        return page;
    }

    // ...
}
批量操作
@Test
public void testBatchInsertEmp() {
    // 什么时候需要批量操作,就获取可批量操作的 SqlSession;没必要在配置文件中修改
    SqlSession sqlSession = sqlSessionFactory.openSession(ExecutorType.BATCH);
    EmployeeDao mapper = sqlSession.getMapper(EmployeeDao.class);
    for(int i = 5000; i < 5050; i++) {
        String s = "wnba"+i;
        mapper.insertEmp(new Employee(s, s+"@163.com", 1));
    }
    sqlSession.commit();
}
批量:预编译 SQL → 设置参数 * 10000 times → 执行
非批量:[预编译 SQL → 设置参数 → 执行] * 10000 times

与 Spring 整合
-
在 applicationContext.xml 中配置
<!-- 配置一个可以批量操作的 SqlSession --> <bean id="sqlSession" class="org.mybatis.spring.SqlSessionTemplate"> <constructor-arg name="sqlSessionFactoryBean" ref="sqlSessionFactoryBean"></constructor-arg> <constructor-arg name="executorType" value="BATCH"></constructor-arg> </bean> -
在 Service 中自动注入该 SqlSession
@Service
public class TeacherService {

    @Autowired
    private SqlSession batchSqlSession;

    public void batchInsertTeachers() {
    	TeacherMapper mapper = batchSqlSession.getMapper(TeacherMapper.class);
    	// ...
    }
}
调用存储过程
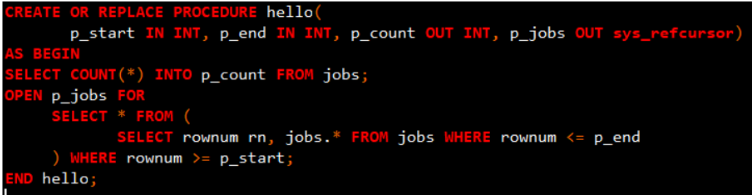
<mapper namespace="cn.edu.nuist.dao.JobDao">

    <!-- void InjectPageJobsByProcedure()
        1. 使用 <select> 定义调用存储过程
        2. statementType="CALLABLE"
    -->
    <select id="InjectPageJobsByProcedure" statementType="CALLABLE">
    {call hello(#{start, mode=IN, jdbcType=INTEGER}
        , #{end, mode=IN, jdbcType=INTEGER}
        , #{count, mode=OUT, jdbcType=INTEGER}
        , #{jobs, mode=OUT, jdbcType=CURSOR, javaType=ResultSet, resultMap=pageJob})
    }
    </select>

    <resultMap type="cn.edu.nuist.bean.Job" id="pageJob">
        <result property="jobId" column="job_id"/>
        <result property="jobTitle" column="job_title"/>
        <result property="minSalary" column="min_salary"/>
        <result property="maxSalary" column="max_salary"/>
    </resultMap>
</mapper>
@Test
public void testBatchInsertEmp() {
    SqlSession sqlSession = sqlSessionFactory.openSession();
    JobDao jobDao = sqlSession.getMapper(JobDao.class);
    Page page = new Page();
    page.setStart(1);
    page.setEnd(5);
    jobDao.InjectPageJobsByProcedure(page);
    System.out.println(page.getCount());
    System.out.println(page.getJobs());
}
自定义类型处理器
通过自定义 TypeHandler 的形式来在设置参数或者取出结果集的时候自定义参数封装策略。
TypeHandler
实现 TypeHandler<I> 或者继承 BaseTypeHandler。
public interface TypeHandler<T> {

  void setParameter(PreparedStatement ps, int i
          , T parameter, JdbcType jdbcType) throws SQLException;

  T getResult(ResultSet rs, String columnName) throws SQLException;

  T getResult(ResultSet rs, int columnIndex) throws SQLException;

  T getResult(CallableStatement cs, int columnIndex) throws SQLException;

}
自定义处理枚举类型
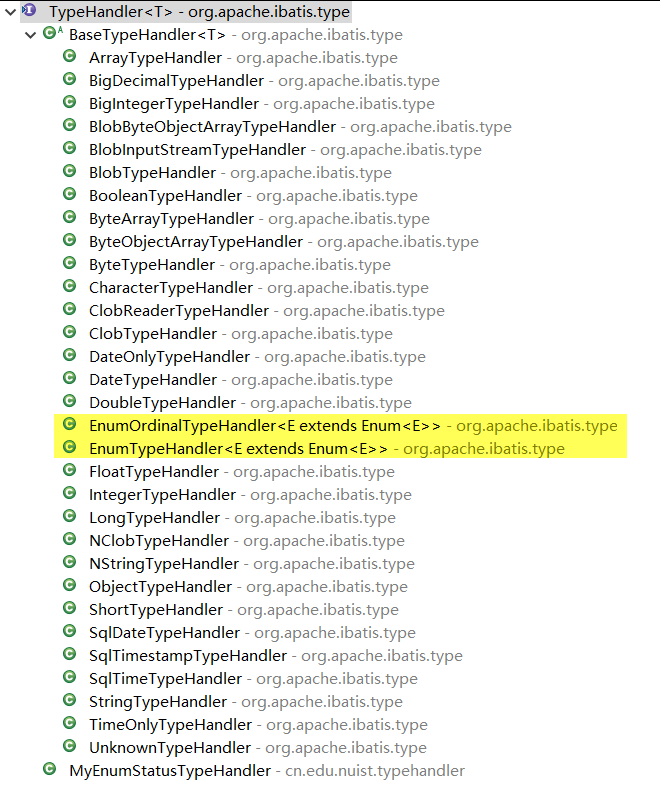
- EnumTypeHandler:
ps.setString(i, parameter.name()); - EnumOrdinalTypeHandler:
ps.setInt(i, parameter.ordinal()); - 【需求】希望 DB 保存的是 code,而不是索引或者枚举名
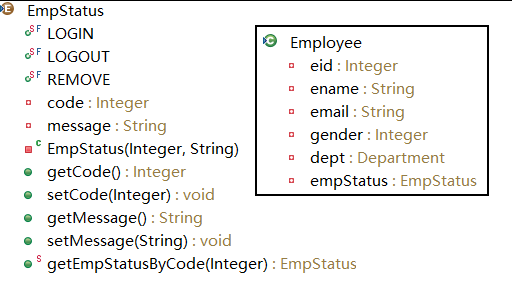
public class MyEnumStatusTypeHandler implements TypeHandler<EmpStatus> {

    @Override
    public void setParameter(PreparedStatement ps, int i
            , EmpStatus parameter, JdbcType jdbcType) throws SQLException {
        ps.setString(i, parameter.getCode().toString());
    }

    @Override
    public EmpStatus getResult(ResultSet rs, String columnName) throws SQLException {
        int code = rs.getInt(columnName);
        System.out.println("GET empStatus FROM DB: " + code);
        EmpStatus status = EmpStatus.getEmpStatusByCode(code);
        return status;
    }

    @Override
    public EmpStatus getResult(ResultSet rs, int columnIndex) throws SQLException {
        int code = rs.getInt(columnIndex);
        System.out.println("GET empStatus FROM DB: " + code);
        EmpStatus status = EmpStatus.getEmpStatusByCode(code);
        return status;
    }

    @Override
    public EmpStatus getResult(CallableStatement cs, int columnIndex) throws SQLException {
        // ...
    }
}
配置
- 在全局配置该 TypeHandler 要处理的 javaType
<typeHandlers> <typeHandler javaType="cn.edu.nuist.bean.EmpStatus" handler="cn.edu.nuist.typehandler.MyEnumStatusTypeHandler"/> </typeHandlers> - 在自定义结果集标签的时候指定 typeHandler
<resultMap type="cn.edu.nuist.bean.Employee" id="empMap"> <id column="eid" property="eid"/> <!-- ... --> <result column="empStatus" property="empStatus" typeHandler="cn.edu.nuist.typehandler.MyEnumStatusTypeHandler"/> </resultMap> - 插入标签做参数处理的时候指定 typeHandler
<insert id="insertEmpWithStatus" useGeneratedKeys="true" keyProperty="eid">
    INSERT INTO emp(ename, gender, email, empStatus)
    VALUES(#{ename}, #{gender}, #{email}, #{empStatus,
        typeHandler=cn.edu.nuist.typehandler.MyEnumStatusTypeHandler})
</insert>