1. String Boot的使用
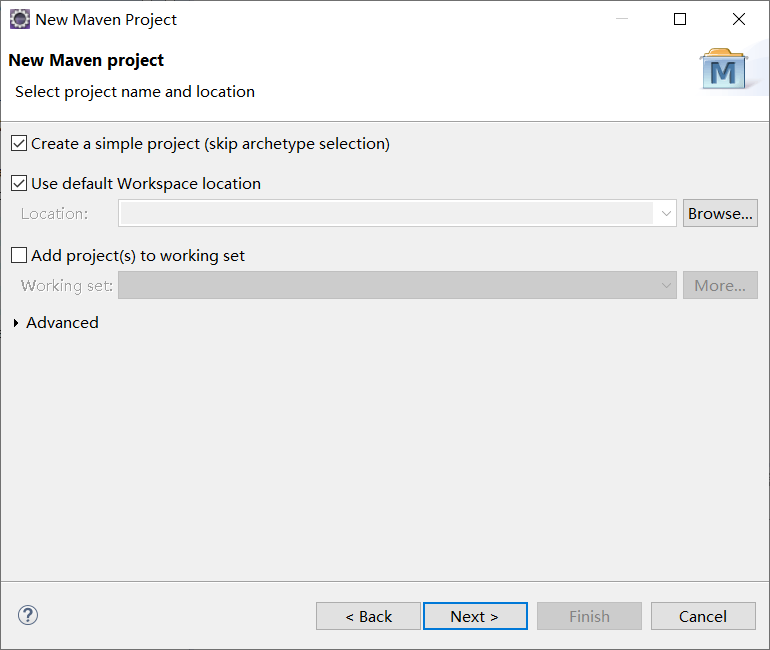
1.1 创建项目


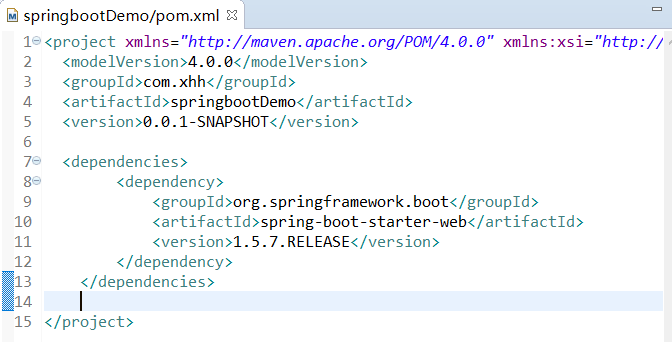
1.2 导入依赖
  <dependencies>
        <dependency>
            <groupId>org.springframework.boot</groupId>
            <artifactId>spring-boot-starter-web</artifactId>
            <version>1.5.7.RELEASE</version>
        </dependency>
    </dependencies>

1.3 制作简单的网站
在src/main/java包下,包结构:

创建FirstApp.java文件:
package com.xhh;

import org.springframework.boot.SpringApplication;
import org.springframework.boot.autoconfigure.SpringBootApplication;

@SpringBootApplication
public class FirstApp {

}
查看@SpringBootApplication,可以看到这个注解是多个注解的集合。
然后编写main方法:
package com.xhh;

import org.springframework.boot.SpringApplication;
import org.springframework.boot.autoconfigure.SpringBootApplication;

@SpringBootApplication
public class FirstApp {

    public static void main(String[] args) {
        SpringApplication.run(FirstApp.class, args);
    }

}
此时,我们可以右键直接运行项目了。

启动的是tomcat的默认端口8080。
再创建一个MyController.java:
package com.xhh;

import org.springframework.stereotype.Controller;
import org.springframework.web.bind.annotation.GetMapping;
import org.springframework.web.bind.annotation.ResponseBody;

@Controller
public class MyController {
    //该注解将HTTP Get 映射到 特定的处理方法上。
    //即可以使用@GetMapping(value = “/hello”)来代替@RequestMapping(value=”/hello”,method= RequestMethod.GET)。
    //组合注解,是@RequestMapping(method = RequestMethod.GET)的缩写
    @GetMapping("/hello")
    //让controller返回数据能够在页面上显示,实现回显效果
    @ResponseBody
    public String hello() {
        return "Hello World";
    }
}
再启动项目,在网页中输入http://localhost:8080/hello:

然后来玩玩返回对象:
先创建实体类Person:
package com.xhh;

public class Person {

    private Integer id;
    private String name;
    private Integer age;
    public Integer getId() {
        return id;
    }
    public void setId(Integer id) {
        this.id = id;
    }
    public String getName() {
        return name;
    }
    public void setName(String name) {
        this.name = name;
    }
    public Integer getAge() {
        return age;
    }
    public void setAge(Integer age) {
        this.age = age;
    }

}
再创建MyRestController.java:
package com.xhh;

import org.springframework.http.MediaType;
import org.springframework.web.bind.annotation.PathVariable;
import org.springframework.web.bind.annotation.RequestMapping;
import org.springframework.web.bind.annotation.RequestMethod;
import org.springframework.web.bind.annotation.RestController;

@RestController
public class MyRestController {

    //produces = MediaType.APPLICATION_JSON_VALUE 将返回的数据转换成json格式
    @RequestMapping(value = "/person/{id}", method = RequestMethod.GET,
            produces = MediaType.APPLICATION_JSON_VALUE)
    //@PathVariable 获取url中的数据
    public Person getPerson(@PathVariable Integer id) {
        Person p = new Person();
        p.setId(id);
        p.setName("angus");
        p.setAge(30);
        return p;
    }
}
运行程序:
