一、File类的使用:
1.File类的一个对象,代表一个文件或一个文件目录(文件夹)
2.File类声明在java.io包下,File类中涉及到关于文件或文件目录的创建、删除、重命名、修改时间、文件大小等方法,并未涉及到写入或读取文件内容的操作。如果需要读取或写入文件内容,必须使用IO流来完成。后续File类的对象常会作为参数传递到流的构造器中,指明读取或写入的“终点”。
3.File类的实例创建:
3.1public File(String pathname)
以pathname为路径创建File对象,可以是绝对路径或者相对路径,如果pathname是相对路径,则默认的当前路径在系统属性user.dir中存储。
绝对路径:是一个固定的路径,从盘符开始
相对路径:是相对于某个位置开始
3.2 public File(String parent,String child)
以parent为父路径,child为子路径创建File对象。
3.3public File(File parent,String child)
根据一个父File对象和子文件路径创建File对象
4.因为路径需要用“”来区分开,但是java中“”有转义的意思,所以需要使用“\”来作为分隔符,又因为java是跨平台的,在unix和url中,分隔符又是用“/”来表示,为了解决这一隐患,File类提供了一个常量:public static final String separator。它能根据操作系统,动态的提供分隔符。
举例:
File file1 = new File(“d:\qianqian\ofo.txt”);//window和Dos下
File file2 = new File(“d:”+File.separator+“qianqian”+File.separator+“ofo.txt”);
File file3 = new File(“d:/qianqian”);//unix下
二、File类的常用方法:
1.File类的获取功能
public String getAbsolutePath():获取绝对路径
public String getPath() :获取路径
public String getName() :获取名称
public String getParent():获取上层文件目录路径。若无,返回null
public long length() :获取文件长度(即:字节数)。不能获取目录的长度。
public long lastModified() :获取最后一次的修改时间,毫秒值
public String[] list() :获取指定目录下的所有文件或者文件目录的名称数组
public File[] listFiles() :获取指定目录下的所有文件或者文件目录的File数组
2.File类的重命名功能
public boolean renameTo(File dest):把文件重命名为指定的文件路径
代码示例:
 File file1 = new File("C:\Users\Administrator\IdeaProjects\JavaSenior\src\com\Fstyle\aa.txt");
    File file2 = new File("C:\Users\Administrator\Desktop\zhuanyidaozhe.txt");

    @Test
    public void sodsd(){
        boolean b = file1.renameTo(file2);
        System.out.println(b);
    }
}//这个时候返回的是true,并且file1路径下的aa.txt文件被移动到了file2指定路径
这里需要注意的是要想成功返回true,也就执行移动成功,需要file1在硬盘中是存在的,且file2不能在硬盘中存在。另外反向取,只需要反向调用方法就行。
3. File类的判断功能
public boolean isDirectory():判断是否是文件目录
public boolean isFile() :判断是否是文件
public boolean exists() :判断是否存在
public boolean canRead() :判断是否可读
public boolean canWrite() :判断是否可写
public boolean isHidden() :判断是否隐藏
4. File类的创建功能
public boolean createNewFile() :创建文件。若文件存在,则不创建,返回false
public boolean mkdir() :创建文件目录。如果此文件目录存在,就不创建了。
如果此文件目录的上层目录不存在,也不创建。
public boolean mkdirs() :创建文件目录。如果上层文件目录不存在,一并创建
注意事项:如果你创建文件或者文件目录没有写盘符路径,那么,默认在项目
路径下。
5. File类的删除功能
public boolean delete():删除文件或者文件夹
删除注意事项:
Java中的删除不走回收站。
要删除一个文件目录,请注意该文件目录内不能包含文件或者文件目录。
三、流的分类:
- 按操作单位不同分为:字节流(8 bit),字符流(16bit)
- 按数据流的流向不同分为:输入流,输出流
- 按流的角色不同分为:节点流,处理流

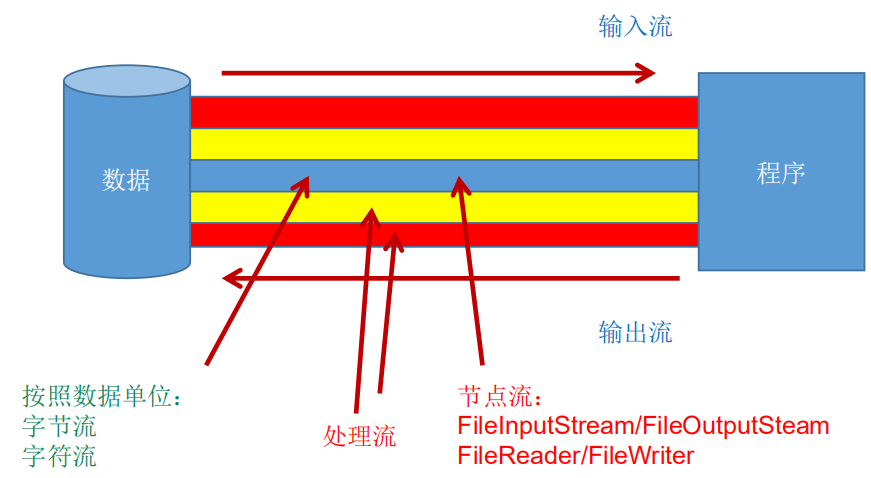
不同流之间的关系图解如下:

做个比喻:节点流就像数据和程序之间的水管,而字节流和字符流就是流在水管里面的水,水管太细流速慢,所以加入处理流加粗水管,加快流水速度。
IO流体系图如下:

四、读写操作的注意要素:
1.读操作:
- read()的理解:返回读入的一个字符。如果达到文件 末尾,返回-1
- 异常的处理:为了保证流资源一定可以执行关闭操作,需要使用try-catch-finally处理
- 读入的文件一定要存在,否则就会报FileNotFoundException
代码示例:
public void testread(File file) {
    FileReader fileReader = null;
        try {
            fileReader = new FileReader(file);
            int num;
            while ((num = fileReader.read()) != -1){
                System.out.println((char)num);
            }


        } catch (FileNotFoundException e) {
            e.printStackTrace();
        } catch (IOException e) {
            e.printStackTrace();
        }
        finally {
            try {
if (fileReader != null){
    fileReader.close();
}
} catch (IOException e) { e.printStackTrace(); } } } public class Billllllll { public static void main(String[] args) { File file = new File("src\com\Fstyle\aa.txt"); Billllllll billllllll = new Billllllll(); billllllll.testread(file); }
若是使用read的带数组参数的构造器,需要注意,在遍历的时候,遍历条件不是数组的长度,而是每次读入数据的长度。(因为最后一次读取的若是不满足数组长度,会读取剩余长度,这样就不会最后一次还是读入数组长度,导致多读数据)
2.写操作:
- 输出操作,对于的File可以不存在,并不会报异常
- File对于的硬盘中的文件如果不存在,在输出的过程中,会自动创建此文件
- File对于的硬盘中的文件如果存在:
- 如果流使用的构造器是:FileWriter(file,false)/FileWriter(file):对原有文件的覆盖。
- 如果流使用的构造器是:FileWriter(file,true):不会对原有文件覆盖,而是在原有文件基础上追加内容。
public void writefile(File file){
    FileWriter fileWriter = null;
    try {
        fileWriter = new FileWriter(file);
        fileWriter.write("I am hungry
");
        fileWriter.write("I am Sorstide");
    } catch (IOException e) {
        e.printStackTrace();
    }finally {
        if (fileWriter!=null){
            try {
                fileWriter.close();
            } catch (IOException e) {
                e.printStackTrace();
            }
        }

    }
}
五、关于FileIputStream和FileOutputStream的使用:
1.对于文本文件(.txt,.java,.c,.cpp),使用字符流处理比较好,因为若是使用字节流处理,一个汉字在utf-8中有些是等于三个字节,有些是等于四个字节,若是按照一个字节一个字节的读,会将汉字拆分,变成乱码,又没有固定的按照几个字节读能满足一定读取不乱码,所以若是只是执行将文件读入内存查看,不推荐用字节流。
2.对于非文本文件(.jpg,.mp3,.mp4,.avi,.doc,.ppt...)使用字节流处理,若是用字符流会导致执行操作失败。
六、处理流之缓冲流的使用:
1.作用:提供流的读取、写入的速度
代码证明:
不用缓冲流复制视频文件:
public void FFtu(File file1,File file2){
        FileInputStream inputStream =null;
        FileOutputStream outputStream =null;
        //创建输入输出流对象
   long start = System.currentTimeMillis();//获取开始时间
    try {
        inputStream = new FileInputStream(file1);
        outputStream = new FileOutputStream(file2);


        byte [] arr = new byte[1024];
        int num;//读入内容,没有则为-1
        while ((num = inputStream.read(arr)) != -1){
            outputStream.write(arr,0,num);
        }
    } catch (IOException e) {
        e.printStackTrace();
    } finally {
        try {
            inputStream.close();
        } catch (IOException e) {
            e.printStackTrace();
        }
        try {
            outputStream.close();
        } catch (IOException e) {
            e.printStackTrace();
        }

    }
    long end = System.currentTimeMillis();//获取结束时间
    System.out.println("用时"+(end-start)+"毫秒");

    }

 public static void main(String[] args) {

        File file1 = new File("C:\Users\Administrator\Desktop\123\探讨.avi");
        File file2 = new File("C:\Users\Administrator\Desktop\123\复制品.avi");
        billllllll.FFtu(file1,file2);//用时581毫秒
    }
使用缓冲流复制视频:
     FileInputStream inputStream =null;
        FileOutputStream outputStream =null;
        //创建输入输出流对象
   long start = System.currentTimeMillis();//获取开始时间
    try {
        inputStream = new FileInputStream(file1);
        outputStream = new FileOutputStream(file2);

        BufferedInputStream bis = new BufferedInputStream(inputStream);
        BufferedOutputStream bos = new BufferedOutputStream(outputStream);//缓冲流对象创建
        byte [] arr = new byte[1024];
        int num;//读入内容,没有则为-1
        while ((num = bis.read(arr)) != -1){
            bos.write(arr,0,num);
        }
    } catch (IOException e) {
        e.printStackTrace();
    } finally {
        try {
            inputStream.close();
        } catch (IOException e) {
            e.printStackTrace();
        }
        try {
            outputStream.close();
        } catch (IOException e) {
            e.printStackTrace();
        }

    }
    long end = System.currentTimeMillis();//获取结束时间
    System.out.println("用时"+(end-start)+"毫秒");//用时581毫秒

    }
public static void main(String[] args) {

        File file1 = new File("C:\Users\Administrator\Desktop\123\探讨.avi");
        File file2 = new File("C:\Users\Administrator\Desktop\123\复制品.avi");
        billllllll.FFtu(file1,file2);//用时199毫秒
    }
那么缓冲流是怎么提高速度的呢?
通过阅读源码我发现,原来缓冲流内部有一个定义了一个常量,大小为8*1024,这是一个缓冲区,也就是说,它内部是每次缓冲这么大一个数据,满了才传输,效率更高。
七、处理流之转换流的使用:

1.转换流:属于字符流
InputStreamReader:将一个字节的输入流转换为字符的输入流
OutputStreamWriter:将一个字符的输出流转换为字节的输出流
2.作用:提供字节流和字符流之间的转换
3.解码:字节、字节数组——>字符数组、字符串
编码:字符数组、字符串——>字节、字节数组
4.使用方法代码:
public class StyleChange {
    @Test
    public void saddasff(){
        File file1 = new File("C:\Users\Administrator\Desktop\123\大声道.txt");
        File file2 = new File("C:\Users\Administrator\Desktop\123\大声道1.txt");

        InputStreamReader inputStreamReader = null;//默认为utf-8
        OutputStreamWriter outputStreamWriter = null;
        try {
            FileInputStream fileInputStream = new FileInputStream(file1);
            FileOutputStream fileOutputStream = new FileOutputStream(file2);

            inputStreamReader = new InputStreamReader(fileInputStream,"utf-8");
            outputStreamWriter = new OutputStreamWriter(fileOutputStream,"gbk");

            char [] chars = new char[30];
            int num;
            while ((num = inputStreamReader.read(chars)) != -1){
                outputStreamWriter.write(chars,0,num);
            }
        } catch (IOException e) {
            e.printStackTrace();
        } finally {
            if (inputStreamReader != null){

                try {
                    inputStreamReader.close();
                } catch (IOException e) {
                    e.printStackTrace();
                }
            }
            if (outputStreamWriter != null){

                try {
                    outputStreamWriter.close();
                } catch (IOException e) {
                    e.printStackTrace();
                }
            }
        }
    }
八、编码集:
-
ASCII:美国标准信息交换码。用一个字节的7位可以表示。
-
ISO8859-1:拉丁码表。欧洲码表用一个字节的8位表示。
-
GB2312:中国的中文编码表。最多两个字节编码所有字符
-
GBK:中国的中文编码表升级,融合了更多的中文文字符号。最多两个字节编码
-
Unicode:国际标准码,融合了目前人类使用的所有字符。为每个字符分配唯一的字符码。所有的文字都用两个字节来表示。
-
UTF-8:变长的编码方式,可用1-4个字节来表示一个字符。
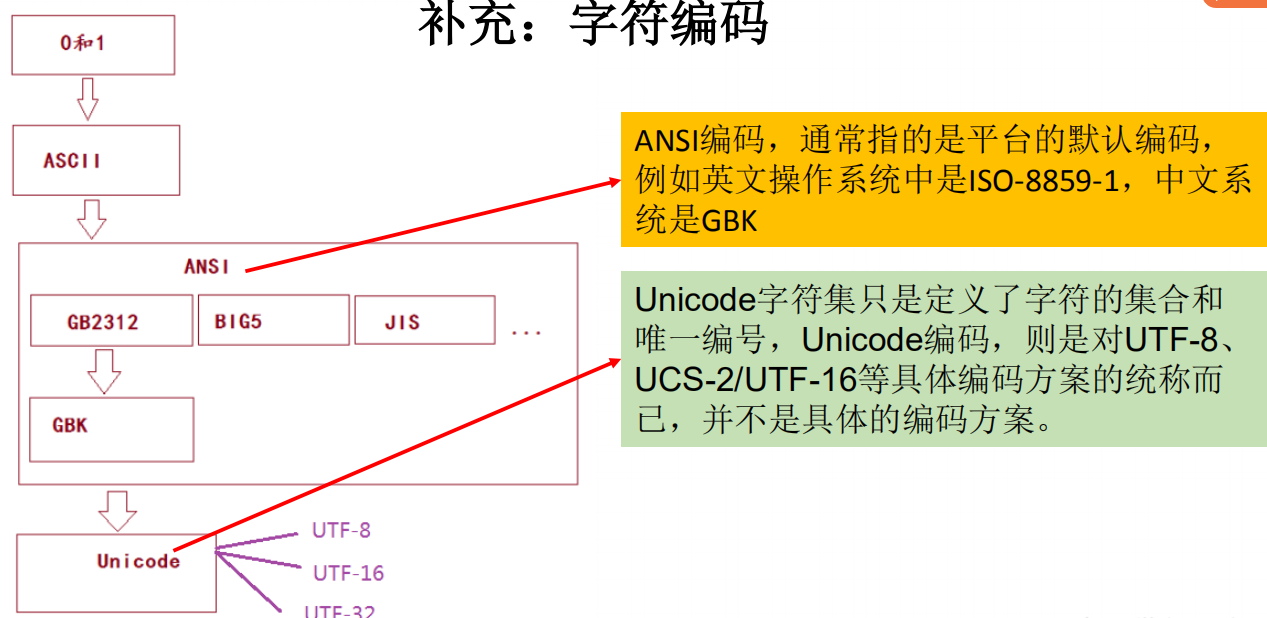
图解编码关系:

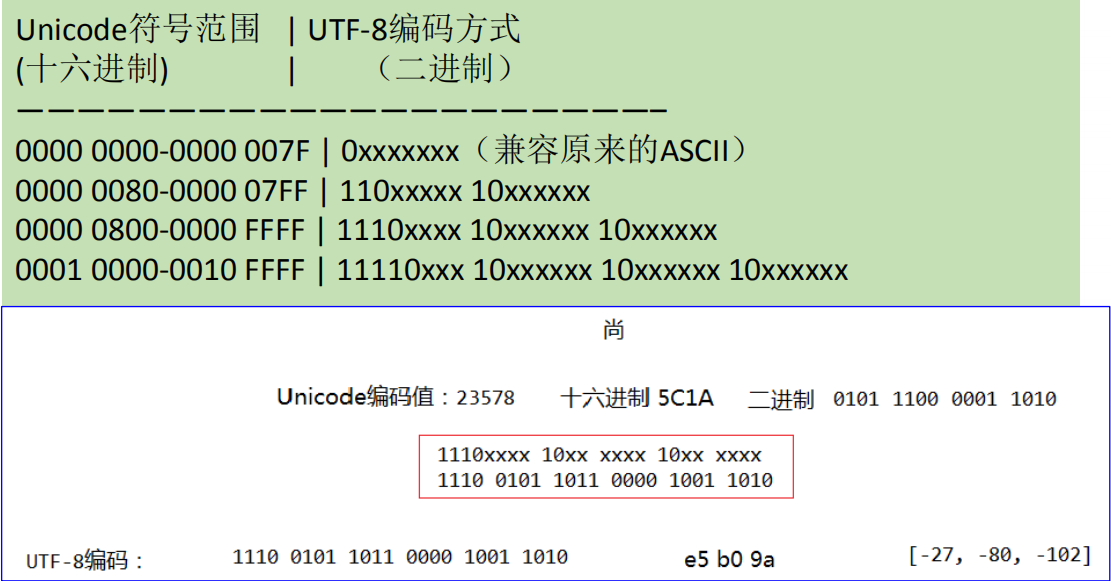
关于unicode的实现,现在都是通过utf-x来实现的,具体实现方法如下图:

九、标准输入、输出流:
1.System.in和System.out分别代表了系统标准的输入和输出设备
-
默认输入设备是:键盘,输出设备是:显示器
-
System.in的类型是InputStream
-
System.out的类型是PrintStream,其是OutputStream的子类
2.FilterOutputStream 的子类
-
重定向:通过System类的setIn,setOut方法对默认设备进行改变。
-
public static void setIn(InputStream in)
-
public static void setOut(PrintStream out)
3.代码案例:从键盘输入字符串,要求将读取到的整行字符串转成大写输出。然后继续进行输入操作,直至当输入“e”或者“exit”时,退出程序。
 public static void stringtake(){
        BufferedReader br = new BufferedReader(new InputStreamReader(System.in));
        try {
            while (true){
                String s = br.readLine();
                if ("e".equalsIgnoreCase(s) || "exit".equalsIgnoreCase(s)){
                    System.out.println("输入结束");
                    break;
                }else{
                    System.out.println(s.toUpperCase());
                }
            }

        } catch (IOException e) {
            e.printStackTrace();
        } finally {
            if (br != null){

                try {
                    br.close();
                } catch (IOException e) {
                    e.printStackTrace();
                }
            }
        }
    }
十、打印流:
- 打印流:PrintStream和PrintWriter
-
PrintStream和PrintWriter的输出不会抛出IOException异常
-
PrintStream和PrintWriter有自动flush功能
-
PrintStream 打印的所有字符都使用平台的默认字符编码转换为字节。
- System.out返回的是PrintStream的实例
用法代码示例:
    @Test
    public void ttts(){

        FileOutputStream fileOutputStream = null;
        try {
            fileOutputStream = new FileOutputStream("C:\Users\Administrator\Desktop\123\大声道1.txt");
            PrintStream printStream  =  new PrintStream(fileOutputStream,true);
            if(printStream != null){
                System.setOut(printStream);
            }
            //1000以内的所有质数打印到指定文件中
            System.out.println(2);
            for (int i = 3; i < 1000; i++) {
                boolean flag = true;
                for (int j = 2;j < Math.sqrt(i) + 1;j++){
                    if (i % j == 0){
                        flag = false;
                        break;
                    }
            }
            if (flag){
                System.out.println(i);
            }
            }
        } catch (FileNotFoundException e) {
            e.printStackTrace();
        } finally {
            if (fileOutputStream != null){

                try {
                    fileOutputStream.close();
                } catch (IOException e) {
                    e.printStackTrace();
                }
            }
        }


    }