Bean配置
简单记录-Java EE企业级应用开发教程(Spring+Spring MVC+MyBatis)-Spring中的Bean
什么是Spring中的Bean?
Spring可以被看作是一个大型工厂,这个工厂的作用就是生产和管理Spring容器中的Bean。如果想要在项目中使用这个工厂,就需要开发者对Spring的配置文件进行配置,配置的时候要在配置文件中告诉它需要哪些Bean,以及需要使用何种方式将这些Bean装配到一起。
提示: Bean的本质就是Java中的类,而Spring中的Bean其实就是对实体类的引用,来生产Java类对象,从而实现生产和管理Bean 。
Spring容器支持XML和Properties两种格式的配置文件,在实际开发中,最常使用的就是XML格式的配置方式。这种配置方式通过XML文件来注册并管理Bean之间的依赖关系。
使用XML文件的形式对Bean的属性和定义进行详细的讲解。
在Spring中,XML配置文件的根元素是, 中包含了多个子元素,每一个子元素定义了一个Bean,并描述了该Bean如何被装配到Spring容器中。元素中同样包含了多个属性以及子元素,其常用属性及子元素如表所示。
表元素的常用属性及其子元素
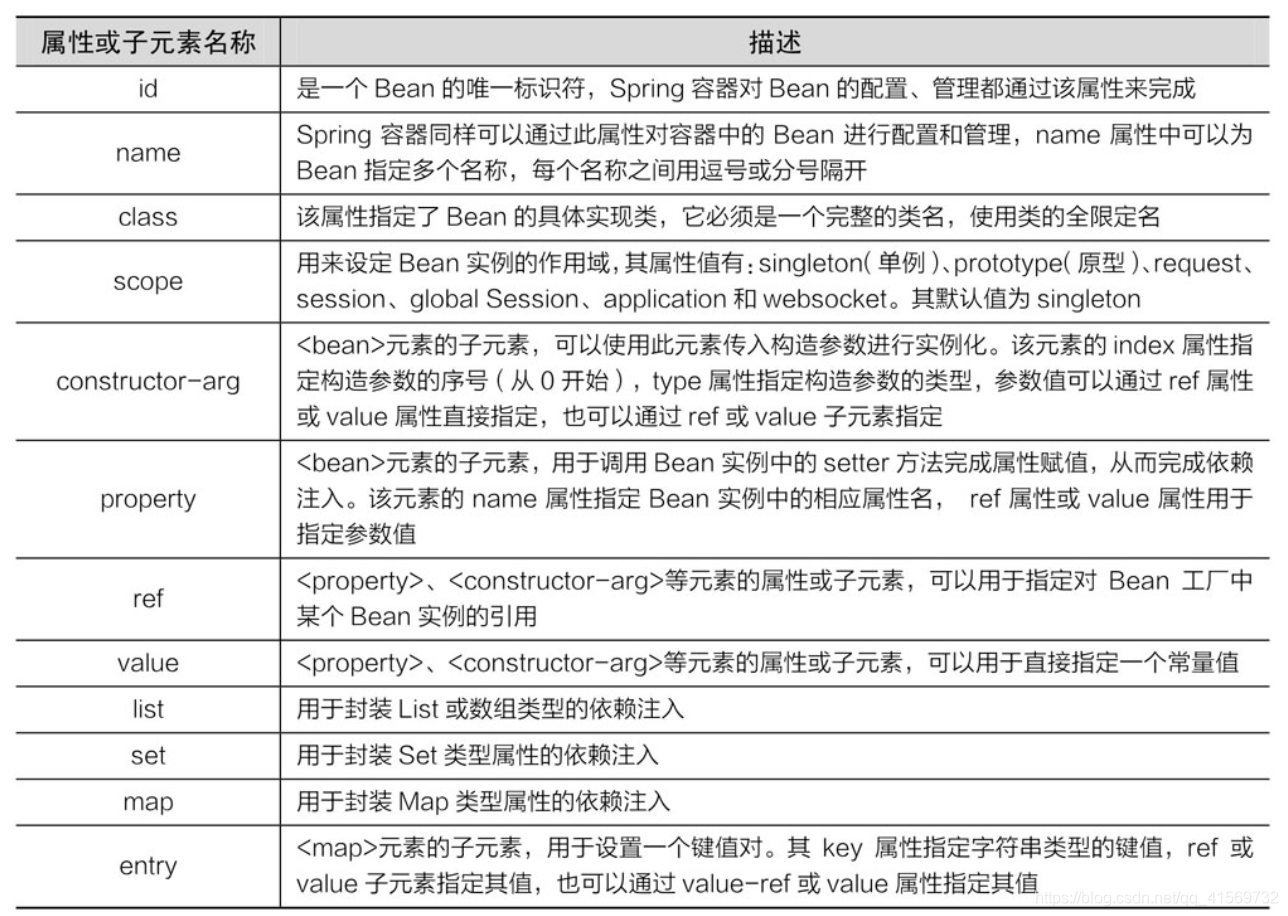
表中只介绍了元素的一些常用属性和子元素,实际上元素还有很多属性和子元素,我们可以到网上查阅相关资料进行获取。
在Spring的配置文件中,通常一个普通的Bean只需要定义id(或name)和class两个属性即可,定义Bean的方式如下所示。
<?xml version="1.0" encoding="UTF-8"?>
<beans xmlns="http://www.springframework.org/schema/beans"
       xmlns:xsi="http://www.w3.org/2001/XMLSchema-instance"
       xsi:schemaLocation="http://www.springframework.org/schema/beans http://www.springframework.org/schema/beans/spring-beans.xsd">
    <!--将指定类配置给Spring,让Spring创建其对象的实例    -->
    <!-- 使用id 属性定义bean1,其对应的实现类为com.awen.instance.constructor.Bean1-->
    <bean id="bean1" class="com.awen.instance.constructor.Bean1"/>
    <!-- 使用name 属性定义bean1,其对应的实现类为com.awen.instance.static_factory.Bean2-->
    <bean name="bean2" class="com.awen.instance.static_factory.Bean2"
</beans>
在上述代码中,分别使用id属性和name属性定义了两个Bean,并使用class元素指定其对应的实现类
注意:如果在Bean中未指定id和name,则Spring会将class值当作id使用。
- 一般情况下,装配一个Bean时,通过指定一个id属性作为Bean的名称
- id属性在IOC容器中必须是唯一的
- 如果Bean的名称中含有特殊字符,就需要使用name属性
实例
1、复杂类型
public class Address {
    private String address;

    public String getAddress() {
        return address;
    }

    public void setAddress(String address) {
        this.address = address;
    }
}
2、真实测试对象
public class Student {
    private String name;
    private Address address;
    private String[] books;
    private List<String> hobbies;
    private Map<String,String> card;
    private Set<String> games;
    private String wife;
    private Properties info;
}
Address的对象address在Student类作为属性
3、beans.xml
完整注入
<?xml version="1.0" encoding="UTF-8"?>
<beans xmlns="http://www.springframework.org/schema/beans"
       xmlns:xsi="http://www.w3.org/2001/XMLSchema-instance"
       xsi:schemaLocation="http://www.springframework.org/schema/beans http://www.springframework.org/schema/beans/spring-beans.xsd">

    <bean id="address" class="com.kuang.pojo.Address"/>

    <bean id="student" class="com.kuang.pojo.Student">
        <!--第一种,普通值注入,value-->
        <property name="name" value="憨批"/>
        <!--第二种,Bean注入,ref-->
        <property name="address" ref="address"/>
        <!--数组注入-->
        <property name="books">
            <array>
                <value>红楼梦</value>
                <value>西游记</value>
                <value>水浒传</value>
                <value>三国演义</value>
            </array>
        </property>
        <!--List注入-->
        <property name="hobbies">
            <list>
                <value>听歌</value>
                <value>敲代码</value>
                <value>看电影</value>
            </list>
        </property>
        <!--Map-->
        <property name="card">
            <map>
                <entry key="身份证" value="1555555555"/>
                <entry key="银行卡" value="5555555555"/>
            </map>
        </property>
        <!--Set-->
        <property name="games">
            <set>
                <value>lol</value>
                <value>wow</value>
            </set>
        </property>
        <!--null-->
        <property name="wife">
            <null/>
        </property>
        <!--Properties-->
        <property name="info">
            <props>
                <prop key="driver">com.mysql.jdbc.Driver</prop>
                <prop key="url">jdbc:mysql://localhost:3306/news</prop>
                <prop key="root">root</prop>
                <prop key="password">123456</prop>
            </props>
        </property>

    </bean>

</beans>
4、测试类
public class MyTest {
    public static void main(String[] args) {
        ApplicationContext context = new ClassPathXmlApplicationContext("beans.xml");
        Student student = (Student) context.getBean("student");
        System.out.println(student.getName());
    }
}