我是在虚拟机上操作的,以下图片是在虚拟机下添加虚拟硬盘的步骤
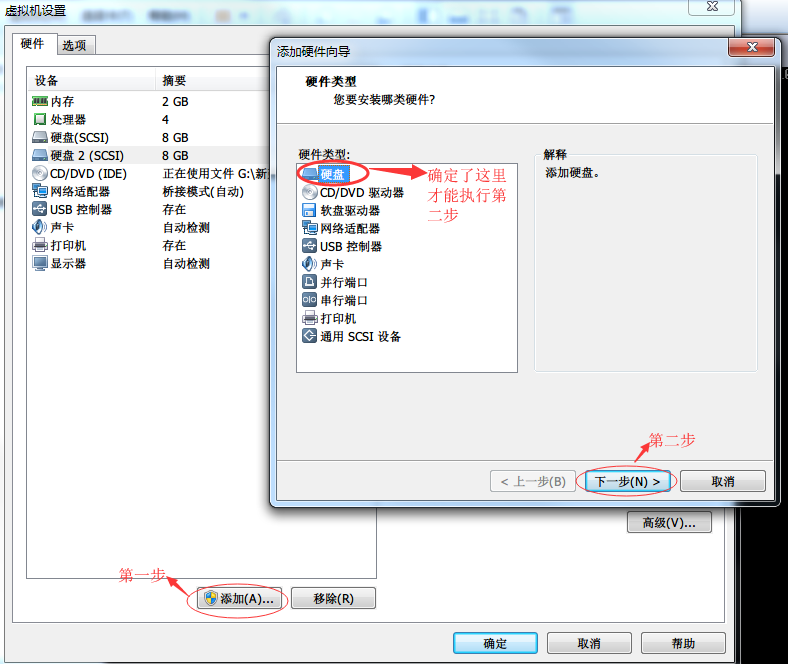
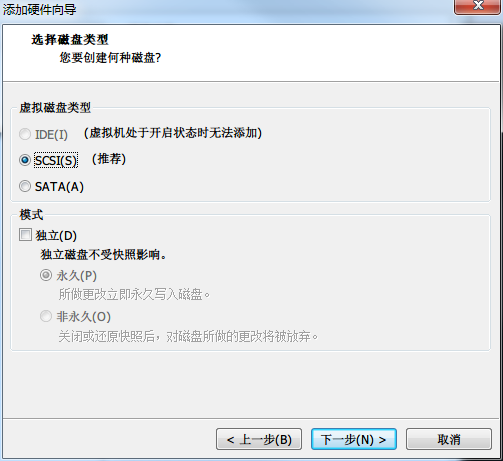

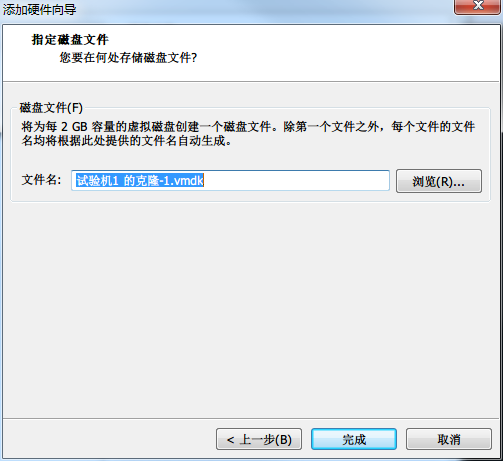
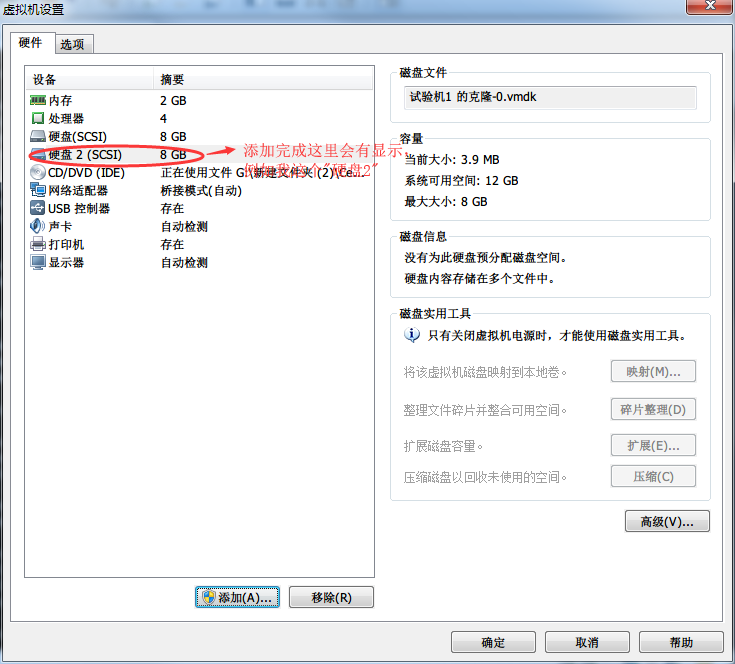
操作好了上面的步骤,接着下面的操作实验
[root@server01 ~]# fdisk -cul
......
Disk /dev/vdb: 5368 MB, 5368709120 bytes
16 heads, 63 sectors/track, 10402 cylinders, total 10485760 sectors
Units = sectors of 1 * 512 = 512 bytes
Sector size (logical/physical): 512 bytes / 512 bytes
I/O size (minimum/optimal): 512 bytes / 512 bytes
Disk identifier: 0x00000000
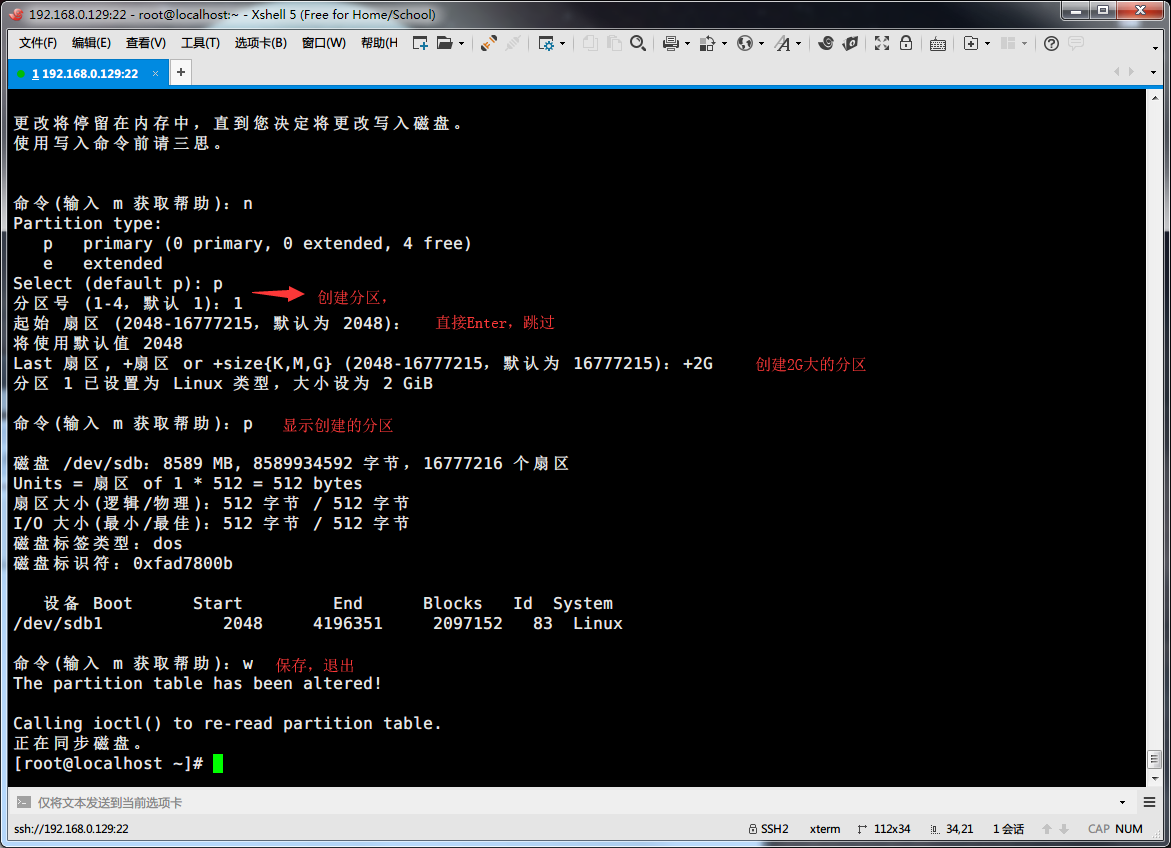
下面图为使用 fstab 创建分区步骤
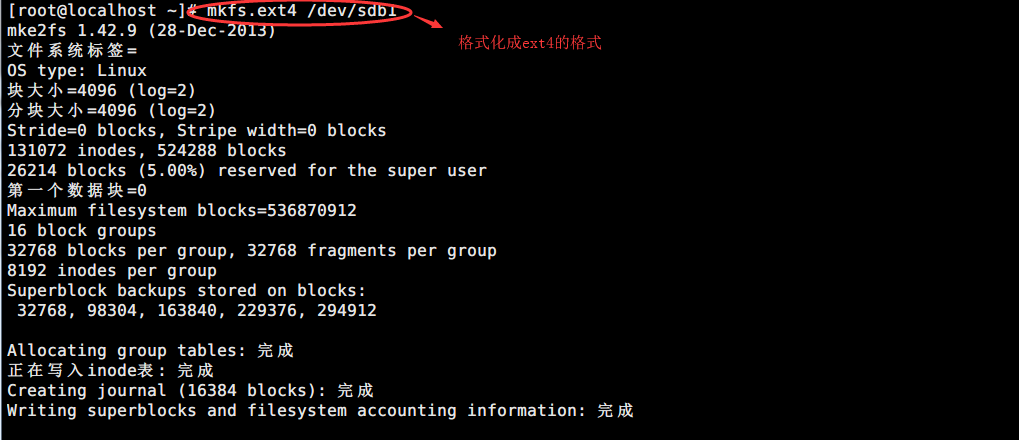
下面的图是创建好的分区格式化成 ext4
然后就是挂载分区到 /date 目录去

若是需要开机自动挂载上去,则需要编辑 /etc/fstab

下面的是详细的解释上面的操作,还有一些上面图片中没有的小操作
使用fdisk命令来进行分区的操作
[root@server01 ~]# fdisk -cu /dev/vdb
Command (m for help): m //输入m指令来获得帮助信息。
Command action
a toggle a bootable flag
b edit bsd disklabel
c toggle the dos compatibility flag
d delete a partition //删除一个分区
l list known partition types
m print this menu
n add a new partition //新建一个分区
o create a new empty DOS partition table
p print the partition table //显示当前的分区表
q quit without saving changes //不保存退出
s create a new empty Sun disklabel
t change a partition's system id //改变分区的system id (分区的类型标识)
u change display/entry units
v verify the partition table
w write table to disk and exit //保存退出
x extra functionality (experts only)
Command (m for help): n
Command action
e extended
p primary partition (1-4)
p p创建主分区
Partition number (1-4):
Value out of range.
Partition number (1-4): 1 选择分区编号,默认从1开始
First sector (2048-10485759, default 2048): 选择起始扇区,默认从2048开始
Using default value 2048
Last sector, +sectors or +size{K,M,G} (2048-10485759, default 10485759): +1G 选择分区大小,使用+n单位的方式。
Command (m for help): p 使用p打印出当前的分区表。
Disk /dev/vdb: 5368 MB, 5368709120 bytes
16 heads, 63 sectors/track, 10402 cylinders, total 10485760 sectors
Units = sectors of 1 * 512 = 512 bytes
Sector size (logical/physical): 512 bytes / 512 bytes
I/O size (minimum/optimal): 512 bytes / 512 bytes
Disk identifier: 0x1e4d4021
Device Boot Start End Blocks Id System
/dev/vdb1 2048 2099199 1048576 83 Linux
看到新建的分区vdb1
Command (m for help): w //确认无误后,w保存退出
The partition table has been altered!
Calling ioctl() to re-read partition table.
Syncing disks.
[root@server01 ~]# cat /proc/partitions 查看内核参数,确认分区表是否立即生效。
major minor #blocks name
7 0 3763200 loop0
252 0 20971520 vda
252 1 512000 vda1
252 2 20458496 vda2
253 0 18391040 dm-0
253 1 2064384 dm-1
252 16 5242880 vdb
252 17 1048576 vdb1
输出结果中有vdb1.
4. 格式化,RHEL6默认使用ext4文件系统。
[root@server01 ~]# mkfs.ext4 /dev/vdb1
mke2fs 1.41.12 (17-May-2010)
文件系统标签=
操作系统:Linux
块大小=4096 (log=2)
分块大小=4096 (log=2)
Stride=0 blocks, Stripe width=0 blocks
65536 inodes, 262144 blocks
13107 blocks (5.00%) reserved for the super user
第一个数据块=0
Maximum filesystem blocks=268435456
8 block groups
32768 blocks per group, 32768 fragments per group
8192 inodes per group
Superblock backups stored on blocks:
32768, 98304, 163840, 229376
正在写入inode表: 完成
Creating journal (8192 blocks): 完成
Writing superblocks and filesystem accounting information: 完成
This filesystem will be automatically checked every 33 mounts or
180 days, whichever comes first. Use tune2fs -c or -i to override.
5. 挂载。
[root@server01 ~]# mkdir /data
[root@server01 ~]# mount /dev/vdb1 /data
使用mount命令查看分区的挂载情况:
[root@server01 ~]# mount |grep vdb1
/dev/vdb1 on /data type ext4 (rw)
使用df命令查看文件系统的使用率:
[root@server01 ~]# df -h
Filesystem Size Used Avail Use% Mounted on
/dev/mapper/vg_mini-lv_root 18G 1.2G 16G 8% /
tmpfs 499M 0 499M 0% /dev/shm
/dev/vda1 485M 33M 427M 8% /boot
/dev/sr0 3.6G 3.6G 0 100% /rhel65
/dev/vdb1 1008M 34M 924M 4% /data
如果需要卸载:
[root@server01 ~]# umount /dev/vdb1
或者:
[root@server01 ~]# umount /data
如果需要下次开机自动挂载该分区:
[root@server01 ~]# vim /etc/fstab
在最后添加:
/dev/vdb1 /data ext4 defaults 0 0
更好写法,是将vdb1设备号用系统对文件系统的唯一命名标示UUID来替代,UUID使用blkid命令来查看。
[root@server01 ~]# blkid /dev/vdb1
/dev/vdb1: UUID="50c3f747-c05d-4e0a-8104-37d0d851e294" TYPE="ext4"
改写如下:
UUID=50c3f747-c05d-4e0a-8104-37d0d851e294 /data ext4 defaults 0 0
最后,reboot重启测试自动挂载:
[root@server01 ~]# reboot
重启完成后:
[root@server01 ~]# mount |grep vdb1
/dev/vdb1 on /data type ext4 (rw)
注意:若是我们创建磁盘完成后格式化不成功,可能是系统没识别出来,此时我们要重启系统 init 1 或reboot。
补充:如果硬盘正在使用,你在新建分区保存之后后出现警告“设备或资源忙”,并新的分区不会被系统内核识别到。这时应该reboot(推荐)或者执行partx -a /dev/vdb的指令。
简单理解: 创建磁盘 格式化 挂载
磁盘强制创建 : partx -a /dev/vdb
格式化磁盘:
mkfs.ext4 /de/vdb
mkswap /dev/vdb
查看UUID :blkid /dev/vdb
挂载格式:
/dev/vdb /a ext4 defaults 0 0
/dev/vdb swap swap defaults 0 0