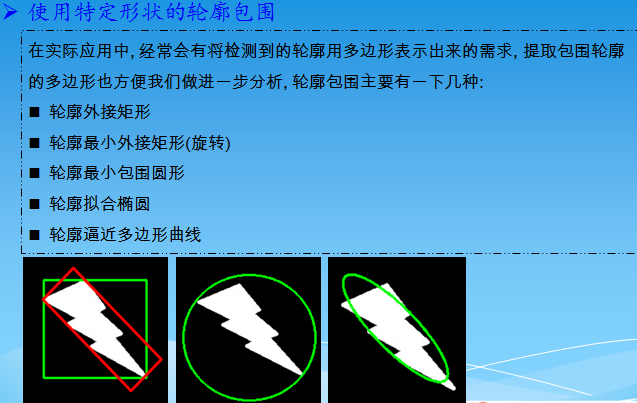
一、简介

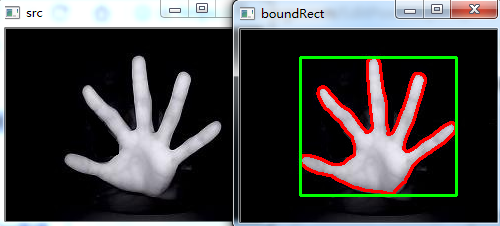
二、外接矩形的查找绘制
 1 #include "opencv2/opencv.hpp"
 2 using namespace cv;
 3 void main()
 4 {
 5     //外接矩形的查找绘制
 6     Mat srcImg =imread("E://12.jpg");
 7     imshow("src",srcImg);
 8     Mat dstImg = srcImg.clone();  //原图备份
 9     cvtColor(srcImg, srcImg, CV_BGR2GRAY); //转为灰度图
10     threshold(srcImg, srcImg, 100, 255, CV_THRESH_BINARY); //二值化
11
12     vector<vector<Point>> contours;
13     vector<Vec4i> hierarcy;
14     findContours(srcImg, contours, hierarcy, CV_RETR_EXTERNAL, CHAIN_APPROX_NONE); //查找轮廓
15     vector<Rect> boundRect(contours.size()); //定义外接矩形集合
16     //drawContours(dstImg, contours, -1, Scalar(0, 0, 255), 2, 8);  //绘制轮廓
17     int x0=0, y0=0, w0=0, h0=0;
18     for(int i=0; i<contours.size(); i++)
19     {
20         boundRect[i] = boundingRect((Mat)contours[i]); //查找每个轮廓的外接矩形
21         drawContours(dstImg, contours, i, Scalar(0, 0, 255), 2, 8);  //绘制轮廓
22         x0 = boundRect[i].x;  //获得第i个外接矩形的左上角的x坐标
23         y0 = boundRect[i].y; //获得第i个外接矩形的左上角的y坐标
24         w0 = boundRect[i].width; //获得第i个外接矩形的宽度
25         h0 = boundRect[i].height; //获得第i个外接矩形的高度
26         rectangle(dstImg, Point(x0, y0), Point(x0+w0, y0+h0), Scalar(0, 255, 0), 2, 8); //绘制第i个外接矩形
27     }
28     imshow("boundRect", dstImg);
29     waitKey(0);
30 }
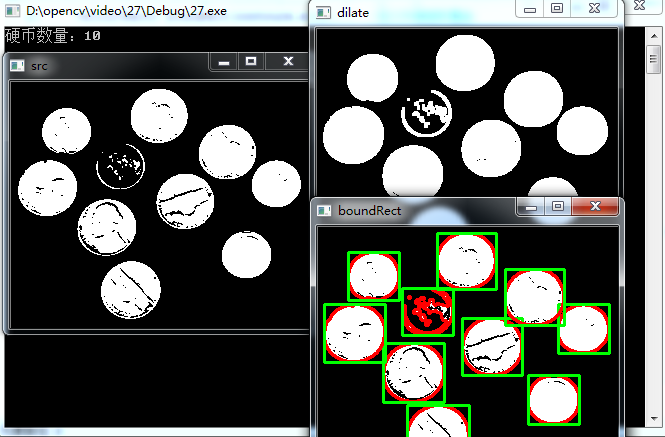
三、分割硬币轮廓并计数
 1 #include "opencv2/opencv.hpp"
 2 #include<iostream>
 3 using namespace cv;
 4 using namespace std;
 5 void main()
 6 {
 7     //分割硬币轮廓
 8     Mat srcImg =imread("E://33.png");
 9     imshow("src", srcImg);
10     Mat dstImg = srcImg.clone();  //原图备份
11     cvtColor(srcImg, srcImg, CV_BGR2GRAY); //转为灰度图
12     threshold(srcImg, srcImg, 100, 255, CV_THRESH_BINARY); //二值化
13     Mat element = getStructuringElement(MORPH_RECT, Size(3, 3), Point(-1, -1)); //获得结构元素
14     dilate(srcImg, srcImg, element); //膨胀操作
15     imshow("dilate",srcImg);
16
17     vector<vector<Point>> contours;
18     vector<Vec4i> hierarcy;
19     findContours(srcImg, contours, hierarcy, CV_RETR_EXTERNAL, CHAIN_APPROX_NONE); //查找轮廓
20     vector<Rect> boundRect(contours.size()); //定义外接矩形集合
21     int x0=0, y0=0, w0=0, h0=0,num=0;
22     for(int i=0; i<contours.size(); i++)
23     {
24         boundRect[i] = boundingRect((Mat)contours[i]); //查找每个轮廓的外接矩形
25         drawContours(dstImg, contours, i, Scalar(0, 0, 255), 2, 8);  //绘制轮廓
26         x0 = boundRect[i].x;
27         y0 = boundRect[i].y;
28         w0 = boundRect[i].width;
29         h0 = boundRect[i].height;
30         if(w0>30 && h0>30)//筛选
31         {
32             rectangle(dstImg, Point(x0, y0), Point(x0+w0, y0+h0), Scalar(0, 255, 0), 2, 8); //绘制第i个外接矩形
33             num++;
34         }
35     }
36     cout<<"硬币数量:"<<num;
37     imshow("boundRect", dstImg);
38     waitKey(0);
39 }
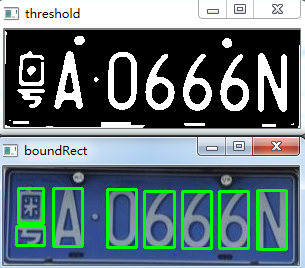
四、简单车牌字符分隔
 1 #include "opencv2/opencv.hpp"
 2 using namespace cv;
 3 void main()
 4 {
 5     //---简单车牌字符分隔
 6     Mat srcImg =imread("E://Car2.jpg");
 7     Mat dstImg = srcImg.clone();  //原图备份
 8     medianBlur(srcImg, srcImg, 5);  //中值滤波
 9     cvtColor(srcImg, srcImg, CV_BGR2GRAY); //转为灰度图
10     threshold(srcImg, srcImg, 100, 255, CV_THRESH_BINARY); //二值化
11     imshow("threshold", srcImg);
12     imwrite("F://car0.jpg", srcImg);
13
14     vector<vector<Point>> contours;
15     vector<Vec4i> hierarcy;
16     findContours(srcImg, contours, hierarcy, CV_RETR_TREE, CHAIN_APPROX_NONE); //查找所有轮廓
17     vector<Rect> boundRect(contours.size()); //定义外接矩形集合
18     int x0=0, y0=0, w0=0, h0=0;
19     for(int i=0; i<contours.size(); i++)
20     {
21         boundRect[i] = boundingRect((Mat)contours[i]); //查找每个轮廓的外接矩形
22         x0 = boundRect[i].x;
23         y0 = boundRect[i].y;
24         w0 = boundRect[i].width;
25         h0 = boundRect[i].height;
26         if(w0>srcImg.cols/12 && w0<srcImg.cols/5 && h0>srcImg.rows/6 && h0<srcImg.rows*5/6)
27         {
28             char pic_name[10];
29             sprintf(pic_name, "F:\%d.bmp", i);
30             Mat ROI = dstImg(Rect(x0, y0, w0, h0));
31             imwrite(pic_name, ROI);
32             rectangle(dstImg, Point(x0, y0), Point(x0+w0, y0+h0), Scalar(0, 255, 0), 2, 8); //绘制第i个外接矩形
33         }
34     }
35     imshow("boundRect", dstImg);
36     waitKey(0);
37 }