双工通讯Duplex具有以下特点:
1它可以在处理完请求之后,通过请求客户端中的回调进行响应操作
2.消息交换过程中,服务端和客户端角色会发生调换
3.服务端处理完请求后,返回给客户端的不是reply,而是callback请求。
4.Duplex模式对Bindding有特殊的要求,它要求支持Duplex MEP(Message Exchange Pattern),如WSDualHttpBinding和NetTcpBinding
注意:在WCF预定义绑定类型中,WSDualHttpBinding和NetTcpBinding均提供了对双工通信的支持,但是两者在对双工通信的实现机制上却有本质的区别。WSDualHttpBinding是基于HTTP传输协议的;而HTTP协议本身是基于请求-回复的传输协议,基于HTTP的通道本质上都是单向的。WSDualHttpBinding实际上创建了两个通道,一个用于客户端向服务端的通信,而另一个则用于服务端到客户端的通信,从而间接地提供了双工通信的实现。而NetTcpBinding完全基于支持双工通信的TCP协议。
我今天的实例讲的就是双工通讯的一个使用场景订阅-发布模式,此时消息的双方变成了订阅者和发布者。订阅者有两个操作(订阅消息、取消订阅),当订阅者订阅消息后,发布者就开始向订阅者广播消息,当订阅者取消订阅后,就不会接收到广播的消息。具体如下图所示:
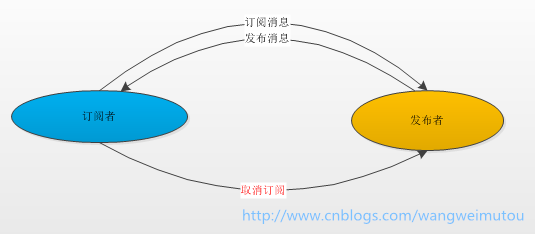
接下来我们我们创建基于WCF的双工通讯的订阅与发布模式的服务。工程结构如下图所示:
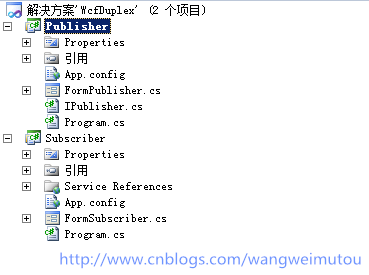
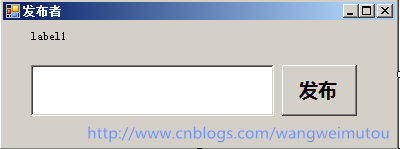
Publisher(发布者)和Subscriber(订阅者)都是Winform工程,我们把发布者作为服务端,订阅者作为客户端,发布者还需要承载寄宿服务。如下图设置好发布者和订阅者的界面,
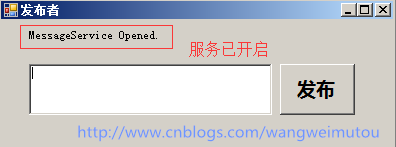
发布者有一个寄宿服务的lable显示服务是否寄宿成功,一个消息文本框和一个发布按钮,输入文本后,点击发布就可以向订阅的客户端广播消息。
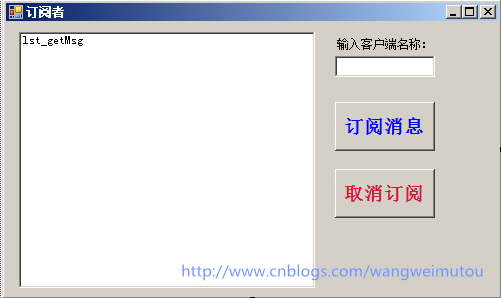
订阅者的界面上有一个消息接收的listbox,以及订阅消息和取消订阅按钮,还有一个输入客户端名称的文本框,界面如下图所示:
接下来我们开始实际的代码操作,首先完成发布者(服务端)的代码实现,创建IPublisher.cs文件,定义服务接口和回调接口,代码如下:

using System;
using System.Collections.Generic;
using System.Linq;
using System.Text;
using System.ServiceModel;

namespace Publisher
{

     [ServiceContract(CallbackContract = typeof(IPublisherEvents))]
     public interface IPublisher
     {
         [OperationContract(IsOneWay = true)]
         void Subscriber(string clientID,string clientName);               //订阅消息

         [OperationContract(IsOneWay = true)]
         void UnSubscriber(string clientID, string clientName);            //取消订阅
     }


     public interface IPublisherEvents
     {
         [OperationContract(IsOneWay = true)]
         void PublishMessage(string message);                        //发布消息
     }
}
接口里面只定义了订阅者(客户端)调用的订阅消息和取消订阅的方法,以及服务端调用客户端的回调方法PublishMessage,然后我们在FormPublisher.cs里面实现该接口,具体代码如下:

using System;
using System.Collections.Generic;
using System.Windows.Forms;
using System.ServiceModel;
using System.Threading;

namespace Publisher
{

    [ServiceBehavior(InstanceContextMode = InstanceContextMode.Single)]
    public partial class FormPublisher : Form, IPublisher, IDisposable
    {
        //定义回调客户端集合
        public static List<IPublisherEvents> ClientCallbackList { get; set; }

        public FormPublisher()
        {
            InitializeComponent();
            ClientCallbackList = new List<IPublisherEvents>();
        }

        //寄宿服务
        private ServiceHost _host = null;
        private void FormPublisher_Load(object sender, EventArgs e)
        {
            _host = new ServiceHost(typeof(Publisher.FormPublisher));
            _host.Open();
            this.label1.Text = "MessageService Opened.";
        }

        //关闭窗体
        private void FormPublisher_FormClosing(object sender, FormClosingEventArgs e)
        {
            if (_host != null)
            {
                _host.Close();
                IDisposable host = _host as IDisposable;
                host.Dispose();
            }
        }

        //发布消息
        private void btn_Publish_Click(object sender, EventArgs e)
        {

            var list =Publisher.FormPublisher.ClientCallbackList;
            if (list == null || list.Count == 0)
                return;
            lock (list)
            {
                foreach (var client in list)
                {
                    client.PublishMessage(this.txt_Message.Text);
                }
            }

        }


        //实现订阅
        public void Subscriber(string clientID, string clientName)
        {
            var client = OperationContext.Current.GetCallbackChannel<IPublisherEvents>();
            var sessionid = OperationContext.Current.SessionId;
            MessageBox.Show( string.Format("客户端{0} 开始订阅消息。", clientName));
            OperationContext.Current.Channel.Closing += new EventHandler(Channel_Closing);
            ClientCallbackList.Add(client);

        }


        //取消订阅
        public void UnSubscriber(string clientID, string clientName)
        {
            var client = OperationContext.Current.GetCallbackChannel<IPublisherEvents>();
            var sessionid = OperationContext.Current.SessionId;
            MessageBox.Show(string.Format("客户端{0}取消订阅消息", clientName));
            OperationContext.Current.Channel.Closing += new EventHandler(Channel_Closing);
            ClientCallbackList.Remove(client);
        }


        //关闭通道,移除回调客户端
        void Channel_Closing(object sender, EventArgs e)
        {
            lock (ClientCallbackList)
            {
                ClientCallbackList.Remove((IPublisherEvents)sender);
            }
        }

    }
}
注意:当前使用了实例上下文模式为单例模式,我们启用的是同一个实例上下文模式,即客户端共享同一个同一个会话,关于实例模式有三种:
1. Single —— 表示所有的客户端共享一个会话(服务对象)(服务关闭时才会销毁服务对象)
2. PerCall —— 表示每次调用都会创建一个会话(服务对象)(调用完毕后就会销毁服务对象)
3. PerSession —— 表示为每个连接(每个客户端代理对象) 创建一个会话(服务对象),只有指定IsTerminating=true的操作被调用,或者是设定的SessionTimeout超时的时候,服务对象会被销毁。但支持Session的Binding只有:WSHttpBinding、WSDualHttpBinding、WSFederationHttpBinding、NetTcpBinding。
关于实例上下文模式,我将在后期博文中详细介绍。
完成后,我们就开始配置我们的服务端的”ABC”,服务端的配置文件如下:

<?xml version="1.0" encoding="utf-8" ?>
<configuration>
  <system.web>
    <compilation debug="true"/>
  </system.web>
  <system.serviceModel>

    <services>
      <service name="Publisher.FormPublisher">
        <endpoint address="" binding="netTcpBinding" bindingConfiguration="netTcpExpenseService_ForSupplier" contract="Publisher.IPublisher">
          <identity>
            <dns value="localhost"/>
          </identity>
        </endpoint>
        <endpoint address="mex" binding="mexHttpBinding" contract="IMetadataExchange"/>
        <host>
          <baseAddresses>
            <add baseAddress="net.tcp://172.0.0.1:9999/WcfDuplexService/"/>
            <add baseAddress="http://172.0.0.1:9998/WcfDuplexService"/>
          </baseAddresses>
        </host>
      </service>
    </services>

    <behaviors>
      <serviceBehaviors>
        <behavior>
          <serviceMetadata httpGetEnabled="True"/>
          <serviceDebug includeExceptionDetailInFaults="False"/>
        </behavior>
      </serviceBehaviors>
    </behaviors>


    <bindings>
      <netTcpBinding>
        <binding name="netTcpExpenseService_ForSupplier" closeTimeout="00:01:00"
            openTimeout="00:01:00" receiveTimeout="00:10:00" sendTimeout="00:01:00"
            transactionFlow="false" transferMode="Buffered" transactionProtocol="OleTransactions"
            hostNameComparisonMode="StrongWildcard" listenBacklog="10"
            maxBufferPoolSize="2147483647" maxBufferSize="2147483647" maxConnections="10"
            maxReceivedMessageSize="2147483647">
          <readerQuotas maxDepth="32" maxStringContentLength="2147483647" maxArrayLength="2147483647"
              maxBytesPerRead="4096" maxNameTableCharCount="16384" />
          <reliableSession ordered="true" inactivityTimeout="00:10:00"
              enabled="false" />
          <security mode="None">
            <transport clientCredentialType="Windows" protectionLevel="EncryptAndSign" />
            <message clientCredentialType="Windows" />
          </security>
        </binding>
      </netTcpBinding>
    </bindings>

  </system.serviceModel>

</configuration>
到此我们的发布者(服务端)的代码完成,编译后启动我们的Publisher.exe就可以看到服务寄宿成功的界面如下图所示:
接下来我们在Subscriber项目中添加服务引用,如下图所示:
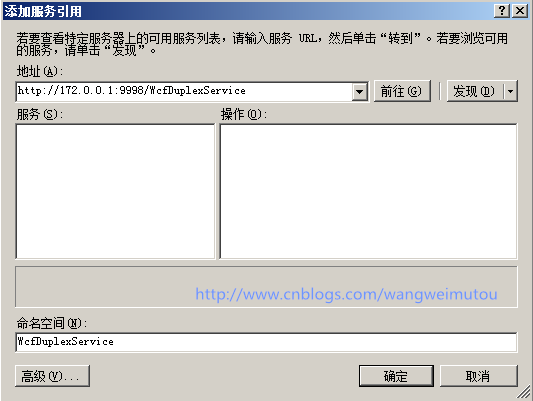
注意:我们选择http://172.0.0.1:9998/WcfDuplexService地址,因为我们的服务已经采用了元数据地址发布,但是你们在引用的时候把配置文件和引用地址中的172.0.0.1改为
localhost或者是127.0.0.1,再或者是你们本机的IP。要不然服务地址是不准确的,无法引用。(评论中有人出现了这个问题呢)
接下来我们实现FormSubscriber.cs窗体的代码:

using System;
using System.Windows.Forms;
using System.ServiceModel;
using System.Threading;
using Subscriber.WcfDuplexService;

namespace Subscriber
{
    public partial class FormSubscriber : Form, IPublisherCallback
    {
        PublisherClient proxy = null;

        public FormSubscriber()
        {
             InitializeComponent();
             InstanceContext instance = new InstanceContext(this);
             proxy = new PublisherClient(instance);

             btn_cancle.Enabled = false;
        }

        //实现客户端回调函数
        public void PublishMessage(string message)
        {
            string msg = string.Format("来自服务端的广播消息 : {0}",message);
            lst_getMsg.Items.Add(msg);
         }

        //订阅消息
        private void btn_ok_Click(object sender, EventArgs e)
        {
            btn_ok.Enabled = false;
            btn_cancle.Enabled = true;

            string ClientID = System.Guid.NewGuid().ToString();
            string ClientName = this.textBox1.Text;
            proxy.Subscriber(ClientID, ClientName);
        }

        //取消订阅
        private void btn_cancle_Click(object sender, EventArgs e)
        {
            btn_ok.Enabled = true;
            btn_cancle.Enabled = false;

            string ClientID = System.Guid.NewGuid().ToString();
            string ClientName = this.textBox1.Text;
            proxy.UnSubscriber(ClientID, ClientName);
        }
    }
}
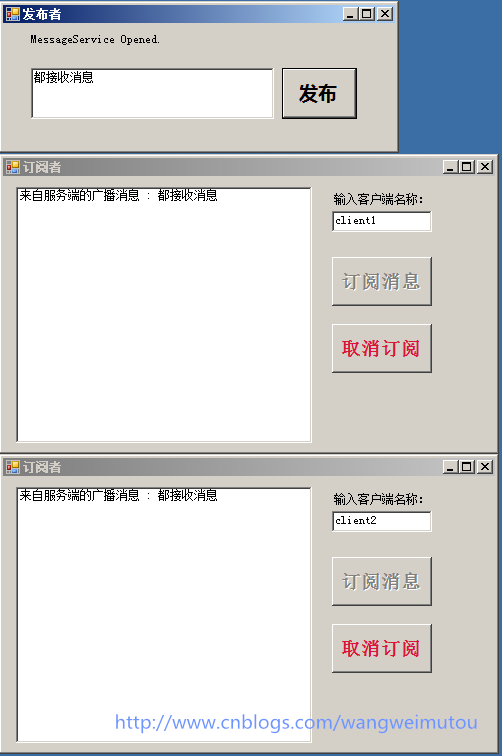
到此,我们整个解决方案已经完成,接下来,我们运行程序来验证我们需要的结果,首先启动发布者(即服务端),再启动订阅者(即客户端,注意:这里我们启动两个,方便验证程序效果),运行效果如下:
效果1:client1和client2都订阅消息,此时两个客户端都能收到广播的消息

效果2:client1订阅消息和client2取消订阅,此时只有client1能收到广播的消息
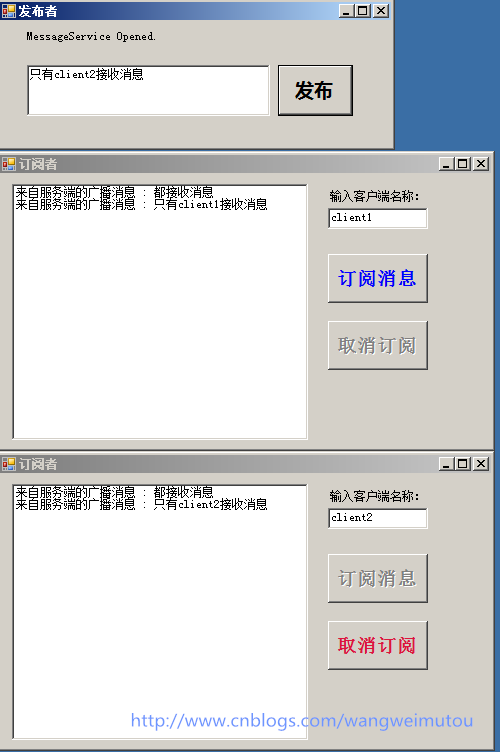
效果3:client1取消订阅和client2订阅消息,此时只有client2收到广播的消息


