-
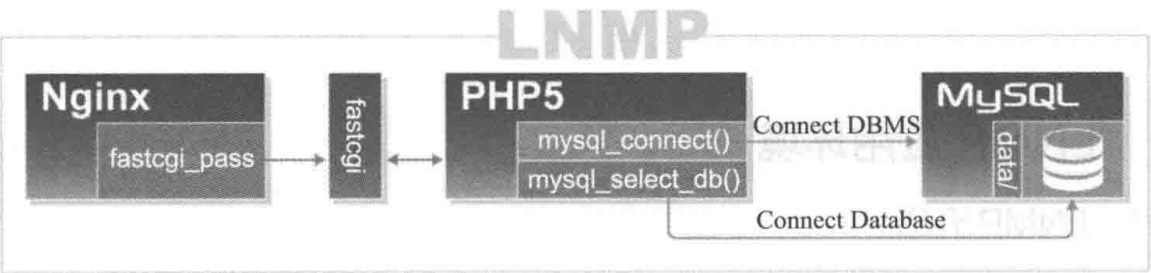
一、LNMP组合工作原理
(1)用户通过浏览器输入域名请求Nginx web服务;
(2)Nginx对请求的资源进行判断,如果是静态资源,则由Nginx返回给用户;如果是动态请求(.php文件),那么Nginx就会把它通过FastCGI接口发送给PHP引擎服务(FastCGI进程php-fpm)进行解析;
(3)当动态请求需要读取数据库数据,PHP就会继续向后端请求Mysql数据库,以读取需要的数据;
(4)最后通过Nginx服务把获取的数据返回给用户。
-
二、MySQL二进制免编译部署


(1)下载二进制免编译版本mysql 5.6.35
[root@localhost tools]# wget http://mirrors.sohu.com/mysql/MySQL-5.6/mysql-5.6.35-linux-glibc2.5-x86_64.tar.gz
[root@localhost tools]# wget http://cn.php.net/distributions/php-7.2.5.tar.gz

(2)增加mysql运行用户
[root@localhost tools]# useradd -s /sbin/nologin -M mysql

(3)解压并移动Mysql到指定的安装路径
[root@localhost tools]# tar -zxf mysql-5.6.35-linux-glibc2.5-x86_64.tar.gz
[root@localhost tools]# mv mysql-5.6.35-linux-glibc2.5-x86_64 /usr/local/mysql-5.6.35

(4)创建软连接并更改目录所属
[root@localhost tools]# ln -sv /usr/local/mysql-5.6.35 /usr/local/mysql
‘/usr/local/mysql’ -> ‘/usr/local/mysql-5.6.35’
[root@localhost mysql]# chown -R mysql.mysql /usr/local/mysql

(5)初始化Mysql
[root@localhost mysql]# scripts/mysql_install_db --basedir=/usr/local/mysql --datadir=/usr/local/mysql/data --user=mysql

(6)拷贝Mysql启动脚本,并修改脚本权限启动
[root@localhost mysql]# cp support-files/mysql.server /etc/init.d/mysqld
[root@localhost mysql]# chmod 755 /etc/init.d/mysqld
[root@localhost mysql]# vim /etc/init.d/mysqld
basedir=/usr/local/mysql
datadir=/usr/local/mysql/data
[root@localhost mysql]# cp support-files/my-default.cnf /etc/my.cnf
[root@localhost mysql]# /etc/init.d/mysqld start
Starting MySQL.Logging to '/usr/local/mysql/data/localhost.err'.
... SUCCESS!
[root@localhost mysql]# netstat -tulnp |grep 3306
tcp6       0      0 :::3306                 :::*                    LISTEN      62679/mysqld

(7)加入开机启动,测试登录
[root@localhost mysql]# chkconfig --add mysqld
[root@localhost mysql]# chkconfig mysqld on
[root@localhost mysql]# export PATH=/usr/local/mysql/bin/:$PATH
[root@localhost mysql]# mysql
Welcome to the MySQL monitor.  Commands end with ; or g.
Your MySQL connection id is 1
Server version: 5.6.35 MySQL Community Server (GPL)

Copyright (c) 2000, 2016, Oracle and/or its affiliates. All rights reserved.

Oracle is a registered trademark of Oracle Corporation and/or its
affiliates. Other names may be trademarks of their respective
owners.

Type 'help;' or 'h' for help. Type 'c' to clear the current input statement.

mysql> quit;

(8)mysql安全设置
[root@localhost mysql]# mysqladmin -uroot password '123456'        //配置mysql的root用户密码
Warning: Using a password on the command line interface can be insecure.
[root@localhost mysql]# mysql
ERROR 1045 (28000): Access denied for user 'root'@'localhost' (using password: NO)
[root@localhost mysql]# mysql -uroot -p123456 -e "show databases;"
Warning: Using a password on the command line interface can be insecure.
+--------------------+
| Database           |
+--------------------+
| information_schema |
| mysql              |
| performance_schema |
| test               |
+--------------------+

[root@localhost mysql]# mysql -uroot -p        //清理无用的Mysql用户和库
Enter password:

mysql> select user,host from mysql.user;
+------+-----------+
| user | host      |
+------+-----------+
| root | 127.0.0.1 |
| root | ::1       |
|      | localhost |
| root | localhost |
+------+-----------+
4 rows in set (0.01 sec)

mysql> drop user "root"@"::1"
    -> ;
Query OK, 0 rows affected (0.00 sec)

mysql> drop user ""@"localhost";
Query OK, 0 rows affected (0.00 sec)

mysql> select user,host from mysql.user;
+------+-----------+
| user | host      |
+------+-----------+
| root | 127.0.0.1 |
| root | localhost |
+------+-----------+
2 rows in set (0.00 sec)

有时使用drop命令删除不了用户,可能是大写或者是特殊的Linux主机名导致的,如下:
mysql> drop user ''@'MySQL';
ERROR 1396 (HY000): Operation DROP USER failed for ''@'mysql'

解决办法如下:
mysql> delete from mysql.user where user='' and host='MySQL';
mysql> flush privileges;
-
三、PHP 7.2.5编译部署
1、CGI和FastCGI
CGI(Common Gateway Interface)通用网关接口,为HTTP服务器与其他机器上的程序服务通信交流的一种工具,CGI程序必须要在网络服务器上运行。传统的CGI接口方式存在很大的缺点就是性能较差。每次HTTP服务器遇到动态程序时,都需要重新启动解析器来执行解析,之后结果才会被返回给HTTP服务器,而这种方式在高并发的场景下是无法使用的,为了解决这一问题,随之产生的就是FastCGI。
FastCGI是一个可伸缩、高速和HTTP服务器和动态脚本语言之间通信的接口(在Linux环境下,FastCGI接口即为socket,这个socket可以是文件socket,也可以是ip socket),主要优点是把动态语言和HTTP服务器分离开来。FastCGI采用的是C/S架构,可以将HTTP服务器和脚本解析服务器分开,同时还能在脚本解析服务器上启动一个或多个脚本解析守护进程,而后将得到的结果返回给浏览器。这种方式可以使HTTP服务器专一处理静态请求,或者是将动态请求的结果返回客户端,在这一点上大大提升了应用系统的性能。
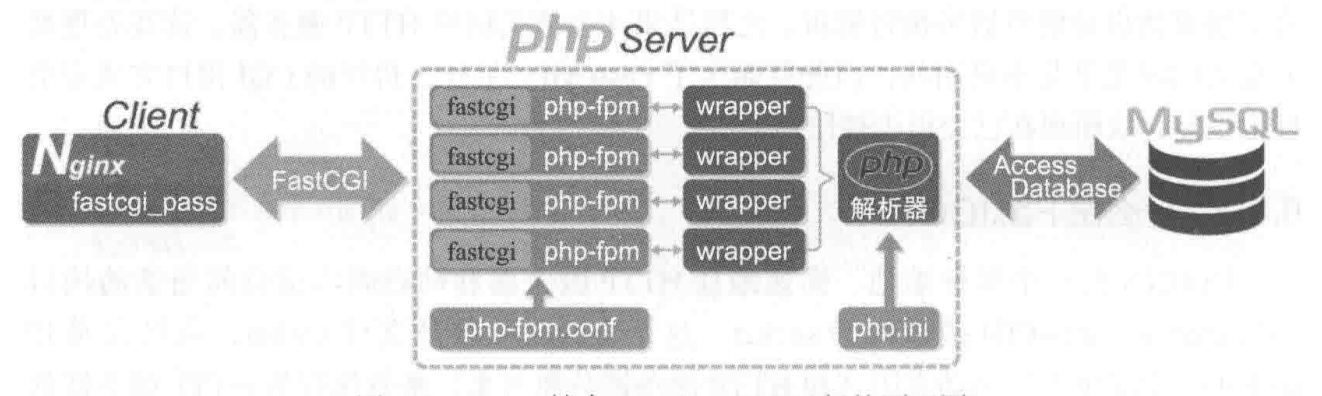
2、Nginx FastCGI的运行原理
Nginx不支持对外部动态程序的直接调用或者解析,所有的外部程序(如PHP)必须通过FastCGI接口来调用。FastCGI在Linux下是socket,为了调用CGI程序,还需要一个FastCGI的wrapper(可以理解为用于启动线程的工具),这个wrapper绑定在某个固定的socket上,如端口或文件socket,比如127.0.0.1:9000。当Nginx将CGI请求发送到这个socket的时候,通过FastCGI接口,wrapper接口到请求,然后派生一个新的线程,这个线程再去调用解释器或者外部程序处理脚本来读取返回的数据;接着wrapper再将返回的数据通过FastCGI接口,沿着原来的socket传递个Nginx;最后Nginx将返回的数据发送给客户端。
3、编译安装PHP 7.2.5
(1)准备PHP依赖的库环境
[root@localhost ~]# yum install -y gcc gcc-c++ autoconf libjpeg libjpeg-devel libpng libpng-devel freetype freetype-devel libpng libpng-devel libxml2 libxml2-devel zlib zlib-devel glibc glibc-devel glib2 glib2-devel bzip2 bzip2-devel ncurses curl openssl-devel gdbm-devel db4-devel libXpm-devel libX11-devel gd-devel gmp-devel readline-devel libxslt-devel expat-devel xmlrpc-c xmlrpc-c-devel
[root@localhost ~]# cd /tools

(2)下载php 7.2.5并解压
[root@localhost ~]# wget http://cn.php.net/distributions/php-7.2.5.tar.gz
[root@localhost tools]# tar -zxf php-7.2.5.tar.gz
[root@localhost tools]# cd php-7.2.5

(3)编译安装
[root@localhost php-7.2.5]# ./configure
--prefix=/usr/local/php7.2.5                                     //指定 php 安装目录
--with-config-file-path=/usr/local/php7.2.5/etc                 //指定php.ini位置
--with-config-file-scan-dir=/usr/local/php7.2.5/etc/conf.d     //指定扩展php.ini位置
--enable-inline-optimization         //优化线程
--disable-debug             //关闭调试模式
--disable-rpath             //关闭额外的运行库文件
--enable-shared
--enable-opcache             //启用操作码缓存
--enable-fpm                 //表示激活PHP-FPM方式服务,即FactCGI方式运行PHP服务。
--with-mysql=mysqlnd         //增加mysql支持
--with-mysqli=mysqlnd
--with-pdo-mysql=mysqlnd
--with-gettext             //打开gnu 的gettext 支持,编码库用到
--enable-mbstring             //多字节,字符串的支持
--with-iconv                 //打开iconv函数,多种字符集间的转换
--with-mcrypt                 //启用mcrypt加密算法
--with-mhash                 //启用mhash加密算法
--with-openssl             //openssl的支持,加密传输时用到的
--enable-bcmath             //打开图片大小调整,用到zabbix监控的时候用到了这个模块
--enable-soap
--with-libxml-dir             //打开libxml2库的支持
--enable-pcntl             //freeTDS需要用到,可能是链接mssql
--enable-shmop
--enable-sysvmsg
--enable-sysvsem             //使用sysv信号机制
--enable-sysvshm
--enable-sockets             //打开sockets支持
--enable-exif
--enable-zend-signals
--enable-gd-native-ttf     //支持TrueType字符串函数库
--enable-ftp                 //打开ftp的支持
--with-curl                 //打开curl浏览工具的支持
--with-zlib                 //打开zlib库的支持
--enable-zip                 //打开对zip的支持
--with-bz2                 //打开对bz2文件的支持
--with-readline
--with-jpeg-dir             //打开对jpeg图片的支持
--with-png-dir             //打开对png图片的支持
--with-gd                     //打开gd库的支持
--with-freetype-dir         //打开对freetype字体库的支持
--with-pear                 //打开pear命令的支持,PHP扩展用的
[root@localhost php-7.2.5]# make && make install

(4)修改php服务的相关配置文件
[root@localhost php-7.2.5]# cp php.ini-production /usr/local/php7.2.5/etc/php.ini
[root@localhost php-7.2.5]# cd /usr/local/php7.2.5/etc/
[root@localhost etc]# cp php-fpm.conf.default php-fpm.conf
[root@localhost etc]# cp php-fpm.d/www.conf.default php-fpm.d/www.conf

(5)拷贝启动脚本,并添加到开机启动
[root@localhost etc]# cp /tools/php-7.2.5/sapi/fpm/php-fpm.service /usr/lib/systemd/system/
[root@localhost etc]# /usr/local/php7.2.5/sbin/php-fpm -t
[17-Jul-2018 16:56:41] NOTICE: configuration file /usr/local/php7.2.5/etc/php-fpm.conf test is successful
[root@localhost etc]# export PATH=/usr/local/php7.2.5/bin/:/usr/local/php7.2.5/sbin/:$PATH
[root@localhost etc]# systemctl enable php-fpm
Created symlink from /etc/systemd/system/multi-user.target.wants/php-fpm.service to /usr/lib/systemd/system/php-fpm.service.

(6)启动php-fpm,并检查端口
[root@localhost etc]# systemctl start php-fpm
[root@localhost etc]# netstat -tulnp |grep 9000
tcp        0      0 127.0.0.1:9000          0.0.0.0:*               LISTEN      14853/php-fpm: mast
[root@localhost php7.2.5]# ln -sv /usr/local/php7.2.5 /usr/local/php
‘/usr/local/php’ -> ‘/usr/local/php7.2.5’
-
四、配置Nginx支持PHP程序请求访问
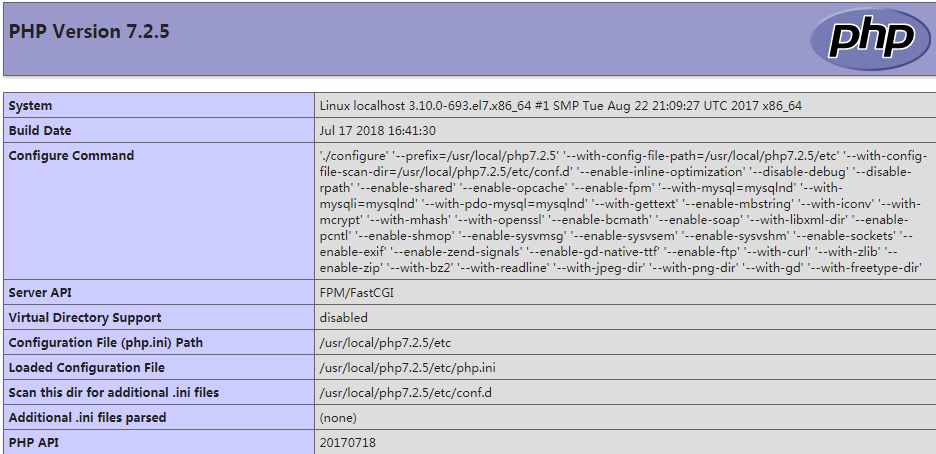
[root@localhost conf]# vim vhosts/www.abc.org.ssl.conf
server {
        listen 443 ssl;
        server_name www.abc.org abc.org;
        root /vhosts/html/www;
        index index.html index.htm index.php;
        ssl_protocols       TLSv1 TLSv1.1 TLSv1.2;
        ssl_ciphers         AES128-SHA:AES256-SHA:RC4-SHA:DES-CBC3-SHA:RC4-MD5;
        ssl_certificate     /usr/local/nginx/conf/cert.pem;
        ssl_certificate_key /usr/local/nginx/conf/cert.key;
        ssl_session_cache   shared:SSL:10m;
        ssl_session_timeout 10m;
        location /nginx_status {
                stub_status on;
                access_log off;

        }
        location ~ .php$ {
            root           /vhosts/html/www;
            fastcgi_pass   127.0.0.1:9000;
            fastcgi_index  index.php;
            fastcgi_param  SCRIPT_FILENAME  $document_root$fastcgi_script_name;
            include        fastcgi_params;
        }

}
[root@localhost conf]# nginx -t
nginx: the configuration file /usr/local/nginx1.15.1/conf/nginx.conf syntax is ok
nginx: configuration file /usr/local/nginx1.15.1/conf/nginx.conf test is successful
[root@localhost conf]# echo "<?php phpinfo(); ?>" > /vhosts/html/www/index.php
[root@localhost conf]# mv /vhosts/html/www/index.html /tmp/
访问:www.abc.org,会出现下面的图,表示php解析成功
针对Nginx请求访问PHP,然后对PHP连接MySQL的连接进行测试,编辑测试页面test.php
[root@localhost vhosts]# mv www.abc.org.conf.ssl.conf /tmp
[root@localhost vhosts]# vim www.abc.org.conf
server {
        listen 80;
        server_name www.abc.org abc.org;
        root /vhosts/html/www;
        index index.html index.php index.htm;

        access_log logs/www.abc.org_access.log main;
        error_log logs/www.abc.org_error.log info;

        location ~ .php$ {
            root           /vhosts/html/www;
            fastcgi_pass   127.0.0.1:9000;
            fastcgi_index  index.php;
            fastcgi_param  SCRIPT_FILENAME  $document_root$fastcgi_script_name;
            include        fastcgi_params;
        }


}
[root@localhost vhosts]# vim /vhosts/html/www/test.php
<?php
        $link_id=mysqli_connect('192.168.56.11','root','123456') or mysqli_error();
        if ($link_id) {
                echo "php_mysql is Success!";
        }
        else {
                echo "php_mysql is Failed!";
        }
?>
访问:http://www.abc.org/test.php

出现的问题:由于本次PHP版本使用的是7.2.5,在测试连接数据库时使用的库函数mysql_connect()无法正常连接数据库,提示报错信息如下:
2018/07/18 09:39:56 [error] 31736#0: *525 FastCGI sent in stderr: "PHP message: PHP Fatal error:  Uncaught Error: Call to undefined function mysql_connect() in /vhosts/html/www/test.php:2
Stack trace:
#0 {main}
  thrown in /vhosts/html/www/test.php on line 2" while reading response header from upstream, client: 192.168.56.1, server: www.abc.org, request: "GET /test.php HTTP/1.1", upstream: "fastcgi://127.0.0.1:9000", host: "www.abc.org"
表示并没有定义mysql_connect()函数,查阅PHP7资料发现PHP5中使用mysql_connect()函数进行连接,但实际上,PHP5.5开始,MySQL就不推荐使用了,属于废弃函数。PHP7中貌似已经彻底不支持了,根据官网说明,取而代之的是如下两个:
本扩展自 PHP 5.5.0 起已废弃,并在将来会被移除。应使用 MySQLi 或 PDO_MySQL 扩展来替换之。参见 MySQL:选择 API 指南以及相关 FAQ 以获取更多信息。用以替代本函数的有:
使用时,不要在使用mysql_connect了,可以换用mysqli_connect(),用法基本类似吧,据说是面向对象的库。
-
五、部署wordpress博客
1、MySQL数据库配置准备
[root@localhost tools]# wget https://cn.wordpress.org/wordpress-4.9.4-zh_CN.tar.gz    //下载wordpress源码包
[root@localhost tools]# mysql -uroot -p
Enter password:
Welcome to the MySQL monitor.  Commands end with ; or g.
Your MySQL connection id is 24
Server version: 5.6.35 MySQL Community Server (GPL)

Copyright (c) 2000, 2016, Oracle and/or its affiliates. All rights reserved.

Oracle is a registered trademark of Oracle Corporation and/or its
affiliates. Other names may be trademarks of their respective
owners.

Type 'help;' or 'h' for help. Type 'c' to clear the current input statement.

mysql> create database wordpress default character set = 'utf8';    //创建wordpress专用数据库,用于存放blog数据
Query OK, 1 row affected (0.00 sec)

mysql> show databases like "wordpress";
+----------------------+
| Database (wordpress) |
+----------------------+
| wordpress            |
+----------------------+
1 row in set (0.02 sec)

mysql> grant all on wordpress.* to wordpress@'%' identified by '123456';    //授权数据库管理用户
Query OK, 0 rows affected (0.02 sec)

mysql> flush privileges;
Query OK, 0 rows affected (0.01 sec)

mysql> quit;
Bye
2、Nginx和PHP配置准备
[root@localhost vhosts]# vim wordpress.conf     //编辑博客虚拟主机配置
server {
        listen 80;
        server_name blog.test.com;
        root /vhosts/html/wordpress;
        index index.html index.php index.htm;

        access_log logs/blog.test.com_access.log main;
        error_log logs/blog.test.com_error.log info;

        location ~ .php$ {
            root           /vhosts/html/wordpress;
            fastcgi_pass   127.0.0.1:9000;
            fastcgi_index  index.php;
            fastcgi_param  SCRIPT_FILENAME  $document_root$fastcgi_script_name;
            include        fastcgi_params;
        }


}
[root@localhost tools]# tar -zxf wordpress-4.9.4-zh_CN.tar.gz     //解压博客源码包
[root@localhost tools]# mv wordpress /vhosts/html/
[root@localhost wordpress]# chown -R nginx.nginx /vhosts/html/wordpress        //更改所属权限
[root@localhost wordpress]# nginx -t
nginx: the configuration file /usr/local/nginx1.15.1/conf/nginx.conf syntax is ok
nginx: configuration file /usr/local/nginx1.15.1/conf/nginx.conf test is successful
[root@localhost wordpress]# nginx -s reload
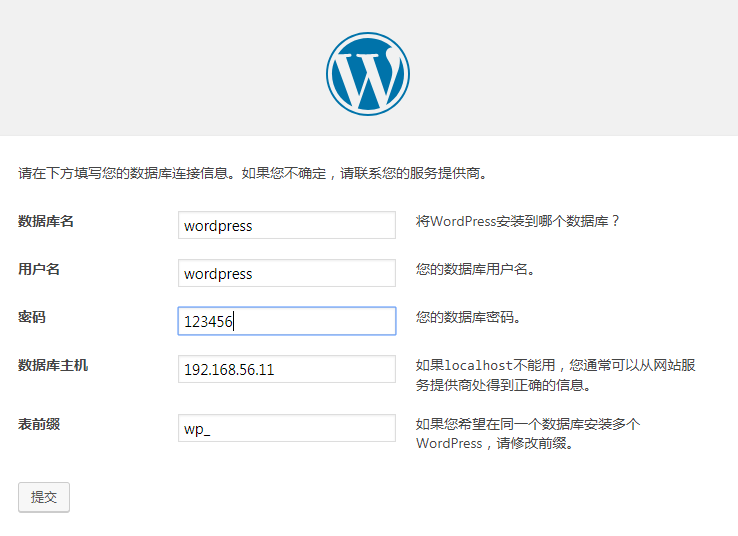
windows下做hosts域名解析 192.168.56.11 blog.test.com,访问blog.test.com,出现以下界面,进行安装wordpress
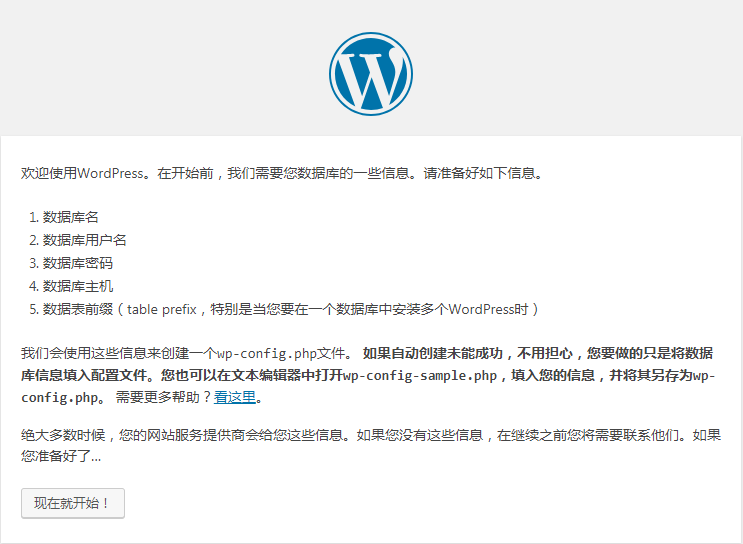
填写数据库相关信息
提交后,点击现在安装,而后输入博客相关信息。完成后登录博客,可进入到博客内部,如图:

在此界面可以进行发布文章,发布完成后,重新访问blog.test.com时,则跳到了正常的博客访问页面。
-
六、实现Wordpress博客程序URL静态化
说到URL静态化,就是常说的伪静态了,那么什么是伪静态呢?
伪静态是相对真实静态而言,那么什么又是静态页面呢?静态页面,是客户访问服务器的资源,服务器会直接把访问的页面中展示在浏览器当中,不需要数据库的支持,通俗地来说就是.html .htm这样的访问页面。而说到这就得说说动态页面,网页会根据客户的请求,从数据库当中筛选出客户想要的内容展示到浏览器当中,通俗地来说,就是.php 等动态语言展示的页面。
那么伪静态,顾名思义就是伪装的静态页面,其目的是为了更好地被搜索引擎收录而通过一定的规则,把动态页面的地址转换成html或htm结尾的地址,看起来是静态的,实际上依然是动态页面。举个例子:
京东的活动静态页面:https://sale.jd.com/act/xuFh7kMODlwN6A.html
京东的登录页面:https://passport.jd.com/uc/login?ReturnUrl=https%3A%2F%2Forder.jd.com%2Fcenter%2Flist.action
对比以上2个页面,就发现静态页面是以.html形式访问,而动态的页面则会在链接当中带? %等一系列的特殊字符。而伪静态的作用则是将原来的动态页面通过一系列的规则转换成静态页面。但是伪静态也存在不足之处:
(1)由于伪静态是用正则判断而不是真实地址,分别显示哪个页面的责任也由直接指定转由CPU来判断了,所以会导致CPU使用率的上升;
(2)网站承受力降低
(3)网页打开速度慢,由于伪静态依旧需要读取数据库,额外地还需要进行URL地址重写,在速度上也是会偏慢的。
(4)做了伪静态,原有的页面也可以进行访问,这也会造成大量的伪静态页面和动态页面重复,导致大量的重复页面。
那么既然有这么多缺点,为什么还要用伪静态呢?其最主要的功能还是为了搜索引擎的收录。这里仅仅作为了解什么是伪静态和配置,涉及SEO方面的知识,哈哈,不懂!
这里在访问博客的一篇文章时,点击访问文章,可以看到连接为:http://blog.test.com/?p=4,这就是一个动态的页面,要实现URL静态化,首先要在Wordpress后台设置-->固定链接-->自定义结构,然后输入下面的代码,如图:
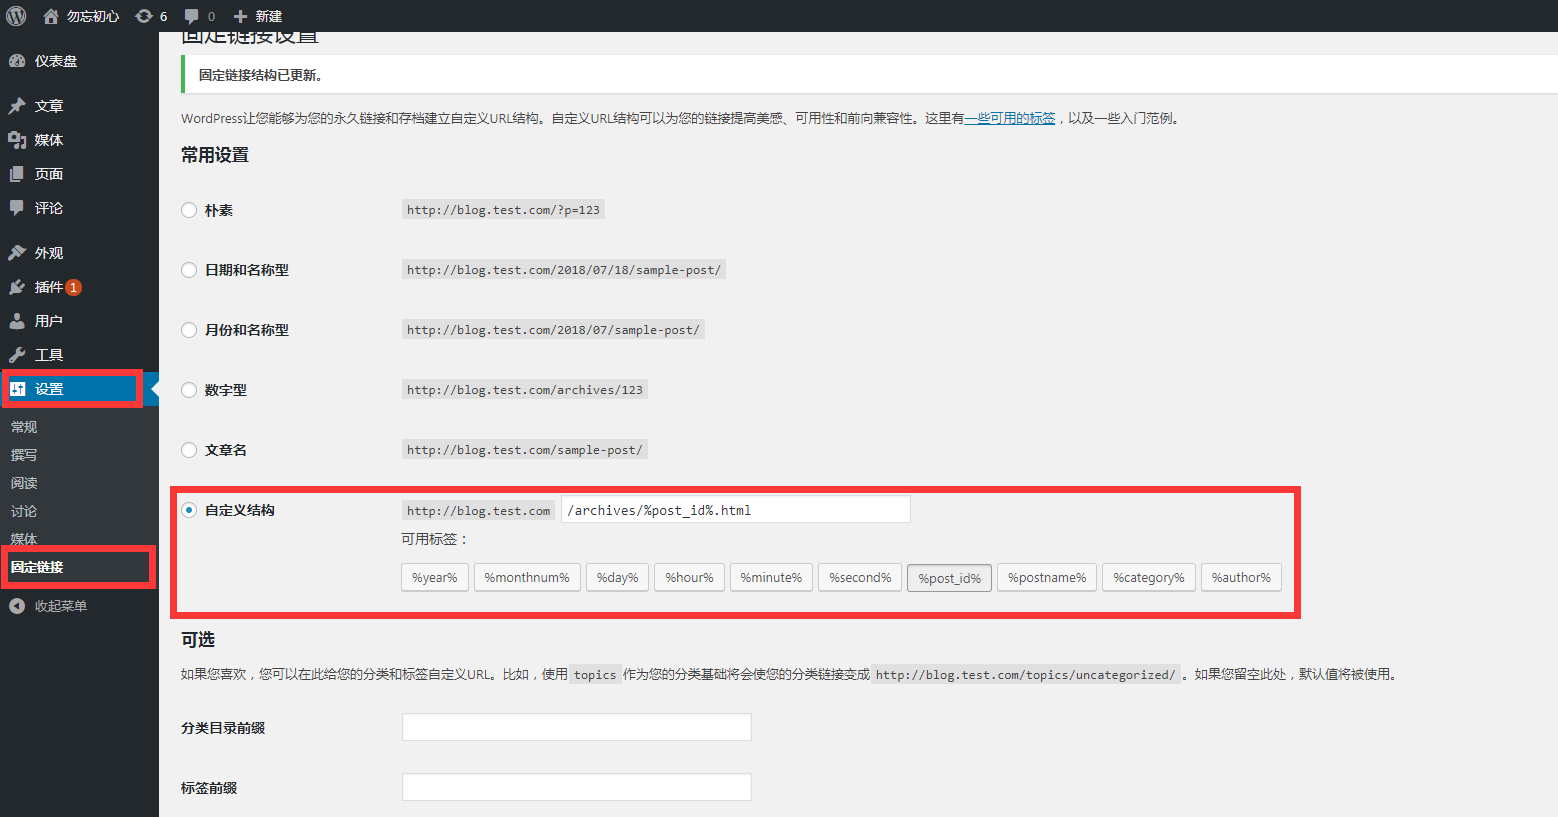
/archives/%post_id%.html 说明:%post_id% 表示的是数据库对应博文内容的唯一ID。然后修改Nginx虚拟主机配置文件:
[root@localhost vhosts]# vim wordpress.conf
server {
        listen 80;
        server_name blog.test.com;
        root /vhosts/html/wordpress;
        index index.html index.php index.htm;

        access_log logs/blog.test.com_access.log main;
        error_log logs/blog.test.com_error.log info;
        if (-f $request_filename/index.html){
                rewrite (.*) $1/index.html break;
        }
        if (-f $request_filename/index.php){
                rewrite (.*) $1/index.php;
        }
        if (!-f $request_filename){
                rewrite (.*) /index.php;
        }
        location ~ .php$ {
            root           /vhosts/html/wordpress;
            fastcgi_pass   127.0.0.1:9000;
            fastcgi_index  index.php;
            fastcgi_param  SCRIPT_FILENAME  $document_root$fastcgi_script_name;
            include        fastcgi_params;
        }
}
[root@localhost vhosts]# nginx -t
nginx: the configuration file /usr/local/nginx1.15.1/conf/nginx.conf syntax is ok
nginx: configuration file /usr/local/nginx1.15.1/conf/nginx.conf test is successful
[root@localhost vhosts]# nginx -s reload
访问:http://blog.test.com 点击博文,可以看到链接由:http://blog.test.com/?p=4 变成了:http://blog.test.com/archives/4.html,至此就实现了URL的伪静态效果。