Ansible-playbook
1.1、什么是playbook?
- playbook 是由一个或多个play组成的列表
- play的主要功能在于将直线归并为一组的主机装扮实现通过ansible中的task定义好的角色。从根本来讲,所谓的task无非是调用ansible的一个module。将多个play组织在一个playbook内,即可以让它们联动起来按实现编排的机制唱一台大戏
- playbook采用YAML语言编写
其工作流程图如下:
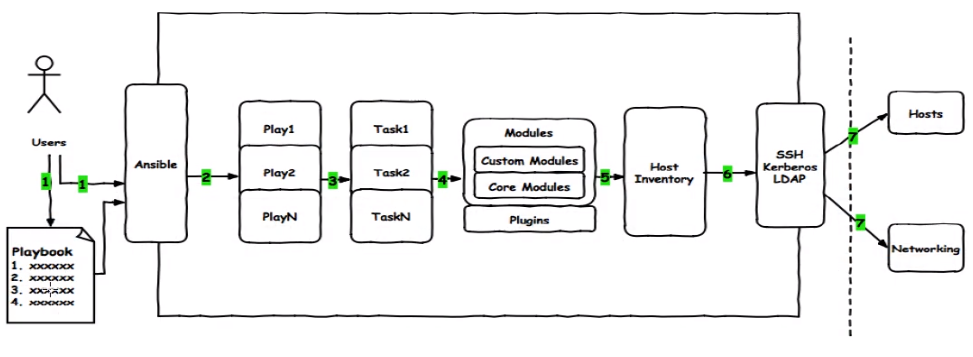
1.2、playbook的核心组成
-
Hosts 执行的远程主机列表
-
Tasks 任务集
-
Varniables 内置变量或自定义变量在playbook中调用
-
Templates 模板,可替换模板中的变量并实现一些简单的逻辑的文件
-
Hanglers和notify结合使用,由特定条件触发的操作,满足条件方才执行,否则不执行
-
Tags 标签 制定某条任务执行,用户选择运行playbook中的部分代码,ansible具有幂等性,因此会自动跳过没有辩护的部分,即便如此,有的代码为测试其确实没有发生变化的时间依然会非常的长,此时确信其没有变化,就可以通过tags跳过这些代码片段
ansible-playbook -t tagsname useradd.yml
先来一个例子:
[root@ansible ansible]# cat hello.yml
---
- hosts: web	#指定执行剧本的主机列表
  remote_user: root	#指定以什么用户去执行playbook

  tasks:	#任务列表
    - name: create new file		#任务名称
      file: name=/data state=directory	#任务模块
    - name: create new user
      user: name=lilei shell=/sbin/nologin
    - name: install httpd
      yum: name=httpd
    - name: start service
      service: name=httpd state=started enabled=yes
[root@ansible ansible]# ansible-playbook -C hello.yml	#检测playbook语法
[root@ansible ansible]# ansible-playbook hello.yml	#执行playbook
- Hosts:playbook中的每一个play 的目的都是为了让某个或某些主机以某个特定身份执行任务,hosts用于制定要执行执行任务的主机,须事先定义在主机清单内。可以是两个组的并集,也可以是两个组的交集,也支持模糊匹配。
- remote_user:可用于Host和task中,也可以通过指定其通过sudo的方式在远程主机上执行任务,其可用于play全局或某服务;次在,甚至可以在sudo时使用sudo_user制定sudo时切换的用户
- tasks:play的主题部分是task list。task list中的个任务按次序诸葛在hosts制定的所有主机下执行,即在所有主机上完成第一个任务后开始第二个。
#运行playbook的方式
ansible-playbook <filename.yml> ...[options]

#常见选项

-- check只检测可能发生的改变,不真正执行等于-C

--list-hosts 列出运行任务的主机

--limit 主机列表指着对主机列表中的主机执行

-v 显示过程 -vv -vvv更详细

实例

ansible-playbook file.yml --check

ansible-playbook file.yml

ansible-playbook file.yml --limit web

ansible-playbook file.yml --list-tasks
当我们对服务的配置文件更改时,如果还是用以上的方法,服务是不会根据配置文件的修改后进行自动重启而生效的,如下:
[root@ansible ansible]# cat hello.yml
---
- hosts: web
  remote_user: root

  tasks:
    - name: create new file
      file: name=/data state=directory
    - name: create new user
      user: name=lilei shell=/sbin/nologin
    - name: install httpd
      yum: name=httpd
    - name: copy conf file
      copy: src=conf_files/httpd.conf dest=/etc/httpd/conf/httpd.conf
    - name: start service
      service: name=httpd state=started enabled=yes
当我们对上述的配置文件进行了修改监听端口为81时,httpd服务是不会自动重启而使配置生效的。此时就需要用到playbook的handers、notify结合来触发服务的重启。
1.3、playbook的handlers、notify触发
[root@ansible ansible]# cat hello.yml
---
- hosts: web
  remote_user: root

  tasks:
#创建文件
    - name: create new file
      file: name=/data state=directory
#创建用户
    - name: create new user
      user: name=lilei shell=/sbin/nologin
#安装httpd服务
    - name: install httpd
      yum: name=httpd
#拷贝配置文件
    - name: copy conf file
      copy: src=conf_files/httpd.conf dest=/etc/httpd/conf/httpd.conf
      notify: restart service    #notify主要用于检测文件的变化,而通知handler对应的模块
#启动服务
    - name: start service
      service: name=httpd state=started enabled=yes
#如果配置文件发生变化则会调用handlers下面的模块
  handlers:
    - name: restart service
      service: name=httpd state=restarted

[root@ansible ansible]# ansible web -m shell -a "netstat -tulnp |grep 82"
1.4、playbook的变量和标签
- 标签(tags)
在众多的playbook当中,我们为了更加方便地调用公共模块的tasks,通常会给一些tasks进行打定标签,在执行的过程中进行指定标签运行,以实现我们的目标需求,如下:
[root@ansible ansible]# cat hello.yml
---
- hosts: web
  remote_user: root

  tasks:
    - name: create new file
      file: name=/data state=directory
    - name: create new user
      user: name=lilei shell=/sbin/nologin
    - name: install httpd
      yum: name=httpd
      tags: install_httpd	#安装httpd的标签
    - name: copy conf file
      copy: src=conf_files/httpd.conf dest=/etc/httpd/conf/httpd.conf
      notify: restart service
      tags: restart_httpd	#重启httpd服务的标签
    - name: start service
      service: name=httpd state=started enabled=yes
      tags: start_httpd		#启动httpd的标签

  handlers:
    - name: restart service
      service: name=httpd state=restarted

# 直接调用了重启httpd服务的标签,-t为指定标签执行,也可以指定多个标签一起执行
[root@ansible ansible]# ansible-playbook -t restart_httpd hello.yml
- 变量(vars)
在playbook当中,所有的任务都是固定的模式,在针对主机时,也是固定组别,服务端口等等也是固定的,写过shell脚本的大佬都知道在一个脚本当中,对于常用的量以变量代替,从而增加脚本的灵活性,那么在playbook当中也是可以引入变量的。
变量名:只能由字母、数字和下划线组成,且只能字母开头
变量的定义方式:
- (1)ansible setup facts远程主机所有的变量可直接调用,支持通配符。
下面可以通过setup模块过滤出ip的变量名为:ansible_all_ipv4_addresses,那么在使用时,可以直接调用该变量名,以实现调用。
[root@ansible ~]# ansible web -m setup -a 'filter=*address*'
192.168.0.116 | SUCCESS => {
    "ansible_facts": {
        "ansible_all_ipv4_addresses": [
            "192.168.0.116"
        ],
        "ansible_all_ipv6_addresses": [
            "fe80::20c:29ff:fef3:ce94"
        ]
    },
    "changed": false
}
192.168.0.135 | SUCCESS => {
    "ansible_facts": {
        "ansible_all_ipv4_addresses": [
            "192.168.0.135"
        ],
        "ansible_all_ipv6_addresses": [
            "fe80::20c:29ff:fe4c:ef31"
        ]
    },
    "changed": false
}
(2)在/etc/ansible/hosts中进行定义,普通变量(主机组中主机单独定义,优先级高于公共变量),公共变量(是在主机组中对所有主机定义的统一变量)
[root@ansible ansible]# cat vars.yml
---
- hosts: web
  remote_user: root

  tasks:
    - name: set hostname
      hostname: name={{ nodename }}.{{ domainname }}	#playbook中的变量调用

[root@ansible ansible]# vim /etc/ansible/hosts
[web]
192.168.0.135 nodename=node01	#普通变量的定义
192.168.0.116 nodename=node02
[web:vars]	#新增变量组,公共变量的定义
domainname=magedu.com
[root@ansible ansible]# ansible-playbook -C vars.yml
[root@ansible ansible]# ansible-playbook vars.yml
[root@ansible ansible]# ansible web -m shell -a "hostname"
192.168.0.135 | CHANGED | rc=0 >>
node01.magedu.com

192.168.0.116 | CHANGED | rc=0 >>
node02.magedu.com
(3)命令行指定变量,优先级是最高的。
# 在命令行用-e参数指定变量的值
[root@ansible ansible]# ansible-playbook -e 'domainname=baidu.com' vars.yml
[root@ansible ansible]# ansible web -m shell -a "hostname"
192.168.0.116 | CHANGED | rc=0 >>
node02.baidu.com

192.168.0.135 | CHANGED | rc=0 >>
node01.baidu.com
(4)playbook中定义变量
#变量定义模式
vars:
- var1: value1
- var2: value2

#修改playbook,增加变量使用
[root@ansible ansible]# vim vars.yml
---
- hosts: web
  remote_user: root
  #配置domainname变量
  vars:
    - domainname: magedu.com

  tasks:
    - name: set hostname
      hostname: name={{ nodename }}.{{ domainname }}

#检测语法后执行,并查看执行后效果
[root@ansible ansible]# ansible-playbook -C vars.yml
[root@ansible ansible]# ansible-playbook vars.yml
[root@ansible ansible]# ansible web -m shell -a "hostname"
192.168.0.135 | CHANGED | rc=0 >>
node01.magedu.com

192.168.0.116 | CHANGED | rc=0 >>
node02.magedu.com
(5)独立的YAML文件中定义
对于变量管理,由于变量有多重方式可以定义,不同人习惯会导致变量混乱等,故可以考虑吧变量放在同一文件内,使用的时候在文件内修改,剧本中调用该文件。
# 新建var.yml增加变量定义
[root@ansible ansible]# vim var.yml
domainname: hao123.com

#在playbook进行调用变量定义文件
[root@ansible ansible]# vim vars.yml
---
- hosts: web
  remote_user: root
  #导入变量文件,这里使用的相对路径,必须和playbook在同一目录下,如果不在同一目录,则需要写全路径
  vars_files:
    - var.yml
  tasks:
    - name: set hostname
      hostname: name={{ nodename }}.{{ domainname }}
[root@ansible ansible]# ansible-playbook -C vars.yml
[root@ansible ansible]# ansible-playbook  vars.yml
[root@ansible ansible]# ansible web -m shell -a "hostname"
192.168.0.135 | CHANGED | rc=0 >>
node01.hao123.com

192.168.0.116 | CHANGED | rc=0 >>
node02.hao123.com
1.5、playbook的模板
在生产服务器集群当中,每台服务器的配置都可能存在不同,在使用ansible进行自动化运维时,只是单纯的查询式操作,我们可以使用普通命令行ansible + hosts + -m + module + -a + "xxx"的模式进行进行批量查询,如查询负载,内存,cpu资源使用率等指标数据。而当我们需要批量化对目标主机进行批量任务操作时,如安装服务,启动服务,设置开机自启等批量化任务时,我们采用了playbook的方式进行任务的批量化执行。而在针对配置更改,实现服务自动重启,也采用了handlers+notify的方式进一步实现自动化的批量更改生效。与此同时,在使用ansible批量化自动运维时,还增加了变量和标签,以提高playbook的灵活性,以上的种种都说明了ansible模块化的强大功能。
而对于不同服务器的配置,以及不同的使用需求时,又改如何去更加灵活地去编写playbook来提高实用性呢?而ansible就提供了这样的一种模板(template)模块。假设有这样的一个需求,进行批量化部署httpd服务后,要求监听的服务端口分别为87、88端口。那么可以来一场这样的剧演:
# (1)创建模板配置目录,拷贝httpd服务的配置文件为j2后缀文件
[root@ansible ansible]# mkdir templates
[root@ansible ansible]# cp conf_files/httpd.conf templates/httpd.conf.j2
[root@ansible ansible]# cd templates/
[root@ansible templates]# ll
total 12
-rw-r--r-- 1 root root 12026 Nov 19 13:51 httpd.conf.j2

# (2)修改j2文件的配置,更改监听端口配置为http_port变量调用
[root@ansible templates]# vim httpd.conf.j2
Listen {{ http_port }}

# (3)修改主机列表中的普通变量,增加每台主机分别监听的端口变量
[root@ansible templates]# vim /etc/ansible/hosts
[web]
192.168.0.135 nodename=node01 http_port=87
192.168.0.116 nodename=node02 http_port=88
[web:vars]
domainname=magedu.com

# (4)编写playbook
[root@ansible ansible]# vim hello.yml
---
- hosts: web
  remote_user: root

  tasks:
    - name: create new file
      file: name=/data state=directory
    - name: create new user
      user: name=lilei shell=/sbin/nologin
    - name: install httpd
      yum: name=httpd
      tags: install_httpd
    - name: copy conf template file
#这里要使用的是template模块,使用方式和copy模块类似
      template: src=templates/httpd.conf.j2 dest=/etc/httpd/conf/httpd.conf
      notify: restart service
      tags: restart_httpd
    - name: start service
      service: name=httpd state=started enabled=yes
      tags: start_httpd

  handlers:
    - name: restart service
      service: name=httpd state=restarted

# (5)playbook测试与执行和查看执行结果
[root@ansible ansible]# ansible-playbook -C hello.yml
[root@ansible ansible]# ansible-playbook hello.yml
[root@ansible ansible]# ansible web -m shell -a "netstat -tulnp |grep httpd"
192.168.0.135 | CHANGED | rc=0 >>
tcp6       0      0 :::87                   :::*                    LISTEN      32274/httpd

192.168.0.116 | CHANGED | rc=0 >>
tcp6       0      0 :::88                   :::*                    LISTEN      28307/httpd
1.6、playbook的条件语句--When
有时候我们希望对某些特定的主机执行某些特定的操作,比如对指定的系统版本,进行关机操作,如下:
tasks:
  - name: "shut down Debian flavored systems"
    command: /sbin/shutdown -t now
    when: ansible_facts['os_family'] == "Debian"

# 也可以进行分组多个条件组合进行判断
tasks:
  - name: "shut down CentOS 6 and Debian 7 systems"
    command: /sbin/shutdown -t now
    when: (ansible_facts['distribution'] == "CentOS" and ansible_facts['distribution_major_version'] == "6") or
          (ansible_facts['distribution'] == "Debian" and ansible_facts['distribution_major_version'] == "7")

# 当需要多个条件都必须具备时,可以使用列表的方式进行指定
tasks:
  - name: "shut down CentOS 6 systems"
    command: /sbin/shutdown -t now
    when:
      - ansible_facts['distribution'] == "CentOS"
      - ansible_facts['distribution_major_version'] == "6"
使用举例:对判断被控端的主机名为node02.hao123.com的主机进行更改httpd服务的端口
# 使用setup获取目标主机的公共变量值
[root@ansible ansible]# ansible web -m setup -a "filter="*hostname*""
192.168.0.135 | SUCCESS => {
    "ansible_facts": {
        "ansible_hostname": "node01"
    },
    "changed": false
}
192.168.0.116 | SUCCESS => {
    "ansible_facts": {
        "ansible_hostname": "node02"
    },
    "changed": false
}

# 编写playbook
[root@ansible ansible]# vim hello.yml
---
- hosts: web
  remote_user: root
  vars:
    - http_port: 90

  tasks:
    - name: install httpd
      yum: name=httpd
      tags: install_httpd
    - name: copy conf template file
      template: src=templates/httpd.conf.j2 dest=/etc/httpd/conf/httpd.conf
      when: ansible_hostname == "node02"	#增加判断条件,当 hostname为node02才会更改配置文件,并重启服务
      notify: restart service
      tags: restart_httpd
    - name: start service
      service: name=httpd state=started enabled=yes
      tags: start_httpd

  handlers:
    - name: restart service
      service: name=httpd state=restarted

[root@ansible ansible]# ansible-playbook -C hello.yml
[root@ansible ansible]# ansible-playbook hello.yml
[root@ansible ansible]# ansible 192.168.0.116 -m shell -a "netstat -tulnp |grep httpd"
192.168.0.116 | CHANGED | rc=0 >>
tcp6       0      0 :::90                   :::*                    LISTEN      30308/httpd
1.7、playbook的循环迭代--Item
Item主要用于循环迭代多个重复的操作,比如批量创建用户、批量创建文件等等。
# 编写playbook,进行批量创建文件
[root@ansible ansible]# cat item.yml
---
- hosts: web
  remote_user: root

  tasks:
    - name: create directory
      file: name=/data state=directory
    - name: create files
      file: name=/data/{{ item }} state=touch
      when: ansible_hostname == "node02"
      with_items:
        - file1
        - file2
        - file3

[root@ansible ansible]# ansible-playbook -C item.yml
[root@ansible ansible]# ansible-playbook item.yml
[root@ansible ansible]# ansible 192.168.0.116 -m shell -a "ls -l /data/file*"
192.168.0.116 | CHANGED | rc=0 >>
-rw-r--r-- 1 root root 0 Nov 19 15:34 /data/file1
-rw-r--r-- 1 root root 0 Nov 19 15:34 /data/file2
-rw-r--r-- 1 root root 0 Nov 19 15:34 /data/file3

# 创建3个组,3个用户,并且对应每一个组
[root@ansible ansible]# cat item_user_group.yml
---
- hosts: web
  remote_user: root

  tasks:
    - name: add some groups
      group: name={{ item }}
      with_items:
        - g1
        - g2
        - g3
    - name: add some users
      user: name={{ item.name }} group={{ item.group }}
      with_items:
        - { name: 'user1' , group: 'g1'}
        - { name: 'user2' , group: 'g2'}
        - { name: 'user3' , group: 'g3'}
[root@ansible ansible]# ansible-playbook -C item_user_group.yml
[root@ansible ansible]# ansible-playbook item_user_group.yml
1.8、playbook的循环语句--For
重复性执行一段代码,生成一段配置信息。示例如下:
# for循环使用语法示例:
{% for vhost in nginx/-vhosts %}

server {

listen {{ vhost.listen| default('80 default_server') }}

{% endfor %}

# 通过jin2模板生成不同监听端口的server标签
[root@ansible ansible]# cat for.yml
---
- hosts: web
  remote_user: root
  vars:
    ports:
      - 83
      - 84
  tasks:
    - name: copy conf file
      template: src=templates/nginx.conf.j2 dest=/data/nginx.conf

# 模板中通过定义循环,生成配置
[root@ansible ansible]# cat templates/nginx.conf.j2
{% for port in ports %}
server {
     listen {{ port }}
}
{% endfor %}

[root@ansible ansible]# ansible-playbook for.yml
[root@ansible ansible]# ansible web -m shell -a 'cat /data/nginx.conf'
192.168.0.135 | CHANGED | rc=0 >>
server {
     listen 83
}
server {
     listen 84
}

192.168.0.116 | CHANGED | rc=0 >>
server {
     listen 83
}
server {
     listen 84
}
1.9、playbook的判断语句--If
通过判断去执行,和shell的语法类似:
{% if vhost.server_name is defined %}

server_name {{vhost.server_name }};

{% endif %}

{% if vhost.root is defined 80 %}

root {{ vhost.root }};

{% endif %}

# 创建3个不同的web站点
[root@ansible ansible]# vim testif1.yml

---
- hosts: web
  remote_user: root
  vars:
    ports:
      - web1:
        port: 86
        #name: web1.hao123.com   #注释
        rootdir: /data/website1
      - web2:
        port: 87
        name: web2.hao123.com
        rootdir: /data/website2
      - web3:
        port: 88
        #name: web3.hao123.com   #注释
        rootdir: /data/website3

  tasks:
    - name: copy conf
      template: src=for3.conf.j2 dest=/data/for3.conf
#对p.name进行判断,没有则不生成servername
[root@ansible ansible]# vim templates/for3.conf.j2
#只有87端口的server有servername  别的由于被注释,if判断不存在 就不创建servername
{% for p in ports %}
server {
        listen {{ p.port }}
{% if p.name is defined %}
        servername {{ p.name }}
{% endif %}
        documentroot {{ p.rootdir }}
}
{% endfor %}

[root@ansible ansible]# ansible-playbook testif1.yml

[root@ansible ansible]# ansible web -m shell -a 'less /data/for3.conf'
1.10、playbook的异常处理
默认Playbook会检查命令和模块的返回状态,如遇到错误就中断playbook的执行加入参数: ignore_errors: yes 忽略错误
[root@ansible ansible]# vim ignore.yml
---
- hosts: web
  remote_user: root

  tasks:
    - name: Ignore False
      command: /bin/false	#直接执行返回false
      ignore_errors: yes	#忽略错误

# 当上一个任务遇到错误中断时,后面的任务就不会执行了
    - name: touch files
      file: path=/tmp/bgx_ignore state=touch

[root@ansible ansible]# ansible-playbook -C ignore.yml
[root@ansible ansible]# ansible-playbook ignore.yml
[root@ansible ansible]# ansible web -m shell -a 'ls -l /tmp/bgx_ignore'
192.168.0.116 | CHANGED | rc=0 >>
-rw-r--r-- 1 root root 0 Nov 20 14:35 /tmp/bgx_ignore

192.168.0.135 | CHANGED | rc=0 >>
-rw-r--r-- 1 root root 0 Nov 20 14:35 /tmp/bgx_ignore