一、etcd介绍
1)etcd 是一个分布式一致性键值存储系统,用于共享配置和服务发现
etcd是一个分布式一致性键值存储系统,用于共享配置和服务发现,
专注于:
    简单:良好定义的,面向用户的API (gRPC)·
    安全: 带有可选客户端证书认证的自动TLS·
    快速:测试验证,每秒10000写入·
    可靠:使用Raft适当分布etcd是Go编写,并使用Raft一致性算法来管理高可用复制日志

etcd可实现的功能,Zookeeper都能实现,那么为什么要用etcd而非直接使用Zookeeper呢?相较之下,
Zookeeper有如下缺点:
    1.复杂。Zookeeper的部署维护复杂,管理员需要掌握一系列的知识和技能;而Paxos强一致性算法也是素来以复杂难懂而闻名于世;
        另外,Zookeeper的使用也比较复杂,需要安装客户端,官方只提供了java和C两种语言的接口。
    2.Java编写。这里不是对Java有偏见,而是Java本身就偏向于重型应用,它会引入大量的依赖。而运维人员则普遍希望机器集群尽可能简单,维护起来也不易出错。

etcd作为一个后起之秀,其优点也很明显。
    1.简单。使用Go语言编写部署简单;使用HTTP作为接口使用简单;使用Raft算法保证强一致性让用户易于理解。
    2.数据持久化。etcd默认数据一更新就进行持久化。
    3.安全。etcd支持SSL客户端安全认证。
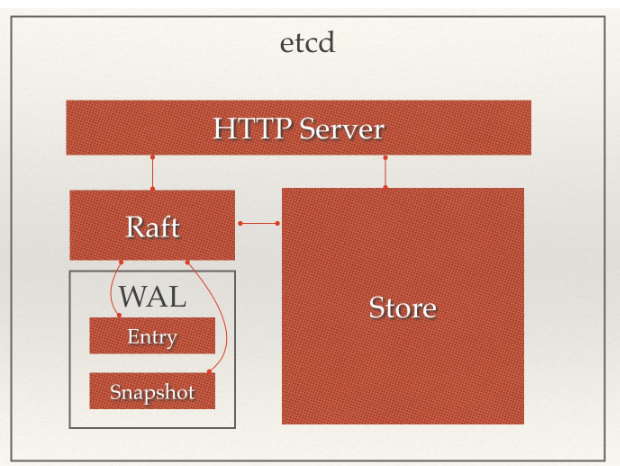
2) etcd的架构图

从etcd的架构图中我们可以看到,etcd主要分为四个部分
HTTP Server: 用于处理用户发送的API请求以及其它etcd节点的同步与心跳信息请求。
Store:用于处理etcd支持的各类功能的事务,包括数据索引、节点状态变更、监控与反馈、事件处理与执行等等,是etcd对用户提供的大多数API功能的具体实现。
Raft:Raft强一致性算法的具体实现,是etcd的核心。
WAL:Write Ahead Log(预写式日志),是etcd的数据存储方式。除了在内存中存有所有数据的状态以及节点的索引以外,etcd就通过WAL进行持久化存储。
WAL中,所有的数据提交前都会事先记录日志。Snapshot是为了防止数据过多而进行的状态快照;Entry表示存储的具体日志内容。
通常,一个用户的请求发送过来,会经由HTTP Server转发给Store进行具体的事务处理
如果涉及到节点的修改,则交给Raft模块进行状态的变更、日志的记录,然后再同步给别的etcd节点以确认数据提交
最后进行数据的提交,再次同步。
3)etcd概念词汇表
Raft:etcd所采用的保证分布式系统强一致性的算法。
Node:一个Raft状态机实例。
Member: 一个etcd实例。它管理着一个Node,并且可以为客户端请求提供服务。
Cluster:由多个Member构成可以协同工作的etcd集群。
Peer:对同一个etcd集群中另外一个Member的称呼。
Client: 向etcd集群发送HTTP请求的客户端。
WAL:预写式日志,etcd用于持久化存储的日志格式。
snapshot:etcd防止WAL文件过多而设置的快照,存储etcd数据状态。
Proxy:etcd的一种模式,为etcd集群提供反向代理服务。
Leader:Raft算法中通过竞选而产生的处理所有数据提交的节点。
Follower:竞选失败的节点作为Raft中的从属节点,为算法提供强一致性保证。
Candidate:当Follower超过一定时间接收不到Leader的心跳时转变为Candidate开始竞选。
Term:某个节点成为Leader到下一次竞选时间,称为一个Term。
Index:数据项编号。Raft中通过Term和Index来定位数据。
4)etcd官方下载
下载地址:https://github.com/coreos/etcd/releases选择合适的版本进行下载。
二、etcd 集群安装。(准备3台机器)
1)第一步。下载etcd命令
wget https://github.com/etcd-io/etcd/releases/download/v3.3.13/etcd-v3.3.13-linux-amd64.tar.gz
tar xf etcd-v3.3.13-linux-amd64.tar.gz
[root@master tools]# ls  etcd-v3.3.13-linux-amd64/etcd*
etcd-v3.3.13-linux-amd64/etcd  etcd-v3.3.13-linux-amd64/etcdctl
[root@master tools]# cp  etcd-v3.3.13-linux-amd64/etcd*  /usr/bin/
[root@master tools]# ls /usr/bin/etcd*
/usr/bin/etcd  /usr/bin/etcdctl
[root@master tools]# chown root:root /usr/bin/etcd*
2)第二步。修改配置文件
2.1)默认端口下在配置(对于健康检查不需要添加--endpoints=http://127.0.0.1:8083参数)

vi /etc/etcd.conf

name: node01
initial-advertise-peer-urls: http://192.168.1.5:2380
listen-peer-urls: http://192.168.1.5:2380
listen-client-urls: http://192.168.1.5:2379,http://127.0.0.1:2379
advertise-client-urls: http://192.168.1.5:2379
initial-cluster-token: etcd-cluster-0
initial-cluster: node01=http://192.168.1.5:2380,node02=http://192.168.1.6:2380,node03=http://192.168.1.7:2380
initial-cluster-state: new
data-dir: /var/lib/etcd
默认的端口为 2380和2379
测试时修改了端口
2.2)将端口改为8083和8084
vi /etc/etcd.conf

name: node01
initial-advertise-peer-urls: http://192.168.1.5:8084
listen-peer-urls: http://192.168.1.5:8084
listen-client-urls: http://192.168.1.5:8083,http://127.0.0.1:8083
advertise-client-urls: http://192.168.1.5:8083
initial-cluster-token: etcd-cluster-0
initial-cluster: node01=http://192.168.1.5:8084,node02=http://192.168.1.6:8084,node03=http://192.168.1.7:8084
initial-cluster-state: new
data-dir: /var/lib/etcd
mkdir /var/lib/etcd
3)第三步,加载etcd到系统程序
vi /usr/lib/systemd/system/etcd.service

[Unit]
Description=Etcd Server
After=network.target
After=network-online.target
Wants=network-online.target
Documentation=https://github.com/coreos

[Service]
Type=notify
ExecStart=/usr/bin/etcd --config-file=/etc/etcd.conf
Restart=on-failure
RestartSec=5
LimitCORE=infinity
LimitNOFILE=655360
LimitNPROC=655350

[Install]
WantedBy=multi-user.target
4)第四步。设置开机自启动
systemctl daemon-reload(重新加载模块)
systemctl enable etcd(开机启动)
systemctl start etcd(启动服务)    最后一起启动
5)其他节点执行同样的操作
[root@master tools]# scp etcd-v3.3.13-linux-amd64/etcd root@192.168.1.6:/usr/bin/
etcd                                                    100%   16MB 103.9MB/s   00:00
[root@master tools]# scp /etc/etcd.conf root@192.168.1.6:/etc/
etcd.conf                                               100%  422   244.9KB/s   00:00
[root@master tools]# scp etcd-v3.3.13-linux-amd64/etcd root@192.168.1.7:/usr/bin/
etcd                                                    100%   16MB 130.4MB/s   00:00
[root@master tools]# scp /etc/etcd.conf root@192.168.1.7:/etc/
etcd.conf                                               100%  422   148.4KB/s   00:00
[root@master tools]# scp /usr/lib/systemd/system/etcd.service root@192.168.1.6:/usr/lib/systemd/system/
etcd.service                                                                                          100%  352    33.9KB/s   00:00
[root@master tools]# scp /usr/lib/systemd/system/etcd.service root@192.168.1.7:/usr/lib/systemd/system/
etcd.service                                                                                          100%  352   136.2KB/s   00:00
修改好对应的配置
systemctl start etcd 启动
6)健康检查
[root@master etcd]# etcdctl --endpoints=http://127.0.0.1:8083 cluster-health
member 19f45ab624e135d5 is healthy: got healthy result from http://192.168.1.7:8083
member 8b1773c5c1edc4a3 is healthy: got healthy result from http://192.168.1.5:8083
member be69fc1f2a25ca22 is healthy: got healthy result from http://192.168.1.6:8083
cluster is healthy

[root@master etcd]# curl http://192.168.1.5:8083/v2/members
7)etcdctl的相关命令操作

https://www.jianshu.com/p/d63265949e52
https://www.cnblogs.com/breg/p/5728237.html
