坦白说,AlertDialog我在工作中用得并不多,因为AlertDialog的样式比较固定和呆板,为了和App的整体设计匹配,一般都是使用自定义的Dialog,只有在要求不高时用一下。但是作为Android的基础控件之一,掌握它是十分有必要。网上相关的资料已经多如牛毛,一搜就有好几页。但我还是决定写一篇自己的博客。
1、创建AlertDialog
首先,我们来了解一下AlertDialog的大体创建顺序。与TextView、Button这些控件稍有不同,AlertDialog并不是初始化(findViewById)之后就直接调用各种方法了。仔细想想AlertDialog的使用场景, 它并不像TextView和Button那些控件似的一般都是固定在界面上,而是在某个时机才会触发出来(比如用户点击了某个按钮或者断网了)。所以AlertDialog并不需要到布局文件中创建,而是在代码中通过构造器(AlertDialog.Builder)来构造标题、图标和按钮等内容的。
- 创建构造器AlertDialog.Builder的对象;
- 通过构造器的对象调用setTitle、setMessage等方法构造对话框的标题、信息和图标等内容;
- 根据需要,设置正面按钮、负面按钮和中立按钮;
- 调用create方法创建AlertDialog的对象;
- AlertDialog的对象调用show方法,让对话框在界面上显示。
AlertDialog.Builder自己也有一个show方法,可以显示对话框,所以上面的第4、第5步可以简化为一步。
下面,我们就来简单创建几种常用的AlertDialog吧。新建一个工程,在MainActivity上放置不同的按钮,点击按钮就会有相应的对话框弹出。
2、提示对话框
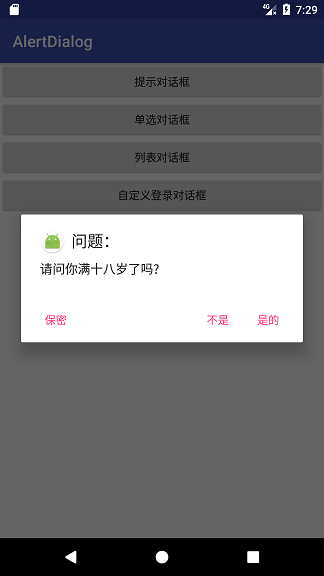
提示对话框应该是最常见的AlertDialog了,中上方是提示文字,底部是“取消”、“确定”等按钮。结合前面的创建步骤,相信下面的代码不难理解。
    /**
     * 提示对话框
     *
     * @param view
     */
    public void tipClick(View view) {
        AlertDialog.Builder builder = new AlertDialog.Builder(context);
        builder.setTitle("问题:");
        builder.setMessage("请问你满十八岁了吗?");
        builder.setIcon(R.mipmap.ic_launcher_round);
        //点击对话框以外的区域是否让对话框消失
        builder.setCancelable(true);
        //设置正面按钮
        builder.setPositiveButton("是的", new DialogInterface.OnClickListener() {
            @Override
            public void onClick(DialogInterface dialog, int which) {
                Toast.makeText(context, "你点击了是的", Toast.LENGTH_SHORT).show();
                dialog.dismiss();
            }
        });
        //设置反面按钮
        builder.setNegativeButton("不是", new DialogInterface.OnClickListener() {
            @Override
            public void onClick(DialogInterface dialog, int which) {
                Toast.makeText(context, "你点击了不是", Toast.LENGTH_SHORT).show();
                dialog.dismiss();
            }
        });
        //设置中立按钮
        builder.setNeutralButton("保密", new DialogInterface.OnClickListener() {
            @Override
            public void onClick(DialogInterface dialog, int which) {
                Toast.makeText(context, "你选择了保密", Toast.LENGTH_SHORT).show();
                dialog.dismiss();
            }
        });
        AlertDialog dialog = builder.create();
        //对话框显示的监听事件
        dialog.setOnShowListener(new DialogInterface.OnShowListener() {
            @Override
            public void onShow(DialogInterface dialog) {
                Log.e(TAG,"对话框显示了");
            }
        });
        //对话框消失的监听事件
        dialog.setOnCancelListener(new DialogInterface.OnCancelListener() {
            @Override
            public void onCancel(DialogInterface dialog) {
                Log.e(TAG,"对话框消失了");
            }
        });
        //显示对话框
        dialog.show();
    }
具体介绍一下用到的方法吧:
-
setTitle:设置对话框的标题,比如“提示”、“警告”等;
-
setMessage:设置对话框要传达的具体信息;
-
setIcon:设置对话框的图标;
-
setCancelable:点击对话框以外的区域是否让对话框消失,默认为true;
-
setPositiveButton:设置正面按钮,表示“积极”、“确认”的意思,第一个参数为按钮上显示的文字,下同;
-
setNegativeButton:设置反面按钮,表示“消极”、“否认”、“取消”的意思;
-
setNeutralButton:设置中立按钮;
-
setOnShowListener:对话框显示时触发的事件;
-
setOnCancelListener:对话框消失时触发的事件。
当然,这些设置并不是非要不可,而是根据自己需要而定。比如标题、图标这些就可要可不要。
效果图如下:
3、单选对话框
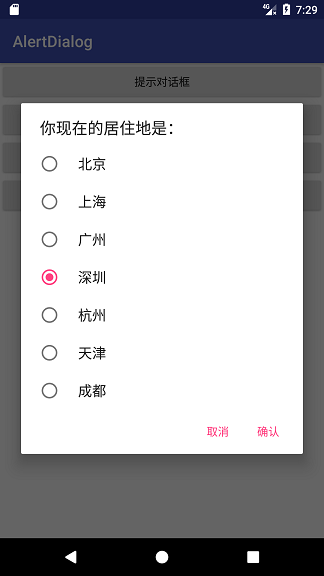
单选对话框的内容就是一个单项选择列表,需要用到setSingleChoiceItems方法,参数一是列表数据,参数二是默认选中的item,,参数三则是点击监听接口,我们要实现这样一个小功能,用户在选好某一项之后记下其选择,下次点开对话框时就默认选中该项。
    /**
     * 单选对话框
     *
     * @param v
     */
    private int checkedItem = 0; //默认选中的item
    public void singleClick(View v) {
        AlertDialog.Builder builder = new AlertDialog.Builder(context);
        builder.setTitle("你现在的居住地是:");
        String[] cities = {"北京", "上海", "广州", "深圳", "杭州", "天津", "成都"};

        builder.setSingleChoiceItems(cities, checkedItem, new DialogInterface.OnClickListener() {
            @Override
            public void onClick(DialogInterface dialog, int which) {
                checkedItem = which;
            }
        });
        //设置正面按钮
        builder.setPositiveButton("确认", new DialogInterface.OnClickListener() {
            @Override
            public void onClick(DialogInterface dialog, int which) {
                dialog.dismiss();
            }
        });
        //设置反面按钮
        builder.setNegativeButton("取消", new DialogInterface.OnClickListener() {
            @Override
            public void onClick(DialogInterface dialog, int which) {
                dialog.dismiss();
            }
        });
        AlertDialog dialog = builder.create();
        dialog.show();
    }
实现后的效果:
你可能会把checkedItem的赋值放在确定按钮的点击事件中,这一看似乎没什么问题,但是这样是错误的!仔细阅读谷歌的API文档就知道了,setSingleChoiceItems 方法中实现的onClick方法中which表示的是当前选中的列表中的item下标,而setPositiveButton和setNegativeButton方法那里的which表示的却是按钮的种类,正面按钮中的which值是-1,反面按钮的是-2,与列表的item是没有关系的。
例子中的保存选中item的方法有问题的,当Activity被销毁之后重新创建的话数据就会丢失,要想持久化保存的话要用sharedpreferences或者数据库。
4、复选对话框
复选对话框是一个可以重复选中的列表,与单选对话框有点像,不过调用的是setMultiChoiceItems方法,而且多了一个布尔值参数isChecked,表示当前点击的item是否被选中。
我们创建一个集合,将点击选中的item添加到集合中,取消勾选的话就从集合中移除,点击确认按钮后就在日志中打印出来。
    /**
     * 复选(列表)对话框
     *
     * @param v
     */
    public void listClick(View v) {
        AlertDialog.Builder builder = new AlertDialog.Builder(context);
        builder.setTitle("请选择你喜欢的颜色:");
        final String[] colors = {"红色", "橙色", "黄色", "绿色", "蓝色", "靛色", "紫色"};
        final List<String> myColors = new ArrayList<>();
        builder.setMultiChoiceItems(colors, null, new DialogInterface.OnMultiChoiceClickListener() {
            @Override
            public void onClick(DialogInterface dialog, int which, boolean isChecked) {
                if (isChecked) {
                    myColors.add(colors[which]);
                } else {
                    myColors.remove(colors[which]);
                }
            }
        });

        //设置正面按钮
        builder.setPositiveButton("确认", new DialogInterface.OnClickListener() {
            @Override
            public void onClick(DialogInterface dialog, int which) {
                for (String color : myColors) {
                    Log.e(TAG, "选择的颜色:" + color);
                }
                dialog.dismiss();
            }
        });
        //设置反面按钮
        builder.setNegativeButton("取消", new DialogInterface.OnClickListener() {
            @Override
            public void onClick(DialogInterface dialog, int which) {
                myColors.clear();
                dialog.dismiss();
            }
        });
//        AlertDialog dialog = builder.create();
//        dialog.show();
        builder.show();
    }

5、自定义登录对话框
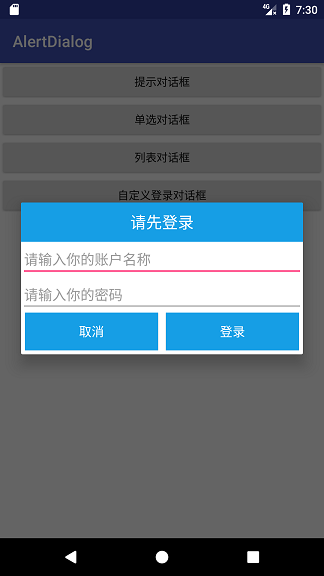
有时候,只显示简单的标题和信息是满足不了我们的要求,比如我们要实现一个登录对话框的话,那就需要在对话框上放置EditText输入框了。AlertDialog早就为我们准备好了setView方法,只要往里面放进我们需要的对话框的View对象就可以了。
5.1 自定义登录对话框布局文件
<LinearLayout xmlns:android="http://schemas.android.com/apk/res/android"
    android:layout_width="match_parent"
    android:layout_height="match_parent"
    android:gravity="center"
    android:background="@android:color/transparent"
    android:orientation="vertical">

    <TextView
        android:id="@+id/textView"
        android:layout_width="match_parent"
        android:layout_height="50dp"
        android:background="#169ee5"
        android:gravity="center"
        android:text="请先登录"
        android:textColor="@android:color/white"
        android:textSize="20sp" />

    <EditText
        android:id="@+id/et_name"
        android:layout_width="match_parent"
        android:layout_height="wrap_content"
        android:hint="请输入你的账户名称"
        android:textCursorDrawable="@drawable/edittext_cursor_color"
        android:textSize="18sp" />

    <EditText
        android:id="@+id/et_pwd"
        android:layout_width="match_parent"
        android:layout_height="wrap_content"
        android:hint="请输入你的密码"
        android:textCursorDrawable="@drawable/edittext_cursor_color"
        android:textSize="18sp" />

    <LinearLayout
        android:layout_width="match_parent"
        android:layout_height="wrap_content"
        android:layout_marginBottom="5dp"
        android:orientation="horizontal"
        android:paddingLeft="5dp"
        android:paddingRight="5dp">

        <Button

            android:id="@+id/btn_cancel"
            android:layout_width="0dp"
            android:layout_height="wrap_content"
            android:layout_marginRight="10dp"
            android:layout_weight="1"
            android:background="#169ee5"
            android:text="取消"
            android:textColor="@android:color/white"
            android:textSize="16sp" />

        <Button
            android:id="@+id/btn_login"
            android:layout_width="0dp"
            android:layout_height="wrap_content"
            android:layout_weight="1"
            android:background="#169ee5"
            android:text="登录"
            android:textColor="@android:color/white"
            android:textSize="16sp" />

    </LinearLayout>

</LinearLayout>
5.2 代码逻辑
setView方法是通过AlertDialog的对象调用的,所以这里的代码顺序会稍有不同:我们要先创建AlertDialog对象和View对象,然后再去初始化对话框中的控件。
6、总结
关于AlertDialog的知识当然不止这么多,大家可以点击参考文献中的链接去阅读API文档。至于源码嘛,只是一些布局和简单代码,就不上传了。值得一提的是,我原本还想自定义一个仿iOS风格的对话框(虽然之前自定义Dialog实现过了),但是圆角边框的效果始终实现不了,也试着去查了源码,无奈限于水平最终未果。在此也希望有朋友能解答我的困惑,不胜感激。