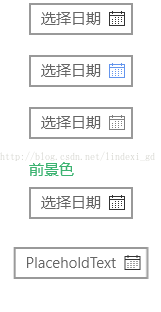
CalendarDatePicker 是一个好用的东西,但是我发现想要修改他右边的那个图标,显示日历的图标颜色,没有这个选项。
如果不知道我说的是哪个,请看下面的图。
左边颜色变化的就是我们要修改的图标。
要修改他很简单,我们需要写资源。
<CalendarDatePicker>
    <CalendarDatePicker.Resources>
        <SolidColorBrush x:Key="CalendarDatePickerCalendarGlyphForeground" Color="CornflowerBlue"/>
    </CalendarDatePicker.Resources>
</CalendarDatePicker>
图标使用的资源被我们在资源重写,于是他就使用我们的资源,这是一个好办法,在堆栈网看到的。
上面的图,其实代码很少
           <StackPanel>
                <CalendarDatePicker Margin="10,10,10,10" HorizontalAlignment="Center"></CalendarDatePicker>
                <CalendarDatePicker Margin="10,10,10,10" HorizontalAlignment="Center">
                    <CalendarDatePicker.Resources>
                        <SolidColorBrush x:Key="CalendarDatePickerCalendarGlyphForeground" Color="CornflowerBlue"/>
                    </CalendarDatePicker.Resources>
                </CalendarDatePicker>

                <CalendarDatePicker Margin="10,10,10,10" HorizontalAlignment="Center">
                    <CalendarDatePicker.Resources>
                        <SolidColorBrush x:Key="CalendarDatePickerCalendarGlyphForeground" Color="Gray"/>
                    </CalendarDatePicker.Resources>
                </CalendarDatePicker>

                <CalendarDatePicker Margin="10,10,10,10" HorizontalAlignment="Center"
                                    Foreground="MediumSeaGreen"  Header="前景色" >

                </CalendarDatePicker>

                <CalendarDatePicker Margin="10,10,10,10" HorizontalAlignment="Center"
                                    Header="" PlaceholderText="PlaceholdText" Foreground="Black">

                </CalendarDatePicker>
</StackPanel>代码 https://github.com/lindexi/UWP/tree/master/uwp/src/CalendarDatePickerForeground
在上传图片,发现csdn博客可以在图片加水印。下面我就来说下在图片加水印。
发现csdn图片可以加水印,csdn 上传的图片加水印,需要在原先的图片加一句watermark。
我们可以在原先上传的图片,假如地址为https://img-blog.csdn.net/20170103153113813,我们在最后面加上 ?watermark/[数字3显示水印]/text/[水印base64]/font/5a6L5L2T/fontsize/[字体大小]/fill/[颜色 #HHHHHH base64]/dissolve/70/gravity/[方向 South SouthEast North West Center 大小写必须是和我们的一样]
看起来大概就是
字体大小在400左右是比较好。

本作品采用知识共享署名-非商业性使用-相同方式共享 4.0 国际许可协议进行许可。欢迎转载、使用、重新发布,但务必保留文章署名林德熙(包含链接:http://blog.csdn.net/lindexi_gd ),不得用于商业目的,基于本文修改后的作品务必以相同的许可发布。如有任何疑问,请与我联系。
