感觉开始学习的前一个月真的太不珍惜慕课网的资源了 上面蛮多小玩意真的蛮适合我这样刚入门JavaScript的同学加深使用理解
大概收藏了百来门或大或小的课程 有一个感觉就是学这个真的比光是看书看概念更有意思的多
预览效果
大概思路:分为三层来实现 类似PS的图层叠加 最底下一层垫着 并设置透明度 中间一层就是那个选取框中的明亮画布,使用clip属性实现 第三层是选取框及其八个触点
html与css代码
<!DOCTYPE html>
<html>
<head>
    <meta charset="utf-8">
    <meta http-equiv="X-UA-Compatible" content="IE=edge">
    <title>Page Title</title>
    <link rel="stylesheet" type="text/css" href="style.css"/><!--注意这个"/"-->
    <script type="text/javascript" src="jquery-1.8.1.min.js"></script>
    <script type="text/javascript" src="jquery-ui-1.10.4.custom.min.js"></script>
    <script src="edition2.js"></script>
    <style>
        body{
    background-color: gray;
}
#box{
    height: 400px;
    width: 600px;
    position: absolute;
    top: 150px;
    left: 200px;
}
#img1{
    height: 400px;
    width: 600px;
    position: absolute;
    top: 0;
    left: 0;
    opacity: 0.3;
}
#img2{
    height: 400px;
    width: 600px;
    position: absolute;
    top: 0;
    left: 0;
    /* display: none; */
    clip: rect(0,200px,200px,0);
}
#main{
    position: absolute;
    border: 1px solid #fff;
    width: 200px;
    height: 200px;
    cursor: move;
}
.min{
    position: absolute;
    font-size: 0;
    width: 8px;
    height: 8px;
    background-color: #fff;

}
.top{
    left: 50%;
    top: -4px;
    margin-left: -4px;
    cursor: n-resize;
}
.lefttop{
    left:-4px;
    top: -4px;
    cursor: nw-resize;
}
.righttop{
    /* background-color: aqua; */
    right: -4px;
    /* 绝对定位中的right*/
    top: -4px;
    cursor: ne-resize;
}
.left{
    top:50%;
    margin-top: -4px;
    left: -4px;
    cursor: w-resize;
}
.leftdown{
    bottom: -4px;
    left: -4px;
    cursor: sw-resize;
}
.down{
    bottom: -4px;
    left:50%;
    margin-left: -4px;
    cursor:s-resize;
}
.rightdown{
    bottom: -4px;
    right: -4px;
    cursor: se-resize;
}
.right{
    top: 50%;
    margin-top: -4px;
    right: -4px;
    cursor: e-resize;
}
#pre{
    position: absolute;
    left: 850px;
    top: 150px;
    width: 600px;
    height: 400px;
}
#img3{
    position: absolute;
    height: 400px;
    width: 600px;
}
    </style>
</head>
<body>
    <div id="box">
            <img id="img1" src="img1.jpg" alt="pic">
            <img id="img2" src="img1.jpg" alt="pic">
            <div id="main">
                <div id="lefttop" class="min lefttop"></div>
                <div id="top" class="min top" ></div>
                <div id="righttop" class="min righttop"></div>
                <div id="left" class="min left"></div>
                <div id="leftdown" class="min leftdown"></div>
                <div id="down" class="min down"></div>
                <div id="rightdown" class="min rightdown"></div>
                <div id="right" class="min right"></div>
            </div>
    </div>
    <div id="pre">
        <img id="img3" src="img1.jpg" alt="pic">
    </div>
</body>
</html>
比较难的地方主要是在js
将解释直接贴在js注释中了 懂的自然懂
document.onselectstart = new Function('event.returnValue = false;');
window.onload = function(){//其实这里是不是可以用JQuery选择器?
var box = document.getElementById("box");
var main = document.getElementById("main");
var rightController = document.getElementById("right");
var topController = document.getElementById("top");
var leftController = document.getElementById("left");
var downController = document.getElementById("down");
var lefttopController = document.getElementById("lefttop");
var leftdownController = document.getElementById("leftdown");
var righttopController = document.getElementById("righttop");
var rightdownController = document.getElementById("rightdown");
var whetherdown = false;
var contact = "";//被按下的触点
$( "#main" ).draggable({ containment: 'parent' ,drag: setArea});
//添加鼠标按下事件
rightController.onmousedown = function(e){
e.stopPropagation();//冒泡 至于原理我还在研究
whetherdown = true;
contact = "right";
};
topController.onmousedown = function(e){
e.stopPropagation();
whetherdown = true;
contact = "top";
};
leftController.onmousedown = function(e){
e.stopPropagation();
whetherdown = true;
contact = "left";
};
downController.onmousedown = function(e){
e.stopPropagation();
whetherdown = true;
contact = "down";
};
lefttopController.onmousedown = function(e){
e.stopPropagation();
whetherdown = true;
contact = "lefttop";
};
leftdownController.onmousedown = function(e){
e.stopPropagation();
whetherdown = true;
contact = "leftdown";
};
rightdownController.onmousedown = function(e){
e.stopPropagation();
whetherdown = true;
contact = "rightdown";
};
righttopController.onmousedown = function(e){
e.stopPropagation();
whetherdown = true;
contact = "righttop";
};
//鼠标事件加在window上
window.onmousemove = function(e){
e.stopPropagation();
if(whetherdown == true){
switch(contact){
case"right":
rightMove(e);
break;
case"top":
topMove(e);
break;
case"left":
leftMove(e);
break;
case"down":
downMove(e);
break;
case"righttop":
topMove(e);
rightMove(e);
break;
case"rightdown":
rightMove(e);
downMove(e);
break;
case"lefttop":
topMove(e);
leftMove(e);
break;
case"leftdown":
leftMove(e);
downMove(e);
break;
}
var width = main.offsetWidth;
var height = main.offsetHeight;
setArea();
}
};
//松开事件
window.onmouseup = function(e){
whetherdown = false;
contact = ""
};
setArea();
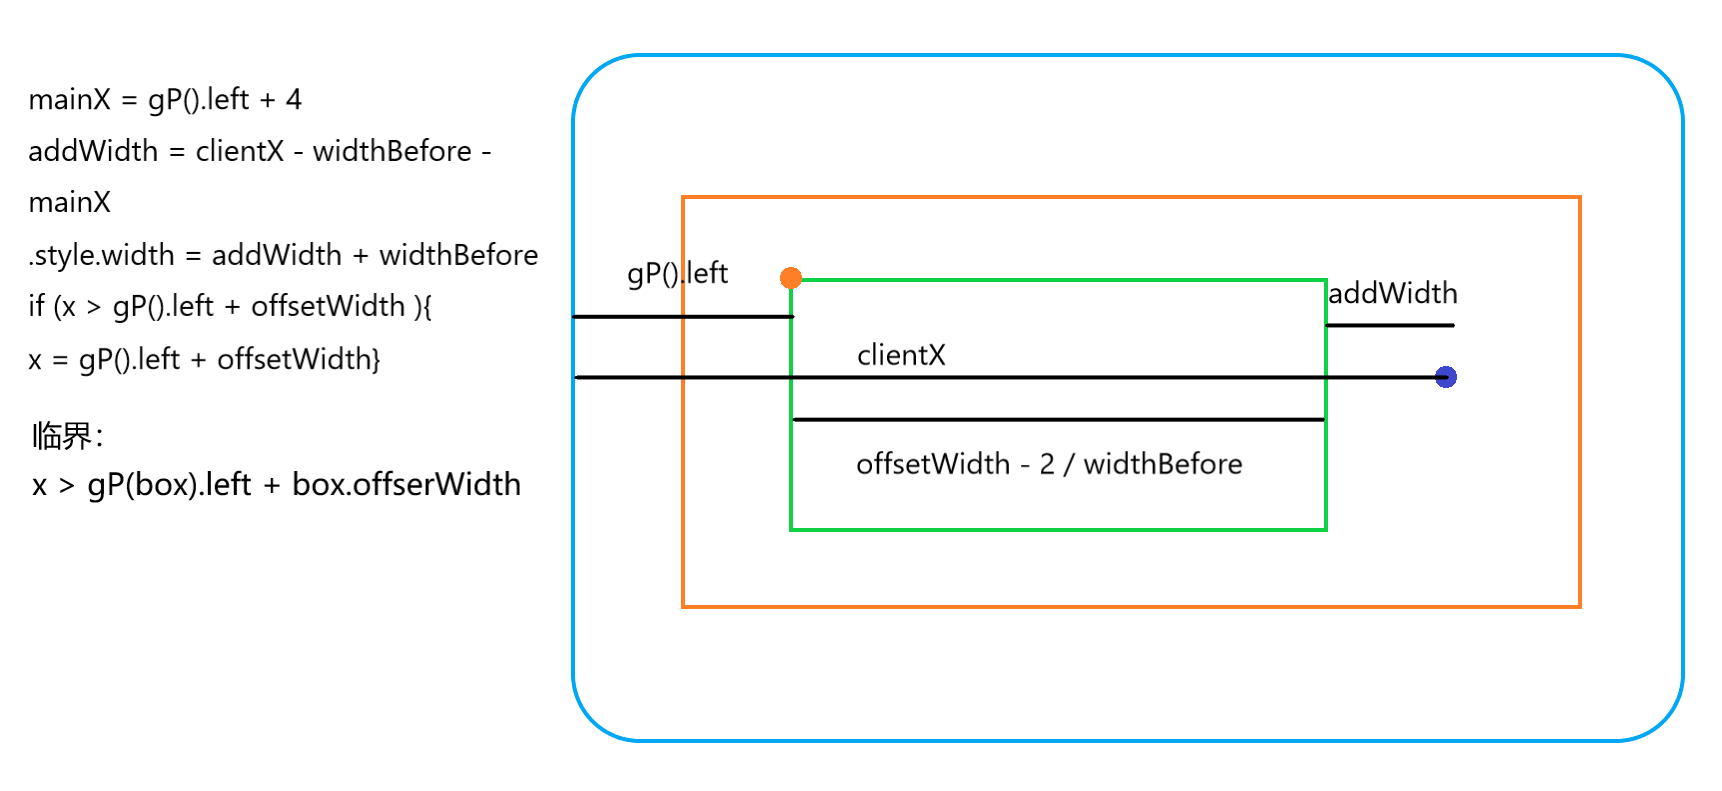
function rightMove(e){
var x = e.clientX;
if(x > getPosition(box).left + box.offsetWidth){
x = getPosition(box).left + box.offsetWidth;
console.log(x);
}
// var addWidth = "";//鼠标移动后增加的宽度
var widthBefore = main.offsetWidth - 2;//变化前宽度
var mainX = getPosition(lefttop).left + 4;
var addWidth = x - mainX - widthBefore;//鼠标移动后增加的宽度
main.style.width = addWidth + widthBefore + "px";//变化后宽度
}
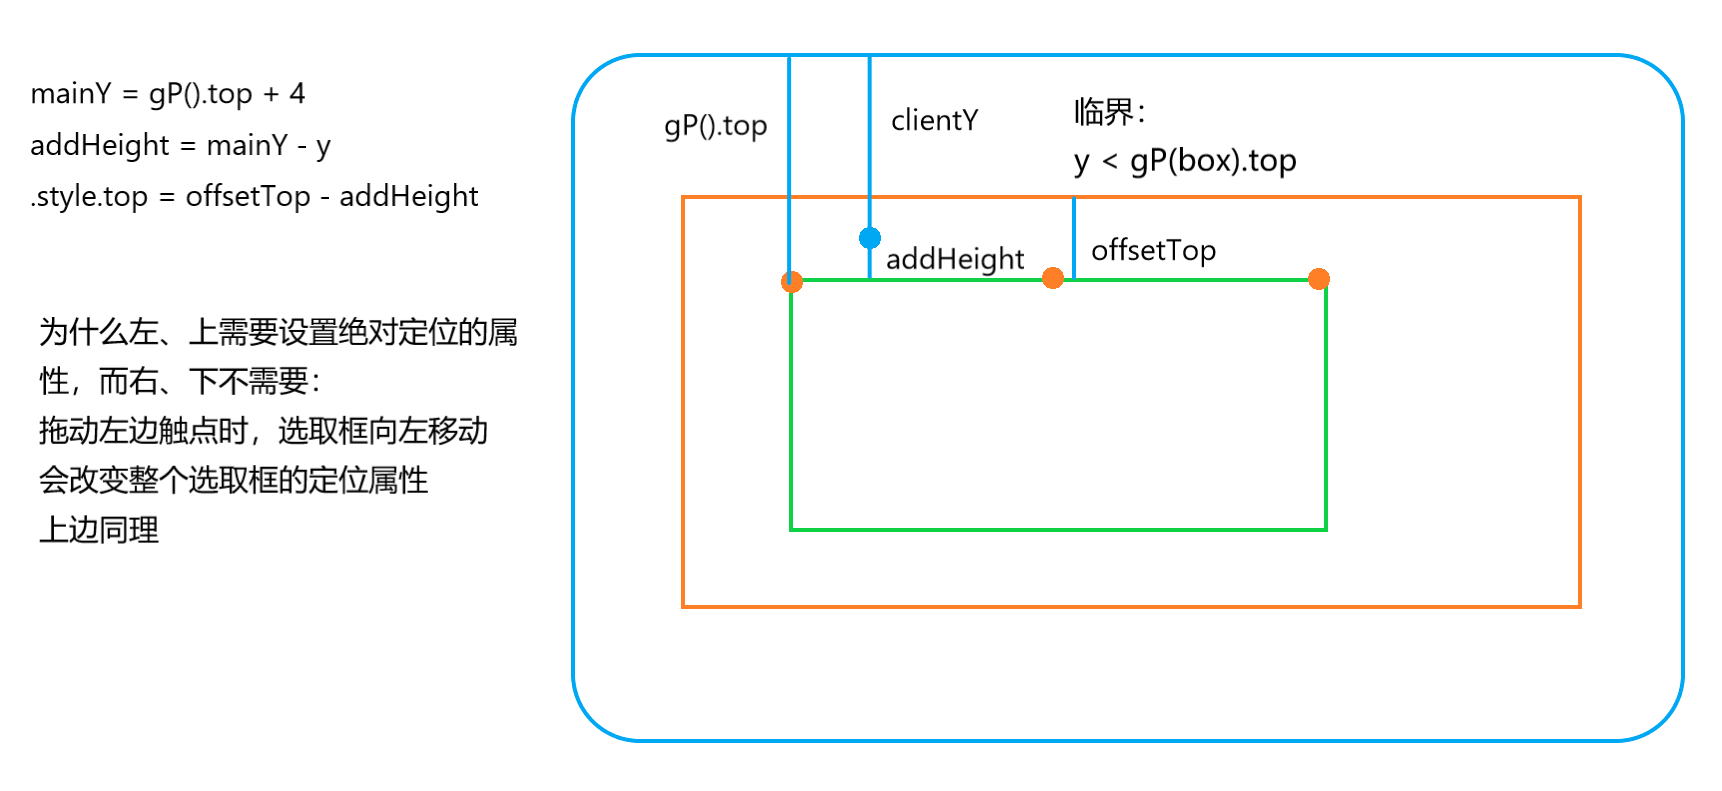
function topMove(e){
var y = e.clientY;
if(y < getPosition(box).top){
y = getPosition(box).top;
}
var mainY = getPosition(lefttop).top + 4;//选取框相对于屏幕上边距离
var addHeight = mainY - y;//增加的高度
var heightBefore = main.offsetHeight - 2;//原来的高度
main.style.height = heightBefore + addHeight + "px";
main.style.top = main.offsetTop - addHeight + "px";
}
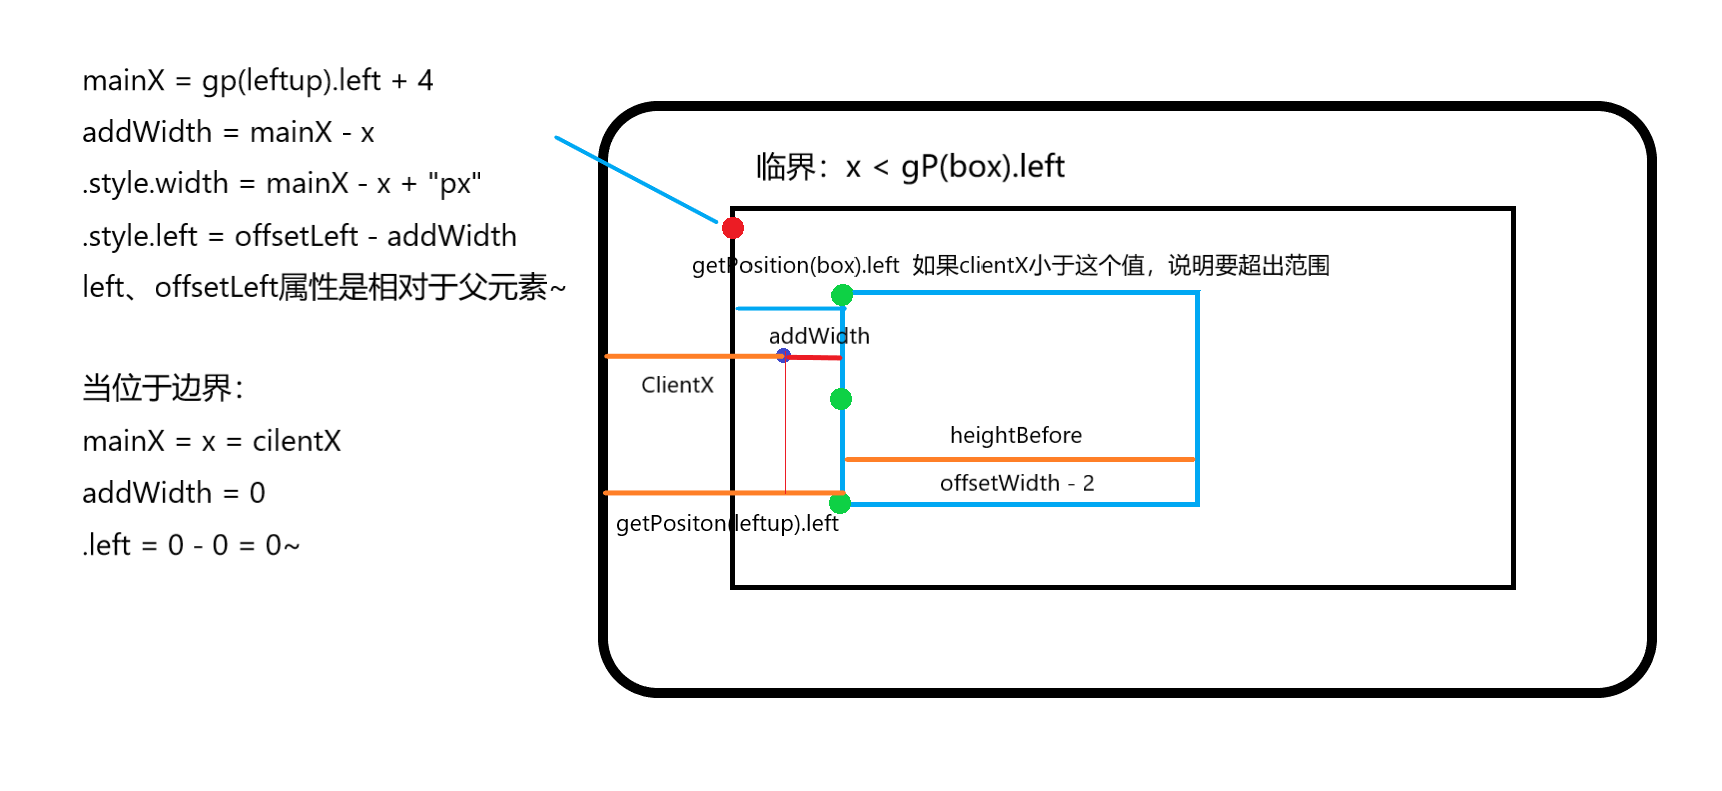
function leftMove(e){
var x = e.clientX;//横坐标
if(x < getPosition(box).left){
x = getPosition(box).left
}
var mainX = getPosition(lefttop).left + 4;
var addWidth = mainX - x;
var widthBefore = main.offsetWidth -2;
main.style.width = widthBefore + addWidth + "px";
main.style.left = main.offsetLeft - addWidth + "px";//调整决定定位的属性
}
function downMove(e){
var y = e.clientY;
if(y > getPosition(box).top + box.offsetHeight){
y = getPosition(box).top + box.offsetHeight
}
var heightBefore = main.offsetHeight - 2;
var mainY = getPosition(lefttop).top +4;
var addHeight = y - heightBefore - mainY;
main.style.height = addHeight + heightBefore + "px";
}
//获取元素相对于屏幕左边距离 通过offsetLeft
function getPosition(node){
var left = node.offsetLeft;
var top = node.offsetTop;
var parent = node.offsetParent;
while(parent != null){
left += parent.offsetLeft;
top += parent.offsetTop;
parent = parent.offsetParent;
}
return {"left":left,"top":top};
}
//设置选取区域高亮
function setArea(){
var top = main.offsetTop;
var right = main.offsetLeft + main.offsetWidth;
var bottom = main.offsetTop + main.offsetHeight;
var left = main.offsetLeft;
var img2 = document.getElementById("img2");
img2.style.clip = "rect(" + top + "px," + right + "px,"
+ bottom + "px," + left + "px)";
preview({"top":top,"right":right,"bottom":bottom,"left":left});//注意这样写的好处
}
//预览函数
function preview(view){
var img3 = document.getElementById("img3");
img3.style.top = -view.top + "px";
img3.style.left = -view.left + "px";
img3.style.clip = "rect(" + view.top + "px," + view.right + "px," + view.bottom + "px," + view.left + "px)";
}
}
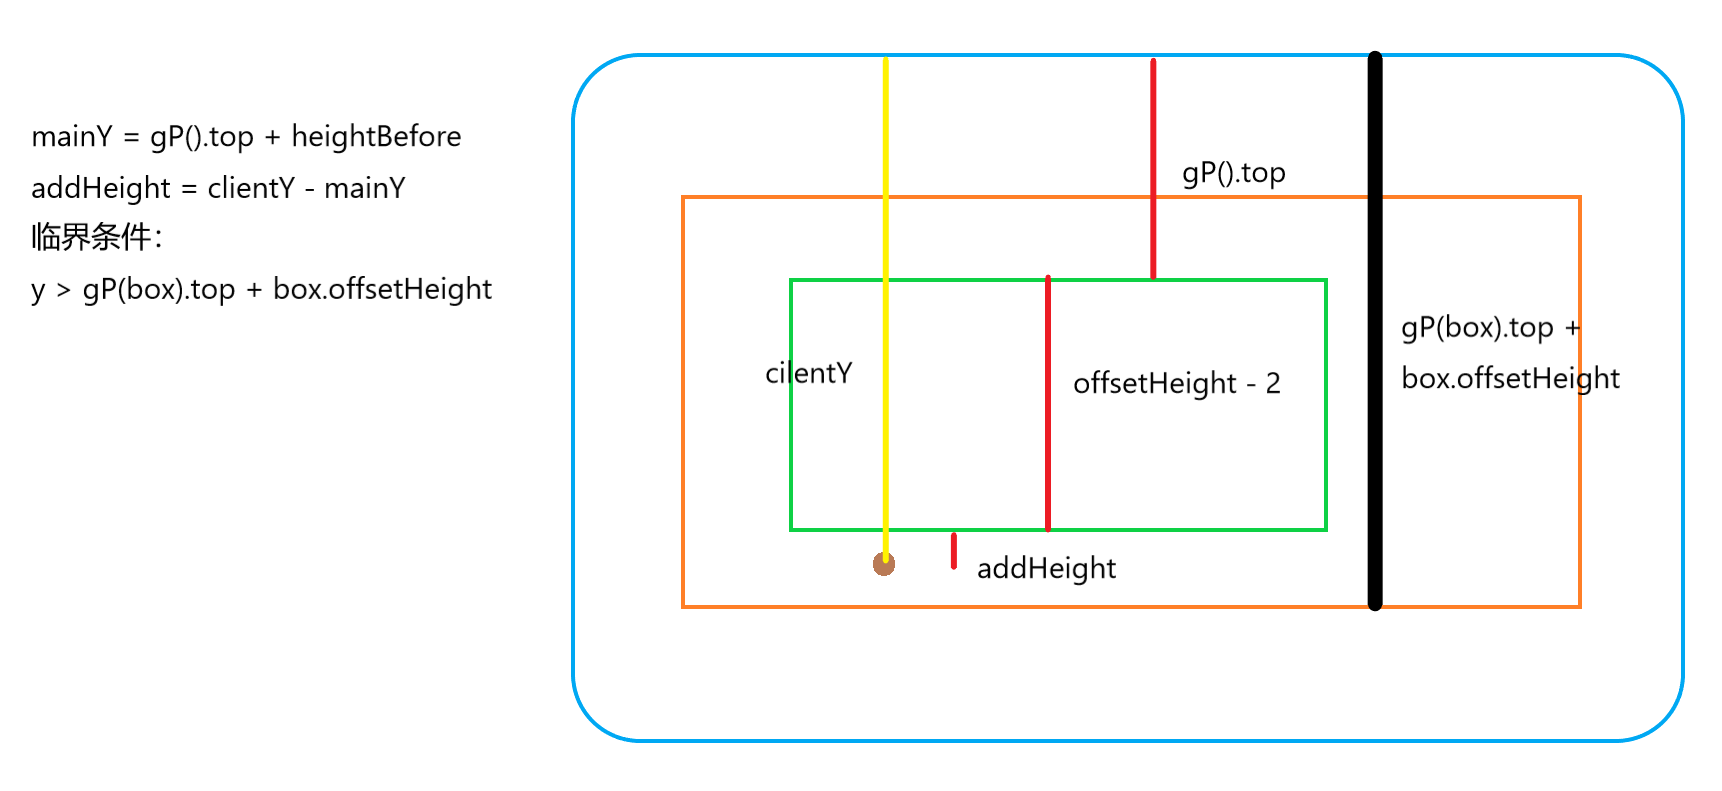
还有一个比较难的地方在于理解 做了几张图便于一目了然的的看懂js中四个方向的拖动为什么要这样写
大概效果就是这样实现的 由于jQuery我还在学习 那个使用jQuery拖动模块的我还需要研究研究 告辞...
我爱前端!