Spring Bean配置有以下三种形式:
- 传统的xml配置
- Spring 2.5 以后新增注解配置
- Spring3.0以后新增JavaConfig
1. 传统的xml配置
<?xml version="1.0" encoding="UTF-8"?>
<beans xmlns="http://www.springframework.org/schema/beans"
       xmlns:xsi="http://www.w3.org/2001/XMLSchema-instance"
       xsi:schemaLocation="http://www.springframework.org/schema/beans http://www.springframework.org/schema/beans/spring-beans.xsd">

    <bean id="helloWorld"  class="com.example.whx.HelloWorld"/>

</beans>
2.基于注解的配置
@Component是Spring容器的基本注解,表示容器中的一个Bean组件。使用@Comopnent相当于代替了XML配置中的<bean>元素
HelloWorld.java
package annotationConfig;

import org.springframework.stereotype.Component;

/**
 * 如果属性名称是value,value可以省略。
 * 如果不指定value,默认值是类名首先字母变为小写。
 * @Component(value="beanId") 就是把当前类实例化。相当于<bean id="beanId">
 */
@Component
public class HelloWorld {

    public void sayHello() {
        System.out.println("Hello World");
    }
}
Spring在2.5后提供了一个context的命名空间,它提供了通过扫描类包来加载使用注解定义的bean的方式。
<!-- 开启注解扫描  -->
<context:component-scan base-package="com.example.annotationconfig"/>
Spring2.5 添加了对JSR250注解的支持,有@Resource @PostConstruct @ PreDestroy
自动装配注解
Spring自带的@AutoWired
JSR250的@Resource注解
JSR330的@Inject注解
Spring容器是默认禁用注解装配的。要使用基于注解的自动装配,我们在xml文件中配置:
<context:annotation-config>
使用<context:annotation-config>相当于代替了xml配置的<property>和<constructor-arg>元素
<context:comoponent-scan>除了包含<context:annotatiion-config>的作用外,还能自动扫描和注册base-package下@Component注解的类,将其bean注册到spring容器里,所以配置文件如果有component-scan就不需要annotation-config
3.基于java config
通过java类定义spring配置元数据,且直接消除xml配置文件
Spring3.0基于java的配置直接支持下面的注解:
@Configuration
@Bean
@DependsOn
@Primary
@Lazy
@Import
@ImportResource
@Value
@Configuration
public class AppConfig {
  @Bean
  public MyService myService() {
      return new MyServiceImpl();
  }
}
测试类,查看配置是否成功:
public class Test {

    public static void main(String[] args) {
        //加载配置
        ApplicationContext ctx = new AnnotationConfigApplicationContext(AppConfig.class);
        MyService myService = ctx.getBean(MyService.class);
        myService.sayHello();
    }

}
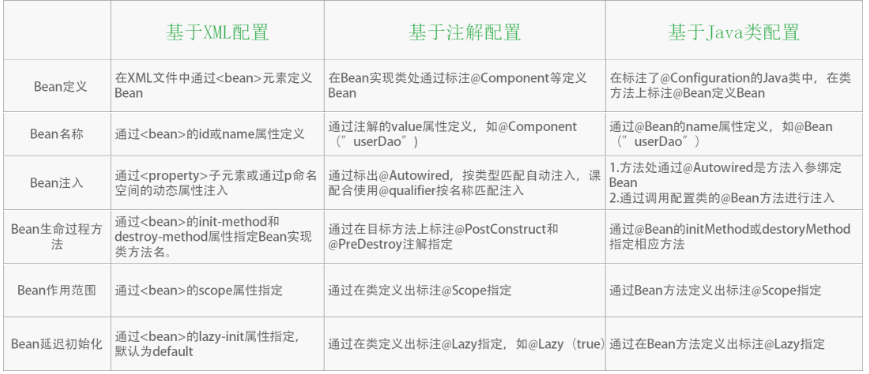
总结:不同配置方式比较
我们来看一下不同配置方式在不同方面的使用

本文系转载。
