• Build your first web service with PHP, JSON and MySql


     原文连接: https://trinitytuts.com/build-first-web-service-php/

    Web services ( application services ) is one of the most important part of today development where we ceneteralized or data and allow user to access that data from different sources like web, software, app etc.. Web service provide Interoperability between two different language.  Web service are easy to understand or to made we can easily create a web service of our website. There are no of method through which you can create you web service

    1. SOAP { Simple Object Access Protocol }.
    2. REST { Representational State Transfer }

     
    Download

    We are going to create a web service using REST method but i also give you small overview of SOAP method first.

    What is SOAP?.

    SOAP is Simple Object Access Protocol based on XML so it easy to read. It is simple XML based protocol to exchange data between two different language.

    What is REST?.

    REST { Representational State Transfer } is a simple stateless architecture that generally runs over HTTP. REST web service system produce status code response in JSON or XML format.

    Create webservice using REST is very easy and take less time to make as compare to other.

    REST support all most commonly used HTTP methods (GET, POST, PUT and DELETE). We use all these method according to need.

    Application using REST

    Now i am going to create a small application using REST. In this application we can create a SignUp, Get user Info and Update user status. Before creating this application it is recommended that you have basic understanding of PHP, MYSQL, JSON. I later explain you that how we can use this in android to access data from PHP based webservice.

    Step 1. I hope that you already install WAMP or XAMPP in your computer.

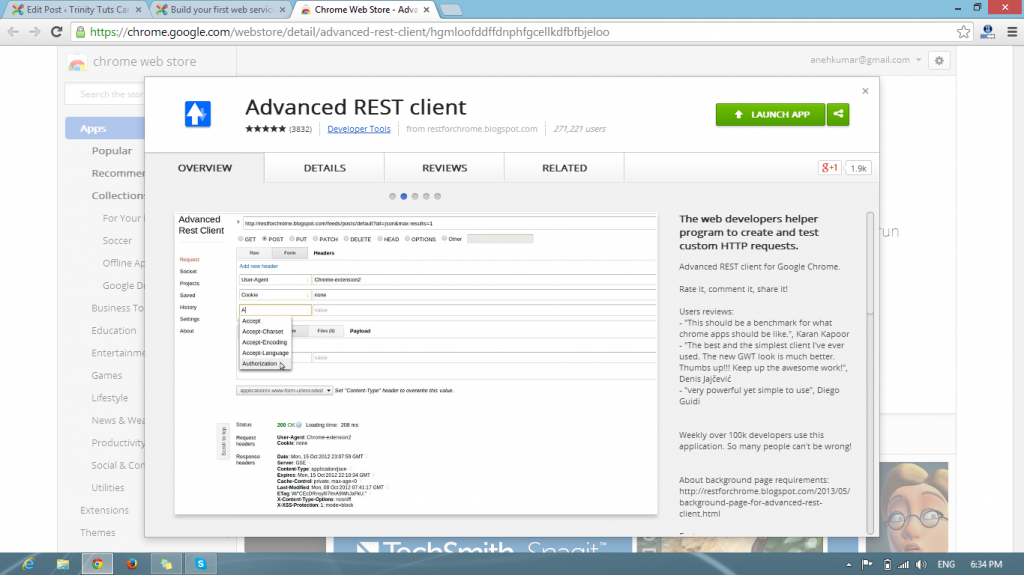
    Step 2.  Now we need to install chrome  extension for testing or web service so i use Advance REST Client.

    REST Client is very useful to test or webservice. You simply follow the link i mention above and install extension in your Chrome browser.

    resttest

    Step 3. Now we are going to create our database http://localhost/phpmyadmin .

    1
    2
    3
    4
    5
    6
    7
    8
    9
    10
    11
    12
    13
    14
    15
    16
    17
    18
    19
    20
    --
    -- Database: `tuts_rest`
    --
     
    create database IF NOT EXISTS `tuts_rest`
     
    -- --------------------------------------------------------
     
    --
    -- Table structure for table `users`
    --
     
    CREATE TABLE IF NOT EXISTS `users` (
      `ID` int(11) NOT NULL AUTO_INCREMENT,
      `name` text NOT NULL,
      `email` varchar(100) NOT NULL,
      `password` varchar(100) NOT NULL,
      `status` text NOT NULL,
      PRIMARY KEY (`ID`)
    ) ENGINE=InnoDB DEFAULT CHARSET=latin1 AUTO_INCREMENT=1 ;

    Copy paste this sql query to your phpmyadmin-> sql.

    Step 4. Now we need to create a data handler file in php and  url where we can handle request information.

    Code : confi.php

    1
    2
    3
    <?php
    $conn = mysql_connect("localhost", "root", "");
    mysql_select_db('tuts_rest', $conn);

    first we need to connection to our database. Now we can create a file to save requested data to data base

    signup.php

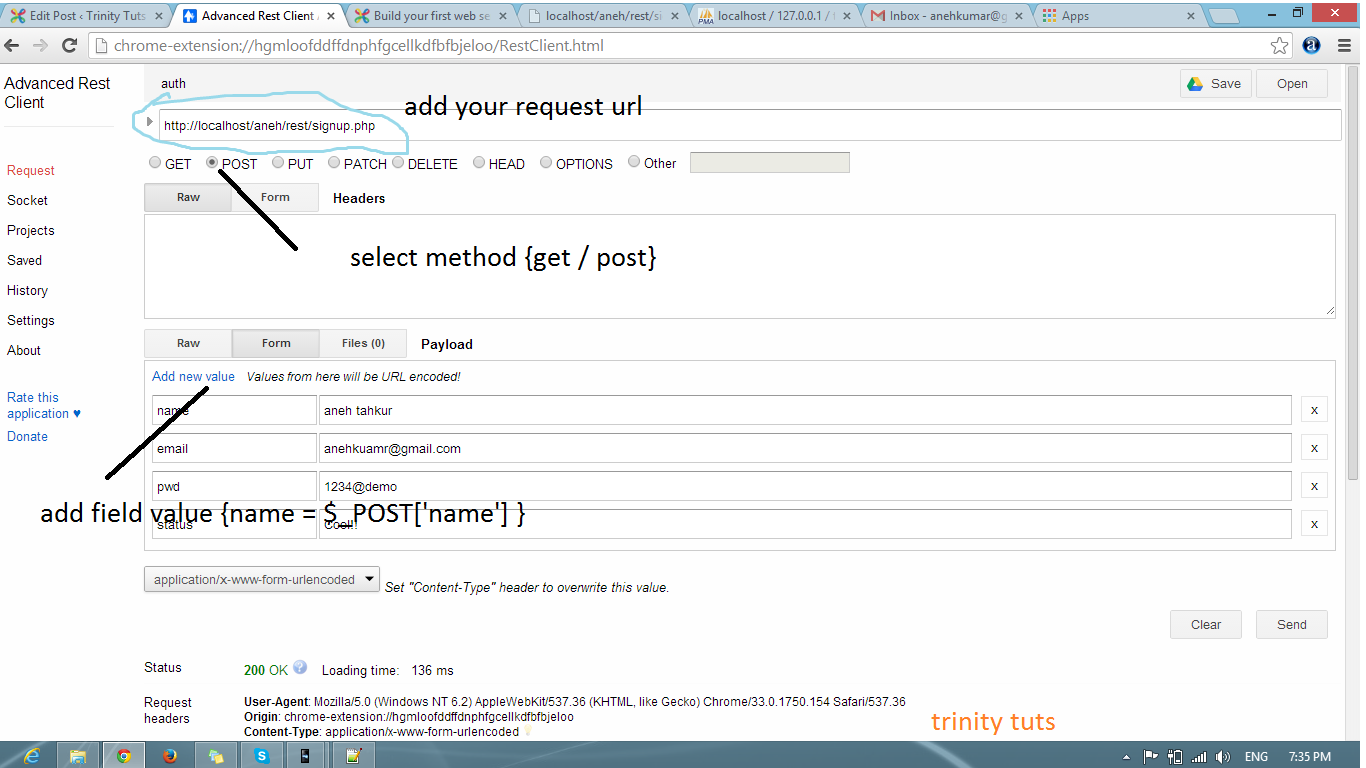
    Requested URL : http://localhost/aneh/rest/signup.php

    1
    2
    3
    4
    5
    6
    7
    8
    9
    10
    11
    12
    13
    14
    15
    16
    17
    18
    19
    20
    21
    22
    23
    24
    25
    26
    27
    28
    29
    <?php
     
    // Include confi.php
    include_once('confi.php');
     
    if($_SERVER['REQUEST_METHOD'] == "POST"){
    // Get data
    $name = isset($_POST['name']) ? mysql_real_escape_string($_POST['name']) : "";
    $email = isset($_POST['email']) ? mysql_real_escape_string($_POST['email']) : "";
    $password = isset($_POST['pwd']) ? mysql_real_escape_string($_POST['pwd']) : "";
    $status = isset($_POST['status']) ? mysql_real_escape_string($_POST['status']) : "";
     
    // Insert data into data base
    $sql = "INSERT INTO `tuts_rest`.`users` (`ID`, `name`, `email`, `password`, `status`) VALUES (NULL, '$name', '$email', '$password', '$status');";
    $qur = mysql_query($sql);
    if($qur){
    $json = array("status" => 1, "msg" => "Done User added!");
    }else{
    $json = array("status" => 0, "msg" => "Error adding user!");
    }
    }else{
    $json = array("status" => 0, "msg" => "Request method not accepted");
    }
     
    @mysql_close($conn);
     
    /* Output header */
    header('Content-type: application/json');
    echo json_encode($json);

    In signup page i did not add any validation you can add your validation here if you like the main and important thing in this page is

    header(‘Content-type: application/json’);

    we tell php that this page is return as json, and we also usejson_encode() to return our data in json format.

    Now after this we need Advance Rest Client to send data to our page. Go to your chrome app store where you add your extensions

    zdsad

    click on Advance Rest client. Now add your request

    url: http://localhost/aneh/rest/signup.php, Select the Request method, Click on  Add new vaule define your value and data in it and click on send.

    adsad

    after doing all this you need send data to server and this output like this

    khk
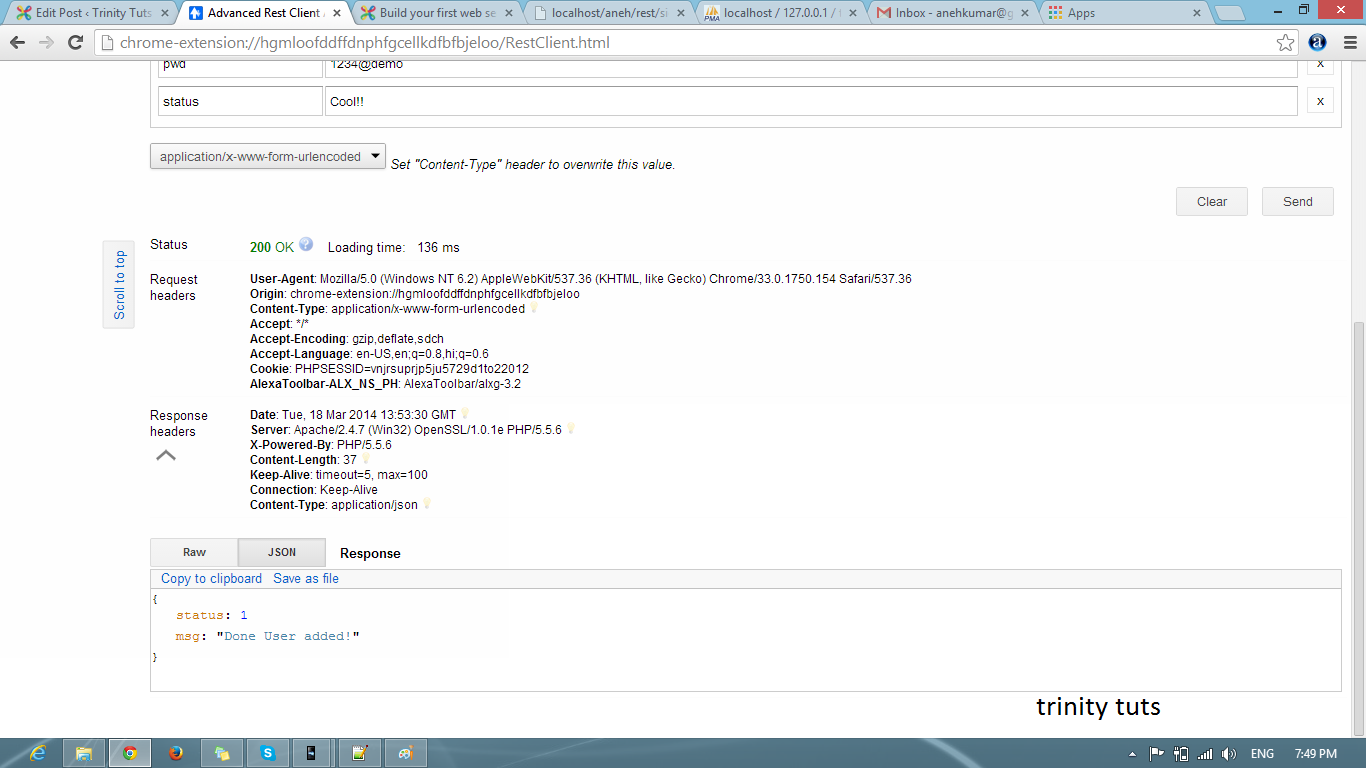
    That all if you get done message!.

    Now we get user info using GET method. I create a new php file to get user info once you have command on this you easily work on single page.

    Info.php

    Requester URL: url: http://localhost/aneh/rest/info.php?uid=Request_ID

    1
    2
    3
    4
    5
    6
    7
    8
    9
    10
    11
    12
    13
    14
    15
    16
    17
    18
    19
    20
    21
    <?php
    // Include confi.php
    include_once('confi.php');
     
    $uid = isset($_GET['uid']) ? mysql_real_escape_string($_GET['uid']) :  "";
    if(!empty($uid)){
    $qur = mysql_query("select name, email, status from `users` where ID='$uid'");
    $result =array();
    while($r = mysql_fetch_array($qur)){
    extract($r);
    $result[] = array("name" => $name, "email" => $email, 'status' => $status);
    }
    $json = array("status" => 1, "info" => $result);
    }else{
    $json = array("status" => 0, "msg" => "User ID not define");
    }
    @mysql_close($conn);
     
    /* Output header */
    header('Content-type: application/json');
    echo json_encode($json);

    In this we pass user id in url. Add this url in Advance REST Client and click on send and get output like this:

    1
    2
    3
    4
    5
    6
    7
    8
    9
    10
    {
    status: 1
    info: [1]
    0:  {
    name: "aneh tahkur"
    email: "anehkuamr@gmail.com"
    status: "Cool!!"
    }-
    -
    }

    Now we can update user info using PUT method. To read about Put method follow this link.

    status.php

    Request URL: http://localhost/aneh/rest/status.php

    Update user status

    1
    2
    3
    4
    5
    6
    7
    8
    9
    10
    11
    12
    13
    14
    15
    16
    17
    18
    19
    20
    21
    22
    23
    24
    25
    26
    27
    28
    <?php
     
    // Include confi.php
    include_once('confi.php');
     
    if($_SERVER['REQUEST_METHOD'] == "PUT"){
    $uid = isset($_SERVER['HTTP_UID']) ? mysql_real_escape_string($_SERVER['HTTP_UID']) : "";
    $status = isset($_SERVER['HTTP_STATUS']) ? mysql_real_escape_string($_SERVER['HTTP_STATUS']) : "";
     
    // Add your validations
    if(!empty($uid)){
    $qur = mysql_query("UPDATE  `tuts_rest`.`users` SET  `status` =  '$status' WHERE  `users`.`ID` ='$uid';");
    if($qur){
    $json = array("status" => 1, "msg" => "Status updated!!.");
    }else{
    $json = array("status" => 0, "msg" => "Error updating status");
    }
    }else{
    $json = array("status" => 0, "msg" => "User ID not define");
    }
    }else{
    $json = array("status" => 0, "msg" => "User ID not define");
    }
    @mysql_close($conn);
     
    /* Output header */
    header('Content-type: application/json');
    echo json_encode($json);

    In above i am using PUT method in PUT we access data like this: $_SERVER[‘HTTP_DATAVARIABLE’].

    Sending PUT Request from Advance Rest Client.

    Put request

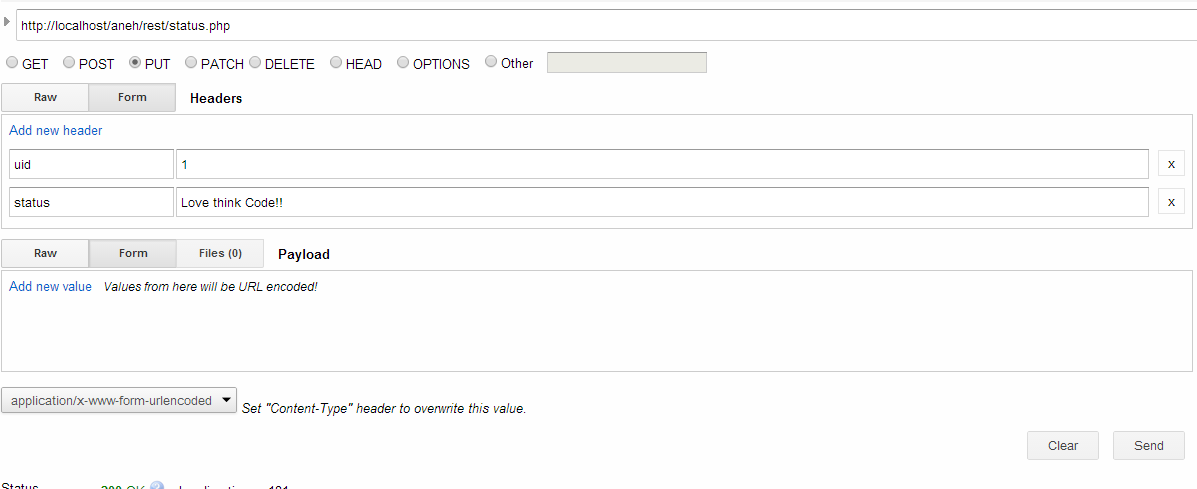
    In this we add url where we want to make request and then select Request method PUT and then add header as shown in above image.

    Out Put of above is

    1
    2
    3
    4
    {
    status: 1
    msg: "Status updated!!."
    }

    This is very simple and easy example webservice example.

    Thanku!

    Happy Coading.

  • 相关阅读:
    python学习之计算机基础详解
    python学习笔记-day03
    名称空间与作用域
    函数参数的应用
    day14
    day13
    函数的基本使用
    day12
    day 09
    文件操作
  • 原文地址:https://www.cnblogs.com/likeatree/p/4442762.html
Copyright © 2020-2023  润新知