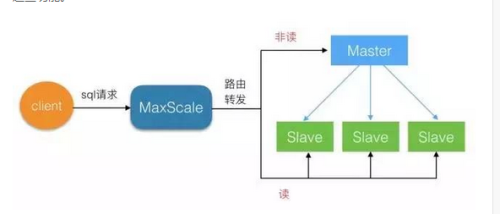
一、MaxScale作用
MaxScale是maridb开发的一个MySQL数据中间件,配置好MySQL的主从复制架构后,希望实现读写分离,把读操作分散到从服务器中,并且对多个服务器实现负载均衡。
MaxScale是插件式结构,允许用户开发适合自己的插件。
读写分离和负载均衡是MySQL集群的基础需求,基础架构:
二、MaxScale的基础组成
MaxScale 目前提供的插件功能分为5类:
认证插件
提供了登录认证功能,MaxScale 会读取并缓存数据库中 user 表中的信息,当有连接进来时,先从缓存信息中进行验证,如果没有此用户,会从后端数据库中更新信息,再次进行验证
协议插件
包括客户端连接协议,和连接数据库的协议
路由插件
决定如何把客户端的请求转发给后端数据库服务器,读写分离和负载均衡的功能就是由这个模块实现的
监控插件
对各个数据库服务器进行监控,例如发现某个数据库服务器响应很慢,那么就不向其转发请求了
日志和过滤插件
提供简单的数据库防火墙功能,可以对SQL进行过滤和容错
三、配置和测试过程:
基础要求:
master:192.168.1.107
slave:192.168.1.108
slave:192.168.1.114
db verson:yum rpm
MaxScale version:RPM包
1、安装数据库、主从搭建(略)
主库搭建好后添加MS用户和Maxscale的路由用户、监控账号
grant replication slave, replication client on *.* to rep@'%' identified by 'root123';
grant replication slave, replication client on *.* to maxscale_monitor@'%' identified by 'root123';
grant select,show databases on *.* to maxscale@'%' identified by 'root123';
2、MaxScale:
安装maxscale看了网络上的各种文档,只能呵呵....
这里提供maxscale的RPM的包,安装简单,直接yum -y install +包名即可
b、yum - y install
c、修改maxscale配置文件(详细见maxscale.cnf)
3、主从读写分离验证:
1、在主节点通过3306登陆DB,添加表 添加数据:
CREATE TABLE `write_read` (
`id` int(11) DEFAULT NULL
) ENGINE=InnoDB DEFAULT CHARSET=utf8
insert into write_read values(87);
同时也在其他2个SLAVE插入86 88的数据
2、通过mysql命令行访问maxscale所在节点的读写分离listener 4006端口
/usr/local/mysql/bin/mysql -udlan -proot123 -hip -P4006
MySQL [maxscale]> select * from write_read;
+------+
| id |
+------+
| 87 |
| 86 |
+------+
select 语句在其中的一个从库上了
3、同时操作INSERT语句
MySQL [maxscale]> insert into write_read values(90)
-> ;
Query OK, 1 row affected (0.04 sec)
server1:
MySQL [maxscale]> select * from write_read;
+------+
| id |
+------+
| 87 |
| 86 |
| 90 |
+------+
3 rows in set (0.00 sec)
###通过登陆3个DB的3306比较结果集:
MariaDB [maxscale]> select * from write_read;
+------+
| id |
+------+
| 87 |
| 90 |
+------+
2 rows in set (0.01 sec)
server2:
MariaDB [maxscale]> select * from write_read;
+------+
| id |
+------+
| 87 |
| 86 |
| 90 |
+------+
3 rows in set (0.00 sec)
server3:
MariaDB [maxscale]> select * from write_read;
+------+
| id |
+------+
| 87 |
| 88 |
| 90 |
+------+
3 rows in set (0.00 sec)
####maxcale实现了读写分离效果,若开始一个事物的话,maxscale就会自动路由到master上,普通的查询还是在SLAVE上
4、验证当一台slave出现故障后,查看MAXSCALE的状态,及恢复后状态
注意使用yum 安装是在/var/log/maxscale2.log,log_info=1logdir=/tmp/ ###通过开启 log_info 级别,可以看到 MaxScale 的路由日志
运行正常情况下:
[root@haproxy_2 ~]# maxadmin -pmariadb list servers;
Servers.
-------------------+-----------------+-------+-------------+--------------------
Server | Address | Port | Connections | Status
-------------------+-----------------+-------+-------------+--------------------
server1 | 192.168.1.108 | 3306 | 0 | Master, Running
server2 | 192.168.1.107 | 3306 | 0 | Slave, Running
server3 | 192.168.1.114 | 3306 | 0 | Slave, Running
-------------------+-----------------+-------+-------------+--------------------
停止server2 的复制:
[root@haproxy_2 ~]# maxadmin -pmariadb list servers;
Servers.
-------------------+-----------------+-------+-------------+--------------------
Server | Address | Port | Connections | Status
-------------------+-----------------+-------+-------------+--------------------
server1 | 192.168.1.108 | 3306 | 0 | Master, Running
server2 | 192.168.1.107 | 3306 | 0 | Running
server3 | 192.168.1.114 | 3306 | 0 | Slave, Running
-------------------+-----------------+-------+-------------+--------------------
状态改变了。。。。
查看日志:
2016-09-15 04:10:08 notice : Server changed state: server2[192.168.1.107:3306]: lost_slave. [Slave, Running] -> [Running]
再次登陆maxcale的4006查看客户端查询结果:
MySQL [maxscale]> select * from write_read;
+------+
| id |
+------+
| 87 |
| 88 |
| 90 |
+------+
3 rows in set (0.00 sec)
MySQL [maxscale]> select @@hostname;
+------------+
| @@hostname |
+------------+
| mycat |
+------------+
由此可见maxcale功能,在SLAVE故障后自动排除不再向其转发请求
##恢复server2。。。。
[root@haproxy_2 ~]# maxadmin -pmariadb list servers;
Servers.
-------------------+-----------------+-------+-------------+--------------------
Server | Address | Port | Connections | Status
-------------------+-----------------+-------+-------------+--------------------
server1 | 192.168.1.108 | 3306 | 0 | Master, Running
server2 | 192.168.1.107 | 3306 | 0 | Slave, Running
server3 | 192.168.1.114 | 3306 | 0 | Slave, Running
-------------------+-----------------+-------+-------------+-------------------
5、全部的SLAVE故障情况:
[root@haproxy_2 ~]# maxadmin -pmariadb list servers;
Servers.
-------------------+-----------------+-------+-------------+--------------------
Server | Address | Port | Connections | Status
-------------------+-----------------+-------+-------------+--------------------
server1 | 192.168.1.108 | 3306 | 0 | Running
server2 | 192.168.1.107 | 3306 | 0 | Running
server3 | 192.168.1.114 | 3306 | 0 | Running
-------------------+-----------------+-------+-------------+--------------------
全部GG了。。。。
说明SLAVE全部失效后,会导致MASTER也无法识别,整个服务失效,但实际还有个M还活着,还能提供服务,需要在monitor模块里添加一个重要参数
detect_stale_master=true
[root@haproxy_2 ~]# maxadmin -pmariadb list servers;
Servers.
-------------------+-----------------+-------+-------------+--------------------
Server | Address | Port | Connections | Status
-------------------+-----------------+-------+-------------+--------------------
server1 | 192.168.1.108 | 3306 | 0 | Master, Stale Status, Running
server2 | 192.168.1.107 | 3306 | 0 | Running
server3 | 192.168.1.114 | 3306 | 0 | Running
-------------------+-----------------+-------+-------------+--------------------
.
####
通过定义的telnet登陆方式与maxadmin的登陆方式一样:
telnet 127.0.0.1 4442 默认用户名密码admin/mariadb
MaxScale> add user max password
Account max for remote (network) usage has been successfully added.
MaxScale> show users
Enabled Linux accounts (secure) :
Created network accounts (insecure): max
就可以通过telnet 使用新的用户登录
查看更多的命令show --help
list threads.......
查看服务状态信息show server servername
MaxScale> show server server1
Server 0x1536ed0 (server1)
Server: 192.168.1.108
Status: Master, Stale Status, Running
Protocol: MySQLBackend
Port: 3306
Server Version: 10.1.16-MariaDB
Node Id: 28703306
Master Id: -1
Slave Ids:
Repl Depth: -1
Number of connections: 1
Current no. of conns: 0
Current no. of operations: 0
如何实现单点故障,解决资源切换,需要配合MHA实现
