集合注入重要是对数组、List、Set、map的注入,具体注入方法请参照一下代码(重点是applicationContext.xml中对这几个集合注入的方式):
1.在工程中新建一个Department类,该类包含在com.LHB.collection包当中
 1 package com.LHB.collection;
 2 import java.util.List;
 3 import java.util.Map;
 4 import java.util.Properties;
 5 import java.util.Set;
 6 public class Department {
 7     private String name;
 8     private String[] empName;
 9     private List<Employee> empList;    //List集合
10     private Set<Employee> empSets;     //Set集合
11     private Map<String,Employee> empMap; //map集合
12     private Properties pp;    //Properties的使用
13
14     public Properties getPp() {
15         return pp;
16     }
17     public void setPp(Properties pp) {
18         this.pp = pp;
19     }
20     public Map<String, Employee> getEmpMap() {
21         return empMap;
22     }
23     public void setEmpMap(Map<String, Employee> empMap) {
24         this.empMap = empMap;
25     }
26     public Set<Employee> getEmpSets() {
27         return empSets;
28     }
29     public void setEmpSets(Set<Employee> empSets) {
30         this.empSets = empSets;
31     }
32     public List<Employee> getEmpList() {
33         return empList;
34     }
35     public void setEmpList(List<Employee> empList) {
36         this.empList = empList;
37     }
38     public String getName() {
39         return name;
40     }
41     public void setName(String name) {
42         this.name = name;
43     }
44     public String[] getEmpName() {
45         return empName;
46     }
47     public void setEmpName(String[] empName) {
48         this.empName = empName;
49     }
50 }
2.继续在包中创建Employee类
 1 package com.LHB.collection;
 2 public class Employee {
 3     private String name;
 4     private int id;
 5     public int getId() {
 6         return id;
 7     }
 8     public void setId(int id) {
 9         this.id = id;
10     }
11     public String getName() {
12         return name;
13     }
14     public void setName(String name) {
15         this.name = name;
16     }
17
18 }
3.创建applicationContext.xml配置文件,配置重点在数组,List,Set,Map,propertes装载值的环节
 1 <?xml version="1.0" encoding="UTF-8"?>
 2 <beans xmlns="http://www.springframework.org/schema/beans"
 3        xmlns:xsi="http://www.w3.org/2001/XMLSchema-instance"
 4        xmlns:context="http://www.springframework.org/schema/context"
 5        xsi:schemaLocation="http://www.springframework.org/schema/beans
 6                 http://www.springframework.org/schema/beans/spring-beans.xsd
 7                 http://www.springframework.org/schema/context
 8                 http://www.springframework.org/schema/context/spring-context.xsd">
 9
10    <bean id="department" class="com.LHB.collection.Department">
11        <property name="name" value="财务部门" />
12        <!-- 给数组注入值 -->
13        <property name="empName">
14            <list>
15                <value>小米</value>
16                <value>小明</value>
17                <value>小四</value>
18            </list>
19        </property>
20
21        <!-- 给list注入值 可以有相同的多个对象  -->
22        <property name="empList">
23            <list>
24                <ref bean="emp1" />
25                <ref bean="emp2"/>
26            </list>
27        </property>
28        <!-- 给set注入值 不能有相同的对象 -->
29        <property name="empSets">
30            <set>
31                <ref bean="emp1" />
32                <ref bean="emp2"/>
33            </set>
34        </property>
35
36        <!-- 给map注入值 只要map中的key值不一样就可以装配value -->
37        <property name="empMap">
38            <map>
39                <entry key="1" value-ref="emp1" />
40                <entry key="2" value-ref="emp2" />
41            </map>
42        </property>
43
44        <!-- 给属性集合配置 -->
45        <property name="pp">
46            <props>
47                <prop key="pp1">hello</prop>
48                <prop key="pp2">world</prop>
49            </props>
50        </property>
51    </bean>
52    <bean id="emp1" class="com.LHB.collection.Employee">
53        <property name="name">
54            <value>北京</value>
55        </property>
56    </bean>
57     <bean id="emp2" class="com.LHB.collection.Employee">
58        <property name="name">
59            <value>天津</value>
60        </property>
61    </bean>
62
63 </beans>
4.继续在该包中新建App1.java测试类
 1 package com.LHB.collection;
 2 import java.util.Enumeration;
 3 import java.util.Iterator;
 4 import java.util.Map;
 5 import java.util.Map.Entry;
 6 import java.util.Properties;
 7
 8 import org.springframework.context.ApplicationContext;
 9 import org.springframework.context.support.ClassPathXmlApplicationContext;
10 public class App1 {
11
12     public static void main(String[] args) {
13         // TODO Auto-generated method stub
14
15         //通过类路径应用上下文获取配置文件applicationContext.xml
16         ApplicationContext ac = new ClassPathXmlApplicationContext("com/LHB/collection/applicationContext.xml");
17         //通过getBean()获取到applicationContext.xml文件中Bean对象
18         Department dm = (Department) ac.getBean("department");
19         System.out.println(dm.getName());
20         //取出数组中的值
21         for(String emName : dm.getEmpName()){
22             System.out.println(emName);
23         }
24
25         System.out.println("*********通过List集合取出数据******");
26         for(Employee e : dm.getEmpList()){
27             System.out.println("name = "+ e.getName());
28         }
29
30         System.out.println("*********通过Set集合取出数据******");
31         for(Employee e : dm.getEmpSets()){
32             System.out.println("name = "+ e.getName());
33         }
34
35         System.out.println("*********通过Map集合取出数据(迭代器)******");
36         //迭代器
37         Map<String,Employee> empMap = dm.getEmpMap();
38         Iterator it = empMap.keySet().iterator();
39         while(it.hasNext()){
40             String key = (String) it.next();
41             Employee emp = empMap.get(key);
42             System.out.println("key = " + key + " " + emp.getName());
43         }
44         System.out.println("*********通过Map集合取出数据(Emtry简洁法)******");
45         //简洁方法
46         for(Entry<String,Employee> entry : dm.getEmpMap().entrySet()){
47
48             System.out.println(entry.getKey()+ " " + entry.getValue().getName());
49         }
50
51         System.out.println("*********通过Propertis取出数据(通过Entry对象取)******");
52         Properties pp = dm.getPp();
53         for(Entry<Object,Object> entry : pp.entrySet()){
54             System.out.println(entry.getKey().toString() + ", "+ entry.getValue().toString());
55         }
56         System.out.println("*********通过Propertis取出数据(通过Enumeration对象取)******");
57         Enumeration en = pp.keys();
58         while(en.hasMoreElements()){
59             String key = (String) en.nextElement();
60             System.out.println(key + " " + pp.getProperty(key));
61         }
62     }
63 }
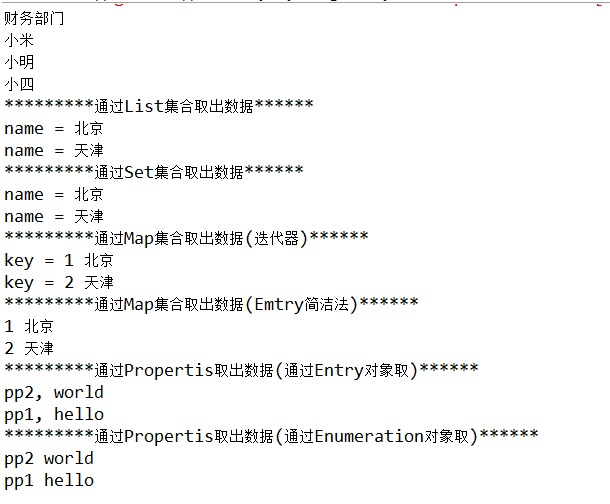
运行结果如下: