理解K8s中的三个IP概念

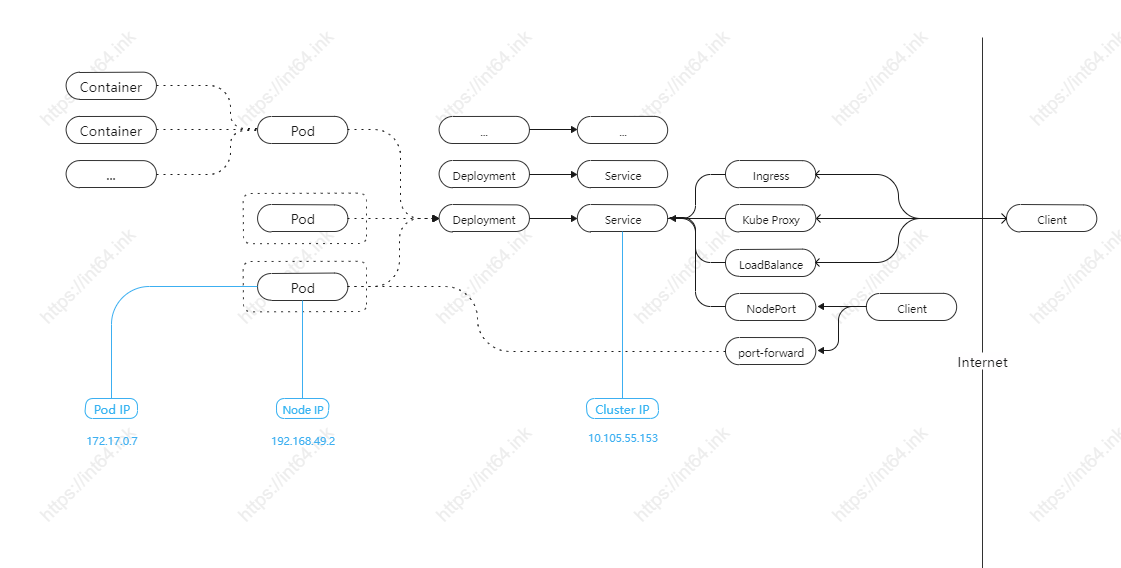
对于K8s集群中出现的三个IP概念:Node IP、Pod IP以及Cluster IP,它们分别指向不同的含义:
- 多个Pod部署在同一个物理机节点(或者虚拟机节点)上,此时这个节点的IP就是
Node IP。 - 由多个pod组成的部署管理对象
Deployment,如果需要对外提供访问能力,就必须借助Service, 而service对象本身的IP就是Cluster IP。集群外如果要访问service,就必须通过Cluster IP访问。 - 每个Pod管理一个或多个容器,Pod本身也有自己的虚拟IP,即
Pop IP。
»如何访问Pod中的服务
假设一个nginx集群的部署如下:
[dockerg@VM-24-6-centos root]$ kubectl get pods
NAME                     READY   STATUS    RESTARTS   AGE
nginx-6799fc88d8-w7994   1/1     Running   0          120m
nginx-6799fc88d8-xn4d9   1/1     Running   0          4h29m
nginx-6799fc88d8-zt2bs   1/1     Running   0          4h23m

[dockerg@VM-24-6-centos root]$ kubectl get deployment
NAME    READY   UP-TO-DATE   AVAILABLE   AGE
nginx   3/3     3            3           4h29m

[dockerg@VM-24-6-centos root]$ kubectl get service
NAME         TYPE        CLUSTER-IP     EXTERNAL-IP   PORT(S)        AGE
kubernetes   ClusterIP   10.96.0.1      <none>        443/TCP        5h51m
nginx NodePort 10.104.80.47 <none> 80:30983/TCP 14s如果需要调试其中的某一个特定的pod上的服务,这个时候,应该屏蔽其负载均衡的功能,因此,可以采用kube-proxy的方式对指定pod设置一个路由出来:
[dockerg@VM-24-6-centos root]$ kubectl port-forward nginx-6799fc88d8-w7994 12223:80
Forwarding from 127.0.0.1:12223 -> 80
Forwarding from [::1]:12223 -> 80
Handling connection for 12223

# 启动另外一个terminel
[dockerg@VM-24-6-centos root]$ curl -XGET http://127.0.0.1:12223
<!DOCTYPE html>
<html>
<head>
<title>Welcome to nginx!</title>
<style>
html { color-scheme: light dark; }
body {  35em; margin: 0 auto;
font-family: Tahoma, Verdana, Arial, sans-serif; }
</style>
</head>
<body>
<h1>Welcome to nginx!</h1>
<p>If you see this page, the nginx web server is successfully installed and
working. Further configuration is required.</p>

<p>For online documentation and support please refer to
<a href="http://nginx.org/">nginx.org</a>.<br/>
Commercial support is available at
<a href="http://nginx.com/">nginx.com</a>.</p>

<p><em>Thank you for using nginx.</em></p>
</body>
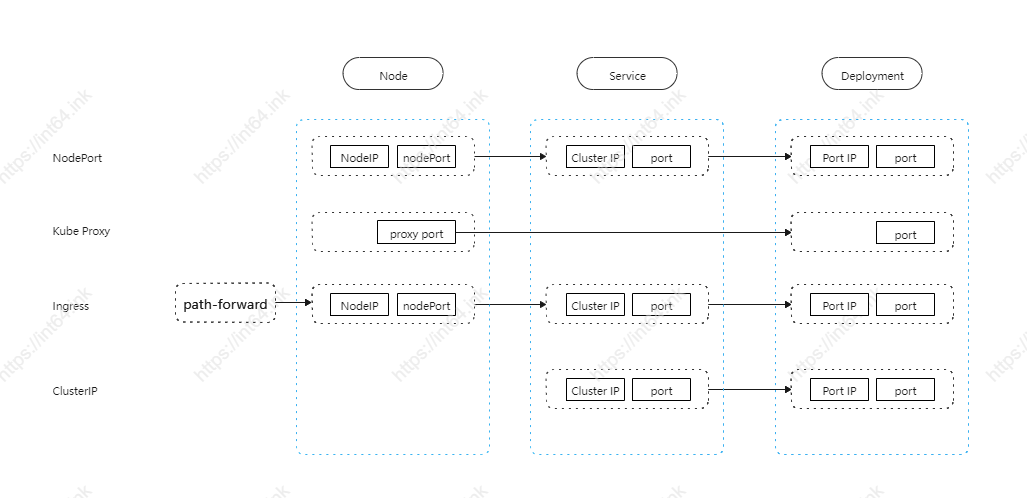
</html>对于NodePort方式,一个定义好的Service,它有自己的ClusterIP以及端口port,它相当于一个集群的负载均衡入口,由clusterIP:clusterPort转发到podIp:podPort,但是cluster-ip只能由集群内部访问,当需要集群外部访问时,则需要采用NodePort方式,顾名思义,就是在物理节点Node上开一个端口,并由它转发到Service的Cluster-IP和Port上。

以上归类了访问服务的四种不同的方式。
Kube-proxy一般用于调试,直接将某个pod的某个端口映射到当前主机的某个pod上。Cluster-IP提供集群内部的服务发现和负载均衡,但只局限于集群内部访问,如组成集群的多个Pod上的容器。NodePort即加一层从主机端口到集群端口的映射,支持从集群外部访问服务。Ingress相当于一个前置的LB网关,支持七层转发。
»Pod的管理
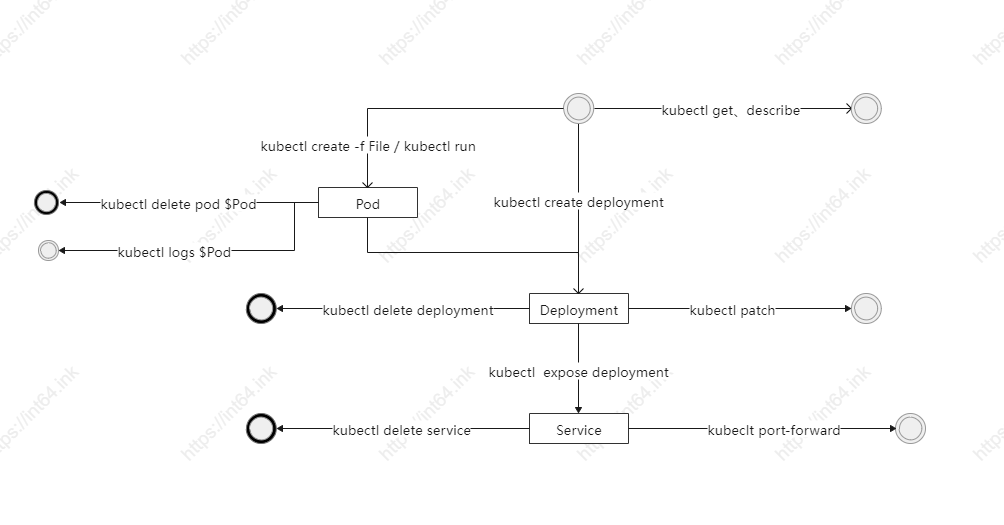
对于Pod的管理,基本上可以由下列这些命令来完成:

创建Deployment,即在Deployment中创建pod副本:
[dockerg@VM-24-6-centos root]$ kubectl create deployment nginx --image=nginx --replicas=2 deployment.apps/nginx
deployment.apps/nginx created
查看pods:
[dockerg@VM-24-6-centos root]$ kubectl get pods -o wide
NAME                     READY   STATUS    RESTARTS   AGE     IP           NODE       NOMINATED NODE   READINESS GATES
nginx-6799fc88d8-g4xvh   1/1     Running   0          2m29s   172.17.0.3   minikube   <none>           <none>
nginx-6799fc88d8-xn4d9   1/1     Running   0          2m29s   172.17.0.6   minikube   <none>           <none>
查看pod的详细描述:
[dockerg@VM-24-6-centos root]$ kubectl describe pod nginx
Name:         nginx-6799fc88d8-g4xvh
Namespace:    default
Priority:     0
Node:         minikube/192.168.49.2
Start Time:   Fri, 12 Nov 2021 11:52:37 +0800
Labels:       app=nginx
              pod-template-hash=6799fc88d8
Annotations:  <none>
Status:       Running
IP:           172.17.0.3
IPs:
  IP:           172.17.0.3
Controlled By:  ReplicaSet/nginx-6799fc88d8
Containers:
  nginx:
    Container ID:   docker://6d4c63a630ebd345d28f3fb5a7b41ccf849851d0231936d8be0331242bdd512a
    Image:          nginx
    Image ID:       docker-pullable://nginx@sha256:dfef797ddddfc01645503cef9036369f03ae920cac82d344d58b637ee861fda1
    Port:           <none>
    Host Port:      <none>
    State:          Running
      Started:      Fri, 12 Nov 2021 11:52:40 +0800
    Ready:          True
    Restart Count:  0
    Environment:    <none>
    Mounts:
      /var/run/secrets/kubernetes.io/serviceaccount from kube-api-access-n4c9b (ro)
Conditions:
...
伸缩容,修改Pod的副本数:
[dockerg@VM-24-6-centos root]$ kubectl patch deployment nginx -p '{"spec":{"replicas":3}}' -n default
deployment.apps/nginx patched

[dockerg@VM-24-6-centos root]$ kubectl get pods
NAME                     READY   STATUS    RESTARTS   AGE
nginx-6799fc88d8-g4xvh   1/1     Running   0          6m23s
nginx-6799fc88d8-xn4d9   1/1     Running   0          6m23s
nginx-6799fc88d8-zt2bs   1/1     Running   0          22s
删除pod:
kubectl delete deployment nginx通过配置文件创建,同时指定多个容器:
kubectl create -f ./nginx.yaml

apiVersion: v1
kind: Pod
metadata:
  name: nginx
  labels:
    app: nginx
spec:
  containers:
    - name: n1
      image: nginx
      ports:
        - containerPort: 80
    - name: n2
      image: nginx
      ports:
        - containerPort: 81