一、Volumes
Voumes是用来挂在数据的,其生命周期独立于pod中容器的生命周期,容器可能会被销毁或重建,但是Volumes会被保留,但是如果Pod不存在,Volumes也会随即消失。
对于可以挂在的卷其实有很多的选择,例如可以选择本地卷、网络卷、云盘、K8S自身资源等。
本地卷:直接挂载到宿主机文件的类型,直接绑定的node节点
网络卷:例如NFS、ClusterFs等
云盘:例如AWS、微软等
K8S自身的资源:例如secret、configmap、downwardAPI等。
(一)本地卷
1、emptyDir
emptyDir类似于docker的volume,但是docker删除容器时,数据卷还会存在,而emptyDir删除容器,数据卷也会丢失,一般这个只做临时数据卷来使用。
emptyDir的主要应用场景就是Pod中容器间数据共享:
当pod被分配节点时,首先创建emptyDir卷,并且只要该pod在该节点上运行,该卷就会存在,该卷刚被创建时是控的,pod中的容器可以读取和写入emptyDir卷中的相同文件。
这里特殊说明一点,容器崩溃不会从节点中移除pod,因此emptyDir卷中的数据在容器崩溃时是安全的
简单地说,empty主要是用来做同一个pod中多个容器间的数据共享的,数据存储于pod内部。
举个例子:
apiVersion: v1
kind: Pod
metadata:
  name: test-pod1
spec:
  containers:
  - image: nginx
    name: test-container
    volumeMounts:
    - mountPath: /cache
      name: cache-volume
  volumes:
  - name: cache-volume
    emptyDir: {}
配置解释:
创建一个pod,并创建一个名为cache-volume的空挂载卷,然后将cache-volume对应到/cache目录
然后创建pod,进入pod中查看是否有/cache目录,如果有说明挂在成功,失败的话是没有该挂载目录的
kubectl apply -f test-pod1.yaml
kubectl get pods
kubectl exec -it test-pod1 sh
cd /cache

上面是对于空卷的演示,下面演示一下效果,在一个pod中创建多个容器,公用同一个空卷,一个pod修改,另一个pod会获取到最新的信息。
apiVersion: v1
kind: Pod
metadata:
  name: test-pod2
spec:
  containers:
  - image: nginx
    name: test-container
    volumeMounts:
    - mountPath: /cache1
      name: cache-volume
  - name: test-1
    image: nginx
    command: ["/bin/sh","-c","sleep 3600s"]
    imagePullPolicy: IfNotPresent
    volumeMounts:
    - mountPath: /cache2
      name: cache-volume
  volumes:
  - name: cache-volume
    emptyDir: {}
配置说明:
创建了一个pod,在pod中创建了两个容器,两个容器公用一个名为cache-volume的emptyDir。挂载目录分别为/cache1和/cache2
验证:
创建pod,然后开启两个窗口分别登录两个容器,进入到挂载目录中,然后在一个容器的挂载目录中创建一个文件,再另外一个容器的挂载目录同样可以看到
kubectl apply -f test-pod2.yaml
# -c可以指定进入pod的哪个容器
kubectl exec -it test-pod2 -c test-container sh
# 切换到挂载目录
cd /cache1
# 创建文件
date > bbb.html


2、HostPath
数据挂载到宿主机上。
应用场景:Pod中容器需要访问宿主机文件
apiVersion: v1
kind: Pod
metadata:
  name: test-pod
spec:
  containers:
  - image: nginx
    name: test-container
    volumeMounts:
    - mountPath: /cache
      name: cache-volume
  volumes:
  - name: cache-volume
    hostPath:
      path: /data
      type: Directory
配置说明:
与emptyDir不同的只有hostPath,hostPath表示宿主机的目录,对应的挂载目录为容器中的/cache目录。
这里创建的数据和我们被分配的Node节点的数据都是一样的,创建的数据都会更新上去,删除容器,不会删除数据卷的数据。
除了所需的path属性外,还可以为hostPath卷指定type
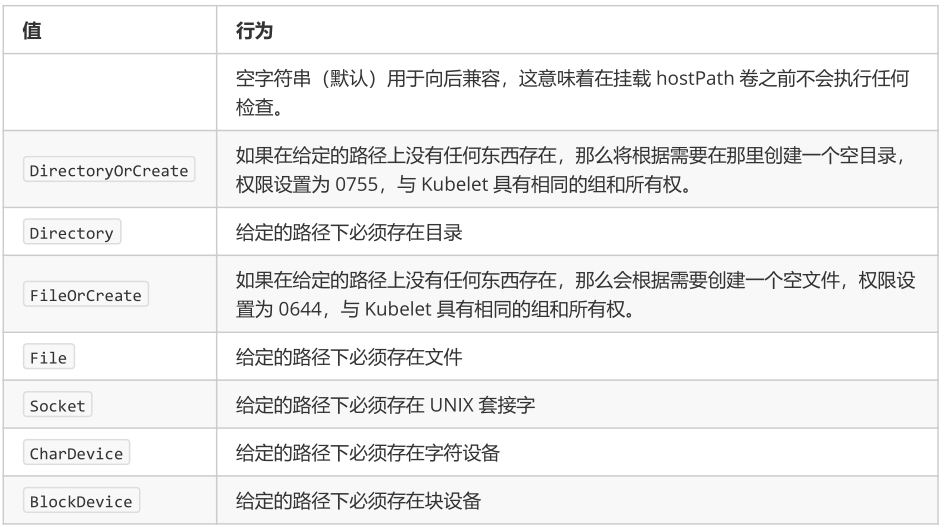
说明:由于上述配置文件指定的type为Directory,说明必须存在/data目录,这个目录指的是node上需要存在该目录,如果不存在,pod将创建失败
首先需要查看数据挂载的是哪个节点
kubectl get pod -o wide
![]()
可以看到是挂载到了node1节点,然后进入容器中的/cache目录,查看,没有数据;在node1的宿主机进入/data目录,创建一个文件,然后重新在容器中查看,就可以看到了。


(二)NFS网络存储
nfs就是一个网络文件存储服务器,装完nfs之后,共享一个目录,其他的服务器就可以通过这个目录挂载到本地了,在本地写到这个目录的文件,就会同步到远程服务器上,实现一个共享存储的功能,一般都是做数据的共享存储,比如多台web服务器,肯定需要保证这些web服务器的数据一致性,那就会用到这个共享存储了,要是将nfs挂载到多台的web服务器上,网站根目录下,网站程序就放在nfs服务器上,这样的话。每个网站,每个web程序都能读取到这个目录,一致性的数据,这样的话就能保证多个节点,提供一致性的程序了。
1、搭建nfs服务器
(1)单独拿一台服务器做nfs服务器,我用的192.168.124.16
# 安装nfs
yum install nfs-utils -y
# 暴露目录,让是让其他服务器能挂载这个目录
mkdir /opt/k8s
vi /etc/exports
/opt/k8s 192.168.124.0/24(rw,no_root_squash)
(2)重启nfs服务
systemctl start nfs
(3)找个节点去挂载测试一下,只要去共享这个目录就要都去安装这个客户端
#其他节点也需要安装nfs
yum install nfs-utils -y
mount -t nfs 192.168.124.16:/opt/k8s /mnt
cd /mnt
df -h
192.168.30.27:/opt/k8s    36G  5.8G   30G   17% /mnt
(4)在nfs目录中添加文件,删除文件,节点都可感知,反之亦然。
2、示例
apiVersion: apps/v1beta1
kind: Deployment
metadata:
  name: nfs
spec:
  replicas: 3
  template:
    metadata:
      labels:
        app: nginx
    spec:
      containers:
      - name: nginx
        image: nginx
        volumeMounts:
        - name: wwwroot
          mountPath: /usr/share/nginx/html
        ports:
        - containerPort: 80
      volumes:
      - name: wwwroot
        nfs:
          server: 192.168.124.16
          path: /opt/k8s/wwwroot
---
apiVersion: v1
kind: Service
metadata:
  name: nginx-service
  labels:
    app: nginx
spec:
  ports:
  - port: 80
    targetPort: 80
  selector:
    app: nginx
  type: NodePort
配置文件解释:
挂载了一个nfs,nfs的目录是/opt/k8s/wwwroot,对应容器中的地址是/usr/share/nginx/html,nfs服务器的文件夹要提前创建,不然会创建报错
创建pod和service
kubectl apply -f nfs.yaml
# 查看pod详情
kubectl get pod -o wide
# 访问
curl 10.244.1.64

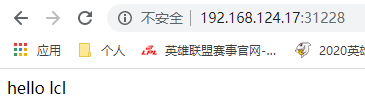
可以看到,访问结果403,其实是因为没有index.html文件导致,然后在nfs服务器的/opt/k8s/wwwroot目录下创建index.html文件,写上“hello lcl”,此时再访问

可以看到已经输出了结果,同时80端口已经暴露,因此还可以通过页面访问
二、ConfigMap
(一)概述ConfigMap
镜像往往是一个应用基础,还有很多需要自定义的参数或配置,这些配置很多,有的还需要保密,例如密码等信息,因此这些配置不能放在镜像中,K8S提供了ConfigMap和Secret来解决这个问题。
ConfigMap对象是一系列配置的集合,K8S会将这一系列的配置注入到对应的Pod中,注入的方式有两种:挂载存储卷和传递变量。
ConfigMap被引用之前必须存在,属于名称空间级别,不能跨命名空间使用内容显示明文。ConfigMap中的内容修改后,必须重新加载配置才会生效,但是,如果应用程序支持热更新,则不需要重启。
(二)传递变量创建ConfigMap
对比一下K8S传递变量和docker中传递变量
| Docker | K8S | 描述 |
| ENTRYPOINT | command | 容器中的可执行文件 |
| CMD | args | 需要传递给可执行文件的参数 |
如果要向容器中传递参数,可以在yaml文件中通过command和args或环境变量的方式实现。示例配置如下所示:
apiVersion: v1
kind: Pod
metadata:
  name: print-greeting
spec:
  containers:
  - name: env-print-demo
    image: nginx
    env:
    - name: GREETING
      value: "Warm greetings to"
    - name: HONORIFIC
      value: "The Most Honorable"
    - name: NAME
      value: "Kubernetes"
    command: ["echo"]
    args: ["$(GREETING) $(HONORIFIC) $(NAME)"]
创建后,命令 echo Warm greetings to The Most Honorable Kubernetes 将在容器中运行,也就是环境变量中的值被传递到了容器中。 查看pod就可以看出
kubectl logs podname

(三)使用存储卷创建ConfigMap
1、创建方式概述
使用:kubectl create configmap --help可以查看使用存储卷创建ConfigMap的样例和方式,输出结果如下所示:
[root@k8s-master01 ~]# kubectl create  configmap --help
Create a configmap based on a file, directory, or specified literal value.

Aliases:
configmap, cm

Examples:
  # #从目录创建  文件名称为键  文件内容为值?
  # Create a new configmap named my-config based on folder bar
  kubectl create configmap my-config --from-file=path/to/bar

  # #从文件创建 key1为键 文件内容为值
  # Create a new configmap named my-config with specified keys instead of file basenames on disk
  kubectl create configmap my-config --from-file=key1=/path/to/bar/file1.txt --from-file=key2=/path/to/bar/file2.txt

  # 直接命令行给定,键为key1 值为config1
  # Create a new configmap named my-config with key1=config1 and key2=config2
  kubectl create configmap my-config --from-literal=key1=config1 --from-literal=key2=config2

  # 从文件创建 文件名为键 文件内容为值
  # Create a new configmap named my-config from the key=value pairs in the file
  kubectl create configmap my-config --from-file=path/to/bar

  # 从env文件创建 文件名为键 文件内容为值
  # Create a new configmap named my-config from an env file
  kubectl create configmap my-config --from-env-file=path/to/bar.env
下面就是对上面几种使用挂在卷方式创建ConfigMap的详细说明。
2、根据目录创建ConfigMap
(1)创建目录,用于存放configMap
mkdir /docs/user-guide/configmap
创建game.properties,ui.properties
(2)创建game.properties
enemies=aliens
lives=3
enemies.cheat=true
enemies.cheat.level=noGoodRotten
secret.code.passphrase=UUDDLRLRBABAS
secret.code.allowed=true
secret.code.lives=30
(3)创建ui.properties
color.good=purple
color.bad=yellow
allow.textmode=true
how.nice.to.look=fairlyNice
(4)创建ConfigMap
kubectl create configmap game-config --from-file=/docs/user-guide/configmap
命令说明:
# game-config :configmap的名称
# --from-file:指定一个目录,目录下的所有内容都会被创建出来。以键值对的形式
# --from-file指定在目录下的所有文件都会被用在 ConfigMap 里面创建一个键值对,键的名字就是文件名,值就是文件的内容
(5)查看ConfigMap
# 查看configmap文件
kubectl get cm
# 查看详细信息
kubectl get cm game-config -o yaml
kubectl describe cm
在data里面就可以查看到配置信息

3、根据文件创建ConfigMap
只需要指定为一个文件就可以从单个文件中创建ConfigMap
# 指定创建的文件即可
kubectl create configmap game-config-2 --from-file=/docs/user-guide/configmap/game.properties
查看
kubectl get configmaps game-config-2 -o yaml
说明:--from-file这个参数可以使用多次,可以分别指定game.properties,ui.propertes.效果和指定整个目录是一样的
4、文字创建ConfigMap
直接在命令行中设置K-V信息
kubectl create configmap my-config-3 --from-literal=name=lcl --from-literal=age=18
查看详情
kubectl get configmaps my-config-3 -o yaml

说明:使用文字方式创建,利用 --from-literal 参数传递配置信息,改参数可以使用多次
5、直接创建
直接通过配置文件进行创建configMap,创建一个/docs/user-guide/comfigmap.yaml文件,内容如下
apiVersion: v1
data:
  game.properties: |
    enemies=aliens
    lives=3
    enemies.cheat=true
    enemies.cheat.level=noGoodRotten
    secret.code.passphrase=UUDDLRLRBABAS
    secret.code.allowed=true
    secret.code.lives=30
  ui.properties: |
    color.good=purple
    color.bad=yellow
    allow.textmode=true
    how.nice.to.look=fairlyNice
kind: ConfigMap
metadata:
  name: game-config
  namespace: default
创建configmap
kubectl create configmap my-config --from-file=/docs/user-guide/comfigmap.yaml
查看
kubectl get configmaps my-config -o yaml

(四)ConfigMap在Pod中的应用
上面演示了如何创建configmap,但是实际生产中是需要在pod中使用configmap。
ConfigMap在Pod中有三种应用方式:使用ConfigMap来替代环境变量、用ConfigMap设置命令行参数、通过数据卷插件使用ConfigMap
1、使用ConfigMap替代环境变量
使用ConfigMap替代环境变量有两种方式:在env中导入、直接使用envFrom导入
(1)首先创建两个configamp
# 创建configMap,   special.how: very   键名:键值
apiVersion: v1
kind: ConfigMap
metadata:
  name: special-config
  namespace: default
data:
  special.how: very
  special.type: charm
# 创建第二个configMap
apiVersion: v1
kind: ConfigMap
metadata:
  name: env-config
  namespace: default
data:
  log_level: INFO
(2)根据yaml文件创建configmap
kubectl apply -f special-config.yaml
kubectl apply -f env-config.yaml
然后创建pod,并在pod中使用configmap
apiVersion: v1
kind: Pod
metadata:
  name: test-pod
spec:
  containers:
    - name: test-container
      image: nginx
      command: ["/bin/sh", "-c", "env"]
      env:
        - name: SPECIAL_LEVEL_KEY
          valueFrom:
            configMapKeyRef:
              name: special-config  # 第一种导入方式:在env中导入
              key: special.how
        - name: SPECIAL_TYPE_KEY
          valueFrom:
            configMapKeyRef:
              name: special-config
              key: special.type
      envFrom:                      # 第二种导入方式,直接使用envFrom导入
        - configMapRef:
            name: env-config
  restartPolicy: Never
配置文件中的注释要删除掉,不然有可能会创建失败。
配置文件说明:
第一种导入方式是在env中导入,直接导入了special-config配置中special.how对应的值,然后将值赋值给env配置中的SPECIAL_LEVEL_KEY
第二种导入方式是直接使用envFrom导入env
最后使用commond打印一下env配置信息
创建pod并查看日志
kubectl apply -f configuse.yaml
kubectl logs test-pod

2、用ConfigMap设置命令行参数
用作命令行参数,将 ConfigMap 用作命令行参数时,需要先把 ConfigMap 的数据保存在环境变量中,然后通过 $(VAR_NAME) 的方式引用环境变量
apiVersion: v1
kind: Pod
metadata:
  name: test-pod
spec:
  containers:
    - name: test-container
      image: nginx
      command: [ "/bin/sh", "-c", "echo $(SPECIAL_LEVEL_KEY) $(SPECIAL_TYPE_KEY)" ]
      env:
        - name: SPECIAL_LEVEL_KEY
          valueFrom:
            configMapKeyRef:
              name: special-config
              key: special.how
        - name: SPECIAL_TYPE_KEY
          valueFrom:
            configMapKeyRef:
              name: special-config
              key: special.type
  restartPolicy: Never
输出结果:

3、通过数据卷插件使用ConfigMap
在数据卷里面使用这个ConfigMap,有不同的选项。最基本的就是将文件填入数据卷,在这个文件中,键就是文件名,键值就是文件内容
apiVersion: v1
kind: Pod
metadata:
  name: test-pod2
spec:
  containers:
    - name: test-container
      image: nginx
      command: [ "/bin/sh", "-c", "sleep 600s" ]
      volumeMounts:
        - name: config-volume
          mountPath: /etc/config # 表示把conifg-volume挂载卷挂载到容器的/etc/config目录下
  volumes:    # 开启挂载外部configmap
    - name: config-volume
      configMap:
        name: special-config
  restartPolicy: Never
然后再登录容器查看/etc/config目录下是否挂在成功。

(五)ConfigMap热更新
配置文件
# ConfigMap的热更新
apiVersion: v1
kind: ConfigMap
metadata:
  name: log-config
  namespace: default
data:
  log_level: INFO
---
apiVersion: extensions/v1beta1
kind: Deployment
metadata:
  name: my-nginx
spec:
  replicas: 1
  template:
    metadata:
      labels:
        run: my-nginx
    spec:
      containers:
        - name: my-nginx
          image: nginx
          ports:
            - containerPort: 80
          volumeMounts:
            - name: config-volume
              mountPath: /etc/config
      volumes:
        - name: config-volume
          configMap:
            name: log-config
配置说明:
首先创建了一个名为log-config的configmap,然后创建了一个名为my-nginx的pod,在该pod中,将log-config挂载到名为config-volume的volume中,然后该volume位置在/etc/config下
获取值&输出:
kubectl exec -it my-nginx-6844885d5f-gwl65 -- cat /etc/config/log_level

修改ConfigMap,修改log-level的值为DEBUG等待大概10秒钟时间,再次查看环境变量的值
kubectl edit configmap log-config

可以看到,已经自己更新了。
三、Secret
Secret和ConfigMap一样,都是用来解决配置文件不打到镜像中的问题,Serect与ConfigMap的区别是Serect存储的是使用Base64加密的密文,一般用于存储敏感信息,而ConfigMap存储的是明文。
Serect一般有两种创建方式,使用kubectl create创建和使用serect配置文件创建。
Serect有四种类型:Service Account、Opaque、Kubernetes.io/dockerconfigjson、kubernetes.io/tls
Service Account :用来访问Kubernetes API,由Kubernetes自动创建,并且会自动挂载到Pod的/run/secrets/kubernetes.io/serviceaccount目录中;
Opaque :base64编码格式的Secret,用来存储密码、密钥、信息、证书等,类型标识符为generic;
kubernetes.io/dockerconfigjson :用来存储私有docker registry的认证信息,类型标识为docker-registry。
kubernetes.io/tls:用于为SSL通信模式存储证书和私钥文件,命令式创建类型标识为tls
(一)Service Account
Service Account用来访问Kubernetes API,由K8S自动创建,并且会挂载到Pod的/run/serect/kubernetes.io/serviceaccount目录中
Service Account不需要我们自己去管理,此证书由K8S创建并维护。
# 创建pod
kubectl run my-nginx --image=nginx
# 查看证书
kubctl exec -it podName -- sh
# 进入证书目录/run/secrets/kubernetes.io/serviceaccount查看即可

(二)opaque Serect
opaque Serect是base64编码格式的Secret,用来存储密码、密钥、信息、证书等,类型标识符为generic,可以使用下面的命令进行加密
echo -n "要加密的字符串" | base64

1、创建serect示例:
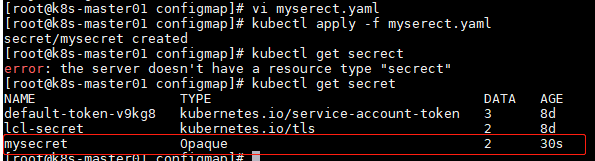
# secret.yaml配置文件方式
apiVersion: v1
kind: Secret
metadata:
  name: mysecret
type: Opaque
data:
 password: YWJjZGVmZ2g=
 username: YWRtaW4=
生成secret
2、使用方式
(1)将secret挂载到volume中
apiVersion: v1
kind: Pod
metadata:
 name: secret-test
 labels:
   name: secret-test
spec:
  volumes:
  - name: secrets
    secret:
      secretName: mysecret
  containers:
  - image: nginx
    name: db
    volumeMounts:
    - name: secrets
      mountPath: "/etc/secrets"
      readOnly: true
配置文件描述:
在容器内进行挂在,挂在的对象是一个名为mysecret的secrets,挂载到/etc/secrets目录。
创建pod,然后进入pod的/etc/secrets目录,查看
kubectl apply -f secretVolume.yaml
kubectl exec -it secret-test sh
cd /etc/secrets
ls
cat password
cat username

可以看到输出结果是已经解密过的数据。
(2)将secret导出到环境变量中
apiVersion: extensions/v1beta1
kind: Deployment
metadata:
 name: secret-deployment
spec:
  replicas: 2
  template:
    metadata:
      labels:
        app: pod-deployment
    spec:
      containers:
      - name: pod-1
        image: nginx
        ports:
        - containerPort: 80
        env:
        - name: TEST_USER
          valueFrom:
            secretKeyRef:
              name: mysecret
              key: username
        - name: TEST_PASSWORD
          valueFrom:
            secretKeyRef:
              name: mysecret
              key: password
配置解释:
使用env的valueFrom将mysecret中username的值赋给TEST_USER,同样的方法将password赋值给TEST_PASSWORD
创建pod后,进入pod,然后输出TEST_USER和TEST_PASSWORD
kubectl exec -it secret-deployment-775fbb66d8-gbccn sh
echo $TEST_USER
echo $TEST_PASSWORD
