1.理论知识
https简介
HTTPS(全称:Hyper Text Transfer Protocol over Secure Socket Layer),是以安全为目标的HTTP通道,简单讲是HTTP的安全版。即HTTP下加入SSL层,HTTPS的安全基础是SSL,因此加密的详细内容就需要SSL。
超文本传输协议HTTP协议被用于在Web浏览器和网站服务器之间传递信息。HTTP协议以明文方式发送内容,不提供任何方式的数据加密,如果攻击者截取了Web浏览器和网站服务器之间的传输报文,就可以直接读懂其中的信息,因此HTTP协议不适合传输一些敏感信息,比如信用卡号、密码等。
为了解决HTTP协议的这一缺陷,需要使用另一种协议:安全套接字层超文本传输协议HTTPS。为了数据传输的安全,HTTPS在HTTP的基础上加入了SSL协议,SSL依靠证书来验证服务器的身份,并为浏览器和服务器之间的通信加密。
HTTPS和HTTP的区别主要为以下四点:
- https协议需要到ca申请证书,一般免费证书很少,需要交费。
- http是超文本传输协议,信息是明文传输,https 则是具有安全性的ssl加密传输协议。
- http和https使用的是完全不同的连接方式,用的端口也不一样,前者是80,后者是443。
- http的连接很简单,是无状态的;HTTPS协议是由SSL+HTTP协议构建的可进行加密传输、身份认证的网络协议,比http协议安全。
简单的说,https就是在http的基础上嵌套SSL协议,由此来实现身份认证,要理解SSL,还要说明一下非对称加密体系。
非对称加密
有非对称加密,那么当然也有对称加密,下面简单说一下这两者的区别。
- 对称加密:指的是加密和解密使用的是同一个密钥,发送者使用秘钥A对信息加密,然后传送密文,接受者使用密钥A对密文解密,得到信息。若此时使用密钥B解密此密文,则无法进行解密。为了保证加密的可靠性,发送者和接受者都要保证密钥A不被泄露。
- 非对称加密:使用一对密钥进行加密和解密操作,分别称为公钥和私钥,公钥和私钥是成对生成的,公钥往往是公开的,任何人都可以得到,私钥是保密的,只有特定的人才拥有。非对称加密有两种典型的使用情况,分别是加密和验证。
下面简单介绍加密与验证。
加密:
- 加密是为了传送需要保密的信息,所以需要保证只有特定的人才可以对信息进行解密。
- 发送者使用公钥A加密,接受者使用私钥A解密。假设所有人都拥有公钥A,只有张三有私钥A,那么,其他人想要给张三发送信息,只需要将信息使用公钥A加密,那么密文只有拥有私钥A的张三才可以解密。
验证:
- 验证是为了向其他人证明“我就是我”的问题。
- 在这里,发送者使用私钥进行A签名,接受者使用公钥A进行验证。还是假设所有人都拥有公钥A,只有张三有私钥A,现在张三要向其他人证明自己就是张三,于是张三将“我是张三”这段信息使用私钥A进行签名,发送给其他人,其他人使用公钥A解密,得到签名“我是张三”,于是其他人就认为这段信息是张三发送的。
- 这里有一个问题,就是任何人都可以使用自己的私钥将“我是张三”签名,从而仿冒张三,假设此时有一个李四,他用自己的私钥B签名“我是张三”,这使其他拥有公钥B的人会认为李四就是张三。
- 解决这个问题的方法就是引入有足够公信力的第三方,由第三方负责验证谁是谁的问题(就像我们使用公安局签发的身份证就可以证明自己是自己)。张三为了证明自己是张三,他会将“我是张三”发送给第三方,第三方用自己的私钥C将验证信息加密(这就是签名),将加密后的签名返回给张三,以后张三就会使用这个签名来证明自己是张三。其他人只会只用第三方的公钥对签名进行验证。这是如果李四要仿冒自己是张三,他用自己私钥B加密后的验证信息,其他人用第三方的公钥C是无法解密的。
- 在https中,CA就是这个第三方,CA(Certificate Authority),也称为电子商务认证中心,是负责发放和管理数字证书的权威机构,并作为电子商务交易中受信任的第三方,承担公钥体系中公钥的合法性检验的责任。CA具体流程下面再说。
https建立流程
首先上图,这张图显示了https建立的流程。

下面简单解释一下这个流程:
- CA建立,并颁发给自己根证书。即CA使用自己的私钥,将CA的验证信息和自己的公钥打包加密成根证书。
- CA与浏览器厂商(browser vendor)联系,告诉浏览器厂商自己的证书,如果浏览器厂商信任这个CA,就会把这个CA的证书加入到自己开发的浏览器中。
- 一个想要获取https服务的网站,首先要将自己的验证信息和自己的公钥发送给CA,并向CA申请自己的证书,CA在验证这个网站的合法性之后,会用CA自己的私钥对网站的验证信息和公钥打包加密,形成这个网站的证书,并将这个证书颁发给网站。
- 现在网站已经有了自己的证书了,于是他可以搭建自己的https服务。
- 现在一个客户端要使用网站的https服务,网站会将自己的证书发送给客户端。客户端使用CA的证书对网站证书进行验证,核实无误后建立安全连接,即SSL握手过程。
- 由客户端开始。客户端发送SSL版本,以及加密和压缩算法给服务器。服务器检查是否支持此版本SSL,并启动客户端期望的加密和压缩算法。
- 基础配置完毕后,服务器发送自己的证书。该证书必须被客户端信任,或者被客户端信任的CA所信任。
- 客户端验证证书,并核实服务器的身份是正确的。
- 验证完毕后,两者协商之后使用的加密方式,并且客户端告诉服务器,从现在起,所有数据互换都是加密的,并发送一个加密的验证”消息“给服务器。
- 服务器验证是客户端发送的,并且”消息“可以被解密。服务器将解密后的”消息“发送给客户端。客户端核实后,安全连接。握手结束。
- 之后,客户端和服务器可以使用https服务进行加密通信了,不过之后的通信一般使用对称加密算法来实现,因为相较于非对称加密,对称加密所占资源更少。
2.搭建https服务
本机环境:Ubuntu 17.10 , Openssl 1.0.2g , FireFox 57.0.1 (64 位) , Apache 2.4.27
首先确认安装OpenSSL
确定OpenSSL版本:
$openssl version
如果版本低于1.0.1f,建议升级,因为1.0.1f版本之下的OpenSSL有一个Heartbleed漏洞。
安装OpenSSL:
$sudo apt-get install openssl
自建CA
因为向CA申请签名是需要收费的,所以我们选择自己搭建一个CA来完成这个实验过程。
首先建立myCA目录用于存放CA相关信息
cd && mkdir -p myCA/signedcerts && mkdir myCA/private && cd myCA
myCA 用于存放 CA 根证书,证书数据库,以及后续服务器生成的证书,密钥以及请求
signedcerts:保存签名证书的 copy
private: 包含私钥
之后配置myCA相关参数,在myCA目录下进行
echo '01'>serial && touh index.txt
然后创建 caconfig.cnf 文件
vim ~/myCA/caconfig.cnf
caconfig.cnf文件内容如下
# My sample caconfig.cnf file.
#
# Default configuration to use when one is not provided on the command line.
#
[ ca ]
default_ca      = local_ca
#
#
# Default location of directories and files needed to generate certificates.
#
[ local_ca ]
dir             = /home/<username>/myCA                    # 这里要将username替换为你的用户名
certificate     = $dir/cacert.pem
database        = $dir/index.txt
new_certs_dir   = $dir/signedcerts
private_key     = $dir/private/cakey.pem
serial          = $dir/serial
#
#
# Default expiration and encryption policies for certificates.
#
default_crl_days        = 365
default_days            = 1825
default_md              = SHA256
#
policy          = local_ca_policy
x509_extensions = local_ca_extensions
#
#
# Default policy to use when generating server certificates.  The following
# fields must be defined in the server certificate.
#
[ local_ca_policy ]
commonName              = supplied
stateOrProvinceName     = supplied
countryName             = supplied
emailAddress            = supplied
organizationName        = supplied
organizationalUnitName  = supplied
#
#
# x509 extensions to use when generating server certificates.
#
[ local_ca_extensions ]
subjectAltName          = DNS:localhost
basicConstraints        = CA:false
nsCertType              = server
#
#
# The default root certificate generation policy.
#
[ req ]
default_bits    = 2048
default_keyfile = /home/<username>/myCA/private/cakey.pem  # 这里要将username替换为你的用户名
default_md      = SHA256
#
prompt                  = no
distinguished_name      = root_ca_distinguished_name
x509_extensions         = root_ca_extensions
#
#
# Root Certificate Authority distinguished name.  Change these fields to match
# your local environment!
#
[ root_ca_distinguished_name ]
commonName              = MyOwn Root Certificate Authority # CA机构名
stateOrProvinceName     = JS                               # CA所在省份
countryName             = CN                               # CA所在国家(仅限2个字符)
emailAddress            = XXXX@XXX.com                     # 邮箱
organizationName        = XXX                              #
organizationalUnitName  = XXX                              #
#
[ root_ca_extensions ]
basicConstraints        = CA:true
生成 CA 根证书和密钥
export OPENSSL_CONF=~/myCA/caconfig.cnf       #该命令用于给环境变量 OPENSSL_CONF 赋值为caconfig.cnf。
openssl req -x509 -newkey rsa:2048 -out cacert.pem -outform PEM -days 1825             # 生成 CA 根证书和密钥
该命令需要用户设置密码。不要忘记。
以上步骤生成了 CA 自签名根证书,和 RSA 公/私密钥对。证书的格式是 PEM,有效期是1825天。
- /myCA/cacert.pem: CA 根证书
- /myCA/private/cakey.pem: CA 私钥
创建服务器公私钥
生成服务器配置文件exampleserver.cnf
vim ~/myCA/exampleserver.cnf
exampleserver.cnf文件内容如下
#
# exampleserver.cnf
#

[ req ]
prompt             = no
distinguished_name = server_distinguished_name

[ server_distinguished_name ]
commonName              = localhost          # 服务器域名
stateOrProvinceName     = JS                 # 服务器所在省份
countryName             = CN                 # 服务器所在国家(仅限2个字符)
emailAddress            = XXXX@XXX.com       # 邮箱
organizationName        = XXX                #
organizationalUnitName  = XXX                #
生成服务器证书和密钥
export OPENSSL_CONF =~/myCA/exampleserver.cnf   # 该命令设置环境变量 OPENSSL_CONF,使得 openssl 更换配置文件。
openssl req -newkey rsa:1024 -keyout tempkey.pem -keyform PEM -out tempreq.pem -outform PEM
同样的,需要输入密码短语。
之后,有2种对临时秘钥的操作,选择其一即可
1.将临时私钥转换为 unencrypted key,即秘钥不加密状态。
penssl rsa -in tempkey.pem -out server_key.pem
需要输入密码短语。
2.如果希望将 key 保持为加密状态,直接改名
mv tempkey.pem server_key.pem
两者的区别是,第二种需要在服务器启动时输入私钥的密码短语,否则会导致服务器启动失败,但第二种安全性高于第一种,可以更好的保护秘钥。
使用 CA key 对服务器证书签名
export OPENSSL_CONF=~/myCA/caconfig.cnf
openssl ca -in tempkey.pem -out server_crt.pem
删除临时证书和密码文件
rm -f tempkey.pem && rm -f tempreq.pem
现在,自签名的服务器证书和密钥对便产生了:
- server_crt.pem : 服务器证书文件
- server_key.pem : 服务器密钥文件
配置 Apache
建立ssl配置文件,lab-ssl.conf
vim /etc/apache2/sites-available/lab-ssl.conf
lab-ssl.conf文件内容如下
<IfModule mod_ssl.c>
	<VirtualHost _default_:443>
		ServerAdmin webmaster@localhost

		DocumentRoot /var/www/lab                              # 网站目录

		# Available loglevels: trace8, ..., trace1, debug, info, notice, warn,
		# error, crit, alert, emerg.
		# It is also possible to configure the loglevel for particular
		# modules, e.g.
		#LogLevel info ssl:warn

		ErrorLog ${APACHE_LOG_DIR}/error.log
		CustomLog ${APACHE_LOG_DIR}/access.log combined

		# For most configuration files from conf-available/, which are
		# enabled or disabled at a global level, it is possible to
		# include a line for only one particular virtual host. For example the
		# following line enables the CGI configuration for this host only
		# after it has been globally disabled with "a2disconf".
		#Include conf-available/serve-cgi-bin.conf

		#   SSL Engine Switch:
		#   Enable/Disable SSL for this virtual host.
		SSLEngine on

		#   A self-signed (snakeoil) certificate can be created by installing
		#   the ssl-cert package. See
		#   /usr/share/doc/apache2/README.Debian.gz for more info.
		#   If both key and certificate are stored in the same file, only the
		#   SSLCertificateFile directive is needed.
		#SSLCertificateFile	/etc/ssl/certs/ssl-cert-snakeoil.pem
		#SSLCertificateKeyFile /etc/ssl/private/ssl-cert-snakeoil.key

		# 网站证书和私钥地址
		SSLCertificateFile    /home/libaoquan/myCA/server_crt.pem
		SSLCertificateKeyFile /home/libaoquan/myCA/server_key.pem

		#   Server Certificate Chain:
		#   Point SSLCertificateChainFile at a file containing the
		#   concatenation of PEM encoded CA certificates which form the
		#   certificate chain for the server certificate. Alternatively
		#   the referenced file can be the same as SSLCertificateFile
		#   when the CA certificates are directly appended to the server
		#   certificate for convinience.
		#SSLCertificateChainFile /etc/apache2/ssl.crt/server-ca.crt

		#   Certificate Authority (CA):
		#   Set the CA certificate verification path where to find CA
		#   certificates for client authentication or alternatively one
		#   huge file containing all of them (file must be PEM encoded)
		#   Note: Inside SSLCACertificatePath you need hash symlinks
		#		 to point to the certificate files. Use the provided
		#		 Makefile to update the hash symlinks after changes.
		#SSLCACertificatePath /etc/ssl/certs/
		#SSLCACertificateFile /etc/apache2/ssl.crt/ca-bundle.crt

		#   Certificate Revocation Lists (CRL):
		#   Set the CA revocation path where to find CA CRLs for client
		#   authentication or alternatively one huge file containing all
		#   of them (file must be PEM encoded)
		#   Note: Inside SSLCARevocationPath you need hash symlinks
		#		 to point to the certificate files. Use the provided
		#		 Makefile to update the hash symlinks after changes.
		#SSLCARevocationPath /etc/apache2/ssl.crl/
		#SSLCARevocationFile /etc/apache2/ssl.crl/ca-bundle.crl

		#   Client Authentication (Type):
		#   Client certificate verification type and depth.  Types are
		#   none, optional, require and optional_no_ca.  Depth is a
		#   number which specifies how deeply to verify the certificate
		#   issuer chain before deciding the certificate is not valid.
		#SSLVerifyClient require
		#SSLVerifyDepth  10

		#   SSL Engine Options:
		#   Set various options for the SSL engine.
		#   o FakeBasicAuth:
		#	 Translate the client X.509 into a Basic Authorisation.  This means that
		#	 the standard Auth/DBMAuth methods can be used for access control.  The
		#	 user name is the `one line' version of the client's X.509 certificate.
		#	 Note that no password is obtained from the user. Every entry in the user
		#	 file needs this password: `xxj31ZMTZzkVA'.
		#   o ExportCertData:
		#	 This exports two additional environment variables: SSL_CLIENT_CERT and
		#	 SSL_SERVER_CERT. These contain the PEM-encoded certificates of the
		#	 server (always existing) and the client (only existing when client
		#	 authentication is used). This can be used to import the certificates
		#	 into CGI scripts.
		#   o StdEnvVars:
		#	 This exports the standard SSL/TLS related `SSL_*' environment variables.
		#	 Per default this exportation is switched off for performance reasons,
		#	 because the extraction step is an expensive operation and is usually
		#	 useless for serving static content. So one usually enables the
		#	 exportation for CGI and SSI requests only.
		#   o OptRenegotiate:
		#	 This enables optimized SSL connection renegotiation handling when SSL
		#	 directives are used in per-directory context.
		#SSLOptions +FakeBasicAuth +ExportCertData +StrictRequire
		<FilesMatch ".(cgi|shtml|phtml|php)$">
				SSLOptions +StdEnvVars
		</FilesMatch>
		<Directory /usr/lib/cgi-bin>
				SSLOptions +StdEnvVars
		</Directory>

		#   SSL Protocol Adjustments:
		#   The safe and default but still SSL/TLS standard compliant shutdown
		#   approach is that mod_ssl sends the close notify alert but doesn't wait for
		#   the close notify alert from client. When you need a different shutdown
		#   approach you can use one of the following variables:
		#   o ssl-unclean-shutdown:
		#	 This forces an unclean shutdown when the connection is closed, i.e. no
		#	 SSL close notify alert is send or allowed to received.  This violates
		#	 the SSL/TLS standard but is needed for some brain-dead browsers. Use
		#	 this when you receive I/O errors because of the standard approach where
		#	 mod_ssl sends the close notify alert.
		#   o ssl-accurate-shutdown:
		#	 This forces an accurate shutdown when the connection is closed, i.e. a
		#	 SSL close notify alert is send and mod_ssl waits for the close notify
		#	 alert of the client. This is 100% SSL/TLS standard compliant, but in
		#	 practice often causes hanging connections with brain-dead browsers. Use
		#	 this only for browsers where you know that their SSL implementation
		#	 works correctly.
		#   Notice: Most problems of broken clients are also related to the HTTP
		#   keep-alive facility, so you usually additionally want to disable
		#   keep-alive for those clients, too. Use variable "nokeepalive" for this.
		#   Similarly, one has to force some clients to use HTTP/1.0 to workaround
		#   their broken HTTP/1.1 implementation. Use variables "downgrade-1.0" and
		#   "force-response-1.0" for this.
		# BrowserMatch "MSIE [2-6]"
		#		nokeepalive ssl-unclean-shutdown
		#		downgrade-1.0 force-response-1.0

	</VirtualHost>
</IfModule>

# vim: syntax=apache ts=4 sw=4 sts=4 sr noet
启动ssl服务
a2ensite /etc/apache2/sites-available/lab-ssl.conf
a2enmod ssl
查看是否正确配置
在浏览器地址栏输入 https://localhost
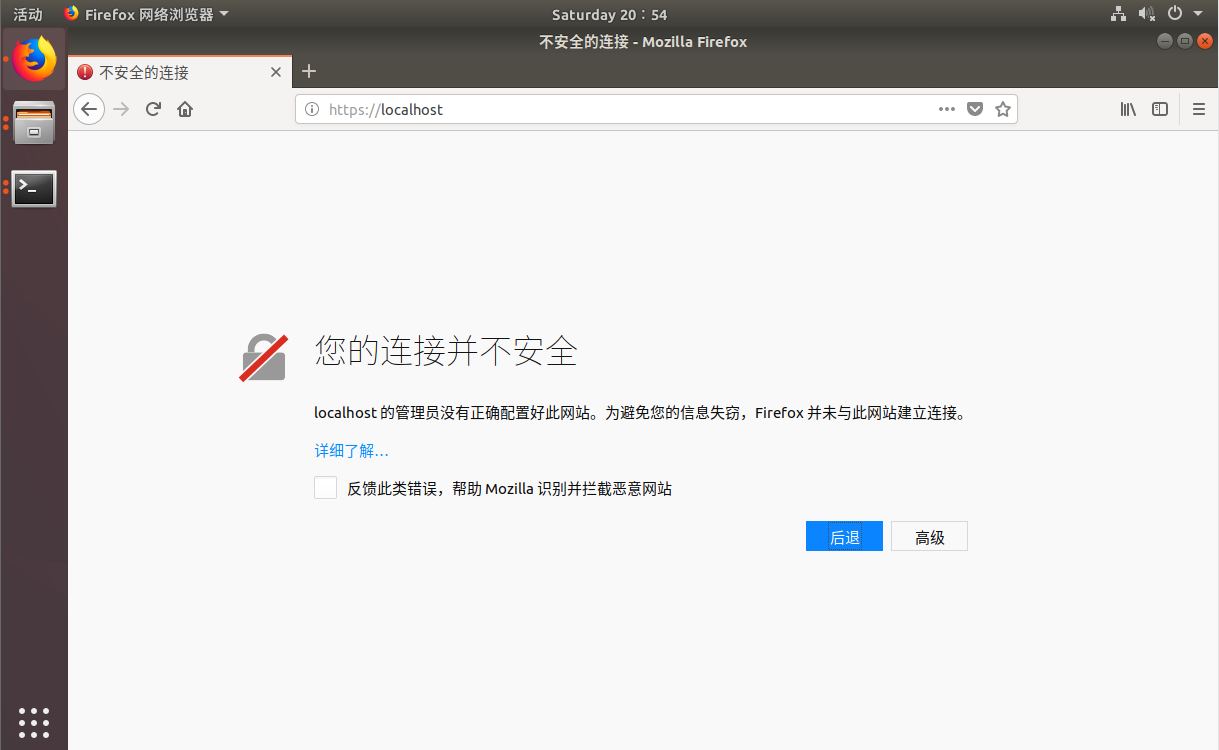
发现浏览器不信任这个网站,为什么?行为这个网站的证书是用我们自己的CA签名的,浏览器并不信任我们自己建立的CA,所以我们需要手动导入CA证书让浏览器信任我们的CA。
导入步骤如下:
打开 FireFox 浏览器,依次选择“编辑”----“首选项”----“隐私与安全”----“证书”----“查看证书”----“证书机构”,点击导入,选择 myCA 目录下的根证书“cacert.pem”, 导入。
之后,再次浏览localhost
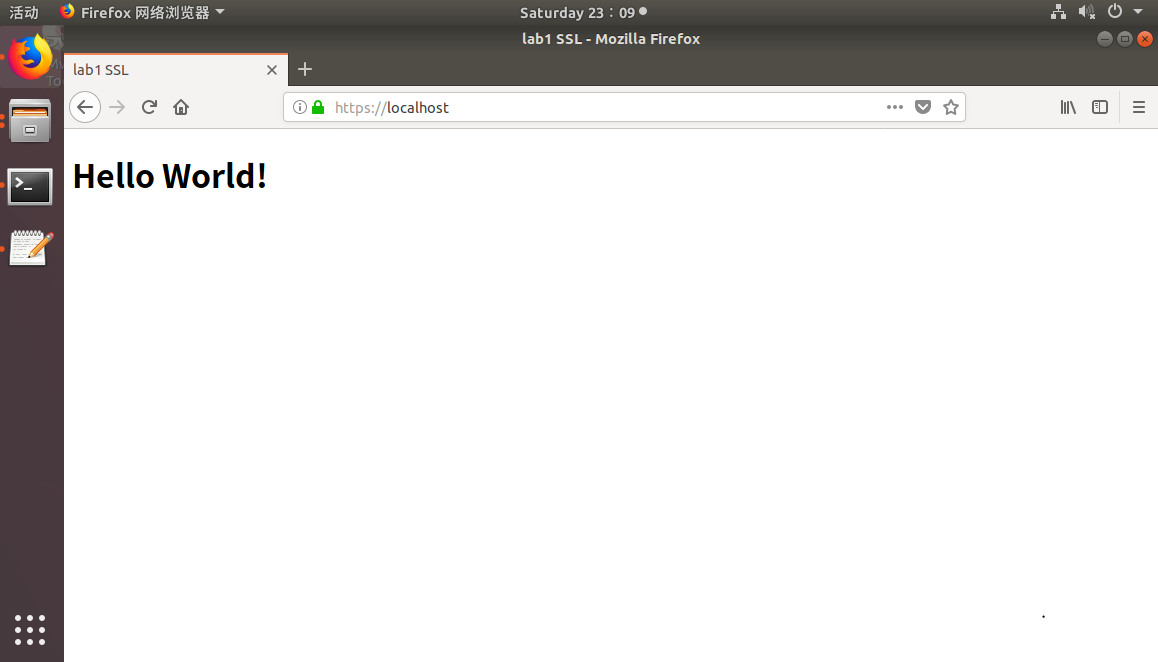
地址栏有一个绿色的锁,至此https服务搭建完成。