在微服务架构中,我们将系统拆分为很多个服务,各个服务之间通过注册与订阅的方式相互依赖,由于各个服务都是在各自的进程中运行,就有可能由于网络原因或者服务自身的问题导致调用故障或延迟,随着服务的积压,可能会导致服务崩溃。为了解决这一系列的问题,断路器等一系列服务保护机制出现了。
断路器本身是一种开关保护机制,用于在电路上保护线路过载,当线路中有电器发生短路时,断路器能够及时切断故障电路,防止发生过载、发热甚至起火等严重后果。
在分布式架构中,断路器模式的作用也是类似的。
针对上述问题,Spring Cloud Hystrix 实现了断路器、线路隔离等一系列服务保护功能。它也是基于 Netflix 的开源框架 Hystrix 实现的,该框架的目标在于通过控制那些访问远程系统、服务和第三方库的节点,从而对延迟和故障提供更强大的容错能力。Hystrix 具备服务降级、服务熔断、线程和信号隔离、请求缓存、请求合并以及服务监控等强大功能。
快速入门
在开始实现断路器之前,先用之前实现的一些内容作为基础,构建一个如下图所示的服务调用关系。
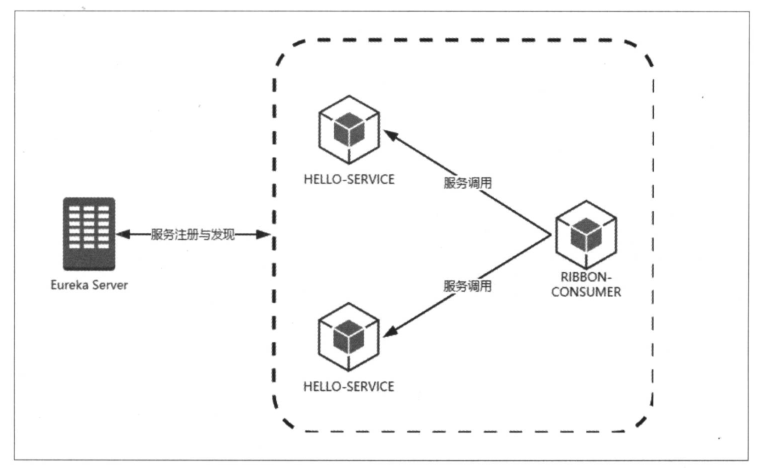
需要启动的工程有如下一些:
- eureka-server 工程:服务注册中心,端口为8082。
- hello-service 工程:HELLO-SERVICE 的服务单元,两个实例启动端口分别为 2221 和 2222.
- ribbon-consumer 工程:使用 Ribbon 实现的服务消费者,端口为 3333
在未加入断路器之前,关闭8081的实例,发送 GET 请求到 http://localhost:3333/ribbon-consumer ,可以获取下面的输入。

下面引入 Spring Cloud Hystrix。
- 在 ribbon-consumer 工程的 pom.xml 的 dependency 节点中引入 spring-cloud-starter-hystrix 依赖:
<dependency>
  <groupId>org.springframework.cloud</groupId>
  <artifactId>spring-cloud-starter-hystrix</artifactId>
</dependency>
- 在 ribbon-consumer 工程的主类上使用 @EnableCircuitBreaker 注解开启断路器功能:
package com.example.demo;

import org.springframework.boot.SpringApplication;
import org.springframework.boot.autoconfigure.SpringBootApplication;
import org.springframework.cloud.client.circuitbreaker.EnableCircuitBreaker;
import org.springframework.cloud.client.discovery.EnableDiscoveryClient;
import org.springframework.cloud.client.loadbalancer.LoadBalanced;
import org.springframework.context.annotation.Bean;
import org.springframework.web.client.RestTemplate;

@EnableCircuitBreaker
@EnableDiscoveryClient
@SpringBootApplication
public class DemoApplication {

    @Bean
    @LoadBalanced
    RestTemplate restTemplate(){
        return new RestTemplate();
    }

    public static void main(String[] args) {
        SpringApplication.run(DemoApplication.class, args);
    }
}
注:此处还可以使用 Spring Cloud 应用中的 @SpringCloudApplication 注解来修饰主类,该注解的具体定义如下。可以看到,该注解中包含了上述所引用的三个注解,这意味着一个 Spring Cloud 标准应用应包含服务发现以及断路器。
//
// Source code recreated from a .class file by IntelliJ IDEA
// (powered by Fernflower decompiler)
//

package org.springframework.cloud.client;

import java.lang.annotation.Documented;
import java.lang.annotation.ElementType;
import java.lang.annotation.Inherited;
import java.lang.annotation.Retention;
import java.lang.annotation.RetentionPolicy;
import java.lang.annotation.Target;
import org.springframework.boot.autoconfigure.SpringBootApplication;
import org.springframework.cloud.client.circuitbreaker.EnableCircuitBreaker;
import org.springframework.cloud.client.discovery.EnableDiscoveryClient;

@Target({ElementType.TYPE})
@Retention(RetentionPolicy.RUNTIME)
@Documented
@Inherited
@SpringBootApplication
@EnableDiscoveryClient
@EnableCircuitBreaker
public @interface SpringCloudApplication {
}
- 改造服务消费方式,新增 HelloService 类,注入 RestTemplate 实例。然后,将在 ConsumerController 中对 RestTemplate 的使用迁移到 helloService 函数中,最后,在 helloService 函数上增加 @HystrixCommand 注解来指定回调方法。
package com.example.demo.web;

import com.netflix.hystrix.contrib.javanica.annotation.HystrixCommand;
import org.springframework.beans.factory.annotation.Autowired;
import org.springframework.stereotype.Service;
import org.springframework.web.bind.annotation.RequestMapping;
import org.springframework.web.bind.annotation.RequestMethod;
import org.springframework.web.client.RestTemplate;

/**
 * @author lxx
 * @version V1.0.0
 * @date 2017-8-16
 */

@Service
public class HelloService {

    @Autowired
    RestTemplate restTemplate;

    @HystrixCommand(fallbackMethod = "helloFallback")
    public String helloService(){
        return restTemplate.getForEntity("http://hello-service/index",
                String.class).getBody();
    }

    public String helloFallback(){
        return "error";
    }
}
- 修改 ConsumerController 类, 注入上面实现的 HelloService 实例,并在 helloConsumer 中进行调用:
package com.example.demo.web;

import org.springframework.beans.factory.annotation.Autowired;
import org.springframework.web.bind.annotation.RequestMapping;
import org.springframework.web.bind.annotation.RequestMethod;
import org.springframework.web.bind.annotation.RestController;
import org.springframework.web.client.RestTemplate;

/**
 * @author lxx
 * @version V1.0.0
 * @date 2017-8-9
 */

@RestController
public class ConsumerController {

    @Autowired
    HelloService helloService;

    @RequestMapping(value = "ribbon-consumer", method = RequestMethod.GET)
    public String helloConsumer(){
        return helloService.helloService();
    }
}
下面,对断路器实现的服务回调逻辑进行验证,重新启动之前关闭的 2221 端口的 hello-service,确保此时服务注册中心、两个 hello-service 和 ribbon-consumer 均已启动,再次访问 http://localhost:3333/ribbon-consumer 可以轮询两个 hello-serive 并返回一些文字信息。此时断开其中任意一个端口的 hello-service,再次访问,当轮询到关闭的端口服务时,输出内容为 error ,不再是之前的提示信息。

除了通过断开具体的服务实例来模拟某个节点无法访问的情况之外,还可以模拟一下服务阻塞(长时间未响应)的情况。下面对hello-serive 的 /index 接口做一些修改,具体如下:
package com.example.demo.web;

import org.apache.log4j.Logger;
import org.springframework.beans.factory.annotation.Autowired;
import org.springframework.cloud.client.ServiceInstance;
import org.springframework.cloud.client.discovery.DiscoveryClient;
import org.springframework.web.bind.annotation.RequestMapping;
import org.springframework.web.bind.annotation.RestController;

import java.util.Random;

/**
 * @author lxx
 * @version V1.0.0
 * @date 2017-8-9
 */

@RestController
public class HelloController {

    private final Logger logger = Logger.getLogger(getClass());

    @Autowired
    private DiscoveryClient client;

    @RequestMapping(value = "/index")
    public String index(){
        ServiceInstance instance = client.getLocalServiceInstance();
        // 让处理线程等待几秒钟
        int sleepTime = new Random().nextInt(3000);
        logger.info("sleepTime:"+sleepTime);

        try {
            Thread.sleep(sleepTime);
        } catch (InterruptedException e) {
            e.printStackTrace();
        }
        logger.info("/hello:host:"+instance.getHost()+" port:"+instance.getPort()
                +" service_id:"+instance.getServiceId());
        return "hello world!";
    }
}
通过Thread.sleep 函数可让 /index 接口的处理线程不是马上返回内容,而是在阻塞几秒后才返回内容。由于 Hystrix 默认超时时间为 2000 毫秒,所以这里采用了 0 至 3000 的随机数以让处理过程有一定概率发生超时来触发断路器。为了更精确的观察断路器的触发,在消费者调用函数中做一些时间记录,具体如下:
package com.example.demo.web;

import com.netflix.hystrix.contrib.javanica.annotation.HystrixCommand;
import org.springframework.beans.factory.annotation.Autowired;
import org.springframework.stereotype.Service;
import org.springframework.web.bind.annotation.RequestMapping;
import org.springframework.web.bind.annotation.RequestMethod;
import org.springframework.web.client.RestTemplate;

/**
 * @author lxx
 * @version V1.0.0
 * @date 2017-8-16
 */

@Service
public class HelloService {

    @Autowired
    RestTemplate restTemplate;

    @HystrixCommand(fallbackMethod = "helloFallback")
    public String helloService(){
        long beginTime = System.currentTimeMillis();
        String body = restTemplate.getForEntity("http://hello-service/index",
                String.class).getBody();
        long endTime = System.currentTimeMillis();
        System.out.println("Spend Time : "+ (endTime - beginTime));
        return body;
    }

    public String helloFallback(){
        return "error";
    }
}
原理分析
工作流程
- 创建 HystrixCommand 或 HystrixObservableCommand 对象
首先,创建一个 HystrixCommand 或 HystrixObservableCommand 对象,用来表示对依赖服务的操作请求,同时传递所有需要的参数。从其命名中我们就能知道它采用了“命令模式” 来实现服务调用操作的封装。而这两个 Command 对象分别针对不同的应用场景。
- HystrixCommand :用在依赖的服务返回单个操作结果的时候。
- HystrixObservableCommand :用在依赖的服务返回多个操作结果的时候。
命令模式,将来自客户端的请求封装成一个对象,从而让你可以使用不同的请求对客户端进行参数化。它可以被用于实现“行为请求者” 与 “行为实现者” 的解耦,以便使两者可以适应变化。下面的示例是对命令模式的简单实现:
package com.example.demo.command;

/**
 * @author lxx
 * @version V1.0.0
 * @date 2017-8-16
 */

// 接收者
public class Receiver {
    public void active(){
        //真正的业务逻辑
        System.out.println("测试命令模式");
    }
}
package com.example.demo.command;

/**
 * @author lxx
 * @version V1.0.0
 * @date 2017-8-16
 */
//抽象命令
public interface Command {
    void excute();
}
package com.example.demo.command;

import org.springframework.beans.factory.annotation.Autowired;

/**
 * @author lxx
 * @version V1.0.0
 * @date 2017-8-16
 */

//具体命令实现
public class CommandImpl implements Command {
    private Receiver receiver;

    public CommandImpl(Receiver receiver) {
        this.receiver = receiver;
    }

    @Override
    public void excute() {
        this.receiver.active();
    }
}
package com.example.demo.command;

/**
 * @author lxx
 * @version V1.0.0
 * @date 2017-8-16
 */

//客户端调用
public class Invoker {

    private Command command;

    public void setCommand(Command command) {
        this.command = command;
    }

    public void  active (){
        command.excute();
    }
}
package com.example.demo.command;

/**
 * @author lxx
 * @version V1.0.0
 * @date 2017-8-16
 */

public class Client {
    public static void main(String[] args) {
        Receiver receiver = new Receiver();
        Command command = new CommandImpl(receiver);
        Invoker invoker = new Invoker();
        invoker.setCommand(command);
        invoker.active(); //客户端通过调用者来执行命令
    }
}
从代码中,可以看到这样几个对象。
- Receiver:接收者,它知道如何处理具体的业务逻辑。
- Command:抽象命令,它定义了一个命令对象应具备的一系列命令操作,比如 execute 等。当命令操作被调用的时候就会触发接收者去做具体命令对应的业务逻辑。
- CommandImpl:具体的命令实现,在这里它绑定了命令操作与接收者之间的关系,execute 命令的实现委托给了 Receiver 的 action 函数。
- Invoker:调用者,它持有一个命令对象,并且可以在需要的时候通过命令对象完成具体的业务逻辑。
从上面的示例中,我们可以看到,调用者 Invoker 与操作者 Receiver 通过 Command 命令接口实现了解耦。对于调用者来说,我们可以为其注入多个命令操作,调用者只需在需要的时候直接调用即可,而不需要知道这些操作命令实际是如何实现的。而在这里所提到的 HystrixCommand 和 HystrixObservableCommand 则是在 Hystrix 中对 Command 的进一步抽象定义。
2. 命令执行
命令执行方式一共有4种,而 Hystrix 在执行时会根据创建的Command对象以及具体的情况来选择一种执行。其中 HystrixCommand 实现了下面两个执行方式。
- execute():同步执行,从依赖的服务返回一个单一的结果对象,或是在发生错误的时候抛出异常。
- queue():异步执行,直接返回一个 Future 对象,其中包含了服务执行结束时要返回的单一结果对象。
R execute();

Future<R> queue();
而 HystrixObservableCommand 实现了另外两种执行方式。
- observe():返回 Observable 对象,它代表了操作的多个结果,它是一个 HotObservable。
- toObservable():同样返回 Observable 对象,也代表了操作的多个结果,但它返回的是一个 Cold Observable。
Observable<R> observe();

Observable<R> toObservable();
在 Hystrix 的底层实现中大量使用了 RxJava ,为了更容易的理解后续内容,在这里对 RxJava 的观察者-订阅者模式做一个简单的入门介绍。
上面提到的 Observable 对象就是 RxJava 中的核心内容之一,可以理解为 “事件源” 或者 “被观察者”,与其对应的 Subscriber 对象,可以理解为 “订阅者” 或者 “观察者”。这两个对象是 RxJava 响应式编程的重要组成部分。
- Observable 用来向订阅者 Subscriber 对象发布事件,Subscriber 对象则在接收到事件后对其进行处理,而在这里所指的事件通常就是对依赖服务的调用。
- 一个 Observable 可以发出多个事件,知道结束或者发生异常。
- Observable 对象每发出一个事件,就会调用对应观察者 Subscriber 对象的 onNext() 方法。
- 每一个 Observable 的执行,最后一定会通过调用 Subscriber.onCompleted() 或者 Subscriber.onError() 来结束该事件的操作流。
下面通过一个简单的例子来直观理解一下 Observable 与 Subscribers:
package com.example.demo.Observable_Subsciber;

import rx.Observable;
import rx.Subscriber;

/**
 * @author lxx
 * @version V1.0.0
 * @date 2017-8-16
 */

public class Obs_Subs {

    public static void main(String[] args) {

        //创建事件源
        Observable<String> observable = Observable.create(new Observable.OnSubscribe<String>() {
            @Override
            public void call(Subscriber<? super String> subscriber) {
                subscriber.onNext("Hello RxJava ");
                subscriber.onNext("I'm XX");
                subscriber.onCompleted();
            }
        });

        //创建订阅者
        Subscriber<String> subscriber = new Subscriber<String>() {
            @Override
            public void onCompleted() {

            }

            @Override
            public void onError(Throwable throwable) {

            }

            @Override
            public void onNext(String s) {

            }
        };

        observable.subscribe(subscriber);

    }
}
在该示例中,创建了一个简单的事件源 observable,一个对事件传递内容输出的订阅者 subscriber ,通过 observable.subscribe(subscriber) 来触发事件的发布。
在这里我们对于事件源 observable 提到了两个不同的概念:Hot Observable 和 Cold Observable ,分别对应了上面的 command.observe() 和 command.toObservable() 的返回对象。其中 HotObservable,不论 “事件源” 是否有 “订阅者” ,都会在创建后对事件进行发布,所以对于 Hot Observable 的每一个 “订阅者” 都有可能是从 “事件源” 的中途开始的,并可能只是看到了整个操作的局部过程。而 Cold Observable 在没有 “订阅者” 的时候并不会发布事件,而是进行等待,直到有 “订阅者” 之后才发布事件,所以对于 Cold Observable 的订阅者,它可以保证从一开始看到整个操作的全部过程。
3. 结果是否被缓存
若当前命令的请求缓存功能是被启用的,并且该命令缓存命中,那么缓存的结果会立即以 Observable 对象的形式返回。
4. 断路器是否打开
在命令结果没有缓存命中的时候,Hystrix 在执行命令前需要检查断路器是否为打开状态:
- 打开:Hystrix不执行命令,转到 fallback 处理逻辑(对应下面第8步)。
- 关闭:Hystrix 跳到第5步,检查是否有可用资源来执行命令。
5. 线程池 / 请求队列 / 信息量是否占满
如果与命令相关的线程池 / 请求队列 / 信息量已经占满,那么 Hystrix 不会执行命令,跳转到 fallback 处理逻辑(对应下面第8步)。
注意:此处的线程池并非容器的线程池,而是每个依赖服务的专有线程池。Hystrix 为了保证不会因为某个依赖服务的问题影响到其他依赖服务而采用了 “舱壁模式” 来隔离每个依赖的服务。
6. HystrixObservableCommand.construct() 或 HystrixCommand.run()
Hystrix 会根据编写的方法来决定采取什么样的方式去请求依赖服务。
- HystrixCommand.run() :返回一个单一的结果,或者抛出异常。
- HystrixObservableCommand.construct():返回一个 Observable 对象来发射多个结果,或通过 onError 发送错误通知。
如果 run() 或 construct() 方法的执行时间超过了命令设置的超时阈值,当前处理线程会抛出 TimeoutException。这种情况下,也会跳转到 fallback 处理逻辑(第8步)。
7. 计算断路器的健康度
Hystrix 会将 “成功”、“失败”、“拒绝”、“超时” 等信息报告给断路器,而断路器会维护一组计数器来统计这些数据。
断路器会使用这些统计数据来决定是否要将断路器打开,来对某个依赖服务的请求进行 “熔断 / 短路”,直到恢复期结束。
8. fallback 处理
当命令执行失败的时候,Hystrix 会进入 fallback 尝试回退处理,我们通常也称为 “服务降级”。下面就是能够引发服务降级处理的几种情况:
- 第4步,当前命令处于 “熔断 / 短路” 状态,断路器是打开的时候。
- 第5步,当前命令的线程池、请求队列或者信号量被占满的时候。
- 第6步,HystrixObservableCommand.construct() 或者 HystrixCommand.run() 抛出异常的时候。
9、返回成功的响应
断路器原理
HystrixCircuitBreaker 的定义:
//
// Source code recreated from a .class file by IntelliJ IDEA
// (powered by Fernflower decompiler)
//

package com.netflix.hystrix;

import com.netflix.hystrix.HystrixCommandGroupKey;
import com.netflix.hystrix.HystrixCommandKey;
import com.netflix.hystrix.HystrixCommandMetrics;
import com.netflix.hystrix.HystrixCommandProperties;
import com.netflix.hystrix.HystrixCommandMetrics.HealthCounts;
import java.util.concurrent.ConcurrentHashMap;
import java.util.concurrent.atomic.AtomicLong;
import java.util.concurrent.atomic.AtomicReference;
import rx.Subscriber;
import rx.Subscription;

public interface HystrixCircuitBreaker {
    boolean allowRequest();

    boolean isOpen();

    void markSuccess();

    void markNonSuccess();

    boolean attemptExecution();

    public static class NoOpCircuitBreaker implements HystrixCircuitBreaker {
        public NoOpCircuitBreaker() {
        }

        public boolean allowRequest() {
            return true;
        }

        public boolean isOpen() {
            return false;
        }

        public void markSuccess() {
        }

        public void markNonSuccess() {
        }

        public boolean attemptExecution() {
            return true;
        }
    }

    public static class HystrixCircuitBreakerImpl implements HystrixCircuitBreaker {
        private final HystrixCommandProperties properties;
        private final HystrixCommandMetrics metrics;
        private final AtomicReference<HystrixCircuitBreaker.HystrixCircuitBreakerImpl.Status> status;
        private final AtomicLong circuitOpened;
        private final AtomicReference<Subscription> activeSubscription;

        protected HystrixCircuitBreakerImpl(HystrixCommandKey key, HystrixCommandGroupKey commandGroup, HystrixCommandProperties properties, HystrixCommandMetrics metrics) {
            this.status = new AtomicReference(HystrixCircuitBreaker.HystrixCircuitBreakerImpl.Status.CLOSED);
            this.circuitOpened = new AtomicLong(-1L);
            this.activeSubscription = new AtomicReference((Object)null);
            this.properties = properties;
            this.metrics = metrics;
            Subscription s = this.subscribeToStream();
            this.activeSubscription.set(s);
        }

        private Subscription subscribeToStream() {
            return this.metrics.getHealthCountsStream().observe().subscribe(new Subscriber() {
                public void onCompleted() {
                }

                public void onError(Throwable e) {
                }

                public void onNext(HealthCounts hc) {
                    if(hc.getTotalRequests() >= (long)((Integer)HystrixCircuitBreakerImpl.this.properties.circuitBreakerRequestVolumeThreshold().get()).intValue() && hc.getErrorPercentage() >= ((Integer)HystrixCircuitBreakerImpl.this.properties.circuitBreakerErrorThresholdPercentage().get()).intValue() && HystrixCircuitBreakerImpl.this.status.compareAndSet(HystrixCircuitBreaker.HystrixCircuitBreakerImpl.Status.CLOSED, HystrixCircuitBreaker.HystrixCircuitBreakerImpl.Status.OPEN)) {
                        HystrixCircuitBreakerImpl.this.circuitOpened.set(System.currentTimeMillis());
                    }

                }
            });
        }

        public void markSuccess() {
            if(this.status.compareAndSet(HystrixCircuitBreaker.HystrixCircuitBreakerImpl.Status.HALF_OPEN, HystrixCircuitBreaker.HystrixCircuitBreakerImpl.Status.CLOSED)) {
                this.metrics.resetStream();
                Subscription previousSubscription = (Subscription)this.activeSubscription.get();
                if(previousSubscription != null) {
                    previousSubscription.unsubscribe();
                }

                Subscription newSubscription = this.subscribeToStream();
                this.activeSubscription.set(newSubscription);
                this.circuitOpened.set(-1L);
            }

        }

        public void markNonSuccess() {
            if(this.status.compareAndSet(HystrixCircuitBreaker.HystrixCircuitBreakerImpl.Status.HALF_OPEN, HystrixCircuitBreaker.HystrixCircuitBreakerImpl.Status.OPEN)) {
                this.circuitOpened.set(System.currentTimeMillis());
            }

        }

        public boolean isOpen() {
            return ((Boolean)this.properties.circuitBreakerForceOpen().get()).booleanValue()?true:(((Boolean)this.properties.circuitBreakerForceClosed().get()).booleanValue()?false:this.circuitOpened.get() >= 0L);
        }

        public boolean allowRequest() {
            return ((Boolean)this.properties.circuitBreakerForceOpen().get()).booleanValue()?false:(((Boolean)this.properties.circuitBreakerForceClosed().get()).booleanValue()?true:(this.circuitOpened.get() == -1L?true:(((HystrixCircuitBreaker.HystrixCircuitBreakerImpl.Status)this.status.get()).equals(HystrixCircuitBreaker.HystrixCircuitBreakerImpl.Status.HALF_OPEN)?false:this.isAfterSleepWindow())));
        }

        private boolean isAfterSleepWindow() {
            long circuitOpenTime = this.circuitOpened.get();
            long currentTime = System.currentTimeMillis();
            long sleepWindowTime = (long)((Integer)this.properties.circuitBreakerSleepWindowInMilliseconds().get()).intValue();
            return currentTime > circuitOpenTime + sleepWindowTime;
        }

        public boolean attemptExecution() {
            return ((Boolean)this.properties.circuitBreakerForceOpen().get()).booleanValue()?false:(((Boolean)this.properties.circuitBreakerForceClosed().get()).booleanValue()?true:(this.circuitOpened.get() == -1L?true:(this.isAfterSleepWindow()?this.status.compareAndSet(HystrixCircuitBreaker.HystrixCircuitBreakerImpl.Status.OPEN, HystrixCircuitBreaker.HystrixCircuitBreakerImpl.Status.HALF_OPEN):false)));
        }

        static enum Status {
            CLOSED,
            OPEN,
            HALF_OPEN;

            private Status() {
            }
        }
    }

    public static class Factory {
        private static ConcurrentHashMap<String, HystrixCircuitBreaker> circuitBreakersByCommand = new ConcurrentHashMap();

        public Factory() {
        }

        public static HystrixCircuitBreaker getInstance(HystrixCommandKey key, HystrixCommandGroupKey group, HystrixCommandProperties properties, HystrixCommandMetrics metrics) {
            HystrixCircuitBreaker previouslyCached = (HystrixCircuitBreaker)circuitBreakersByCommand.get(key.name());
            if(previouslyCached != null) {
                return previouslyCached;
            } else {
                HystrixCircuitBreaker cbForCommand = (HystrixCircuitBreaker)circuitBreakersByCommand.putIfAbsent(key.name(), new HystrixCircuitBreaker.HystrixCircuitBreakerImpl(key, group, properties, metrics));
                return cbForCommand == null?(HystrixCircuitBreaker)circuitBreakersByCommand.get(key.name()):cbForCommand;
            }
        }

        public static HystrixCircuitBreaker getInstance(HystrixCommandKey key) {
            return (HystrixCircuitBreaker)circuitBreakersByCommand.get(key.name());
        }

        static void reset() {
            circuitBreakersByCommand.clear();
        }
    }
}
主要定义了三个断路器的抽象方法。
- allowRequest:Hystrix 命令的请求通过它判断是否被执行。
- isOpen:返回当前断路器是否打开。
- markSuccess:用来闭合断路器。
另外还有三个静态类。
- 静态类 Factory 中维护了一个 Hystrix 命令与 HystrixCircuitBreaker 的关系集合:ConcurrentHashMap<String, HystrixCircuitBreaker> circuitBreakersByCommand,其中 String 类型的key 通过 HystrixCommandKey 定义,每一个 Hystrix 命令需要有一个 key 来标识,同时一个 Hystrix 命令也会在该集合中找到它对应的断路器 HystrixCircuitBreaker 实例。
- 静态类 NoOpCircuitBreaker 定义了一个什么都不做的断路器实现,它允许所有请求,并且断路器状态始终闭合。
- 静态类 HystrixCircuitBreakerImpl 是断路器接口 HystrixCIrcuitBreaker 的实现类,在该类中定义断路器的 4 个核心对象。
- HystrixCommandProperties properties :断路器对应 HystrixCommand 实例的属性对象。
- HystrixCommandMetrics metrics :用来让 HystrixCommand 记录各类度量指标的对象。
- AtomicLong circuitOpened :断路器打开或是上一次测试的事件戳。
HystrixCircuitBreakerImpl 的各个实现方法如下:
- isOpen:判断断路器的打开 / 关闭状态。
 public boolean isOpen() {
  return ((Boolean)this.properties.circuitBreakerForceOpen().get()).booleanValue()?true:(((Boolean)this.properties.circuitBreakerForceClosed().get()).booleanValue()?false:this.circuitOpened.get() >= 0L);
 }
- allowRequest:判断请求是否被允许:
 public boolean allowRequest() {
  return ((Boolean)this.properties.circuitBreakerForceOpen().get()).booleanValue()?false:(((Boolean)this.properties.circuitBreakerForceClosed().get()).booleanValue()?true:(this.circuitOpened.get() == -1L?true:(((HystrixCircuitBreaker.HystrixCircuitBreakerImpl.Status)this.status.get()).equals(HystrixCircuitBreaker.HystrixCircuitBreakerImpl.Status.HALF_OPEN)?false:this.isAfterSleepWindow())));
 }
- markSuccess:“半开路” 状态时使用。若Hystrix命令调用成功,通过该方法将打开的断路器关闭,并重置度量指标对象。
 public void markNonSuccess() {
  if(this.status.compareAndSet(HystrixCircuitBreaker.HystrixCircuitBreakerImpl.Status.HALF_OPEN, HystrixCircuitBreaker.HystrixCircuitBreakerImpl.Status.OPEN)) {
    this.circuitOpened.set(System.currentTimeMillis());
  }
}
依赖隔离
Hystrix 使用 “舱壁模式” 实现线程池的隔离,它为每一个依赖服务创建一个独立的线程池,就算某个依赖服务出现延迟过高的情况,也不会拖慢其他的依赖服务。
使用详解
创建请求命令
Hystrix 命令就是我们之前所说的 HystrixCommand,它用来封装具体的依赖服务调用逻辑。
可以通过继承的方式来实现,比如: