我们看下当前的代码:
using UnityEngine;
using UnityEngine.UI;

namespace QFramework.Example
{

    // 1. 定义一个 Model 对象
    public class CounterAppModel : AbstractModel
    {
        public int Count;

        protected override void OnInit()
        {
            Count = 0;
        }
    }


    // 2.定义一个架构(提供 MVC、分层、模块管理等)
    public class CounterApp : Architecture<CounterApp>
    {
        protected override void Init()
        {
            // 注册 Model
            this.RegisterModel(new CounterAppModel());
        }
    }

    // 引入 Command
    public class IncreaseCountCommand : AbstractCommand
    {
        protected override void OnExecute()
        {
            this.GetModel<CounterAppModel>().Count++;
        }
    }

    public class DecreaseCountCommand : AbstractCommand
    {
        protected override void OnExecute()
        {
            this.GetModel<CounterAppModel>().Count--;
        }
    }

    // Controller
    public class CounterAppController : MonoBehaviour , IController /* 3.实现 IController 接口 */
    {
        // View
        private Button mBtnAdd;
        private Button mBtnSub;
        private Text mCountText;

        // 4. Model
        private CounterAppModel mModel;

        void Start()
        {
            // 5. 获取模型
            mModel = this.GetModel<CounterAppModel>();

            // View 组件获取
            mBtnAdd = transform.Find("BtnAdd").GetComponent<Button>();
            mBtnSub = transform.Find("BtnSub").GetComponent<Button>();
            mCountText = transform.Find("CountText").GetComponent<Text>();


            // 监听输入
            mBtnAdd.onClick.AddListener(() =>
            {
                // 交互逻辑
                this.SendCommand<IncreaseCountCommand>();
                // 表现逻辑
                UpdateView();
            });

            mBtnSub.onClick.AddListener(() =>
            {
                // 交互逻辑
                this.SendCommand<DecreaseCountCommand>();
                // 表现逻辑
                UpdateView();
            });

            UpdateView();
        }

        void UpdateView()
        {
            mCountText.text = mModel.Count.ToString();
        }

        // 3.
        public IArchitecture GetArchitecture()
        {
            return CounterApp.Interface;
        }

        private void OnDestroy()
        {
            // 8. 将 Model 设置为空
            mModel = null;
        }
    }
}
我们通过引入了 Command 来帮助 Controller 分担了一部分的交互逻辑。
但是表现逻辑的代码目前看起来并不是很智能。
表现逻辑的代码如下:
// 监听输入
mBtnAdd.onClick.AddListener(() =>
{
    // 交互逻辑
    this.SendCommand<IncreaseCountCommand>();
    // 表现逻辑
    UpdateView();
});

mBtnSub.onClick.AddListener(() =>
{
    // 交互逻辑
    this.SendCommand<DecreaseCountCommand>();
    // 表现逻辑
    UpdateView();
});
每次调用逻辑之后,表现逻辑部分都需要手动调用一次(UpdateView 方法)。
在一个项目中,表现逻辑的调用次数,至少会和交互逻辑的调用次数一样多。因为只要修改了数据,对应地就要把数据的biang在界面上表现出来。
而这部分嗲用表现逻辑的代码也会很多,所以我们引入一个事件机制来解决这个问题。
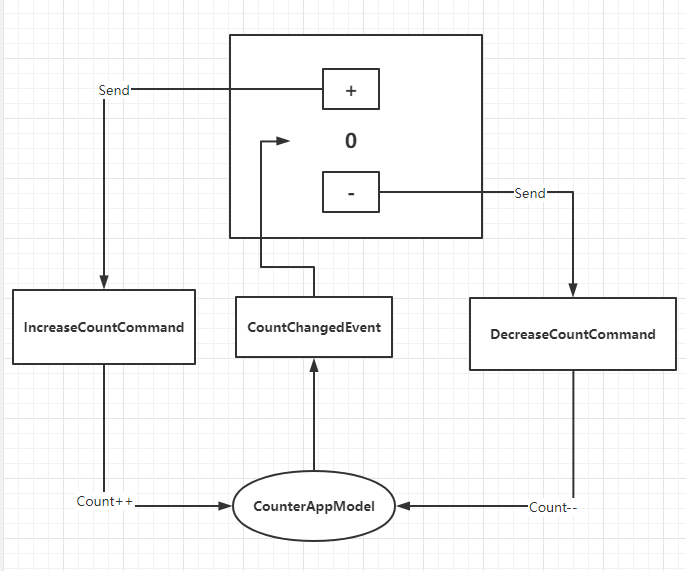
这个事件机制的使用其实是和 Command 一起使用的,这里有一个简单的小模式,如下图所示:

即通过 Command 修改数据,当数据发生修改后发送对应的数据变更事件。
这个是简化版本的 CQRS 原则,即 Command Query Responsibility Separiation,读写分离原则。
引入这项原则会很容易实现 事件驱动、数据驱动 架构。
在 QFramework 中,用法非常简单,代码如下:
using UnityEngine;
using UnityEngine.UI;

namespace QFramework.Example
{

    // 1. 定义一个 Model 对象
    public class CounterAppModel : AbstractModel
    {
        public int Count;

        protected override void OnInit()
        {
            Count = 0;
        }
    }


    // 2.定义一个架构(提供 MVC、分层、模块管理等)
    public class CounterApp : Architecture<CounterApp>
    {
        protected override void Init()
        {
            // 注册 Model
            this.RegisterModel(new CounterAppModel());
        }
    }

    // 定义数据变更事件
    public struct CountChangeEvent // ++
    {

    }

    // 引入 Command
    public class IncreaseCountCommand : AbstractCommand
    {
        protected override void OnExecute()
        {
            this.GetModel<CounterAppModel>().Count++;
            this.SendEvent<CountChangeEvent>(); // ++
        }
    }

    public class DecreaseCountCommand : AbstractCommand
    {
        protected override void OnExecute()
        {
            this.GetModel<CounterAppModel>().Count--;
            this.SendEvent<CountChangeEvent>(); // ++
        }
    }

    // Controller
    public class CounterAppController : MonoBehaviour , IController /* 3.实现 IController 接口 */
    {
        // View
        private Button mBtnAdd;
        private Button mBtnSub;
        private Text mCountText;

        // 4. Model
        private CounterAppModel mModel;

        void Start()
        {
            // 5. 获取模型
            mModel = this.GetModel<CounterAppModel>();

            // View 组件获取
            mBtnAdd = transform.Find("BtnAdd").GetComponent<Button>();
            mBtnSub = transform.Find("BtnSub").GetComponent<Button>();
            mCountText = transform.Find("CountText").GetComponent<Text>();


            // 监听输入
            mBtnAdd.onClick.AddListener(() =>
            {
                // 交互逻辑
                this.SendCommand<IncreaseCountCommand>();
            });

            mBtnSub.onClick.AddListener(() =>
            {
                // 交互逻辑
                this.SendCommand(new DecreaseCountCommand(/* 这里可以传参(如果有) */));
            });

            UpdateView();

            // 表现逻辑
            this.RegisterEvent<CountChangeEvent>(e =>
            {
                UpdateView();

            }).UnRegisterWhenGameObjectDestroyed(gameObject);
        }

        void UpdateView()
        {
            mCountText.text = mModel.Count.ToString();
        }

        // 3.
        public IArchitecture GetArchitecture()
        {
            return CounterApp.Interface;
        }

        private void OnDestroy()
        {
            // 8. 将 Model 设置为空
            mModel = null;
        }
    }
}
代码很简单。
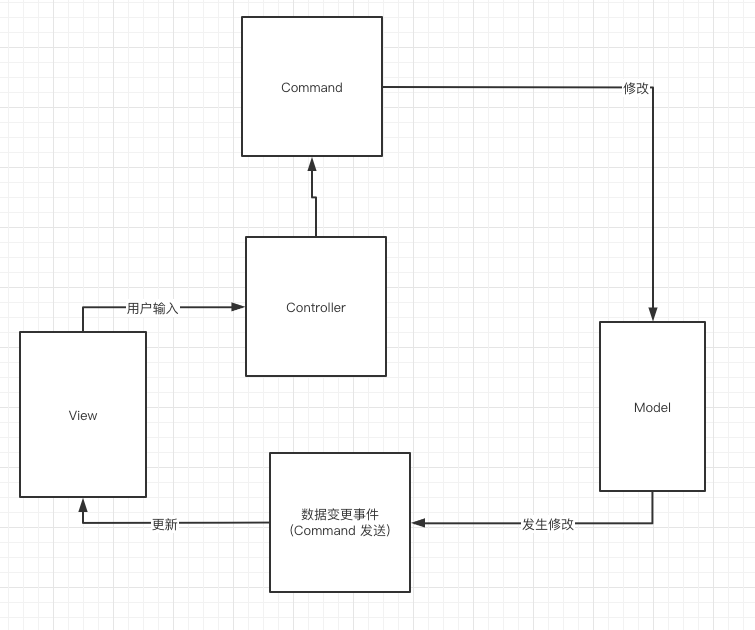
流程图如下:
运行结果如下:
引入事件机制 和 CQRS 原则之后,我们的表现逻辑的代码变少了很多。
由原来的两次主动调用
// 监听输入
mBtnAdd.onClick.AddListener(() =>
{
    // 交互逻辑
    this.SendCommand<IncreaseCountCommand>(); // 没有参数构造的命令支持泛型
    // 表现逻辑
    UpdateView();
});

mBtnSub.onClick.AddListener(() =>
{
    // 交互逻辑
    this.SendCommand(new DecreaseCountCommand()); // 也支持直接传入对象(方便通过构造传参)
    // 表现逻辑
    UpdateView();
});
变成了一处监听事件,接收事件进行调用。
// 监听输入
mBtnAdd.onClick.AddListener(() =>
{
    // 交互逻辑
    this.SendCommand<IncreaseCountCommand>(); // 没有参数构造的命令支持泛型
});

mBtnSub.onClick.AddListener(() =>
{
    // 交互逻辑
    this.SendCommand(new DecreaseCountCommand()); // 也支持直接传入对象(方便通过构造传参)
});

UpdateView();

// 表现逻辑
this.RegisterEvent<CountChangeEvent>(e =>
{
    UpdateView();
}).UnRegisterWhenGameObjectDestroyed(gameObject);
这样减缓了很多交互逻辑。
OK,到此,我们算是用上了还算合格的 MVC 的实现,而 QFramework 所提供的概念中,最重要的概念已经接触到了,即 CQRS,通过 Command 去修改数据,数据发生修改后发送数据变更事件。
当前的示意图如下:
学到这里,对于 QFramework 架构的使用算是真正的入门了。
不过接下来还有一些概念,我们下一篇继续。
更多内容
- 转载请注明地址:liangxiegame.com (首发) 微信公众号:凉鞋的笔记
- QFramework 主页:qframework.cn
- QFramework 交流群: 623597263
- QFramework Github 地址: https://github.com/liangxiegame/qframework
- QFramework Gitee 地址:https://gitee.com/liangxiegame/QFramework
- GamePix 独立游戏学院 & Unity 进阶小班地址:https://www.gamepixedu.com/