1.Spring.Net的IOC简单应用
新建一个解决方案添加一个控制台应用程序和一个业务层一个业务层的接口层,通过配置,让控制台应用程序调业务层的方法
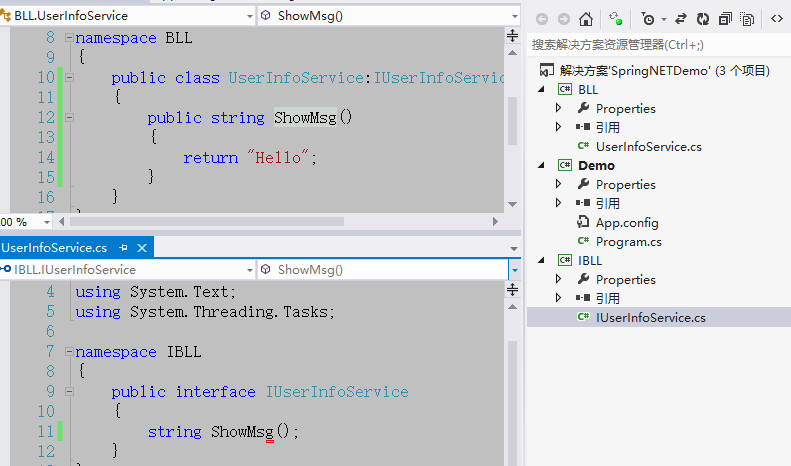
1)新建如下图所示,BLL为业务层,通过Spring.Net在Demo控制台应用程序中获取BLL中UserInfoService的方法
2)在Demo项目文件夹中新建一个Lib文件夹用来放第三方类库,把Spring.Net的核心类库Spring.Core.dll和Common.Logging.dll放进去然后Demo项目引用一下
3)给Demo项目的App.config中配置Spring.Net所需要的配置信息,如下
其中objects节点的子节点object是配置获取类的实例的,type中写的是类的全名称(BLL.UserInfoService)和其所在程序集(BLL),创建类UserInfoService的实例
 1 <?xml version="1.0" encoding="utf-8" ?>
 2 <configuration>
 3   <configSections>
 4     <sectionGroup name="spring">
 5       <section name="context" type="Spring.Context.Support.ContextHandler, Spring.Core"/>
 6       <section name="objects" type="Spring.Context.Support.DefaultSectionHandler, Spring.Core" />
 7     </sectionGroup>
 8   </configSections>
 9   <spring>
10     <context>
11       <resource uri="config://spring/objects"/>
12     </context>
13     <objects xmlns="http://www.springframework.net">
14       <description>An  example that demonstrates simple IoC features.</description>
15       <object name="MyUserInfoService" type="BLL.UserInfoService, BLL"></object>
16     </objects>
17   </spring>
18 </configuration>
4)Demo项目中的Program中的代码
1 static void Main(string[] args)
2         {
3             IApplicationContext ctx = ContextRegistry.GetContext();//读取配置文件
4             IUserInfoService userInfoService = (IUserInfoService)ctx.GetObject("MyUserInfoService");//由ctx容器拿到UserInfoService的实例,MyUserInfoService就是配置文件中object的name属性值
5             Console.WriteLine(userInfoService.ShowMsg());//调取方法
6
7             Console.ReadKey();
8         }
5)运行结果,这样就实现了Demo项目和BLL的解耦,不用再Demo中通过IUserInfoService userService =new UserInfoService();来调取他里面的方法。
以后我们想要换另一个命名空间中的UserInfoService只要引用新的业务层,修改配置文件中object中的属性值对应新的业务层的命名空间,变成另一个项目了就。
如果有多个需要获取的类,则在objects节点下写多个object节点即可。

2.Spring.Net DI属性注入(简单类型和实体的注入)
1)首先在UserInfoService中添加一个属性值
 1 namespace BLL
 2 {
 3     public class UserInfoService : IUserInfoService
 4     {
 5         public string UserName { get; set; }
 6         public string UserAge { get; set; }
 7         public string ShowMsg()
 8         {
 9             return "Hello " + UserName + " " + UserAge;
10         }
11     }
12 }
2)在配置文件App.config中对这个属性赋值,如下
1 <objects xmlns="http://www.springframework.net">
2       <description>An  example that demonstrates simple IoC features.</description>
3       <object name="MyUserInfoService" type="BLL.UserInfoService, BLL">
4         <property name="UserName" value="XiaoMing"></property>
5         <property name="UserAge" value="26"></property>
6       </object>
7     </objects>
3)运行结果,这就是简单类型注入

4)比如新建Model层,新建实体Department,如下图

在UserInfoService中实现Department的注入,UserInfoService的代码如下
 1 namespace BLL
 2 {
 3     public class UserInfoService : IUserInfoService
 4     {
 5         public string UserName { get; set; }
 6         public string UserAge { get; set; }
 7         public Department Department { get; set; }
 8         public string ShowMsg()
 9         {
10             return "Hello " + UserName + " " + UserAge
11                 +" 部门名称:" +Department.Name;
12         }
13     }
14 }
配置文件App.config中的写法,如下注释解释
 1 <objects xmlns="http://www.springframework.net">
 2       <description>An  example that demonstrates simple IoC features.</description>
 3       <object name="MyUserInfoService" type="BLL.UserInfoService, BLL">
 4         <property name="UserName" value="XiaoMing"></property>
 5         <property name="UserAge" value="26"></property>
 6         <property name="Department" ref="MyDepartment"></property>//ref所指的名称是另一个object,代表该属性和另一个object节点绑定,这样就实现实体的注入
 7       </object>
 8       <object name="MyDepartment" type="Model.Department,Model">//type中第一个是类的全名和程序集名称
 9         <property name="Name" value="研发部门"></property>//给实体中的属性赋值
10       </object>
11     </objects>
5)运行结果如下,这是实体的注入

6)在App.config中放很多object会很乱,在Demo项目新建一个services.xml,记得设置属性(复制到输出目录为始终复制),然后把App.config中objects代码挪过去,如下
 1 <?xml version="1.0" encoding="utf-8" ?>
 2 <objects xmlns="http://www.springframework.net">
 3   <description>An  example that demonstrates simple IoC features.</description>
 4   <object name="MyUserInfoService" type="BLL.UserInfoService, BLL">
 5     <property name="UserName" value="XiaoMing"></property>
 6     <property name="UserAge" value="26"></property>
 7     <property name="Department" ref="MyDepartment"></property>
 8   </object>
 9   <object name="MyDepartment" type="Model.Department,Model">
10     <property name="Name" value="研发部门"></property>
11   </object>
12 </objects>
App.config中添加services.xml的关联
 1 <?xml version="1.0" encoding="utf-8" ?>
 2 <configuration>
 3   <configSections>
 4     <sectionGroup name="spring">
 5       <section name="context" type="Spring.Context.Support.ContextHandler, Spring.Core"/>
 6       <section name="objects" type="Spring.Context.Support.DefaultSectionHandler, Spring.Core" />
 7     </sectionGroup>
 8   </configSections>
 9   <spring>
10     <context>
11       <resource uri="config://spring/objects"/>
12       <resource uri="file://services.xml"/>//和services.xml做关联
13     </context>
14     <objects xmlns="http://www.springframework.net">
15       <!--<description>An  example that demonstrates simple IoC features.</description>
16       <object name="MyUserInfoService" type="BLL.UserInfoService, BLL">
17         <property name="UserName" value="XiaoMing"></property>
18         <property name="UserAge" value="26"></property>
19         <property name="Department" ref="MyDepartment"></property>
20       </object>
21       <object name="MyDepartment" type="Model.Department,Model">
22         <property name="Name" value="研发部门"></property>
23       </object>-->
24     </objects>
25   </spring>
26 </configuration>
7)运行后结果和上个结果一致。
3.Spring.Net在MVC4中的应用
1)导入dll文件
新建MVC4的项目WebMVC然后,导入Spring.Net中的dll文件:Spring.Core.dll,Spring.Web.dll,Spring.Web.Extensions.dll,Spring.Web.Extensions.xml,Spring.Web.Mvc4.dll,Spring.Web.Mvc4.xml
2)修改配置信息
将Spring.Net带的examples中的Spring.Mvc4QuickStart中的Config文件夹拷到项目WebMVC(这里其实就是在新建的MVC4项目根目录添加一个Config文件夹里面添加一个controllers.xml代码如下),代码中objects的子节点对应的是Controller,它的property对应的是Controller中需要DI注入的属性,这里singleton指是否是单例模式
 1 <?xml version="1.0" encoding="utf-8" ?>
 2 <objects xmlns="http://www.springframework.net">
 3
 4   <object type="Spring.Mvc4QuickStart.Controllers.HomeController, Spring.Mvc4QuickStart" singleton="false" >
 5     <property name="Message" value="Welcome to ASP.NET MVC4 powered by Spring.NET!" />
 6   </object>
 7
 8   <object type="Spring.Mvc4QuickStart.Controllers.SuffixController, Spring.Mvc4QuickStart" singleton="false" >
 9     <property name="Suffix" value="_Spring.NET_was_Here!" />
10   </object>
11
12   <object type="Spring.Mvc4QuickStart.Controllers.OdataController, Spring.Mvc4QuickStart" singleton="false" />
13
14
15   <!--intentionally do NOT register the AccountController or the ValuesController with the container; demonstrates that the underlying
16   default controller factory will properly (attempt to!) resolve all controllers not registered with Spring.NET
17   using its default controller resolution behavoir-->
18   <!--<object type="Spring.Mvc4QuickStart.Controllers.AccountController, Spring.Mvc4QuickStart" singleton="false" />-->
19   <!--<object type="Spring.Mvc4QuickStart.Controllers.ValuesController, Spring.Mvc4QuickStart" singleton="false" />-->
20 </objects>
3)在WebMVC项目中的Controller中新增一个,如下
 1 namespace WebMVC.Controllers
 2 {
 3     public class UserInfoController : Controller
 4     {
 5         //
 6         // GET: /UserInfo/
 7
 8         IUserInfoService UserInfoService { get; set; }
 9         public ActionResult Index()
10         {
11             string msg = UserInfoService.ShowMvcMsg();
12             ViewData["msg"] = msg;
13             return View();
14         }
15
16     }
17 }
同时分别在IUserInfoService中添加一个ShowMvcMsg()和UserInfoService中添加代码如下
1         public string ShowMvcMsg()
2         {
3             return "Hello Spring.Net MVC4";
4         }
4)修改controller.xml中的配置信息如下
1 <?xml version="1.0" encoding="utf-8" ?>
2 <objects xmlns="http://www.springframework.net">
3   <object type="WebMVC.Controllers.UserInfoController, WebMVC" singleton="false" >
4     <property name="UserInfoService" ref="MyUserInfoService" />
5   </object>
6
7   <object name="MyUserInfoService" type="BLL.UserInfoService, BLL" singleton="false" >
8   </object>
9 </objects>
5)修改WebMVC项目中Web.config配置文件,添加Spring.Net的配置,这里只是显示和Spring.Net相关的配置设置
 1 <configSections>
 2     <sectionGroup name="spring">
 3       <section name="context" type="Spring.Context.Support.MvcContextHandler, Spring.Web.Mvc4"/>
 4     </sectionGroup>
 5   </configSections>
 6   <spring>
 7     <context>
 8       <resource uri="file://~/Config/controllers.xml"/>
 9     </context>
10   </spring>
6)同样的道理将controller.xml中将控制器的配置与业务类的配置分离到services.xml
controller.xml代码如下
1 <?xml version="1.0" encoding="utf-8" ?>
2 <objects xmlns="http://www.springframework.net">
3   <object type="WebMVC.Controllers.UserInfoController, WebMVC" singleton="false" >
4     <property name="UserInfoService" ref="MyUserInfoService" />
5   </object>
6
7 </objects>
services.xml代码如下
1 <?xml version="1.0" encoding="utf-8" ?>
2 <objects>
3   <object name="MyUserInfoService" type="BLL.UserInfoService, BLL" singleton="false" >
4   </object>
5 </objects>
MVC项目中的Web.config中context节点下添加子节点
1 <resource uri="file://~/Config/services.xml"/>
7)修改Global.asax文件原来该类继承System.Web.HttpApplication,修改为继承SpringMvcApplication
8)WebMVC项目展示

运行结果如下,实现了Controller和业务层(BLL层)的解耦。

4.Spring.Net在MVC4中请求Webservice
为什么要解耦UI层和业务逻辑层呢?业务层不可能说今天换一个明天可能换另一个。数据访问层和数据库解耦是因为现在
用SqlServer实际环境会变成Oracle这样大大降低了修改成本。其实解耦Ui层和业务逻辑层是因为,让程序更加灵活,有了面
向服务的资本,可以把业务层做成服务发布出去,UI层可以通过Spring.Net去请求服务来实例化UI层中的接口,就是
(3.Spring.Net在MVC4中的应用)中是用本地的(BLL)中来注册实例化IUserInfoService UserInfoService { get; set; },
下面其实就是在配置文件中把本地的写法,换成服务地址的写法,如下:
1)新建一个Webservice服务
 1 using IBLL;
 2 using System;
 3 using System.Collections.Generic;
 4 using System.Linq;
 5 using System.Web;
 6 using System.Web.Services;
 7
 8 namespace WebService
 9 {
10     /// <summary>
11     /// WebService1 的摘要说明
12     /// </summary>
13     [WebService(Namespace = "http://tempuri.org/")]
14     [WebServiceBinding(ConformsTo = WsiProfiles.BasicProfile1_1)]
15     [System.ComponentModel.ToolboxItem(false)]
16     // 若要允许使用 ASP.NET AJAX 从脚本中调用此 Web 服务,请取消注释以下行。
17     // [System.Web.Script.Services.ScriptService]
18     public class WebService1 : System.Web.Services.WebService,IUserInfoService
19     {
20
21         [WebMethod]
22         public string ShowMsg()
23         {
24             return "Hello ";
25         }
26         [WebMethod]
27         public string ShowMvcMsg()
28         {
29             return "Hello Spring.Net MVC4 Webservice服务";
30         }
31     }
32 }
2)项目引用该服务,在项目的引用上右击添加服务引用,下图

然后就和上面一样了,配置如下:controllers.xml
1 <?xml version="1.0" encoding="utf-8" ?>
2 <objects xmlns="http://www.springframework.net">
3   <object type="WebMVC.Controllers.UserInfoController, WebMVC" singleton="false" >
4     <property name="UserInfoService" ref="MyUserInfoService" />
5   </object>
6
7 </objects>
主要是services.xml,看见了吗?就是把value的地址改成服务的地址就是这样。
1 <?xml version="1.0" encoding="utf-8" ?>
2 <objects>
3   <object name="MyUserInfoService" type="Spring.Web.Services.WebServiceProxyFactory, Spring.Services" >
4     <property name="ServiceUri" value="http://localhost:3042/WebService1.asmx"/>
5     <property name="ServiceInterface" value="IBLL.IUserInfoService, IBLL"/>
6   </object>
7 </objects>
3)结果如下
