一、IOC容器
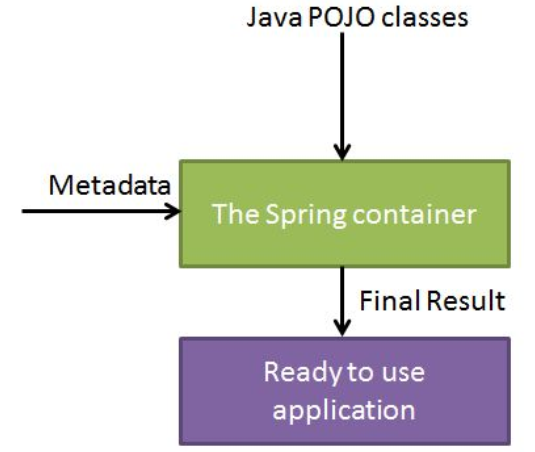
1.Spring IoC 容器利用 Java 的 POJO 类和配置元数据来生成完全配置和可执行的系统或应用程序。
2.spring的BeanFactory容器
定义:这是一个最简单的容器,它主要的功能是为依赖注入 (DI) 提供支持 。
最常被使用的是 XmlBeanFactory 类。这个容器从一个 XML 文件中读取配置元数据,由这些元数据来生成一个被配置化的系统或者应用。


package com.tutorialspoint;
public class HelloWorld {
private String message;
public void setMessage(String message){
this.message = message;
}
public void getMessage(){
System.out.println("Your Message : " + message);
}
}
package com.tutorialspoint;
import org.springframework.beans.factory.InitializingBean;
import org.springframework.beans.factory.xml.XmlBeanFactory;
import org.springframework.core.io.ClassPathResource;
public class MainApp {
public static void main(String[] args) {
XmlBeanFactory factory = new XmlBeanFactory
(new ClassPathResource("Beans.xml"));
HelloWorld obj = (HelloWorld) factory.getBean("helloWorld");
obj.getMessage();
}
}
在主程序当中,我们需要注意以下两点:
• 第一步利用框架提供的 XmlBeanFactory() API 去生成工厂 bean 以及利用 ClassPathResource() API
去加载在路径 CLASSPATH 下可用的 bean 配置文件。XmlBeanFactory() API 负责创建并初始化所有的
对象,即在配置文件中提到的 bean。
• 第二步利用第一步生成的 bean 工厂对象的 getBean() 方法得到所需要的 bean。 这个方法通过配置文件中
的 bean ID 来返回一个真正的对象,该对象最后可以用于实际的对象。一旦得到这个对象,就可以利用这个
对象来调用任何方法。
<?xml version="1.0" encoding="UTF-8"?>
<beans xmlns="http://www.springframework.org/schema/beans"
xmlns:xsi="http://www.w3.org/2001/XMLSchema-instance"
xsi:schemaLocation="http://www.springframework.org/schema/beans
http://www.springframework.org/schema/beans/spring-beans-3.0.xsd">
<bean id="helloWorld" class="com.tutorialspoint.HelloWorld">
<property name="message" value="Hello World!"/>
</bean>
</beans>
3.ApplicationContext容器
Application Context 是 spring 中较高级的容器。和 BeanFactory 类似,它可以加载配置文件中定义的 bean,
将所有的 bean 集中在一起,当有请求的时候分配 bean。 另外,它增加了企业所需要的功能,比如,从属性
文件从解析文本信息和将事件传递给所指定的监听器。
ApplicationContext 包含 BeanFactory 所有的功能,一般情况下,相对于 BeanFactory,ApplicationConte
xt 会被推荐使用。
最常被使用的 ApplicationContext 接口实现:
• FileSystemXmlApplicationContext:该容器从 XML 文件中加载已被定义的 bean。在这里,你需要提供
给构造器 XML 文件的完整路径
• ClassPathXmlApplicationContext:该容器从 XML 文件中加载已被定义的 bean。在这里,你不需要提
供 XML 文件的完整路径,只需正确配置 CLASSPATH 环境变量即可,因为,容器会从 CLASSPATH 中
搜索 bean 配置文件。
• WebXmlApplicationContext:该容器会在一个 web 应用程序的范围内加载在 XML 文件中已被定义的 be
an。
package com.tutorialspoint;
public class HelloWorld {
private String message;
public void setMessage(String message){
this.message = message;
}
public void getMessage(){
System.out.println("Your Message : " + message);
}
}
package com.tutorialspoint;
import org.springframework.context.ApplicationContext;
import org.springframework.context.support.FileSystemXmlApplicationContext;
public class MainApp {
public static void main(String[] args) {
ApplicationContext context = new FileSystemXmlApplicationContext
("C:/Users/ZARA/workspace/HelloSpring/src/Beans.xml");
HelloWorld obj = (HelloWorld) context.getBean("helloWorld");
obj.getMessage();
}
}
<?xml version="1.0" encoding="UTF-8"?>
<beans xmlns="http://www.springframework.org/schema/beans"
xmlns:xsi="http://www.w3.org/2001/XMLSchema-instance"
xsi:schemaLocation="http://www.springframework.org/schema/beans
http://www.springframework.org/schema/beans/spring-beans-3.0.xsd">
<bean id="helloWorld" class="com.tutorialspoint.HelloWorld">
<property name="message" value="Hello World!"/>
</bean>
</beans>
在主程序当中,我们需要注意以下两点:
• 第一步生成工厂对象。加载完指定路径下 bean 配置文件后,利用框架提供的 FileSystemXmlApplication
Context API 去生成工厂 bean。FileSystemXmlApplicationContext 负责生成和初始化所有的对象,比
如,所有在 XML bean 配置文件中的 bean。
• 第二步利用第一步生成的上下文中的 getBean() 方法得到所需要的 bean。 这个方法通过配置文件中的 bea
n ID 来返回一个真正的对象。一旦得到这个对象,就可以利用这个对象来调用任何方法。
二、Bean定义
被称作 bean 的对象是构成应用程序的支柱也是由 Spring IoC 容器管理的。bean 是一个被实例化,组装,并通
过 Spring IoC 容器所管理的对象。这些 bean 是由用容器提供的配置元数据创建的 。
bean 定义的下列属性 :
属性 描述
| class | 这个属性是强制性的,并且指定用来创建 bean 的 bean 类。 |
| name | 这个属性指定唯一的 bean 标识符。在基于 XML 的配置元数据中,你可以使用 ID 和/或 name 属性来指定 bean 标识符。 |
| scope | 这个属性指定由特定的 bean 定义创建的对象的作用域,它将会在 bean 作用域 的章节中进行讨论。 |
| constructor-arg | 它是用来注入依赖关系的,并会在接下来的章节中进行讨论。 |
| properties | 它是用来注入依赖关系的,并会在接下来的章节中进行讨论。 |
| autowiring mode | 它是用来注入依赖关系的,并会在接下来的章节中进行讨论。 |
| lazy-initialization mode | 延迟初始化的 bean 告诉 IoC 容器在它第一次被请求时,而不是在启动时去创 建一个 bean 实例。 |
| initialization 方法 | 在 bean 的所有必需的属性被容器设置之后,调用回调方法。它将会在 bean 的 生命周期章节中进行讨论。 |
| destruction 方法 | 当包含该 bean 的容器被销毁时,使用回调方法。它将会在 bean 的生命周期章 节中进行讨论。 |
配置元数据的三种方式:
•基于 XML 的配置文件。
• 基于注解的配置
• 基于 Java 的配置
三、Bean的作用域
作用域 描述
| singleton | 该作用域将 bean 的定义的限制在每一个 Spring IoC 容器中的一个单一实例(默认)。 |
| prototype | 该作用域将单一 bean 的定义限制在任意数量的对象实例。 |
| request | 该作用域将 bean 的定义限制为 HTTP 请求。只在 web-aware Spring ApplicationCo ntext 的上下文中有效。 |
| session | 该作用域将 bean 的定义限制为 HTTP 会话。 只在web-aware Spring ApplicationCo ntext的上下文中有效。 |
| global-session | 该作用域将 bean 的定义限制为全局 HTTP 会话。只在 web-aware Spring Applicatio nContext 的上下文中有效。 |
四、Bean的生命周期
public class App {

    public static void main(String[] args) throws InterruptedException {
        AbstractApplicationContext context=new ClassPathXmlApplicationContext("applicationContext.xml");
        UserService userService=(UserService) context.getBean("userService");
        context.registerShutdownHook();
    }

}
public class UserService {
    public String toString()
    {
        return "UserService";
    }

    public void init(){
        System.out.println("Bean is going through init.");
        }
    public void destroy(){
        System.out.println("Bean will destroy now.");
        }
}
<?xml version="1.0" encoding="UTF-8"?>
<beans xmlns="http://www.springframework.org/schema/beans"
    xmlns:xsi="http://www.w3.org/2001/XMLSchema-instance"
    xsi:schemaLocation="http://www.springframework.org/schema/beans
        http://www.springframework.org/schema/beans/spring-beans.xsd">

    <bean id="userService" class="com.liandy.service.UserService" init-method="init" destroy-method="destroy">
        <!-- collaborators and configuration for this bean go here -->
    </bean>


</beans>
五、依赖注入
1.Spring 基于构造函数的依赖注入
public class App {

    public static void main(String[] args) throws InterruptedException {
        ApplicationContext context=new ClassPathXmlApplicationContext("applicationContext.xml");
        UserService userService=(UserService) context.getBean("userService");
        Student student1=(Student) context.getBean("student");
        Student student2=(Student) context.getBean("student");
        System.out.println(student1==student2);
    }

}
public class Student {
    private String name;
    private int age;
    public Student(String name,int age)
    {
        this.name=name;
        this.age=age;
    }
}
<?xml version="1.0" encoding="UTF-8"?>
<beans xmlns="http://www.springframework.org/schema/beans"
    xmlns:xsi="http://www.w3.org/2001/XMLSchema-instance"
    xsi:schemaLocation="http://www.springframework.org/schema/beans
        http://www.springframework.org/schema/beans/spring-beans.xsd">

    <bean id="userService" class="com.liandy.service.UserService" init-method="init" destroy-method="destroy">
        <!-- collaborators and configuration for this bean go here -->
    </bean>

       <bean id="student" class="com.liandy.model.Student" >
           <constructor-arg name="name" value="zhangsan"></constructor-arg>
           <constructor-arg name="age" value="13"></constructor-arg>
       </bean>


</beans>
2.基于设值函数的依赖注入
public class App {

    public static void main(String[] args) throws InterruptedException {
        ApplicationContext context=new ClassPathXmlApplicationContext("applicationContext.xml");
        UserService userService=(UserService) context.getBean("userService");
        Student student=(Student) context.getBean("student");
        System.out.println(student.getAge());
    }

}
public class Student {
    private String name;
    private int age;
    public String getName() {
        return name;
    }
    public void setName(String name) {
        this.name = name;
    }
    public int getAge() {
        return age;
    }
    public void setAge(int age) {
        this.age = age;
    }

}
<?xml version="1.0" encoding="UTF-8"?>
<beans xmlns="http://www.springframework.org/schema/beans"
    xmlns:xsi="http://www.w3.org/2001/XMLSchema-instance"
    xsi:schemaLocation="http://www.springframework.org/schema/beans
        http://www.springframework.org/schema/beans/spring-beans.xsd">

    <bean id="userService" class="com.liandy.service.UserService" init-method="init" destroy-method="destroy">
        <!-- collaborators and configuration for this bean go here -->
    </bean>

       <bean id="student" class="com.liandy.model.Student" >
           <property name="name" value="lisi"></property>
           <property name="age" value="12"></property>
       </bean>


</beans>
六、注入集合
public class App {

    public static void main(String[] args) throws InterruptedException {
        ApplicationContext context=new ClassPathXmlApplicationContext("applicationContext.xml");
        Student student=(Student) context.getBean("student");
        for(String address :student.getAddressList())
        {
            System.out.println(address);
        }
    }
}
package com.liandy.model;

import java.util.*;

public class Student {
    List<String> addressList;
    Set addressSet;
    Map addressMap;
    Properties addressProp;
    public List<String> getAddressList() {
        return addressList;
    }
    public void setAddressList(List<String> addressList) {
        this.addressList = addressList;
    }
    public Set getAddressSet() {
        return addressSet;
    }
    public void setAddressSet(Set addressSet) {
        this.addressSet = addressSet;
    }
    public Map getAddressMap() {
        return addressMap;
    }
    public void setAddressMap(Map addressMap) {
        this.addressMap = addressMap;
    }
    public Properties getAddressProp() {
        return addressProp;
    }
    public void setAddressProp(Properties addressProp) {
        this.addressProp = addressProp;
    }

}
<?xml version="1.0" encoding="UTF-8"?>
<beans xmlns="http://www.springframework.org/schema/beans"
    xmlns:xsi="http://www.w3.org/2001/XMLSchema-instance"
    xsi:schemaLocation="http://www.springframework.org/schema/beans
        http://www.springframework.org/schema/beans/spring-beans.xsd">


       <bean id="student" class="com.liandy.model.Student" >
               <property name="addressList">
            <list>
            <value>INDIA</value>
            <value>Pakistan</value>
            <value>USA</value>
            <value>USA</value>
            </list>
            </property>
       </bean>


</beans>
七、Bean的自动装配
指示 Spring 容器为来使用自动装配进行依赖注入。
| no | 这是默认的设置,它意味着没有自动装配,你应该使用显式的bean引用来连线。你 不用为了连线做特殊的事。在依赖注入章节你已经看到这个了。 |
| byName (beans-auto wiring/spring-autowirin g-byname.md) |
由属性名自动装配。Spring 容器看到在 XML 配置文件中 bean 的自动装配的属性 设置为 byName。然后尝试匹配,并且将它的属性与在配置文件中被定义为相同名 称的 beans 的属性进行连接。 |
| byType (beans-auto-w iring/spring-autowirin g-byType.md) |
由属性数据类型自动装配。Spring 容器看到在 XML 配置文件中 bean 的自动装配 的属性设置为 byType。然后如果它的匹配配置文件中的一个确切的 bean 名 称,它将尝试匹配和连接属性的类型。如果存在不止一个这样的 bean,则一个致 命的异常将会被抛出。 |
| constructor (beans-aut o-wiring/spring-autowir ing-by-Constructor.m d) |
类似于 byType,但该类型适用于构造函数参数类型。如果在容器中没有一个构造 函数参数类型的 bean,则一个致命错误将会发生。 |
| autodetect | Spring首先尝试通过 constructor 使用自动装配来连接,如果它不执行,Spring 尝试通过 byType 来自动装配。 |
类型可以使用 byType 或者 constructor 自动装配模式来连接数组和其他类型的集合。
public class Cat {
    private String name;

    public String getName() {
        return name;
    }

    public void setName(String name) {
        this.name = name;
    }
}
public class Student {
    private Cat cat;
    public Cat getCat() {
        return cat;
    }
    public void setCat(Cat cat) {
        this.cat = cat;
    }
    private String name;
    private int age;
    public int getAge() {
        return age;
    }
    public void setAge(int age) {
        this.age = age;
    }
    public String getName() {
        return name;
    }
    public void setName(String name) {
        this.name = name;
    }


}
<?xml version="1.0" encoding="UTF-8"?>
<beans xmlns="http://www.springframework.org/schema/beans"
    xmlns:xsi="http://www.w3.org/2001/XMLSchema-instance"
    xsi:schemaLocation="http://www.springframework.org/schema/beans
        http://www.springframework.org/schema/beans/spring-beans.xsd">
    <bean id="student" autowire="byType" class="com.liandy.model.Student">
        <property name="name" value="jake"></property>
    </bean>
    <bean id="cat"  class="com.liandy.model.Cat">
        <property name="name" value="Tom"></property>
    </bean>
</beans>
public class App {

    public static void main(String[] args) throws InterruptedException {
        ApplicationContext context=new ClassPathXmlApplicationContext("applicationContext.xml");
        Student student=(Student) context.getBean("student");
        System.out.println(student.getCat().getName());//Tom
    }
}
1.自动装配的局限性
当自动装配始终在同一个项目中使用时,它的效果最好。如果通常不使用自动装配,它可能会使开发人员混淆的
使用它来连接只有一个或两个 bean 定义。不过,自动装配可以显著减少需要指定的属性或构造器参数,但你应
该在使用它们之前考虑到自动装配的局限性和缺点。
限制 描述
| 重写的可能性 | 你可以使用总是重写自动装配的 <constructor-arg> 和 <property> 设置来指 定依赖关系。 |
| 原始数据类型 | 你不能自动装配所谓的简单类型包括基本类型,字符串和类。 |
| 混乱的本质 | 自动装配不如显式装配精确,所以如果可能的话尽可能使用显式装配。 |
八、基于注解的配置
注解连线在默认情况下在 Spring 容器中不打开。因此,在可以使用基于注解的连线之前,我们将需要在我们的 S
pring 配置文件中启用它。所以如果你想在 Spring 应用程序中使用的任何注解,可以考虑到下面的配置文件。
<?xml version="1.0" encoding="UTF-8"?>
<beans xmlns="http://www.springframework.org/schema/beans"
xmlns:xsi="http://www.w3.org/2001/XMLSchema-instance"
xmlns:context="http://www.springframework.org/schema/context"
xsi:schemaLocation="http://www.springframework.org/schema/beans
http://www.springframework.org/schema/beans/spring-beans-3.0.xsd
http://www.springframework.org/schema/context
http://www.springframework.org/schema/context/spring-context-3.0.xsd">
<context:annotation-config/>
<!-- bean definitions go here -->

</beans>
1.@Required
@Required 注释应用于 bean 属性的 setter 方法,它表明受影响的 bean 属性在配置时必须放在 XML 配置文
件中,否则容器就会抛出一个 BeanInitializationException 异常。
2.@Autowired
2.1Setter 方法中的 @Autowired :当 Spring遇到一个在 setter 方法中使用的 @Autowired 注释,它会在方法中视图执行 byType 自动连接。
2.2属性中的 @Autowired :你可以在属性中使用 @Autowired 注释来除去 setter 方法。当时使用 为自动连接属性传递的时候,Spring 会
将这些传递过来的值或者引用自动分配给那些属性。
2.3构造函数中的 @Autowired :你也可以在构造函数中使用 @Autowired。一个构造函数 @Autowired 说明当创建 bean 时,即使在 XML 文
件中没有使用 元素配置 bean ,构造函数也会被自动连接。
3.@Qualifier 注释
能会有这样一种情况,当你创建多个具有相同类型的 bean 时,并且想要用一个属性只为它们其中的一个进行
装配,在这种情况下,你可以使用 @Qualifier 注释和 @Autowired 注释通过指定哪一个真正的 bean 将会被装
配来消除混乱。
4.@PostConstruct 和 @PreDestroy 注释 :
为了定义一个 bean 的安装和卸载,我们使用 init-method 和/或 destroy-method 参数简单的声明一下 。initmethod 属性指定了一个方法,该方法在 bean 的实例化阶段会立即被调用。同样地,destroy-method 指定了
一个方法,该方法只在一个 bean 从容器中删除之前被调用。
你可以使用 @PostConstruct 注释作为初始化回调函数的一个替代,@PreDestroy 注释作为销毁回调函数的
一个替代 。
5.@Resource 注释
你可以在字段中或者 setter 方法中使用 @Resource 注释,它和在 Java EE 5 中的运作是一样的。@Resour
ce 注释使用一个 ‘name’ 属性,该属性以一个 bean 名称的形式被注入。你可以说,它遵循 by-name 自动
连接语义 。
九、基于java的配置
1.@Configuration 和 @Bean 注解
带有 @Configuration 的注解类表示这个类可以使用 Spring IoC 容器作为 bean 定义的来源。@Bean 注解告
诉 Spring,一个带有 @Bean 的注解方法将返回一个对象,该对象应该被注册为在 Spring 应用程序上下文中的
bean。
package com.liandy.model;


import org.springframework.context.annotation.Bean;
import org.springframework.context.annotation.Configuration;
import org.springframework.context.annotation.Scope;

@Configuration
public class TestConfiguration {
    public TestConfiguration() {
        System.out.println("TestConfiguration容器启动初始化。。。");
    }

    // @Bean注解注册bean,同时可以指定初始化和销毁方法
    // @Bean(name="testBean",initMethod="start",destroyMethod="cleanUp")
    @Bean
    @Scope("prototype")
    public TestBean testBean() {
        return new TestBean();
    }
}
package com.liandy.model;


public class TestBean {

    private String username;
    private String url;
    private String password;

    public void sayHello() {
        System.out.println("TestBean sayHello...");
    }

    public String toString() {
        return "username:" + this.username + ",url:" + this.url + ",password:" + this.password;
    }

    public void start() {
        System.out.println("TestBean 初始化。。。");
    }

    public void cleanUp() {
        System.out.println("TestBean 销毁。。。");
    }
}
package com.liandy.main;

import org.springframework.beans.factory.BeanFactory;
import org.springframework.beans.factory.xml.XmlBeanFactory;
import org.springframework.context.ApplicationContext;
import org.springframework.context.annotation.AnnotationConfigApplicationContext;
import org.springframework.context.support.AbstractApplicationContext;
import org.springframework.context.support.ClassPathXmlApplicationContext;
import org.springframework.core.io.ClassPathResource;

import com.liandy.model.Cat;
import com.liandy.model.Student;
import com.liandy.model.TestBean;
import com.liandy.model.TestConfiguration;
import com.liandy.service.UserService;

public class App {

    public static void main(String[] args) throws InterruptedException {
        ApplicationContext context = new AnnotationConfigApplicationContext(TestConfiguration.class);
        TestBean tb = (TestBean) context.getBean("testBean");
        tb.sayHello();
    }
}
2.生命周期回调
@Bean 注解支持指定任意的初始化和销毁的回调方法,就像在 bean 元素中 Spring 的 XML 的初始化方法和销
毁方法的属性 。
public class Foo {
    public void init()
    {
        System.out.println("init");
    }

    public void destry()
    {
        System.out.print("destry");
    }
}
@Configuration
public class FooConfig {
    @Bean(initMethod = "init", destroyMethod = "destry" )
    public Foo foo() {
    return new Foo();
    }
}
public class App {

    public static void main(String[] args) throws InterruptedException {
        AnnotationConfigApplicationContext context = new AnnotationConfigApplicationContext(FooConfig.class);
        Foo foo = (Foo) context.getBean("foo");
        context.destroy();
    }
}
十、Spring中的事件处理
public class HelloWorld {
    private String message;
    public void setMessage(String message){
    this.message = message;
    }
    public void getMessage(){
        System.out.println("Your Message : " + message);
    }
}
public class CStartEventHandler implements ApplicationListener<ContextStartedEvent> {

    @Override
    public void onApplicationEvent(ContextStartedEvent event) {
        // TODO Auto-generated method stub
        System.out.println("ContextStartedEvent Received");
    }

}
public class CStopEventHandler implements ApplicationListener<ContextStartedEvent> {

    @Override
    public void onApplicationEvent(ContextStartedEvent event) {
        // TODO Auto-generated method stub
        System.out.println("ContextStoppedEvent Received");
    }

}
十一、Spring的自定义事件
public class CustomEvent extends ApplicationEvent{
public CustomEvent(Object source) {
super(source);
}
public String toString(){
return "My Custom Event";
}
}
public class CustomEventPublisher implements ApplicationEventPublisherAware{
    private ApplicationEventPublisher publisher;
    public void setApplicationEventPublisher(ApplicationEventPublisher publisher){
        this.publisher = publisher;
    }
    public void publish() {
        CustomEvent ce = new CustomEvent(this);
        publisher.publishEvent(ce);
    }
}
public class CustomEventHandler implements ApplicationListener<CustomEvent>{

    @Override
    public void onApplicationEvent(CustomEvent event) {
        // TODO Auto-generated method stub
        System.out.println(event.toString());
    }

}
public class App {

    public static void main(String[] args) throws InterruptedException {
        ConfigurableApplicationContext context =
                new ClassPathXmlApplicationContext("applicationContext.xml");
                CustomEventPublisher cvp =
                (CustomEventPublisher) context.getBean("customEventPublisher");
                cvp.publish();
                cvp.publish();
    }
}
十二、spring框架的AOP
1.AOP术语项 描述
| Aspect | 一个模块具有一组提供横切需求的 APIs。例如,一个日志模块为了记录日志将被 A OP 方面调用。应用程序可以拥有任意数量的方面,这取决于需求。 |
| Join point | 在你的应用程序中它代表一个点,你可以在插件 AOP 方面。你也能说,它是在实 际的应用程序中,其中一个操作将使用 Spring AOP 框架。 |
| Advice | 这是实际行动之前或之后执行的方法。这是在程序执行期间通过 Spring AOP 框架 实际被调用的代码。 |
| Pointcut | 这是一组一个或多个连接点,通知应该被执行。你可以使用表达式或模式指定切入 点正如我们将在 AOP 的例子中看到的。 |
| Introduction | 引用允许你添加新方法或属性到现有的类中。 |
| Target object | 被一个或者多个方面所通知的对象,这个对象永远是一个被代理对象。也称为被通 知对象。 |
| Weaving | Weaving 把方面连接到其它的应用程序类型或者对象上,并创建一个被通知的对 象。这些可以在编译时,类加载时和运行时完成。 |
2.通知的类型
| 前置通知 | 在一个方法执行之前,执行通知。 |
| 后置通知 | 在一个方法执行之后,不考虑其结果,执行通知。 |
| 返回后通知 | 在一个方法执行之后,只有在方法成功完成时,才能执行通知 |
| 抛出异常后通知 | 在一个方法执行之后,只有在方法退出抛出异常时,才能执行通知。 |
| 环绕通知 | 在建议方法调用之前和之后,执行通知。 |
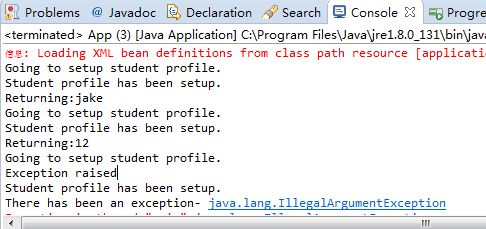
package com.liandy.model;

public class Logging {
/**
* This is the method which I would like to execute
* before a selected method execution.
*/
public void beforeAdvice(){
System.out.println("Going to setup student profile.");
}
/**
* This is the method which I would like to execute
* after a selected method execution.
*/
public void afterAdvice(){
System.out.println("Student profile has been setup.");
}
/**
* This is the method which I would like to execute
* when any method returns.
*/
public void afterReturningAdvice(Object retVal){
System.out.println("Returning:" + retVal.toString() );
}
/**
* This is the method which I would like to execute
* if there is an exception raised.
*/
public void AfterThrowingAdvice(IllegalArgumentException ex){
System.out.println("There has been an exception: " + ex.toString());
}
}
package com.liandy.model;

import java.util.*;

import org.springframework.beans.factory.annotation.Autowired;
import org.springframework.beans.factory.annotation.Qualifier;
import org.springframework.context.annotation.Configuration;
@Configuration
public class Student {
    private String name;
    private int age;
    public int getAge() {
        return age;
    }
    public void setAge(int age) {
        this.age = age;
    }
    public String getName() {
        return name;
    }
    public void setName(String name) {
        this.name = name;
    }

    public void printThrowException(){
        System.out.println("Exception raised");
        throw new IllegalArgumentException();
    }
}
<?xml version="1.0" encoding="UTF-8"?>
<beans xmlns="http://www.springframework.org/schema/beans"
xmlns:xsi="http://www.w3.org/2001/XMLSchema-instance"
xmlns:context="http://www.springframework.org/schema/context"
xmlns:aop="http://www.springframework.org/schema/aop"
xsi:schemaLocation="http://www.springframework.org/schema/beans
http://www.springframework.org/schema/beans/spring-beans-3.0.xsd
http://www.springframework.org/schema/context
http://www.springframework.org/schema/context/spring-context-3.0.xsd
http://www.springframework.org/schema/aop
http://www.springframework.org/schema/aop/spring-aop-3.0.xsd">
    <aop:config>
        <aop:aspect id="log" ref="logging">
        <aop:pointcut id="selectAll"
        expression="execution(* com.liandy.model.*.*(..))"/>
        <aop:before pointcut-ref="selectAll" method="beforeAdvice"/>
        <aop:after pointcut-ref="selectAll" method="afterAdvice"/>
        <aop:after-returning pointcut-ref="selectAll"
        returning="retVal"
        method="afterReturningAdvice"/>
        <aop:after-throwing pointcut-ref="selectAll"
        throwing="ex"
        method="AfterThrowingAdvice"/>
        </aop:aspect>
    </aop:config>

<!-- bean definitions go here -->
    <bean id="student" class="com.liandy.model.Student">
        <property name="name" value="jake"></property>
        <property name="age" value="12"></property>
    </bean>
    <bean id="logging" class="com.liandy.model.Logging"/>
</beans>
package com.liandy.main;

import org.springframework.beans.factory.BeanFactory;
import org.springframework.beans.factory.xml.XmlBeanFactory;
import org.springframework.context.ApplicationContext;
import org.springframework.context.ConfigurableApplicationContext;
import org.springframework.context.annotation.AnnotationConfigApplicationContext;
import org.springframework.context.support.AbstractApplicationContext;
import org.springframework.context.support.ClassPathXmlApplicationContext;
import org.springframework.core.io.ClassPathResource;

import com.liandy.model.Cat;
import com.liandy.model.CustomEventPublisher;
import com.liandy.model.Foo;
import com.liandy.model.FooConfig;
import com.liandy.model.HelloWorld;
import com.liandy.model.Student;
import com.liandy.model.TestBean;
import com.liandy.model.TestConfiguration;
import com.liandy.service.UserService;

public class App {

    public static void main(String[] args) throws InterruptedException {
        ApplicationContext context =
                new ClassPathXmlApplicationContext("applicationContext.xml");
                Student student = (Student) context.getBean("student");
                student.getName();
                student.getAge();
                student.printThrowException();
    }
}