1、新建一个文件目录,命令行进入当前目录,输入npm init 创建package.json文件
2、安装项目依赖webpack模块: npm install webpack --save-dev
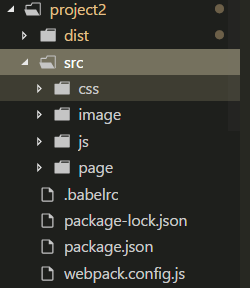
3、新建如下图目录结构
4、在根目录下新建文件:webpack.config.js 并编辑如下代码:
module.exports = {
  devtool: 'eval-source-map',
    entry: {
        main: './src/js/main.js',
        home: './src/js/home.js'
    },
    output: {
        filename: '[name].js',
        path: __dirname + '/dist'
    },
}
5、安装webpack脚手架(webpack-cli模块)和html-webpack-plugin 和 html-loader(多页面加载)插件:npm install webpack-cli html-webpack-plugin
继续编辑webpack.config.js文件(引入path模块)
const path = require("path");
const HtmlWebpackPlugin = require('html-webpack-plugin');

module.exports = {
    mode: 'production',
    devtool: 'eval-source-map',
    entry: {
        main: './src/js/main.js',
        home: './src/js/home.js'
    },
    output: {
        filename: 'js/[name].js',
        path: __dirname + '/dist'
    },
    plugins: [
        new HtmlWebpackPlugin({
            filename : 'index.html',//入口html
            template : './src/page/index.html',
            minify : {
                // removeComments:true,   //删除注释
                // collapseWhitespace: true      //删除空格,压缩
            },
            chunks: ['main']  //对应entry的入口js.这样可以按需加载js
        }),
        new HtmlWebpackPlugin({
            filename : 'home.html',
            template : './src/page/home.html',
            minify : {
                // removeComments:true,   //删除注释
                // collapseWhitespace: true      //删除空格,压缩
            },
            chunks: ['home']
        }),
    ],
    devServer: {
        host : '127.0.0.1',
        port : 8080 ,
        inline : true,
        open :true,   //自动打开浏览器
        hot : false,   //慎用!打开热更新,会导致修改样式可能不支持。关闭热更新,页面会强刷
        contentBase : path.join(__dirname, "dist"),
    }
}
6、为了方便启动webpack,在package.json中加入代码
"scripts": {
    "test": "echo "Error: no test specified" && exit 1",
    "webpack": "webpack --config webpack.config.js --progress --display-modules --colors --display-reason",
    "dev": "node_modules/.bin/webpack --mode development",
    "start": "node_modules/.bin/webpack-dev-server --open"
  },
7、使用babel-loader转化ES6代码
安装依赖:
npm install --save-dev babel-core babel-preset-es2015
npm install --save-dev babel-loader@7  /*babel-core 6的版本得安装babel-loader 7*/
编辑webpack.config.js文件
    module: {
        loaders: [{
            test: /.js$/,
            use: 'babel-loader'
        }]
    }
创建babel调用的文件.babelrc
{ "presets": [ "es2015" ] }
8、css和scss的处理模块
安装依赖
npm install style-loader css-loader sass-loader
//因为sass-loader依赖于node-sass,所以还要安装node-sass
npm install --save-dev node-sass
编辑webpack.config.js文件
    module: {
        rules: [{
                test: /.js$/,
                use: ['babel-loader']
            },
            {
                test: /.css$/,
                use: ['style-loader', 'css-loader']
            },
            {
                test: /.scss$/,
                use: ['style-loader', 'css-loader', 'sass-loader']
            }
        ]
    },
9、图片处理模块
安装依赖
npm install url-loader image-webpack-loader --save-dev
编辑webpack.config.js文件
    {
            test: /.(png|jpg|gif|svg)$/, use: [
                {
                    loader: 'url-loader', //此处使用url-loader可进行base64,使用file-loader不能
                    options: {
                        limit: 20000,
                        name: 'image/[name]-[hash:5].[ext]',
                    }
                },
                { loader: 'image-webpack-loader' }  //image-webpack-loader 的作用是对图片进行压缩
            ]
        },
注意:在html 引用图片使用以下方式
<img src="${require('../image/3.jpg')}" alt="">
10、出现webpack-dev-server报错,删除node_modules模块,在运行npm install
11、完整代码参考
webpack.config.js
const path = require("path");
const HtmlWebpackPlugin = require('html-webpack-plugin');

module.exports = {
    mode: 'production',
    devtool: 'eval-source-map',
    entry: {
        main: './src/js/main.js',
        home: './src/js/home.js'
    },
    output: {
        filename: 'js/[name].js',
        path: __dirname + '/dist'
    },
    plugins: [
        new HtmlWebpackPlugin({
            filename: 'index.html',//入口html
            template: './src/page/index.html',
            minify: {
                // removeComments:true,   //删除注释
                // collapseWhitespace: true      //删除空格,压缩
            },
            chunks: ['main']  //对应entry的入口js.这样可以按需加载js
        }),
        new HtmlWebpackPlugin({
            filename: 'home.html',
            template: './src/page/home.html',
            minify: {
                // removeComments:true,   //删除注释
                // collapseWhitespace: true      //删除空格,压缩
            },
            chunks: ['home']
        }),
    ],
    module: {
        rules: [{
            test: /.js$/,
            use: ['babel-loader']
        },
        {
            test: /.css$/,
            use: ['style-loader', 'css-loader']
        },
        {
            test: /.scss$/,
            use: ['style-loader', 'css-loader', 'sass-loader']
        },
        {
            test: /.(png|jpg|gif|svg)$/, use: [
                {
                    loader: 'url-loader', //此处使用url-loader可进行base64,使用file-loader不能
                    options: {
                        limit: 20000,
                        name: 'image/[name].[ext]',
                    }
                },
                { loader: 'image-webpack-loader' }  //image-webpack-loader 的作用是对图片进行压缩
            ]
        },
        ]
    },
    devServer: {
        host: '127.0.0.1',
        port: 8080,
        inline: true,
        open: true,   //自动打开浏览器
        hot: false,   //慎用!打开热更新,会导致修改样式可能不支持。关闭热更新,页面会强刷
        contentBase: path.join(__dirname, "dist"),
    }
}
11、完整项目:https://github.com/huangguohua96/webpack.git