和xml版差不多,只不过创建对象的方式是由spring自动扫描包名,然后命名空间多一行context代码在application.xml中,然后将每个对象通过注解创建和注入:
直接上代码:
1.userDao
package cn.mr.li.dao;

import java.util.List;

import cn.mr.li.entity.User;

public interface UserDao {

    List<User> getUser();
}
2.userDaoImpl
package cn.mr.li.dao.impl;

import java.util.List;

import org.apache.ibatis.session.SqlSessionFactory;
import org.mybatis.spring.support.SqlSessionDaoSupport;
import org.springframework.beans.factory.annotation.Autowired;
import org.springframework.stereotype.Repository;

import cn.mr.li.dao.UserDao;
import cn.mr.li.entity.User;

/**
 * 因为直接调用的都是Service接口类型,不直接注入impl实现类,所以不用写@Repository("userDao")@Service("userService")这样的
 * @author Administrator
 *
 */
@Repository()
public class UserDaoImpl extends SqlSessionDaoSupport implements UserDao {

    @Autowired
    @Override
    public void setSqlSessionFactory(SqlSessionFactory sqlSessionFactory) {
        super.setSqlSessionFactory(sqlSessionFactory);
    }

    @Override
    public List<User> getUser() {
        return this.getSqlSession().selectList("cn.mr.li.entity.user.mapper.getAll");
    }
}
3.userService
package cn.mr.li.service;

import java.util.List;

import cn.mr.li.entity.User;

public interface UserService {

    List<User> getAll();
}
4.userServiceImpl
package cn.mr.li.service.impl;

import java.util.List;

import org.springframework.beans.factory.annotation.Autowired;
import org.springframework.stereotype.Service;

import cn.mr.li.dao.UserDao;
import cn.mr.li.entity.User;
import cn.mr.li.service.UserService;

@Service()
public class UserServiceImpl implements UserService {

    @Autowired
    private UserDao userDao;

    @Override
    public List<User> getAll() {
        return userDao.getUser();
    }

    public UserDao getUserDao() {
        return userDao;
    }

    public void setUserDao(UserDao userDao) {
        this.userDao = userDao;
    }
}
5.user对象
package cn.mr.li.entity;

public class User {

    private int id;

    private String name;

    private int age;

    public int getId() {
        return id;
    }

    public void setId(int id) {
        this.id = id;
    }

    public String getName() {
        return name;
    }

    public void setName(String name) {
        this.name = name;
    }

    public int getAge() {
        return age;
    }

    public void setAge(int age) {
        this.age = age;
    }

    public User(int id, String name, int age) {
        super();
        this.id = id;
        this.name = name;
        this.age = age;
    }

    public User() {
    }
}
6.user.mapper.xml
<?xml version="1.0" encoding="UTF-8"?>
<!DOCTYPE mapper
PUBLIC "-//mybatis.org//DTD Mapper 3.0//EN"
"http://mybatis.org/dtd/mybatis-3-mapper.dtd">
<mapper namespace="cn.mr.li.entity.user.mapper">
    <select id="getAll" resultType="User">
        select * from user
    </select>
</mapper>
7.userAction
package cn.mr.li.action;

import java.util.List;

import org.springframework.beans.factory.annotation.Autowired;
import org.springframework.context.annotation.Scope;
import org.springframework.stereotype.Controller;

import cn.mr.li.entity.User;
import cn.mr.li.service.UserService;

/**
 *@Scope注解的意思是为了配置让每个被访问的Action都不是单例的,否则本次访问到下次在访问,上次的数据就会还存在。
 * @author Administrator
 *
 */
@Controller()
@Scope("prototype")
public class UserAction {
    private List<User> list;

    @Autowired
    private UserService userService;

    /**
     * 这里必须返回success,因为访问的时候回判断状态,如果不是success让数据不予扎实,页面就会404
     * @return
     */
    public String list(){
        list = userService.getAll();
        return "success";
    }

    public List<User> getList() {
        return list;
    }

}
8.applicationContext.xml
<?xml version="1.0" encoding="UTF-8"?>
<beans xmlns="http://www.springframework.org/schema/beans"
    xmlns:xsi="http://www.w3.org/2001/XMLSchema-instance"
    xmlns:aop="http://www.springframework.org/schema/aop"
    xmlns:tx="http://www.springframework.org/schema/tx"
    xmlns:context="http://www.springframework.org/schema/context"
    xsi:schemaLocation="
        http://www.springframework.org/schema/beans http://www.springframework.org/schema/beans/spring-beans.xsd
        http://www.springframework.org/schema/aop http://www.springframework.org/schema/aop/spring-aop.xsd
        http://www.springframework.org/schema/tx http://www.springframework.org/schema/tx/spring-tx.xsd
        http://www.springframework.org/schema/context http://www.springframework.org/schema/context/spring-context.xsd">

    <!-- 配置数据源 -->
    <bean id="dataSource" class="org.springframework.jdbc.datasource.DriverManagerDataSource">
        <property name="driverClassName" value="com.mysql.jdbc.Driver"/>
        <property name="url" value="jdbc:mysql://localhost:3306/test"/>
        <property name="username" value="root"/>
        <property name="password" value="123456"/>
    </bean>
    <!-- 声明式事务配置 开始 -->
    <!-- 配置事务管理器 -->
    <bean id="txManager" class="org.springframework.jdbc.datasource.DataSourceTransactionManager">
        <property name="dataSource" ref="dataSource"/>
    </bean>
    <!-- 配置事务通知 -->
    <tx:advice id="txAdvice" transaction-manager="txManager">
        <tx:attributes>
            <!-- 配置哪些方法使用什么样的事务,配置事务的传播特性 -->
            <tx:method name="add" propagation="REQUIRED"/>
            <tx:method name="insert" propagation="REQUIRED"/>
            <tx:method name="update" propagation="REQUIRED"/>
            <tx:method name="delete" propagation="REQUIRED"/>
            <tx:method name="remove*" propagation="REQUIRED"/>
            <tx:method name="get" read-only="true"/>
            <tx:method name="*" propagation="REQUIRED"/>
        </tx:attributes>
    </tx:advice>
    <aop:config>
        <aop:pointcut expression="execution(* cn.mr.li.service.impl.*.*(..))" id="pointcut"/>
        <aop:advisor advice-ref="txAdvice" pointcut-ref="pointcut"/>
    </aop:config>
    <!-- 声明式事务配置 结束 -->
    <!-- 配置sqlSessionFactory -->
    <bean id="sqlSessionFactory" class="org.mybatis.spring.SqlSessionFactoryBean">
        <property name="dataSource" ref="dataSource"/>
        <property name="configLocation" value="classpath:mybatis.cfg.xml"></property>
    </bean>

    <!-- spring启动之初会自动扫描该包下的所有类文件 -->
    <context:component-scan base-package="cn.mr.li"/>
</beans>
9.mybatis.cfg.xml
<?xml version="1.0" encoding="UTF-8" ?>
<!DOCTYPE configuration
PUBLIC "-//mybatis.org//DTD Config 3.0//EN"
"http://mybatis.org/dtd/mybatis-3-config.dtd">
<configuration>
     <typeAliases>
        <package name="cn.mr.li.entity"/>
    </typeAliases>
    <mappers>
        <mapper resource="cn/mr/li/entity/user.mapper.xml"/>
    </mappers>
</configuration>s
10.struts.xml
<?xml version="1.0" encoding="UTF-8" ?>
<!DOCTYPE struts PUBLIC
    "-//Apache Software Foundation//DTD Struts Configuration 2.3//EN"
    "http://struts.apache.org/dtds/struts-2.3.dtd">

<struts>
    <package name="user" namespace="/" extends="struts-default">
        <!-- 此处配置的name="list",意思是在访问的时候可以通过list.去访问,至于.什么,是在web.xml
        中的struts配置中配置的,本项目配置的是*.action所以就是,如果想访问本项目下的list.jsp页面的话
        就直接在父路径(默认是项目名)后跟 /list.action -->
        <action name="list" class="userAction" method="list">
            <result>/list.jsp</result>
        </action>
    </package>
</struts>
11.web.xml
<?xml version="1.0" encoding="UTF-8"?>
<web-app xmlns:xsi="http://www.w3.org/2001/XMLSchema-instance" xmlns="http://java.sun.com/xml/ns/javaee" xmlns:web="http://java.sun.com/xml/ns/javaee/web-app_2_5.xsd" xsi:schemaLocation="http://java.sun.com/xml/ns/javaee http://java.sun.com/xml/ns/javaee/web-app_2_5.xsd" id="WebApp_ID" version="2.5">
     <!-- 配置spring:配合全局变量,将由contextConfigLocation去读取spring得配置,不在需要在程序中读取了 -->
     <context-param>
         <param-name>contextConfigLocation</param-name>
         <param-value>classpath:applicationContext.xml</param-value>
     </context-param>
     <!-- 配置监听器:此监听器在启动初始化的时候在它的构造器中初始化全局上下文,
     因此需要将spring的配置也加载进去,因为spring中有对象实例 -->
     <listener>
         <listener-class>org.springframework.web.context.ContextLoaderListener</listener-class>
     </listener>

     <!-- 配置struts2:需要配置过滤器,和它的url,访问样式 -->
     <filter>
         <filter-name>struts2</filter-name>
         <filter-class>org.apache.struts2.dispatcher.ng.filter.StrutsPrepareAndExecuteFilter</filter-class>
     </filter>
     <filter-mapping>
         <filter-name>struts2</filter-name>
         <!-- 访问时的后缀名就在这里设置了 -->
        <url-pattern>*.action</url-pattern>
     </filter-mapping>
  <welcome-file-list>
    <welcome-file>index.html</welcome-file>
    <welcome-file>index.htm</welcome-file>
    <welcome-file>index.jsp</welcome-file>
    <welcome-file>default.html</welcome-file>
    <welcome-file>default.htm</welcome-file>
    <welcome-file>default.jsp</welcome-file>
  </welcome-file-list>
</web-app>
12.list.jsp
<%@ page language="java" import="java.util.*" pageEncoding="utf-8"%>
<%@taglib prefix="c" uri="http://java.sun.com/jsp/jstl/core"%>
<%
String path = request.getContextPath();
String basePath = request.getScheme()+"://"+request.getServerName()+":"+request.getServerPort()+path+"/";
%>

<!DOCTYPE HTML PUBLIC "-//W3C//DTD HTML 4.01 Transitional//EN">
<html>
  <head>
    <base href="<%=basePath%>">

    <title>My JSP 'index.jsp' starting page</title>
    <meta http-equiv="pragma" content="no-cache">
    <meta http-equiv="cache-control" content="no-cache">
    <meta http-equiv="expires" content="0">
    <meta http-equiv="keywords" content="keyword1,keyword2,keyword3">
    <meta http-equiv="description" content="This is my page">
    <!--
    <link rel="stylesheet" type="text/css" href="styles.css">
    -->
  </head>

  <body>
    <table width="80%" align="center">
        <tr>
            <td>编号</td>
            <td>姓名</td>
            <td>密码</td>
        </tr>
        <c:forEach items="${list }" var="bean">
        <tr>
            <td>${bean.id }</td>
            <td>${bean.name }</td>
            <td>${bean.age }</td>
        </tr>
        </c:forEach>
    </table>
  </body>
</html>
我的访问路径:http://localhost:8080/spring001/list.action

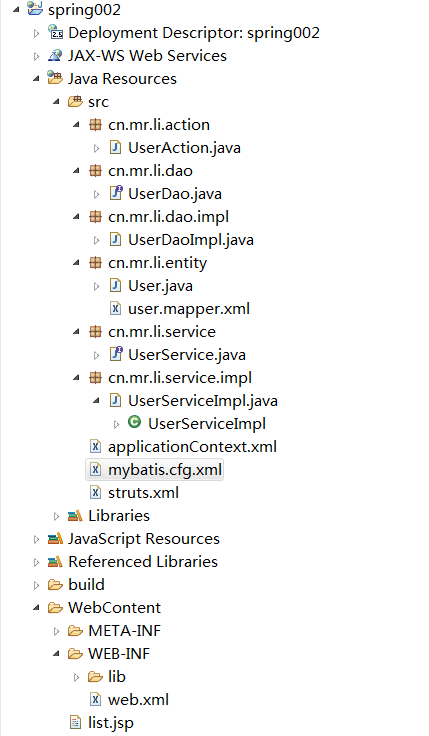
项目目录结构: