对于一个使用Xcode的使用者来说,麻烦的地方在于使用代码布置界面时候的调试,5s改一下代码,用10s查看修改效果,如果电脑配置稍低,时间更长,这是病,得治,哈哈。下面就来说一下injection的使用,injection是一个插件,修改代码之后,只要command+s即可刷新模拟器,显示已经修改的界面,是不是很fashion呢?使用方法也很简单,只需三步!!!
1.安装injectionIII,在App Store中是收费的,我们可以在官网下载,http://johnholdsworth.com/injection.html,
下载后可直接安装,非常简单。
2.在Appdelegate.m文件中,修改路径
 #if DEBUG
        Bundle(path: "/Applications/InjectionIII.app/Contents/Resources/iOSInjection10.bundle")?.load()
         //for tvOS:
         Bundle(path: "/Applications/InjectionIII.app/Contents/Resources/tvOSInjection10.bundle")?.load()
         //Or for macOS:
         Bundle(path: "/Applications/InjectionIII.app/Contents/Resources/macOSInjection10.bundle")?.load()
 #endif
这段代码写在didFinishLaunchingWithOptions中,当然,这是swift版,下面是Objective-C版
#if DEBUG
    //    for iOS
    [[NSBundle bundleWithPath:@"/Applications/InjectionIII.app/Contents/Resources/iOSInjection10.bundle"] load];
    //    for tvOS
    [[NSBundle bundleWithPath:@"/Applications/InjectionIII.app/Contents/Resources/tvOSInjection10.bundle"] load];
    //    for masOS
    [[NSBundle bundleWithPath:@"/Applications/InjectionIII.app/Contents/Resources/macOSInjection10.bundle"] load];
#endif
这些代码用于Xcode10,如果不是Xcode10,把10删掉即可。
3.修改完路径,开始使用,在ViewController.m中添加一个方法,
- (void)injected{
    NSLog(@"I've been injected: %@", self);
    [self viewDidLoad];
}
完毕!

此时若将yellowColor改为greenColor,保存一下即可刷新哦!
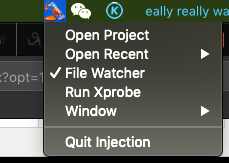
注意⚠️:关于injection的配置,在使用的时候需要注意一些问题

1.file watcher要保持选中
2.open project,选择当前的工程根目录

而不是下一层的forTest4
总的来说就这么多内容。
现在试一下?