- GUI(Graphical User Interface),图形用户接口
- CLI(Command Line User Interface),命令行用户接口
1. 容器 Container
GUI主要位于 java.awt 和 javax.swing 两个包及其子包中
Container 和 Component 是AWT中的两个核心类,Container是Component子类,Container子类对象可以“容纳”别的Component对象。
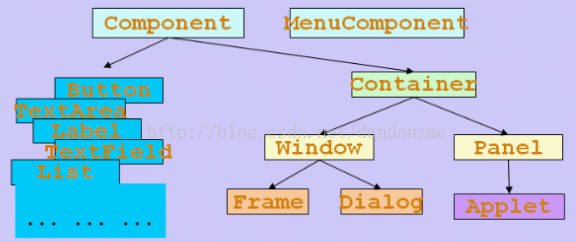
Frame是Window的子类,由Frame或其子类创建的对象为一个窗体。
    public static void main(String[] args){
        Frame f = new Frame("AwtDemo1");
        f.setSize(500, 300);            //设置窗体大小(width, high)
        f.setLocation(300, 200);        //设置窗体位置(x, y)

        //设置Frame显示
        f.setVisible(true);
    }
对于Frame的编程而言,比较常用的方式是继承Frame类,并且在构造函数或者新编写一个函数来设置Frame的信息
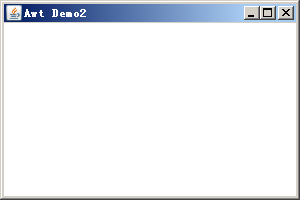
public class AwtDemo2 extends Frame{
    public AwtDemo2(){
        this.setTitle("Awt Demo2");
        this.setBounds(500, 300, 300, 200);    //x, y, width, height
        this.setVisible(true);
    }
    public static void main(String[] args){
        new AwtDemo2();
    }
}
运行上面代码会生成如下这样一个窗体:
Panel对象可以看成可以容纳Component的空间,可以拥有自己的布局管理器。
2. 组件 Component
代码1:按钮、标签、复选框 、下拉列表等组件
public class ComponentDemo1 extends Frame{

    public static void main(String[] args){
        new ComponentDemo1();
    }
    public ComponentDemo1(){
        //标签Label,第一个参数是标题,第二个参数是排列方式
        this.add(new Label("姓名", Label.LEFT));
        //文本框,第一个参数是标题,第二个参数是长度
        TextField tf = new TextField ("小明", 15);
        this.add(tf);
        //文本域TextArea,第一参数是行数,第二个参数是列数
        TextArea ta = new TextArea (2, 25);
        ta.setText ("你好!");    //设置默认内容
        this.add(ta);
        //复选框Checkbox,第一个参数是名称,第二参数可选,表示是否选中状态
        Checkbox cb1 = new Checkbox ("系统管理员");
        Checkbox cb2 = new Checkbox ("用户", true);
        Checkbox cb3 = new Checkbox ("过客", true);
        //将复选框添加到复选框组里,就变成单选框
        CheckboxGroup g = new CheckboxGroup();
        cb1.setCheckboxGroup (g);
        cb2.setCheckboxGroup (g);
        cb3.setCheckboxGroup (g);
        //setBounds 移动组件并调整其大小。
        cb1.setBounds (20,60,140,20);
        cb2.setBounds (20,80,140,20);
        cb3.setBounds (20,100,140,20);

        this.add(cb1);
        this.add(cb2);
        this.add(cb3);
        //下拉列表Choice
        Choice choice = new Choice();
        choice.add("英语");
        choice.add("法语");
        choice.add("德语");
        this.add(choice);
        //列表List,可以多选
        List list = new List(3, true);
        list.add("大学物理");
        list.add("数据结构");
        list.add("计算机网络");
        this.add(list);

        this.setTitle("AWT组件库Component演示1");
        this.setLayout(new FlowLayout());
        this.setBounds(200, 200, 400, 200);

        this.setVisible(true);
    }
}
运行结果:

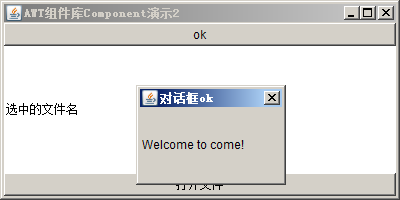
代码2:对话框和文件对话框
public class ComponentDemo2 extends Frame{
    public static void main(String[] args){
        new ComponentDemo2();
    }
    public ComponentDemo2(){
        this.setTitle("AWT组件库Component演示2");
        this.setBounds(200, 200, 400, 200);

        final Label fileLabel = new Label("选中的文件名");
        this.add(fileLabel, BorderLayout.CENTER);    //默认是BorderLayout

        //对话框Dialog,第一参数是父窗口,第二参数是标题,第三个参数表示是否显示
        final Dialog dialog = new Dialog(this, "对话框ok", false);
        Label label = new Label("Welcome to come!");
        dialog.add(label);
        dialog.setBounds(300, 300, 150, 100);
        dialog.addWindowListener(new WindowAdapter() {
            public void windowClosing(WindowEvent e){
                dialog.setVisible(false);
            }
        });
        //按钮Button,第一参数是名称
        Button btn = new Button("ok");
        btn.addActionListener(new ActionListener(){
            public void actionPerformed(ActionEvent e){
                dialog.setVisible(true);
            }
        });
        this.add(btn, BorderLayout.NORTH);

        //文件对话框FileDialog,第1个参数是父窗口,第2个参数是标题,第3个参数是文件对话框的作用是打开还是保存
        final FileDialog fileDialog = new FileDialog(this, "打开文件", FileDialog.LOAD);
        fileDialog.setBounds(300, 300, 150, 100);
        Button btn2 = new Button("打开文件");
        btn2.addActionListener(new ActionListener(){
            public void actionPerformed(ActionEvent e){
                fileDialog.setVisible(true);
                String dir = fileDialog.getDirectory();
                String file = fileDialog.getFile();//获取选中的文件名称
                fileLabel.setText(dir + "" + file);
            }
        });
        this.add(btn2, BorderLayout.SOUTH);
        this.addWindowListener(new WindowAdapter() {
            public void windowClosing(WindowEvent e){
                System.exit(0);
            }
        });
        this.setVisible(true);
    }
}
运行结果:
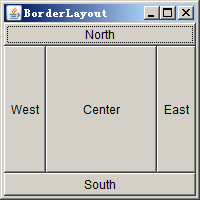
3. 布局管理器 Layout
下面这窗体中的组件太乱了,有什么办法让他们变的整齐一些吗?使用布局管理器可以达到布局整齐的效果!
三种布局管理器:
- BorderLayout
- FlowLayout
- GridLayout
简单的代码说明:
 1 public class LayoutDemo1 extends Frame{
 2     public static void main (String args[]) {
 3         new LayoutDemo1(args[0]);
 4     }
 5
 6     public LayoutDemo1(String layout){
 7         this.setTitle(layout);
 8         this.setBounds(300, 200, 200, 200);
 9         this.addWindowListener(new WindowAdapter(){
10             public void windowClosing(WindowEvent e){
11                 System.exit(0);
12                 super.windowClosing(e);
13             }
14         });
15
16         switch(layout){
17             case "BorderLayout" :
18                 addBorderLayout();
19             break;
20             case "FlowLayout" :
21                 addFlowLayout();
22             break;
23             case "GridLayout" :
24                 addGridLayout();
25             break;
26             default:
27                 addBorderLayout();
28             break;
29         }
30         this.setVisible(true);
31     }
32     public void addBorderLayout(){
33         this.setLayout(new BorderLayout());
34         this.add(new Button("North"), BorderLayout.NORTH);
35         this.add(new Button("South"), BorderLayout.SOUTH);
36         this.add(new Button("East"), BorderLayout.EAST);
37         this.add(new Button("West"), BorderLayout.WEST);
38         this.add(new Button("Center"), BorderLayout.CENTER);
39     }
40     public void addFlowLayout(){
41         this.setLayout(new FlowLayout());
42         this.add(new Button("Button1"));
43         this.add(new Button("Button2"));
44         this.add(new Button("Button3"));
45         this.add(new Button("Button4"));
46     }
47     public void addGridLayout(){
48         //new GridLayout(3,2) 构造一个3行2列的网格
49         setLayout(new GridLayout(3,2));
50         add(new Button("1"));
51         add(new Button("2"));
52         add(new Button("3"));
53         add(new Button("4"));
54         add(new Button("5"));
55         add(new Button("6"));
56
57     }
58 }
运行结果:


4. 菜单
简单的菜单演示:
class MenuDemo1 extends Frame{
    private MenuBar menuBar;
    private Menu menu, secondLevelMenu;
    private MenuItem exitItem,subItem;

    MenuDemo1(){
        this.setTitle("MenuDemo1");
        this.setBounds(200,200,500,400);    //setBounds(x, y, width, high)
        //菜单栏
        menuBar = new MenuBar();
        //一级菜单
        menu = new Menu("文件");
        //二级菜单
        secondLevelMenu = new Menu("新建");
        //子菜单
        exitItem = new MenuItem("退出");
        subItem = new MenuItem("Java文件");

        secondLevelMenu.add(subItem);
        menu.add(secondLevelMenu);
        menu.add(exitItem);
        menuBar.add(menu);
        //添加菜单栏
        this.setMenuBar(menuBar);
        this.addWindowListener(new WindowAdapter(){
            public void windowClosing(WindowEvent e){
                System.exit(0);
            }
        });
        this.setVisible(true);
    }
    public static void main(String[] args){
        new MenuDemo1();
    }
}
运行结果:
