介绍
权限认证是接口开发中不可避免的问题,权限认证包括两个方面
- 接口需要知道调用的用户是谁
- 接口需要知道该用户是否有权限调用
第1个问题偏向于架构,第2个问题更偏向于业务,因此考虑在架构层解决第1个问题,以达到以下目的
- 所有请求被保护的接口保证是合法的(已经认证过的用户)
- 接口可以从请求头中获取当前用户信息
- 每个请求都有uuid用于标识
JWT(JSON Web Token)目前是应用最广的接口权限方案,具有无状态,跨系统,多语言多平台支持等特点,如果能在网关层实现JWT验证不仅可以避免代码入侵还能为整个后台提供统一的解决方案,目前客户网关使用Nginx,但社区版Nginx中没有JWT模块,自己实现不现实,因此选择OpenResty作为网关层, 据官网介绍,OpenResty® 是一个基于 Nginx 与 Lua 的高性能 Web 平台,其内部集成了大量精良的 Lua 库、第三方模块以及大多数的依赖项。用于方便地搭建能够处理超高并发、扩展性极高的动态 Web 应用、Web 服务和动态网关。本质上就是一个Nginx+Lua的集成软件.
整体架构如图:

实现
环境
[root@docker ~]# cat /etc/redhat-release
CentOS Linux release 7.4.1708 (Core)
[root@docker ~]# more /proc/version
Linux version 3.10.0-693.el7.x86_64 (builder@kbuilder.dev.centos.org) (gcc version 4.8.5 20150623 (Red Hat 4.
8.5-16) (GCC) ) #1 SMP Tue Aug 22 21:09:27 UTC 2017
安装OpenResty
OpenRestry安装很简单,可以在这里找到不同版本操作系统安装文档,本次使用的环境是CentOS Linux release 7.4
[root@docker ~]# yum install yum-utils
[root@docker ~]# yum-config-manager --add-repo https://openresty.org/package/centos/openresty.repo
[root@docker ~]# yum install openresty
[root@docker ~]# yum install openresty-resty系统默认安装在/usr/local/openresty/目录下,版本如下
[root@docker openresty]# cd /usr/local/openresty/bin/
[root@docker bin]# ./openresty -v
nginx version: openresty/1.13.6.2可以将OpenResty目录加到PATH里,方便使用.
修改nginx.conf文件测试是否安装成功
tee /usr/local/openresty/nginx/conf/nginx.conf <<-'EOF'
worker_processes  1;
error_log logs/error.log;
events {
    worker_connections 1024;
}
http {
    server {
        listen 8080;
        location / {
            default_type text/html;
            content_by_lua '
                ngx.say("<p>hello, world</p>")
            ';
        }
    }
}
EOF
[root@docker conf]# openresty -s reload
[root@docker conf]# curl localhost:8080
<p>hello, world</p>
安装JWT模块
这里使用JWT官方推荐Lua实现库,项目地址为https://github.com/SkyLothar/...,有趣的是,这个项目的介绍是这么写的JWT For The Great Openresty,看来是为OpenResty量身定做.github上有安装教程,但一方面有些第三方库的安装文档没有提及,另一方面有些内容没有用到安装的时候可以跳过,这里将完整安装步骤重新整理了下.
- 在release页面https://github.com/SkyLothar/...下载项目源码,截止到目前最新版为
v0.1.11 - 下载
hmac源码,截止到目前项目还未release,只能下载项目里的源文件https://github.com/jkeys089/l... - 在服务器创建目录
/usr/local/openresty/nginx/jwt-lua/resty,将第1步压缩包中目录lua-resty-jwt-0.1.11/lib/resty/下的所有lua文件和第2步中的hmac.lua文件拷贝到该目录下,文件列表如下.
[root@docker resty]# pwd
/usr/local/openresty/nginx/jwt-lua/resty
[root@docker resty]# ll
total 60
-rwxr-xr-x. 1 root root 11592 Jul 18 10:40 evp.lua
-rw-r--r--. 1 root root  3796 Jul 18 10:40 hmac.lua
-rwxr-xr-x. 1 root root 27222 Jul 18 10:40 jwt.lua
-rwxr-xr-x. 1 root root 15257 Jul 18 10:40 jwt-validators.lua修改nginx.conf验证是否生效
tee /usr/local/openresty/nginx/conf/nginx.conf <<-'EOF'
worker_processes  1;
error_log logs/error.log info;
events {
    worker_connections 1024;
}
http {
    lua_package_path "/usr/local/openresty/nginx/jwt-lua/?.lua;;";
    server {
        listen 8080;
        default_type text/plain;
        location = / {
            content_by_lua '
                local cjson = require "cjson"
                local jwt = require "resty.jwt"

                local jwt_token = "eyJ0eXAiOiJKV1QiLCJhbGciOiJIUzI1NiJ9" ..
                    ".eyJmb28iOiJiYXIifQ" ..
                    ".VAoRL1IU0nOguxURF2ZcKR0SGKE1gCbqwyh8u2MLAyY"
                local jwt_obj = jwt:verify("lua-resty-jwt", jwt_token)
                ngx.say(cjson.encode(jwt_obj))
            ';
        }
        location = /sign {
            content_by_lua '
                local cjson = require "cjson"
                local jwt = require "resty.jwt"

                local jwt_token = jwt:sign(
                    "lua-resty-jwt",
                    {
                        header={typ="JWT", alg="HS256"},
                        payload={foo="bar"}
                    }
                )
                ngx.say(jwt_token)
            ';
        }
    }
}
EOF
[root@docker resty]# curl localhost:8080
{"signature":"VAoRL1IU0nOguxURF2ZcKR0SGKE1gCbqwyh8u2MLAyY","reason":"everything is awesome~ :p","valid":true,"raw_header":"eyJ0eXAiOiJKV1QiLCJhbGciOiJIUzI1NiJ9","payload":{"foo":"bar"},"header":{"alg":"HS256","typ":"JWT"},"verified":true,"raw_payload":"eyJmb28iOiJiYXIifQ"}验证通过,jwt模块安装完毕
自定义验证逻辑
上面jwt模块还无法用于生产环境,有几个问题没解决
- jwt token目前是写死在配置文件里,生产需要从header
Authorization中获取 - 验证失败目前返回是
200生产需要返回401 - 需要配置反向代理并且将用户信息放在代理header上
创建文件/usr/local/openresty/nginx/jwt-lua/resty/nginx-jwt.lua
local jwt = require "resty.jwt"
local cjson = require "cjson"
--your secret
local secret = "5pil6aOO5YaN576O5Lmf5q+U5LiN5LiK5bCP6ZuF55qE56yR"

local M = {}

function M.auth(claim_specs)
    -- require Authorization request header
    local auth_header = ngx.var.http_Authorization

    if auth_header == nil then
        ngx.log(ngx.WARN, "No Authorization header")
        ngx.exit(ngx.HTTP_UNAUTHORIZED)
    end

    ngx.log(ngx.INFO, "Authorization: " .. auth_header)

    -- require Bearer token
    local _, _, token = string.find(auth_header, "Bearer%s+(.+)")

    if token == nil then
        ngx.log(ngx.WARN, "Missing token")
        ngx.exit(ngx.HTTP_UNAUTHORIZED)
    end

    ngx.log(ngx.INFO, "Token: " .. token)

    local jwt_obj = jwt:verify(secret, token)
    if jwt_obj.verified == false then
        ngx.log(ngx.WARN, "Invalid token: ".. jwt_obj.reason)
        ngx.exit(ngx.HTTP_UNAUTHORIZED)
    end

    ngx.log(ngx.INFO, "JWT: " .. cjson.encode(jwt_obj))

    -- write the uid variable
    ngx.var.uid = jwt_obj.payload.sub
end

return M修改配置文件nginx.conf
worker_processes  1;
error_log logs/error.log info;
events {
    worker_connections 1024;
}
http {
    upstream tomcat{
     server localhost:80;
    }
    lua_package_path "/usr/local/openresty/nginx/jwt-lua/?.lua;;";
    server {
        listen 8080;
        set $uid '';
        location / {
            access_by_lua '
            local jwt = require("resty.nginx-jwt")
            jwt.auth()
        ';
            default_type application/json;
            proxy_set_header uid $uid;
            proxy_pass http://tomcat;
        }
    }
}这里后台启动了一台tomcat并设置监听端口为80,tomcat上部署了一个示例的war包,代码逻辑较简单,就是输出所有的header,代码如下:
package asan.demo;
import java.io.IOException;
import java.io.PrintWriter;
import java.util.Enumeration;
import javax.servlet.*;
import javax.servlet.http.*;

public class JWTDemoService extends HttpServlet {
    private static final String CONTENT_TYPE = "text/html; charset=UTF-8";

    public void init(ServletConfig config) throws ServletException {
        super.init(config);
    }

    public void service(HttpServletRequest request,
                        HttpServletResponse response) throws ServletException,
                                                             IOException {
        response.setContentType(CONTENT_TYPE);
        PrintWriter out = response.getWriter();
        Enumeration em=request.getHeaderNames();
        while(em.hasMoreElements()){
            String key=(String)em.nextElement();
            String value=(String)request.getHeaders(key).nextElement();
            out.println(String.format("%s ==> %s", key,value));
        }
        out.close();
    }
}
重启OpenResty测试,如果没有指定jwt token信息返回401
[root@docker conf]# curl http://localhost:8080/jwtdemo/service
<html>
<head><title>401 Authorization Required</title></head>
<body bgcolor="white">
<center><h1>401 Authorization Required</h1></center>
<hr><center>openresty/1.13.6.2</center>
</body>
</html>
指定jwt token
[root@docker conf]# curl -i http://localhost:8080/jwtdemo/ -H 'Authorization: Bearer eyJ0eXAiOiJKV1QiLCJhbGciOiJIUzI1NiJ9.eyJqdGkiOiJ5YXlhIiwiaWF0IjoxNTMxODkyNzE3LCJpc3MiOiJ5YXlhIiwic3ViIjoieWF5YSIsImV4cCI6MTUzMTkyODcxN30.W5UXlwKHSrpUAYbfoF-fTBTS9Enm1wsvCKNQm0yLSfQ'
HTTP/1.1 200
Server: openresty/1.13.6.2
Date: Wed, 18 Jul 2018 05:52:13 GMT
Content-Type: text/html;charset=UTF-8
Content-Length: 298
Connection: keep-alive

uid ==> yaya
host ==> tomcat
connection ==> close
user-agent ==> curl/7.29.0
accept ==> */*
authorization ==> Bearer eyJ0eXAiOiJKV1QiLCJhbGciOiJIUzI1NiJ9.eyJqdGkiOiJ5YXlhIiwiaWF0IjoxNTMxODkyNzE3LCJpc3MiOiJ5YXlhIiwic3ViIjoieWF5YSIsImV4cCI6MTUzMTkyODcxN30.W5UXlwKHSrpUAYbfoF-fTBTS9Enm1wsvCKNQm0yLSfQ从结果上看,后台服务已经获取到uid这个header
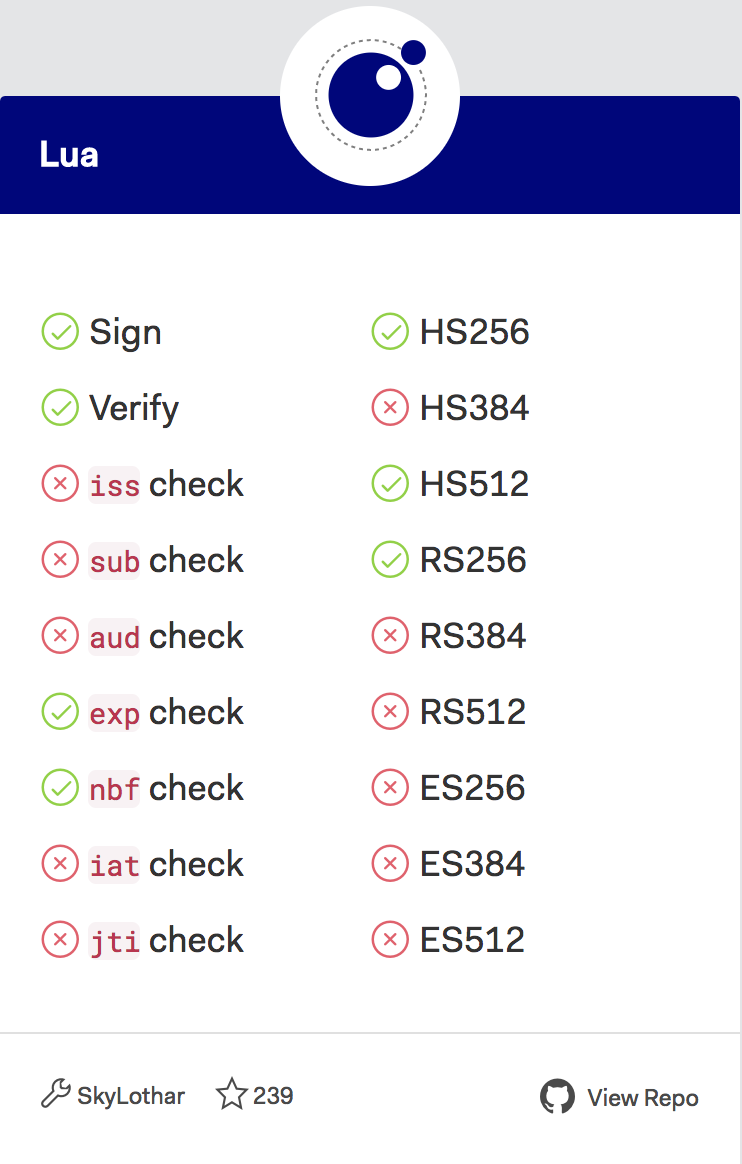
至于请求用到jwt token可以从任意平台生成只要保证secret一样即可,根据官网介绍,该库目前支持到jwt生成算法如图:
uuid生成
为每个请求生成唯一的uuid码可以将网关层上的请求和应用层的请求关联起来,对排查问题,接口统计都非常有用.
创建文件/usr/local/openresty/nginx/jwt-lua/resty/uuid.lua
local M  = {}
local charset = {}  do -- [0-9a-zA-Z]
    for c = 48, 57  do table.insert(charset, string.char(c)) end
    for c = 65, 90  do table.insert(charset, string.char(c)) end
    for c = 97, 122 do table.insert(charset, string.char(c)) end
end
function M.uuid(length)
        local res = ""
        for i = 1, length do
                res = res .. charset[math.random(1, #charset)]
        end
        return res
end
return M修改配置文件nginx.conf
worker_processes  1;
error_log logs/error.log info;
events {
    worker_connections 1024;
}
http {
    upstream tomcat{
     server localhost:80;
    }
    lua_package_path "/usr/local/openresty/nginx/jwt-lua/?.lua;;";
    server {
        listen 8080;
        set $uid '';
        set $uuid '';
        location / {
            access_by_lua '
            local jwt = require("resty.nginx-jwt")
            jwt.auth()
            local u = require("resty.uuid")
            ngx.var.uuid = u.uuid(64)
        ';
            default_type application/json;
            proxy_set_header uid $uid;
            proxy_set_header uuid $uuid;
            proxy_pass http://tomcat;
        }
    }
}
重启OpenResty,测试
[root@docker conf]# openresty -s reload
[root@docker conf]# curl -i http://localhost:8080/jwtdemo/ -H 'Authorization: Bearer eyJ0eXAiOiJKV1QiLCJhbGciOiJIUzI1NiJ9.eyJqdGkiOiJ5YXlhIiwiaWF0IjoxNTMxODk0MDA3LCJpc3MiOiJ5YXlhIiwic3ViIjoieWF5YSIsImV4cCI6MTUzMTkzMDAwN30.vQvpQpIHCmK5QBgIoRR8jhIGeYlHOMYySIr4gHvoZFE'
HTTP/1.1 200
Server: openresty/1.13.6.2
Date: Wed, 18 Jul 2018 08:05:45 GMT
Content-Type: text/html;charset=UTF-8
Content-Length: 372
Connection: keep-alive

uid ==> yaya
uuid ==> nhak5eLjQZ73yhAyHLTgZnSBeDa8pa1p3pcpBFvJ4Mv1fkY782UgVr8Islheq03l
host ==> tomcat
connection ==> close
user-agent ==> curl/7.29.0
accept ==> */*
authorization ==> Bearer eyJ0eXAiOiJKV1QiLCJhbGciOiJIUzI1NiJ9.eyJqdGkiOiJ5YXlhIiwiaWF0IjoxNTMxODk0MDA3LCJpc3MiOiJ5YXlhIiwic3ViIjoieWF5YSIsImV4cCI6MTUzMTkzMDAwN30.vQvpQpIHCmK5QBgIoRR8jhIGeYlHOMYySIr4gHvoZFE可以看到,多了一个uuid的请求头
jwt token生成java示例
这里提供一个生成jwt token的java示例
package com.yaya;

import io.jsonwebtoken.JwtBuilder;
import io.jsonwebtoken.Jwts;
import io.jsonwebtoken.SignatureAlgorithm;
import javax.crypto.spec.SecretKeySpec;
import java.security.Key;
import java.util.Date;
import java.util.HashMap;
import java.util.Map;

/**
 * @Description:
 * @author: jianfeng.zheng
 * @since: 2018/7/5 下午9:56
 * @history: 1.2018/7/5 created by jianfeng.zheng
 */
public class JWTDemo {

    public static final String SECRET="5pil6aOO5YaN576O5Lmf5q+U5LiN5LiK5bCP6ZuF55qE56yR";

    public static String createJWT(String uid, long ttlMillis) throws Exception {
        SignatureAlgorithm signatureAlgorithm = SignatureAlgorithm.HS256;
        long nowMillis = System.currentTimeMillis();
        Date now = new Date(nowMillis);
        Key signingKey = new SecretKeySpec(SECRET.getBytes(), signatureAlgorithm.getJcaName());

        Map<String,Object> header=new HashMap<String,Object>();
        header.put("typ","JWT");
        header.put("alg","HS256");
        JwtBuilder builder = Jwts.builder().setId(uid)
                .setIssuedAt(now)
                .setIssuer(uid)
                .setSubject(uid)
                .setHeader(header)
                .signWith(signatureAlgorithm, signingKey);
        if (ttlMillis >= 0) {
            long expMillis = nowMillis + ttlMillis;
            Date exp = new Date(expMillis);
            builder.setExpiration(exp);
        }
        return builder.compact();
    }

    public static void main(String[]cmd) throws Exception {
        String s=createJWT("yaya",36000000);
        System.out.println("Bearer "+s);
    }

}
pom.xml
<?xml version="1.0" encoding="UTF-8"?>
<project xmlns="http://maven.apache.org/POM/4.0.0"
         xmlns:xsi="http://www.w3.org/2001/XMLSchema-instance"
         xsi:schemaLocation="http://maven.apache.org/POM/4.0.0 http://maven.apache.org/xsd/maven-4.0.0.xsd">
    <modelVersion>4.0.0</modelVersion>

    <groupId>com.yaya</groupId>
    <artifactId>jwtdemo</artifactId>
    <version>1.0-SNAPSHOT</version>
    <dependencies>
        <dependency>
            <groupId>io.jsonwebtoken</groupId>
            <artifactId>jjwt</artifactId>
            <version>0.6.0</version>
        </dependency>
    </dependencies>
</project>
写在最后
这里只是解决了文章开头提到的第一个问题,接口需要知道是谁调用了接口,第二个问题,用户能不能调接口目前考虑用aop在应用层实现,后续也会继续更新.