内容已失效,使用教程可见TensorflowHub官网
任何深度学习框架,为了获得成功,必须提供一系列最先进的模型,以及在流行和广泛接受的数据集上训练的权重,即与训练模型。
TensorFlow现在已经提出了一个更好的框架,称为TensorFlow Hub,它非常易于使用且组织良好。使用TensorFlow Hub,您可以通过几行代码导入大型和流行的模型,自信地执行广泛使用的传输学习活动。TensorFlow Hub非常灵活,可以托管您的模型以供其他用户使用。TensorFlow Hub中的这些模型称为模块。在本文中,让我们看看如何使用TensorFlow Hub模块的基础知识,它是各种类型和代码示例。
前置知识
接下来,让我们看一些可用于了解TensorFlow Hub模块更多细节的重要方面和功能。
1)模块实例化:由TensorFlow Hub网站托管用于不同目的(图像分类,文本嵌入等)的不同模型(Inception,ResNet,ElMo等)组成的各种模块。用户必须浏览模块目录,然后在完成其目的和模型后,需要复制托管模型的URL。然后,用户可以像这样实例化他的模块:
import tensorflow_hub as hub

module = hub.Module(<<Module URL as string>>, trainable=True)
除了URL参数,另一个最值得注意的参数是'trainable'。如果用户希望微调/修改模型的权重,则必须将此参数设置为True 。
2)签名:模块的签名指定了每个模块的作用。如果未明确提及签名,则所有模块都带有“默认”签名并使用它。对于大多数模块,当使用“默认”签名时,模型的内部层将从用户中抽象出来。用于列出模块的所有签名名称的函数是get_signature_names()。
import tensorflow_hub as hub

module = hub.Module('https://tfhub.dev/google/imagenet/inception_v3/classification/1')
print(module.get_signature_names())
# ['default', 'image_classification', 'image_feature_vector']
import tensorflow_hub as hub

module = hub.Module('https://tfhub.dev/google/imagenet/inception_v3/classification/1')
print(module.get_input_info_dict())   # When no signature is given, considers it as 'default'
# {'images': <hub.ParsedTensorInfo shape=(?, 299, 299, 3) dtype=float32 is_sparse=False>}

print(module.get_input_info_dict(signature='image_feature_vector'))
# {'images': <hub.ParsedTensorInfo shape=(?, 299, 299, 3) dtype=float32 is_sparse=False>}
4)预期输出:为了在构建TensorFlow Hub模型之后构建图的剩余部分,有必要知道预期的输出类型。get_output_info_dict()函数用于此目的。请注意,对于“默认”签名,通常只有一个输出,但是当您使用非默认签名时,图表的多个图层将向您公开。
import tensorflow_hub as hub

module = hub.Module('https://tfhub.dev/google/imagenet/inception_v3/classification/1')
print(module.get_output_info_dict())  # When no signature is given, considers it as 'default'
# {'default': <hub.ParsedTensorInfo shape=(?, 1001) dtype=float32 is_sparse=False>}

print(module.get_output_info_dict(signature='image_classification'))
# {'InceptionV3/global_pool': <hub.ParsedTensorInfo shape=(?, 1, 1, 2048) dtype=float32 is_sparse=False>,
# 'InceptionV3/Logits': <hub.ParsedTensorInfo shape=(?, 1001) dtype=float32 is_sparse=False>,
#  'InceptionV3/Conv2d_2b_3x3': <hub.ParsedTensorInfo shape=(?, 147, 147, 64) dtype=float32 is_sparse=False>
# ..... Several other exposed layers...... }
5)收集所需的模块层:实例化模块后,必须从模块中提取所需的层/输出并将其添加到图形中。以下是一些方法:
import tensorflow as tf
import tensorflow_hub as hub

images = tf.placeholder(tf.float32, (None, 299, 299, 3))

module = hub.Module('https://tfhub.dev/google/imagenet/inception_v3/classification/1')
logits1 = module(dict(images=images))    # implies default signature
print(logits1)
# Tensor("module_apply_default/InceptionV3/Logits/SpatialSqueeze:0", shape=(?, 1001), dtype=float32)

module_features = module(dict(images=images), signature='image_classification', as_dict=True)
# module_features stores all layers in key-value pairs
logits2 = module_features['InceptionV3/Logits']
print(logits2)
# Tensor("module_apply_image_classification/InceptionV3/Logits/SpatialSqueeze:0", shape=(?, 1001), dtype=float32)

global_pool = module_features['InceptionV3/global_pool']
print(global_pool)
# Tensor("module_apply_image_classification/InceptionV3/Logits/GlobalPool:0", shape=(?, 1, 1, 2048), dtype=float32)
import tensorflow as tf

with tf.Session() as sess:
    sess.run([tf.tables_initializer(), <<other initializers>>])
代码骨架
一旦构建了包含模块,学习算法优化器,目标函数,自定义层等的完整图形,这就是代码的图形部分的框架。
 1 import tensorflow as tf
 2 import tensorflow_hub as hub
 3
 4 << Create Placeholders >>
 5 << Create Dataset and Iterators >>
 6
 7 module1 = hub.Module(<< Module URL >>)
 8 logits1 = module1(<< input_dict >>)
 9
10 module2 = hub.Module(<< Module URL >>)
11 module2_features = module2(<< input_dict >>, signature='default', as_dict=True)
12 logits2 = module2_features['default']
13
14 << Remaining graph, learning algorithms, objective function, etc >>
15
16 with tf.Session() as sess:
17     sess.run([tf.tables_initializer(), << other initializers >>])
18
19     << Remaining training pipeline >>
我正在使用两个模块。第一个模块使用最小的代码构建,隐式使用默认签名和层。在第二个模块中,我明确指定了默认签名和图层。以类似的方式,我们可以指定非默认签名和图层。
1)图像分类模块
顾名思义,这些模块集用于图像分类。在这类模块中,给出了完整的网络架构。这包括用于分类的最终密集连接层。在这个类别的代码示例中,我将使用Inception V3模块将Kaggle的猫狗分类问题分类为1001个ImageNet类。
import tensorflow as tf
import tensorflow_hub as hub

from Dataset import Dataset

tf.reset_default_graph()
dataset = Dataset()

module = hub.Module('https://tfhub.dev/google/imagenet/inception_v3/classification/1')
logits = module(dict(images=dataset.img_data))

softmax = tf.nn.softmax(logits)
top_predictions = tf.nn.top_k(softmax, top_k, name='top_predictions')
2)特征向量模块
这与图像分类模块非常相似,唯一的区别是模块不包括最终的密集分类层。在这个类别的代码示例中,我将针对Hackerearth的多标签动物属性分类问题微调Resnet-50模块。 在微调操作期间,除了定制附加的密集层之外,通常还需要优化模块的最终层。在这种情况下,您必须找到要微调的范围或变量的名称。我附加了代码的相关部分以在特征向量模块中执行此类过程。
 1 module = hub.Module('https://tfhub.dev/google/imagenet/resnet_v2_50/feature_vector/1',
 2                     trainable=True)   # Trainable is True since we are going to fine-tune the model
 3 module_features = module(dict(images=dataset.image_data), signature="image_feature_vector",
 4                          as_dict=True)
 5 features = module_features["default"]
 6
 7 with tf.variable_scope('CustomLayer'):
 8     weight = tf.get_variable('weights', initializer=tf.truncated_normal((2048, n_class)))
 9     bias = tf.get_variable('bias', initializer=tf.ones((n_class)))
10     logits = tf.nn.xw_plus_b(features, weight, bias)
11
12 # Find out the names of all variables present in graph
13 print(tf.all_variables())
14
15 # After finding the names of variables or scope, gather the variables you wish to fine-tune
16 var_list = tf.get_collection(tf.GraphKeys.GLOBAL_VARIABLES, scope='CustomLayer')
17 var_list2 = tf.get_collection(tf.GraphKeys.GLOBAL_VARIABLES, scope='module/resnet_v2_50/block4')
18 var_list.extend(var_list2)
19
20 # Pass this set of variables into your optimiser
21 optimizer = tf.train.AdamOptimizer(learning_rate=lr).minimize(loss, var_list=var_list)
如果模块图中的节点没有直观命名(非常不可能的情况),则必须弄清楚模块的体系结构,然后将它们映射到正在打印的节点。
在代码示例中,我已经调整了最后几层变量属于'resnet_v2_50 / block4'的变量范围。通过10个时期的训练,你可以毫不费力地获得这个问题的F1分数0.95819。
3)视频分类模块
视频分类是指对视频片段中发生的活动的性质进行分类。在代码示例中,我已经在Inception 3D模块上训练了包含27个类的20BN-Jester数据集。再说一次,只有3个训练时期,我的准确率达到了91.45%。模块代码的相关部分如下所示。
import tensorflow as tf
import tensorflow_hub as hub

from Dataset import Dataset
dataset = Dataset()

module = hub.Module("https://tfhub.dev/deepmind/i3d-kinetics-400/1", trainable=True)
features = module(dict(rgb_input=dataset.image_data))

n_class = 27
with tf.variable_scope('CustomLayer'):
    weight = tf.get_variable('weights',
                             initializer=tf.truncated_normal((400, n_class)))
    bias = tf.get_variable('bias', initializer=tf.ones((n_class)))
    logits = tf.nn.xw_plus_b(features, weight, bias)
为了测试模型的准确性,我构建了一个简单的实时视频分类应用程序,这里是一个小视频
4)文本嵌入模型
 1 module = hub.Module('https://tfhub.dev/google/elmo/2', trainable=True)
 2 embeddings = module(dict(text=dataset.text_data))
 3 embeddings = tf.expand_dims(embeddings, axis=1)
 4
 5 with tf.variable_scope('Layer1'):
 6     cell_fw1 = tf.nn.rnn_cell.LSTMCell(num_units=128, state_is_tuple=True)
 7     cell_bw1 = tf.nn.rnn_cell.LSTMCell(num_units=128, state_is_tuple=True)
 8
 9     outputs1, states1 = tf.nn.bidirectional_dynamic_rnn(
10         cell_fw=cell_fw1,
11         cell_bw=cell_bw1,
12         inputs=embeddings)
13
14 rnn_output = tf.reshape(outputs1[0], (-1, 128))
15
16 with tf.variable_scope('Layer2'):
17     weight2 = tf.get_variable('weight', initializer=tf.truncated_normal((128, n_class)))
18     bias2 = tf.get_variable('bias', initializer=tf.ones(n_class))
19     logits = tf.nn.xw_plus_b(rnn_output, weight2, bias2)
5)图像增强模块
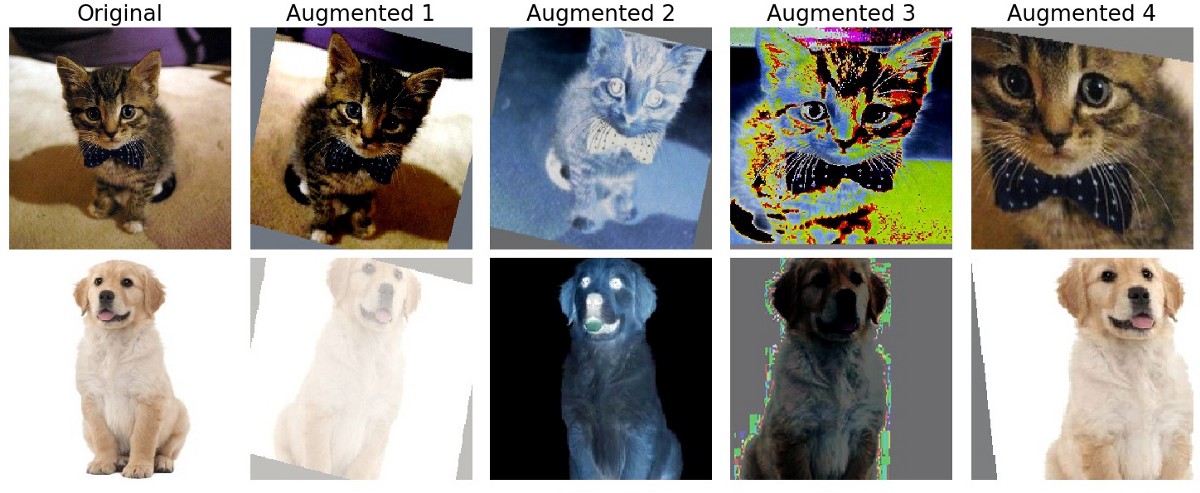
图像增强是流水话训练中的一个重要组成部分,可以提高模型的准确性。所有图像增强模块(在编写本文时)都没有任何变量,因此,这些模块不具有可调性/可训练性。使用'from_decoded_images'的签名,您可以直接将图像提供给这些模块。下面示出了示例代码块以及生成的增强图像。
 1 import tensorflow as tf
 2 import tensorflow_hub as hub
 3 import tensorflow.contrib.image           # Needed for Image Augmentation modules
 4
 5 from Dataset import Dataset
 6 dataset = Dataset()
 7
 8 module = hub.Module('https://tfhub.dev/google/image_augmentation/nas_svhn/1')
 9 input_dict = dict(image_size=image_size,       # Output Image size
10                   images=dataset.img_data,     # Has the image in Numpy data format
11                   augmentation=True)
12 aug_images = module(input_dict, signature='from_decoded_images')
6)对象检测模块
对象检测模块不支持微调,因此如果您有自己的数据集,则必须从头开始执行培训。目前也不支持批量处理数据。在代码示例中,我将仅使用Inception-ResNet V2模块上的FasterRCNN对图像进行推断。我附上了下面模块生成的代码和图像的模块部分。
import tensorflow as tf
import tensorflow_hub as hub

from Dataset import Dataset
dataset = Dataset()

module = hub.Module('https://tfhub.dev/google/faster_rcnn/openimages_v4/inception_resnet_v2/1')
detector = module(dict(images=dataset.image_data), as_dict=True)

class_entities = detector['detection_class_entities']
boxes = detector['detection_boxes']
scores = detector['detection_scores']
class_labels = detector['detection_class_labels']
class_names = detector['detection_class_names']
7)生成器模型
这些对应于生成性对抗网络(GAN)。一些模块没有暴露其网络的Discriminator部分。就像对象检测一样,即使在代码示例中,我也只是在进行推理。使用在CelebA数据集上训练的Progressive GAN模块,我将生成新面孔。我附上了下面模块生成的代码和图像的模块部分 。
1 import tensorflow as tf
2 import tensorflow_hub as hub
3
4 from Dataset import Dataset
5 dataset = Dataset()
6
7 module = hub.Module("https://tfhub.dev/google/progan-128/1")
8 images = module(dataset.latent_vector_space)
对应的模型在TensorFlow Hub官网也有示例,可以在Colab上复现。例如,目标检测Colab。
原文链接:https://medium.com/ymedialabs-innovation/how-to-use-tensorflow-hub-with-code-examples-9100edec29af