不知不觉地春节要来临了,今天已经是放假的第二天,想想回老家之后所有的时间就不是自己的了,要陪孩子玩,走亲戚等等,我还是趁着在郑州的这两天,把几天后春节要发布的文章给提前整整。在此,提前祝大家春节快乐!!
前面我已写了6篇相关的Webpack方面的技术知识点,今天我主要分享有关PostCSS方面的技术,PostCSS严格来说不是一款c s s预处理器,而是一个用 JavaScript 工具和插件转换 CSS 代码的工具。它的工作模式是接收样式源代码并交由编译插件处理,最后输出CSS。通过PostCSS包含的很多功能强大的插件,可以让我们使用更新的CSS特性,保证更好的浏览器兼容性。
PostCSS特点
- 支持未来的css, 使用cssnext书写未来的css
- 编译速度有了很大的提升
- 丰富的插件系统
- c s s可以模块化
PostCSS在Webpack中的用法
使用npm 进行安装postcss-loader,postcss-loader是连接PostCSS和Webpack。安装命令行如下:
npm install postcss-loader --save-dev
webpack.config.js配置如下:
const path = require('path')
const MiniCssExtractPlugin = require('mini-css-extract-plugin')
module.exports = {
  context: path.join(__dirname, './src'),
  entry: {
    index: './index.js'
  },
  output: {
    path: path.join(__dirname, 'dist'),
    filename: '[name].js'
  },
  mode: 'development',
  module: {
    rules: [
      {
        test: /.css$/i,
        use: [{
          loader: MiniCssExtractPlugin.loader,
          options: {
            publicPath: './dist'
          },
        }, 'css-loader'], // "css-loader" 将 CSS 转化成 CommonJS 模块
        exclude: /node_modules/
      },
      {
        test: /.scss$/i,
        use: ['style-loader',
        {
          loader: 'css-loader',
          options: {
            sourceMap: true
          }
        },
        {
          loader: 'sass-loader',
          options: {
            sourceMap: true
          }
        },
        'postcss-loader'  //配置postcss-loader
        ],
        exclude: /node_modules/
      },
      {
        test: /.js$/,
        exclude: /(node_modules|bower_components)/,
        use: {
          loader: 'babel-loader',
          options: {
            cacheDirectory: true,
            presets: [
              [
                'env', {
                  modules: false
                }
              ]
            ]
          }
        }
      }
    ],
  },
  plugins: [new MiniCssExtractPlugin({
    filename: '[name].css',
    chunkFilename: '[id].css'
  })],
}
postcss-loader可以结合css-loader使用,也可单独使用,就是单独使用也可以达到需要的效果,但是单独使用的时候不建议用css中的@import语法,否则会产生冗余代码。官方推荐是两者结合着使用,不要单独使用。
postcss与Autoprefixer
postCSS必须有一个单独的配置文件,所以还需要在项目根目录下配置一个postcss.config.js,
这个可以结合着自动添加前缀插件Autoprefixer使用,Autoprefixer 自动获取浏览器的流行度和能够支持的属性,并根据这些数据帮你自动为 CSS 规则添加前缀。这是postCss最广泛的一个应用场景。首先安装Autoprefixer,安装命令代码如下:
npm install autoprefixer --save-dev
在postcss.config.js中添加autoprefixer,配置代码如下:
const autoprefixer = require('autoprefixer')
module.exports = {
  parser: 'sugarss',
  plugins: {
    'autoprefixer': {
      flex: true,
      browsers: [
        '> 1%',
        'last 3 versions',
        'android 4.2',
        'ie 8'
      ]
    }
  }
}
我们可以在autoprefixer中添加需要支持的特性(如grid)以及兼容哪些浏览器(browsers)。配置好之后,我们就可以使用一些较新的CSS特性。如:
.main{
dislay: grid;
}
由于配置中制定grid为true,也就是grid特性添加ie前缀,经过编译后变成:
.main{
display: -ms-grid;
dislay: grid;
}
postcss 与cssnext
postcss可以与cssnext 结合使用,这样可以在应用中使用最新的CSS的语法特性。
首页使用npm 命令行安装:
npm install postcss-cssnext --save-dev
然后在posts.config.js中添加相应的配置,代码如下:
const postcssCssnext = require('postcss-cssnext')
module.exports = {
  parser: 'sugarss',
  plugins: {
    'postcssCssnext': {

      browsers: [
        '> 1%',
        'last 2 versions'
      ]
    }
  }
}
指定好需要支持的浏览器之后,我们就可以顺畅地使用CSSNext的特性了。PostCSS会帮我们把CSSNext的语法翻译为浏览器能接受的属性和形式。比如下面的代码:
/** main.css **/
:root {
	--highligtColor: hwb(190, 35%, 20%);
}
body {
	color: var(--highlightColor)
}
打包后编译的效果如下:
body {
	color: rgb(89, 185, 204)
}
postcss 与stylelint
stylelint是一个css代码质量检测的工具,我们可以为其添加各种规则,来统一项目的代码风格,来确保代码质量高。
首页先用命令行安装stylelint代码如下:
npm install stylelint --save-dev
postcss.config.js配置代码如下:
const stylelint = require('stylelint')
module.exports = {
  plugins: {
    'stylelint': {
      config: {
        rules: {
          'declaration-no-important': true
        }
      }
    }
  }
}
这里我们添加了declaration-no-important这样一条规则,当我们的代码中出现了“!important”时就会给出警告。比如下面的代码:
/** a.scss**/
$base-color: red;

html {
  body{
    color: $base-color !important;
  }
}
打包效果如下图:
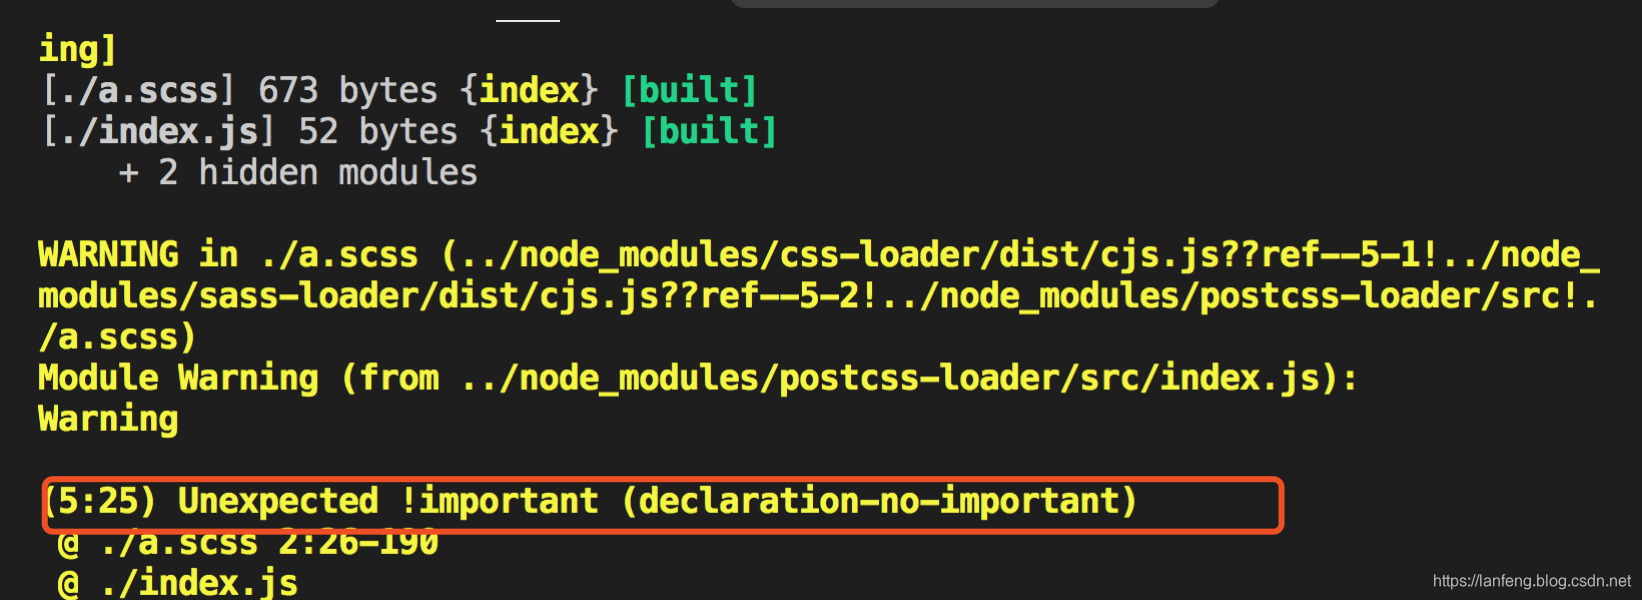
可以看出给出警告。
使用stylelint可以检测出代码中的样式问题(语法错误、重复的属性等),帮助我们写出更加安全并且风格更加一致的代码。
CSS Modules
CSS Modules 模块化是css的全局的终结者,就是说你永远不用担心命名太大众化而造成冲突,只要用最有意义的名字就行了。
css 模块化是近几年比较流行的一种开发模式,让css跟其他开发语言一样,具有自己的模块作用域,让css也拥有模块化的特点:
- 每个CSS文件中的样式都拥有单独的作用域,不会和外界发生命名冲突。
- 对CSS进行依赖管理,可以通过相对路径引入CSS文件。
- 可以通过composes轻松复用其他CSS模块。
使用CSS Modules 不需要额外安装其他组件,只需要配置css-loader即可。
配置web pack.config.js配置如下:
const path = require('path')
const MiniCssExtractPlugin = require('mini-css-extract-plugin')
module.exports = {
  context: path.join(__dirname, './src'),
  entry: {
    index: './index.js'
  },
  output: {
    path: path.join(__dirname, 'dist'),
    filename: '[name].js'
  },
  mode: 'development',
  module: {
    rules: [
      {
        test: /.css$/i,
        use: ['style-loader', {
          loader: 'css-loader',
          options: {
            modules: {
              localIdentName: '[path][name]__[local]--[hash:base64:5]',
            }
          }
        }]
      },
      {
        test: /.js$/,
        exclude: /(node_modules|bower_components)/,
        use: {
          loader: 'babel-loader',
          options: {
            cacheDirectory: true,
            presets: [
              [
                'env', {
                  modules: false
                }
              ]
            ]
          }
        }
      }
    ],
  }
}
我们只需要配置modules.localIdentName配置即可
- [name]指代的是模块名,这里被替换为style。
- [local]指代的是原本的选择器标识符,这里被替换为title。
- [hash:base64:5]指代的是一个5位的hash值,这个hash值是根据模块名和标识符计算的,因此不同模块中相同的标识符也不会造成样式冲突。
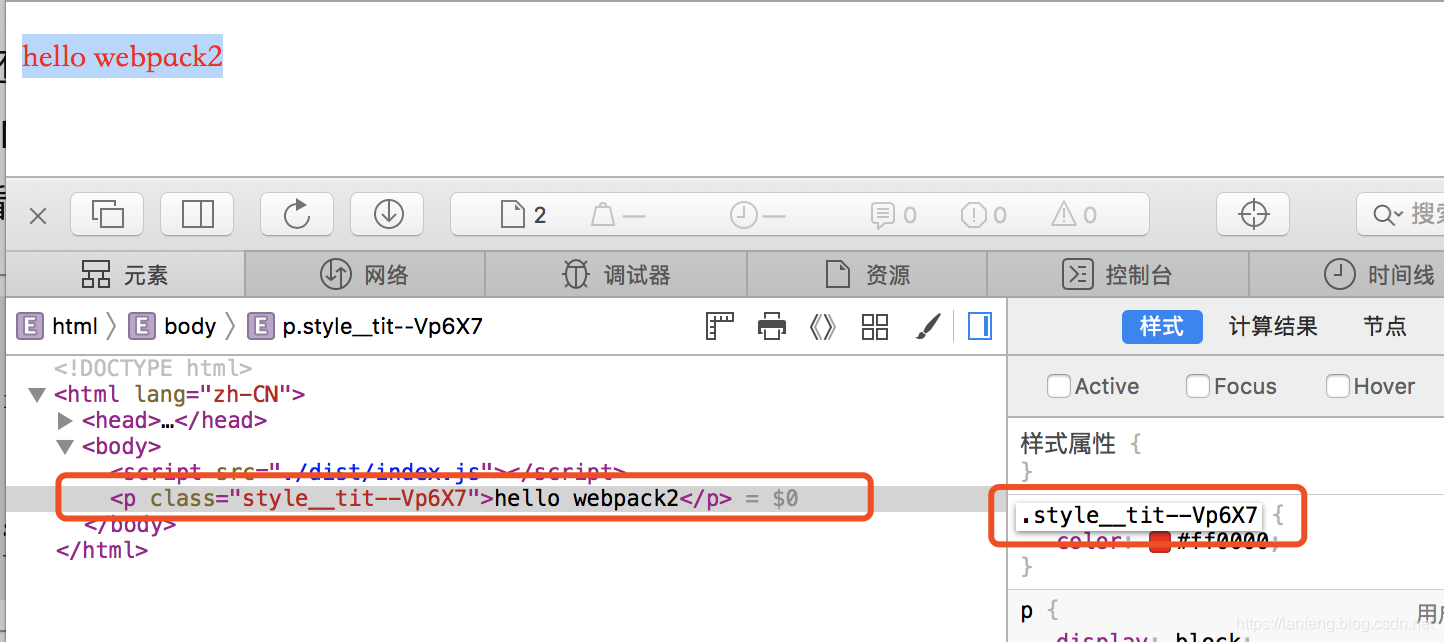
cs s代码如下:
/** style.css**/
.tit {
  color: #ff0000;
}
// index.js
import style from  './style.css';
document.write(`<p class="${style.tit}">hello webpack2</p>`);
编译后发现代码成了一个class为.style__tit--Vp6X7,以前我在j s中引入c s s文件,直接import引入即可,不需要定义一个名称,但是这个c s s modules 引入c s s的时候需要定义一个对象,然后再引用,最终这个HTML中的class才能与我们编译后的CSS类名匹配上。
运行效果如图:
总结:
今天与大家分享的主要是postcss相关的,主要包括到postcss与webpack结合使用,autoprefixer自动添加前缀,stylelint检测代码,css modules等等。这只是个人观点,如果有不足,还请多指教。如果想了解更多,请扫描下面的二维码: