前言:对于应用,配制文件通常是放在项目中管理的,它可能有spring、mybatis、log等等各种各样的配置文件和属性文件,另外你还可能有开发环境、测试环境、生产环境等,这样的话就得一式三份,若是传统应用还好说,如果是微服务呢,这样不光配置文件有可能冗余而且量大,繁重复杂,不好维护,这样的话就需要一个配置文件的统一管理了。
一、SpringCloud Config简介
SpringCloud Config为分布式系统外部化配置提供了服务器端和客户端的支持,它包括ConfigServer和ConfigClient两部分。

Server:
- 实例一般多于两个,以实现HA;
- 配置以文件形式存储,快速支持目前以SpringBoot的开发方式的配置文件;
- 支持GIt,码云,SVN,本地文件等多种形式;
- 支持属性加密;
Client:即各自的微服务应用;
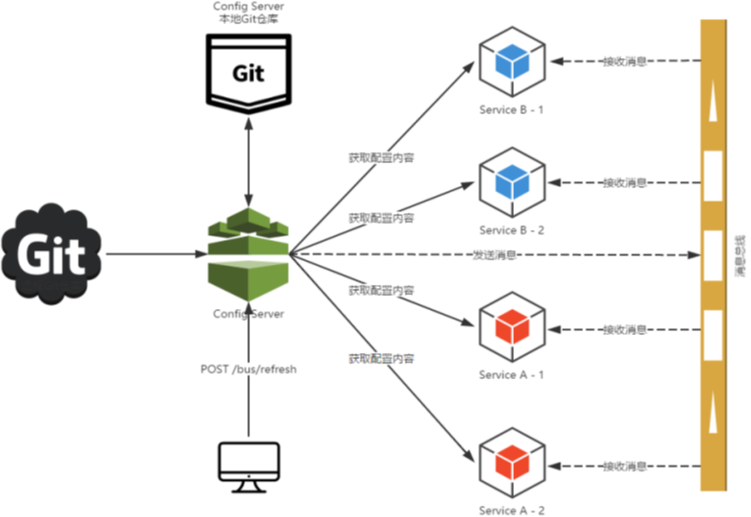
使用SpringCloud BUS配置和借助Git仓库的WebHooks自动刷新;
二、SpringCloud Config基本使用
创建服务端:
1、前面简单介绍了一下Config,那么首先要做的准备是先到Git仓库或者码云中创建一个项目并新建一些配置文件 spring-cloud-repo:

2、创建Maven工程 config-server,添加依赖:
    <dependency>
      <groupId>org.springframework.cloud</groupId>
      <artifactId>spring-cloud-config-server</artifactId>
    </dependency>
3、创建启动类,并加上开启Config服务端注解@EnableConfigServer:
@SpringBootApplication
@EnableConfigServer
public class ConfigApplication {

    public static void main(String[] args) {
        SpringApplication.run(ConfigApplication.class, args);
    }

}
4、添加application属性文件:
server.port=9000
spring.application.name=config-server-9000
spring.cloud.config.server.git.uri=https://gitee.com/lfalex/spring-cloud-repo
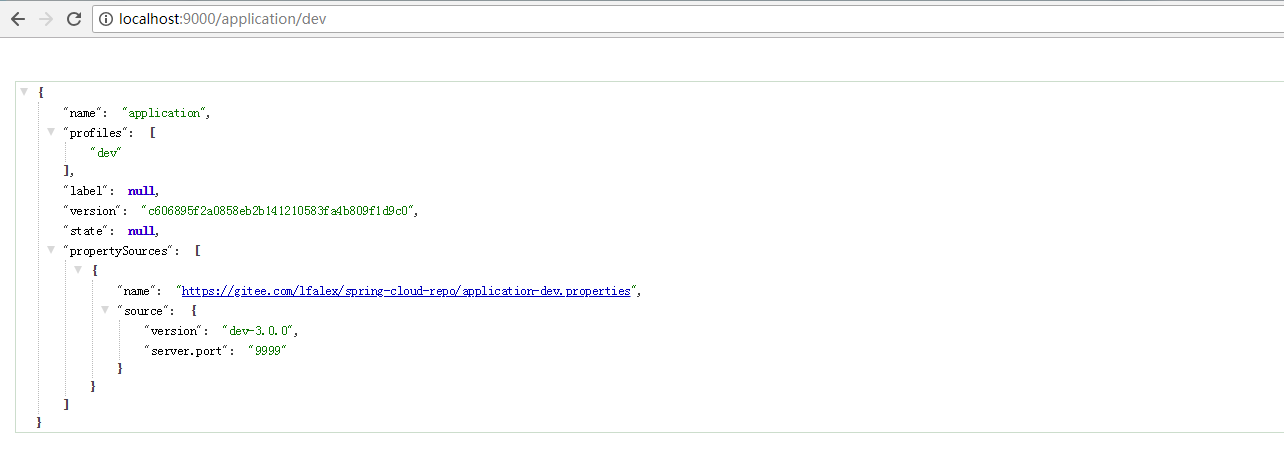
5、启动项目,简单测试,访问:localhost:9000/application/dev,localhost:9000/application-dev.properties:
访问规则:
      /{appication}/{profile}/[{label}]

      /{application}-{profile}.yml

      /{application}-{profile}.properties

      /{label}/{application}-{profile}.properties

      /{label}/{application}-{profile}.yml
它们都可以映射到对应的配置文件{application}-{profile}.properties,其中{label}为具体的分支,默认为master;


创建客户端(一般为具体的微服务):
1、创建Maven项目 config-client,添加依赖:
    <dependency>
      <groupId>org.springframework.boot</groupId>
      <artifactId>spring-boot-starter-web</artifactId>
    </dependency>
    <!-- 实现Config的客户端配置 -->
    <dependency>
      <groupId>org.springframework.cloud</groupId>
      <artifactId>spring-cloud-starter-config</artifactId>
    </dependency>
    <!-- 实现通过端点refresh手动刷新 -->
    <dependency>
      <groupId>org.springframework.boot</groupId>
      <artifactId>spring-boot-starter-actuator</artifactId>
    </dependency>
2、创建一般启动类即可,无需添加注解,创建Controller,为测试做准备:
    @Value("${version}")
    private String version;

    @RequestMapping("/getVersion")
    public String getVersion() {
        return this.version;
    }
3、为了更明显的测试Config是否生效,在application配置文件中添加:
server.port=9001
4、添加bootstrap.properties配置文件,bootstrap.properties为默认文件名,在springcloud中配置文件有个优先级的概念,当本地application.properties文件和bootstrap.properties文件中配置了同样的属性不同的值,由于bootstrap的优先级高,则在bootstrap中的属性不会被application中的覆盖,反而会覆盖掉application中的配置:
#对应着config server所获取配置文件的{application}和URL
spring.application.name=application
spring.cloud.config.uri=http://localhost:9000/
#对应着文件后面的后缀{profile}
spring.cloud.config.profile=dev
#分支
spring.cloud.config.label=master
5、先启动服务器,再启动客户端,观察端口和页面,由于前面在application中添加了端口为9001,而远程仓库的配置文件中也添加了端口9999:


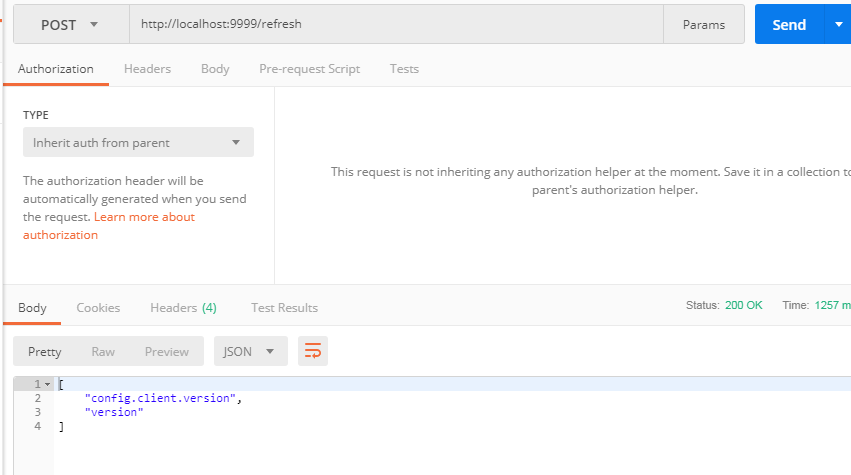
这样就实现了基本的远程配置仓库了,但是一旦有文件更改还得重新启动项目,这样就很有问题了,所以需要刷新,使用/refresh端点刷新:
1、在application或远程文件中添加:
#由于要使用actuator,所以必须要将安全权限关闭
management.security.enabled=false
2、在controller上添加注解@RefreshScope注解:
@RestController
@RefreshScope       //非重启项目手动刷新配置注解
public class ConfigController {
      。。。。
}
3、启动测试,打开,修改version=dev-3.0.0为version=dev-4.0.0,并发送刷新请求http://localhost:9999/refresh,刷新测试页面查看:


三、SpringCloud Bus自动刷新配置
前面的基于端点刷新,只针对一个服务,若为多个微服务,这样就很繁琐,所以需要一个可以集体刷新或指定刷新的组件=》SpringCloud Bus;
1、使用SpringCloud Bus需要使用RabbitMQ,未安装的请安装,基于之前的端点刷新的项目,添加依赖:
    <dependency>
      <groupId>org.springframework.cloud</groupId>
      <artifactId>spring-cloud-starter-bus-amqp</artifactId>
    </dependency>
2、在bootstrap中增加RabbitMQ的配置:
spring.rabbitmq.host=localhost
spring.rabbitmq.port=5672
spring.rabbitmq.username=guest
spring.rabbitmq.password=guest
3、启动 config-bus-client测试,打开,修改version=dev-3.0.0为version=dev-4.0.0,并发送刷新请求http://localhost:9999/bus/refresh,刷新测试页面查看:


还可以通过Git或者码云的WebHooks来发送修改刷新配置请求:

参考书籍:《SpringCloud与Docker微服务架构实战》周力著
代码示例:https://gitee.com/lfalex/springcloud-example( config-server、 config-client、 config-bus-client)