一、防止页面变形
在改变浏览器大小时,可能会导致里面的元素变形(特别是用百分比设置的宽度)。
那么,我们如何解决这个问题?
可以在最外层的元素(例如div)中,设置一个固定像素的宽度,例如:
<body style="background: #dddddd; margin: 0px;">
    <div style="background-color: #2b99ff;800px;height:2000px;margin: 0 auto;">
        <div></div>
        <div></div>
        <div></div>
    </div>
</body>
我们在<body>中的最外层div标签中设置宽度为800px。那么当浏览器页面不足800px的时候,浏览器会自动出现左右滚动条。
二、重用CSS样式
当多个元素的样式出现重复时,即有一些样式一样,有一些样式是独有的。我们可以这样处理。
<head>
    <meta charset="UTF-8">
    <title>test</title>
    <link rel="stylesheet" href="xxx.css"/>
    <style>
        .c{
            height: 100px; width:100px;
        }
        .c1{
            background-color: red;
        }
        .c2{
            background-color: blue;
        }
    </style>
</head>
<body style="background: #dddddd; margin: 0px;">
    <div class="c c1"></div>
    <div class="c c2"></div>
</body>
将不同元素中相同的样式提取出来形成一类单独的样式。然后在每个元素中同时使用多个样式,从而达到目的。
三、去除img的边框
在淘宝等网页中,商品的图片可以添加超链接,点击跳转到相应的页面。他是使用a标签和img标签实现的。
<body style="background: #dddddd; margin: 0px;">
    <a href="www.baidu.com">
        <img src="xiaohua.png" style="height: 550px; 400px;">
    </a>
</body>
当使用IE打开时,图片边上会有一个蓝色的边框。如果去除这个边框?
<head>
    <meta charset="UTF-8">
    <title>test</title>
    <link rel="stylesheet" href="xxx.css"/>
    <style>
        img{
            border: 0px;
        }
    </style>
</head>
<body style="background: #dddddd; margin: 0px;">
    <a href="www.baidu.com">
        <img src="xiaohua.png" style="height: 550px; 400px;">
    </a>
</body>
img默认有一个1px的border。通过将其设置为0px,去除这个边框。
四、CSS补充-position
我们遇到过几种情况:
1.网站页面右下角存在一个返回顶部的按钮,永远在那个位置,不管缩放页面还是滚动页面,按钮位置不变。
2.网站顶部有一个固定的菜单,不管怎么上下滚动,菜单位置不变。
处理方法:使用position: fixed,固定在浏览器窗口某个位置,并与其它元素分层,互不影响。
第一种情况:
<body>
    <div onclick="GoTop()" style="50px;height: 50px;background-color: blue;color: white;position: fixed;bottom:20px;right:20px;">回到顶部</div>
    <div style="height: 5000px;"></div>
    <script>
        function GoTop(){
            document.body.scrollTop = 0;
        }
    </script>
</body>
使用position: fixed; bottom: 20px; right: 20px;将《回到顶部》这个按钮固定在浏览器页面的右下角。并使用JS实现回到顶部的效果(Chrome不生效,搜狗生效)。
第二种情况:
<body>
    <div style="height: 50px; 100%; background-color: blue;color:white;position: fixed;top:0px;">Top Menu...</div>
    <div style="height: 5000px; 800px; background-color: #9b9b9b;margin:0 auto;"></div>
</body>
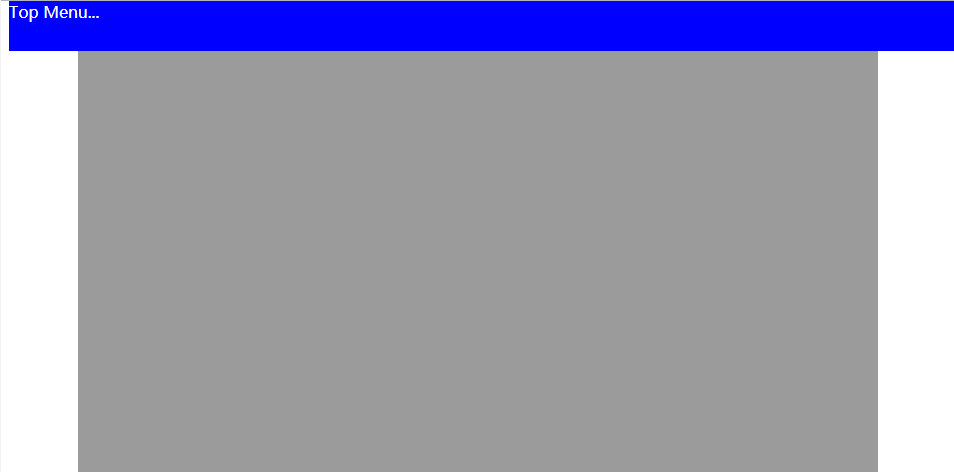
同样使用position将其固定在顶部。这样上下滚动,该菜单也不会动。
position: absolute;
position:absolute是将某个元素固定在页面(画布,即当前浏览器的窗口)上的一个点,当我们滚动页面时,该元素是会跟对页面移动的。单独使用这个样式,是没有什么意义的。
position:absolute要和position:relative配合使用才有意义:
<body>
    <div style="position: relative; background-color: #9b9b9b; border:1px solid red;height: 100px;100px;">
        <div style="position: absolute; top:10px;left:10px; background-color:red; height: 10px;10px;"></div>
    </div>
    <div style="position: relative; background-color: #9b9b9b; border:1px solid red;height: 100px;100px;">
        <div style="position: absolute; bottom:10px; right:10px; background-color:blue; height: 10px;10px;"></div>
    </div>
</body>
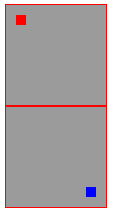
position: relative;相当于将父亲div变为一个独立的画布,儿子div中的position:absolute;是以父亲div为参照的。但是儿子div所处位置不一定被包含在父亲div中,我们把position:absolute;bottom:-20px;left:100px;里面的相对位置设置为负数,或者值比较大,父亲div比较小的时候,儿子div就可以处于父亲div之外。实际上,父亲div只是充当了儿子div的一个参照物。
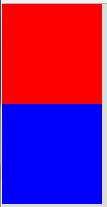
五、三层样式
有时候我们访问的网站会出现一个弹窗,当弹窗出现时,原本页面的元素我们就不能操作了。例如下图:

这种页面其实分为三层:
1.原本的页面
2.中间灰色的遮挡层
3.弹框
按如下代码实现:
<body>
    <!-- 最上面层(弹窗)可操作层-->
    <div style="z-index:10; position: fixed; top:50%; left:50%; margin-left:-250px;margin-top:-100px;background-color: white;height: 200px; 500px;">
        <a href="http://www.baidu.com">
            <img src="xiaohua.png" style=" 500px;height: 200px;border: 0px;">
        </a>
    </div>
    <!-- 中间遮挡层,半透明 -->
    <div style="z-index:9; position:fixed;background-color: #7B7B7B;
    top:0;
    bottom:0;
    left:0;
    right:0;
    opacity: 0.5;"></div>
    <!-- 最下面层,本来页面层,被遮挡不能操作 -->
    <div style="background-color: #2b99ff;height: 5000px;">
        <img src="xiaohua.png">
    </div>
</body>
效果如下,小图片为弹窗,可点击跳转到baidu:
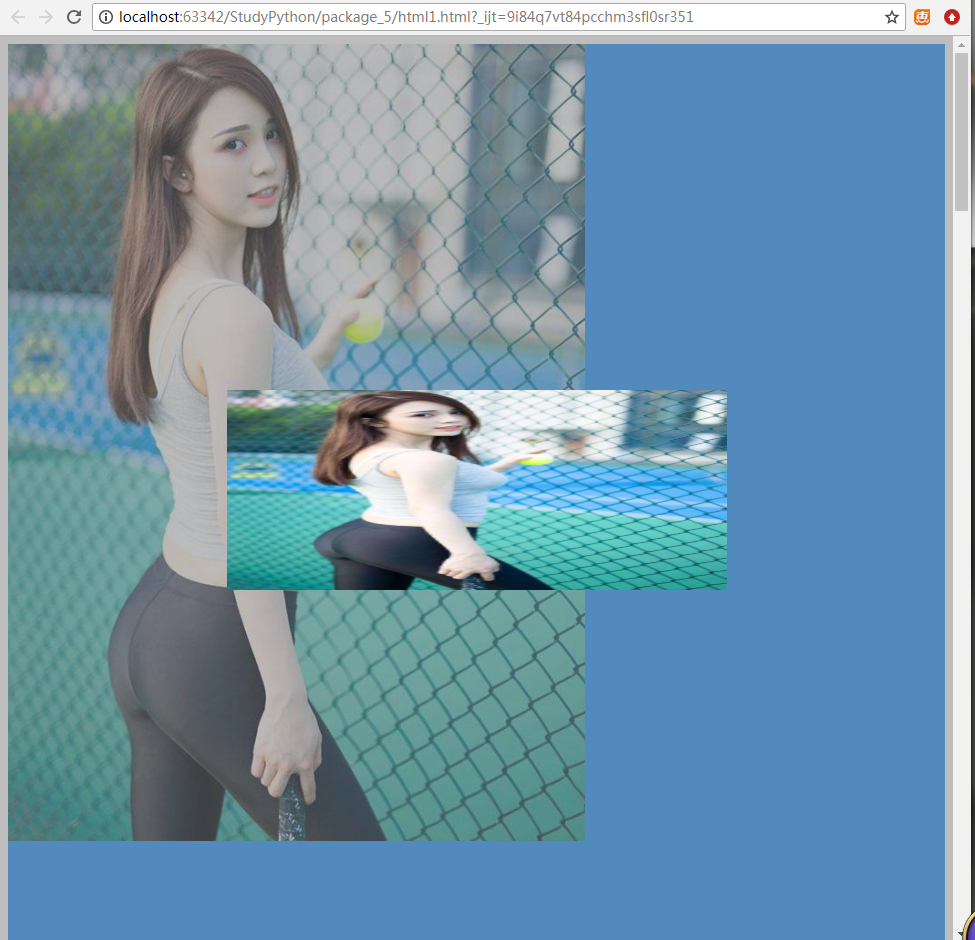
代码中的z-index表示层次关系,z-index越大,越在上层。
使用JS来控制上面两层(弹窗和遮挡层)的display:none,即可实现弹窗效果。
六、元素大小约束
当内层元素的尺寸大于外层元素的时候,可能会将其撑大。例如:
<body>
    <div style="height: 300px;200px;">
        <img src="xiaohua.png">
    </div>
</body>
div中的img尺寸大于200*300。此时如何约束图片:
<body>
    <div style="height: 300px;200px;overflow: hidden">
        <img src="xiaohua.png">
    </div>
</body>
使用overflow:hidden,效果如下(只能显示局部):

另一种方式overflow:auto
<body>
    <div style="height: 300px;200px;overflow: auto">
        <img src="xiaohua.png">
    </div>
</body>
效果如下(由滚动条):

七、鼠标悬停变色
<head>
    <meta charset="UTF-8">
    <title>Title</title>
    <style>
        .pg_header{
            position: fixed;    /*固定不动*/
            right:0;
            left:0;
            top:0;
            height:48px;
            line-height: 48px;  /*使其中的元素居中*/
            background-color: #2459a2;
        }
        .pg_body{
            margin-top:50px;    /*避免内容被pg_header挡住*/
        }
        .w{
            width:980px;
            margin: 0 auto;
        }
        .pg_header .menu{
            display: inline-block;  /*让其可以修改大小*/
            padding: 0 10px;
        }
        .pg_header .menu:hover{    /*当鼠标悬停时,这个样式才生效*/
            color: white;
            background-color: #2b99ff;
        }
    </style>
</head>
<body>
    <div class="pg_header">
        <div class="w">
            <a class="LOGO">LOGO</a>
            <a class="menu">全部</a>
            <a class="menu">42区</a>
            <a class="menu">1024</a>
            <a class="menu">段子</a>
        </div>
    </div>
    <div class="pg_body">
        <div class="w">hello</div>
    </div>
</body>
 、
、
八、background-image
background-image:
<div style="height: 100px;background-image: url('xiaohua.png')"></div>
此时,效果是这样的(重复的),即当图片的高或宽大于div的高或宽时,图片显示不完整。当图片高或宽小于div时,会重复填充。

这种效果如何应用:例如渐变色的背景图,实际上是一个很小的局部渐变图片重复填充形成的。
background-repeat: no-repeat
background-repeat: repeat-x
background-repeat: repeat-y
如果想让图片不填充,只横向填充,或纵向填充,可以使用这些样式。
有些网站使用的小图标,例如下图:
实际上他是一个背景图片:
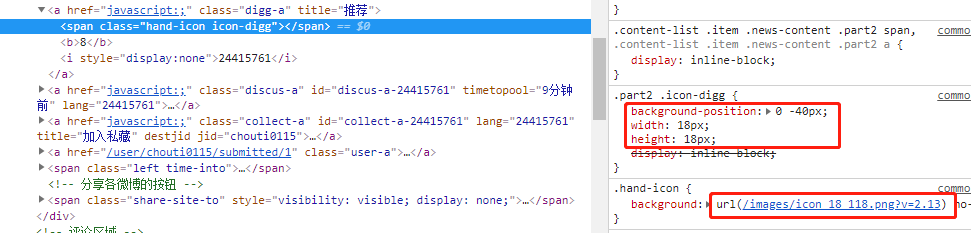
这个背景图片是这样的:

要让其只显示其中一个小图标,可以使用以下样式:
background-position: 0 -40px;
background-position-x: 0;
background-position-y: -40px;
这样做的好处:多个小图片合并成一张图,客户端只需要请求一次。如果每个小图标都是单独是一张图,那么需要多次请求。
还有一种简写的方式:
background: url(img.png) -40px -40px no-repeat;
相当于:
background-image: url(img.png);
background-position: -40px -40px;
background-repeat: no-repeat;
九、JavaScript概述
除了名字和Java有点像,但是没有任何关系。
是一种解释性语言,浏览器具有JS解释器的功能。
JS终端:
在浏览器F12的Console里可以输入JS代码。和Python的终端差不多。
JS代码是放在HTML文件中的:
<head>
    <meta charset="UTF-8">
    <title>Title</title>
    <script type="text/javascript">
        alert("hello")
    </script>
</head>
使用<script></script>包裹。type="text/javascript"用于执行其中的代码是JS代码,也可以不写,默认是JS。
如果多个HTML都需要使用同样的JS代码,则使用:
<head>
    <meta charset="UTF-8">
    <title>Title</title>
    <script src="xxx.js"></script>
</head>
JS代码注释:
使用"//"进行单行注释。
使用"/* */"进行多行注释。
十、放JS代码的位置(重要)
HTML页面是按从上到下的顺序解释的,我们在打开页面的时候为了提高用户体验,需要先显示页面元素,再来加载JS代码(若JS代码在远程服务器,例如google,不翻墙无法访问。那么我们将JS放在最前面,默认会先去请求JS文件,会造成页面元素在JS加载好之前不显示)。
所以,我们在编写JS代码后,需要将JS代码或JS文件的引入放在页面元素的最后:</body>的前面。
<head>
    <meta charset="UTF-8">
    <title>Title</title>
</head>
<body>
    <div>hello</div>
    <div>world</div>

    <script type="text/javascript">
        alert("hello")
    </script>
    <script src="xxx.js"></script>
</body>
十一、JS中的基本语法
变量的定义:(很重要)
name = "alex"; // 全局变量
var name = "leo" //局部变量
数字:JS中的数字都默认是float的。
age = 18;
feet = "4";
feet_num = parseInt(feet)    //将字符串转换为数字
字符串:
a = "Hello World,hello,hahah";
a.length;   //字符串长度
a.trim();   //去掉前后的空白字符。
a.trimLeft();   //去掉最左边的空白字符。
a.trimRight();  //去掉最右边的空白字符。
a.charAt(0);    //返回某个位置的字符。
a.concat("I'm","Leo");  //a还是Hello World,返回的值为Hello WorldI'mLeo。
a.indexOf("llo",0); //从index=0开始查找子串,返回这个子串的位置index。
a.lastIndexOf("llo");  //找最后一个符合的子串。
a.substring(1,5);  //获取index从1-5的子串。
a.slice(1,5); //切片,和substring()一样,获得一个子串。
a.toLowerCase(); //变为小写。
a.toUpperCase(); //变为大写。
a.split(' ');  //按某个字符分割字符串。获得一个数组。
定时器:
setInterval("alert(123);",5000); 每5000毫秒执行一次alert(123);
函数:
function func1(){
    console.log(123);   //在F12的console中打印消息123,百度在这里发布了招聘程序猿的信息。^*^
}
setInterval("func1();",5000);
跑马灯效果:
<body>
    <div id="i1">欢迎奥巴马访问成都</div>
    <script type="text/javascript">
        function func1(){
            var div_item = document.getElementById("i1");
            var content = div_item.innerText;
            var c0 = content.charAt(0);
            var c1 = content.substring(1,content.length);
            var new_content = c1 + c0;
            div_item.innerText = new_content;
        }
        setInterval("func1();",500);
    </script>
</body>
每0.5秒将第一个字放到最后,然后重新将值设置到标签中。实现跑马灯效果。
布尔类型:
真:true
假:false
和Python不一样的是,Python中布尔类型首字母为大写,例如True和False。
数组(列表):
obj = [11,22,33,44,55];
obj2 = [1,2,3,4]
obj.length;
obj.push(100);
obj.pop();
obj.unshift(101);
obj.shift();
obj.splice(1,2,102,"ooo",103,104); //从index=1的位置删除2个元素,然后插入102和"ooo"。可以插入多个。
obj.slice(1,3); //获取index从1-3的子数组。
obj.reverse();  //反转数组。
obj.join("*")      //使用一个字符链接起来构建一个字符串,11*22*33*44*55
obj.concat(obj2,obj2);  //多数组组合起来,形成一个新的数组。
obj.sort()  //对数组进行排序。
字典:
和Python比较像。
a = {"k1":"v","k2":"v2"};
for循环:
obj = [11,22,33,44,55];
for(var i in obj){
    console.log(obj[i]);
}
for(var i = 0;i<obj.length;i++){
    console.log(obj[i]);
}

dict = {'k1':'v1','k2':'v2'};
for(var key in dict){
    console.log(dict[key]);
}
条件语句:
1 == '1': true,==表示值相等。
1 === '1':false,===表示值和类型都相等。
JS中不能使用Python中的and和or,和C++一样,使用&&和||。
if(1 === 1){
    //do
}else if(1 == 1){
    //do
}else{
    //do
}
十二、DOM
JS要让HTML的标签动起来,需要做两个步骤的事情:
1.找到这个标签。
2.让他动起来:删除标签(隐藏标签等)、修改属性、修改内容等。
获取标签:
通过document直接找标签:
document.getElementById('a1');  //获取对应id的标签,id不能重复,只能获取一个
document.getElementsByName("hello");  //根据标签name属性获取一个标签列表
document.getElementsByTagName("div");   //根据标签种类获取一个标签列表
document.getElementsByClassName("c1");  //根据类名获取一个标签列表
间接找标签:(当前标签的父亲、儿子、兄弟等)
tag = document.getElementById('i1');   //先直接找到一个标签
tag.parentElement;  //通过已经找到标签,找他的父亲标签
tag.children;  //获取她的儿子标签(列表)
tag.firstElementChild;  //找她的第一个儿子标签
tag.lastElementChild;  //找她的最后一个儿子标签
tag.previousElementSibling;    //找他前面那个兄弟标签
tag.nextElementSibling;    //找他后面那个兄弟标签
修改标签内容:
innerText:标签内部文本,例如<div>inner text</div>
tag = document.getElementById('i1');
tag.innerText = "Good"; //修改标签的innerText值。
className:标签class的值,例如<div class="className"></div>。
classList:标签class可以设置多个,可以使用classList获取class列表。可以通过列表操作来添加删除class。
tag.className;
tag.classList.add("c2");
tag.classList.remove("c2");
十三、实现弹窗
<!DOCTYPE html>
<html lang="en">
<head>
    <meta charset="UTF-8">
    <title>Leo</title>
    <style>
        /* 遮罩层样式 */
        .c1{
            position: fixed;
            left:0;
            top:0;
            right:0;
            bottom:0;
            background-color: black;
            opacity: 0.6;
            z-index: 9;
        }
        /* 弹框样式 */
        .c2{
            width:500px;
            height: 400px;
            background-color: white;
            left: 50%;
            top:50%;
            margin-left: -250px;
            margin-top: -200px;
            position: fixed;
            z-index: 10;
        }
        /* 隐藏 */
        .hide{
            display: none;
        }
    </style>
</head>
<body>
    <div>
        <!-- 点击添加按钮时,调用Show()函数,显示遮罩层和弹框-->
        <input type="button" value="添加" onclick="Show();"/>
        <table>
            <thead>
                <tr>
                    <th>主机名</th>
                    <th>端口</th>
                </tr>
            </thead>
            <tbody>
                <tr>
                    <td>192.168.1.8</td>
                    <td>8080</td>
                </tr>
                <tr>
                    <td>192.168.1.9</td>
                    <td>8081</td>
                </tr>
                <tr>
                    <td>192.168.1.10</td>
                    <td>8082</td>
                </tr>
            </tbody>
        </table>
    </div>
    <!-- 透明遮罩层开始,默认是隐藏的 -->
    <div id='i1' class="c1 hide"></div>
    <!-- 透明遮罩层结束 -->

    <!-- 弹框开始,默认是隐藏的 -->
    <div id='i2' class="c2 hide">
        <p><input type="text"/></p>
        <p><input type="text"/></p>
        <p>
            <input type="button" value="确定"/>
            <input type="button" value="取消" onclick="Cancel()"/>
        </p>
    </div>
    <!-- 弹框结束-->

    <!-- JS代码,定义Show()和Cancel() -->
    <script>
        function Show(){
            document.getElementById('i1').classList.remove('hide')
            document.getElementById('i2').classList.remove('hide')
        }
        function Cancel(){
            document.getElementById('i1').classList.add('hide')
            document.getElementById('i2').classList.add('hide')
        }
    </script>
</body>
</html>
效果:
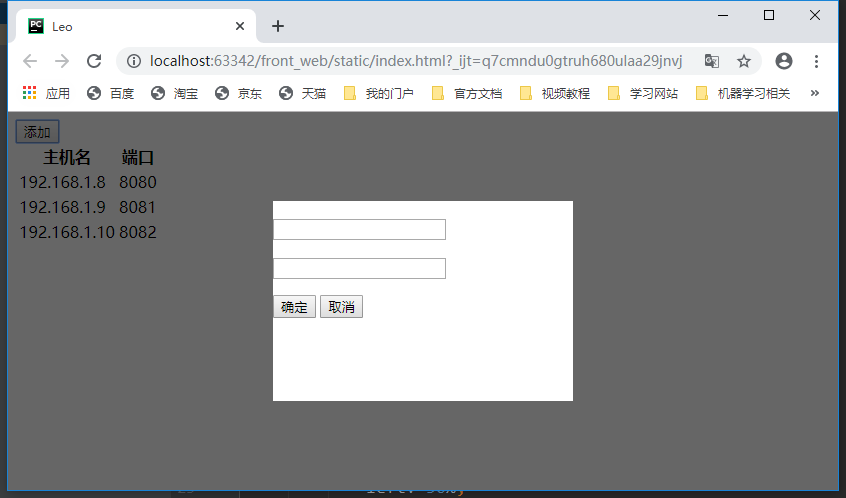
点击添加按钮弹出弹框,点击取消按钮,弹框消失。
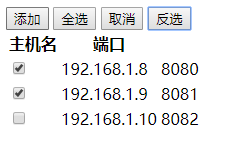
十四、实现checkbox全选、取消和反选
<!DOCTYPE html>
<html lang="en">
<head>
    <meta charset="UTF-8">
    <title>Leo</title>
    <style>
        /* 遮罩层样式 */
        .c1 {
            position: fixed;
            left: 0;
            top: 0;
            right: 0;
            bottom: 0;
            background-color: black;
            opacity: 0.6;
            z-index: 9;
        }

        /* 弹框样式 */
        .c2 {
            width: 300px;
            height: 200px;
            background-color: white;
            left: 50%;
            top: 50%;
            margin-left: -150px;
            margin-top: -100px;
            position: fixed;
            z-index: 10;
        }

        /* 隐藏 */
        .hide {
            display: none;
        }
    </style>
</head>
<body>
    <div>
        <!-- 点击添加按钮时,调用Show()函数,显示遮罩层和弹框-->
        <input type="button" value="添加" onclick="Show();"/>
        <input type="button" value="全选" onclick="ChooseAll();">
        <input type="button" value="取消" onclick="CancelAll();">
        <input type="button" value="反选" onclick="ReverseAll();">

        <table>
            <thead>
            <tr>
                <th>主机名</th>
                <th>端口</th>
            </tr>
            </thead>
            <tbody id="tb">
            <tr>
                <td><input type="checkbox"/></td>
                <td>192.168.1.8</td>
                <td>8080</td>
            </tr>
            <tr>
                <td><input type="checkbox"/></td>
                <td>192.168.1.9</td>
                <td>8081</td>
            </tr>
            <tr>
                <td><input type="checkbox"/></td>
                <td>192.168.1.10</td>
                <td>8082</td>
            </tr>
            </tbody>
        </table>
    </div>
    <!-- 透明遮罩层开始,默认是隐藏的 -->
    <div id='i1' class="c1 hide"></div>
    <!-- 透明遮罩层结束 -->

    <!-- 弹框开始,默认是隐藏的 -->
    <div id='i2' class="c2 hide">
        <p><input type="text"/></p>
        <p><input type="text"/></p>
        <p>
            <input type="button" value="确定"/>
            <input type="button" value="取消" onclick="Cancel()"/>
        </p>
    </div>
    <!-- 弹框结束-->

    <!-- JS代码,定义Show()和Cancel() -->
    <script>
        function Show() {
            document.getElementById('i1').classList.remove('hide');
            document.getElementById('i2').classList.remove('hide');
        }

        function Cancel() {
            document.getElementById('i1').classList.add('hide');
            document.getElementById('i2').classList.add('hide');
        }
        // 实现全选功能
        function ChooseAll() {
            var tbody = document.getElementById('tb');

            var tr_list = tbody.children;
            for (var i = 0; i < tr_list.length; i++) {
                var current_tr = tr_list[i];
                // 这里拿到checkbox
                var checkbox = current_tr.children[0].children[0];
                checkbox.checked = true;
            }
        }
        // 实现取消全选功能
        function CancelAll() {
            var tbody = document.getElementById('tb');
            var tr_list = tbody.children;
            for (var i = 0; i < tr_list.length; i++) {
                var current_tr = tr_list[i];
                // 这里拿到checkbox
                var checkbox = current_tr.children[0].children[0];
                checkbox.checked = false;
            }
        }
        // 实现反选功能
        function ReverseAll() {
            var tbody = document.getElementById('tb');
            var tr_list = tbody.children;
            for (var i = 0; i < tr_list.length; i++) {
                var current_tr = tr_list[i];
                // 这里拿到checkbox
                var checkbox = current_tr.children[0].children[0];
                checkbox.checked = !(checkbox.checked);
            }
        }
    </script>
</body>
</html>
效果: