发送邮件由于是一个耗时的操作,有可能需要一个几十秒的操作,但是呢,接口 是一个瞬间完成的,为了不影响接口的性能,所以需要对发送邮件的操作进行异步操作,我们这里呢,首先我们要引入发送邮件的测试模块。
  <dependency>
            <groupId>org.springframework.boot</groupId>
            <artifactId>spring-boot-starter-mail</artifactId>
        </dependency>
引入包后呢,我们去配置需要的邮件相关的配置,
  mail:
    host: smtp.qq.com
    port: 587
    username: 952943386@qq.com
    password: 需要在你用的邮箱那里配置
    default-encoding: utf-8
    properties:
      mail:
        smtp:
          socketFactoryClass: javax.net.ssl.SSLSocketFactory
        debug: true
这样配置完毕之后呢,就可以发送邮件了,我们利用异步,首先我们先编写一个发送邮件的接口
public interface EmailServer {

    void  sendemail(String  subject,String from ,String touserEmail,String text);
}
我们去实现这个接口,
@Component
@Service
public class EmailServerImpl implements EmailServer {
    @Autowired
    private JavaMailSender javaMailSender;
    @Async("taskExecutor")
    @Override
    public void sendemail(String subject, String from, String touserEmail, String text) {
        SimpleMailMessage message = new SimpleMailMessage();
        message.setSubject(subject);
        message.setFrom(from);
        message.setTo(touserEmail);
        message.setSentDate(new Date());
        message.setText(text);
        javaMailSender.send(message);
    }
}
实现完毕后呢,我们这里已经配置完毕了,我们就可以在正常 的业务去调用了。
我这里改的找回密码的逻辑。
if (user.getEmail() != null) {
                emailServerl.sendemail("全栈测试平台修改密码",user.getEmail(),
                        user.getEmail(),"你的密码修改成功,用户名:" + user.getUsername());
            }
这里,需要在上面去引入
    @Autowired
    private EmailServer emailServerl;
这样我们就已经开发完毕了,我们还需要配置启动的时候,启动异步。
SpringBootApplication(exclude = {DataSourceAutoConfiguration.class, DataSourceTransactionManagerAutoConfiguration.class}, scanBasePackages = "pan")
@EnableScheduling
@EnableAsync//增加这里即可,
public class PlanApplication extends SpringBootServletInitializer {
    public static void main(String[] args) {
        SpringApplication.run(PlanApplication.class, args);
    }

    protected SpringApplicationBuilder configure(SpringApplicationBuilder builder) {
        return builder.sources(PlanApplication.class);
    }


    @Bean
    MeterRegistryCustomizer meterRegistryCustomizer(MeterRegistry meterRegistry) {
        return meterRegistry1 -> {
            meterRegistry.config()
                    .commonTags("application", "Tenantapp");
        };
    }
}
配置完毕后,我们需要配置下异步任务的配置
@Configuration
public class TaskPoolConfig {
    @Bean("taskExecutor")
    public Executor taskExecutor () {
        ThreadPoolTaskExecutor executor = new ThreadPoolTaskExecutor();
        // 核心线程数10:线程池创建时候初始化的线程数
        executor.setCorePoolSize(10);
        // 最大线程数20:
        executor.setMaxPoolSize(15);
        // 缓冲队列200:
        executor.setQueueCapacity(200);
        // 允许线程的空闲时间60秒:
        executor.setKeepAliveSeconds(60);
        // 线程池名的前缀:
        executor.setThreadNamePrefix("taskExecutor-");
        /*
        线程池对拒绝任务的处理策略:这里采用了CallerRunsPolicy策略,
         */
        executor.setRejectedExecutionHandler(new ThreadPoolExecutor.CallerRunsPolicy());
        // 设置线程池关闭的时候等待所有任务都完成再继续销毁其他的Bean
        executor.setWaitForTasksToCompleteOnShutdown(true);
        // 设置线程池中任务的等待时间,如果超过这个时候还没有销毁就强制销毁,
        executor.setAwaitTerminationSeconds(600);
        return executor;
    }
}
这样,我们就完成了整体的代码开发,我们去调用下我们的api测试下
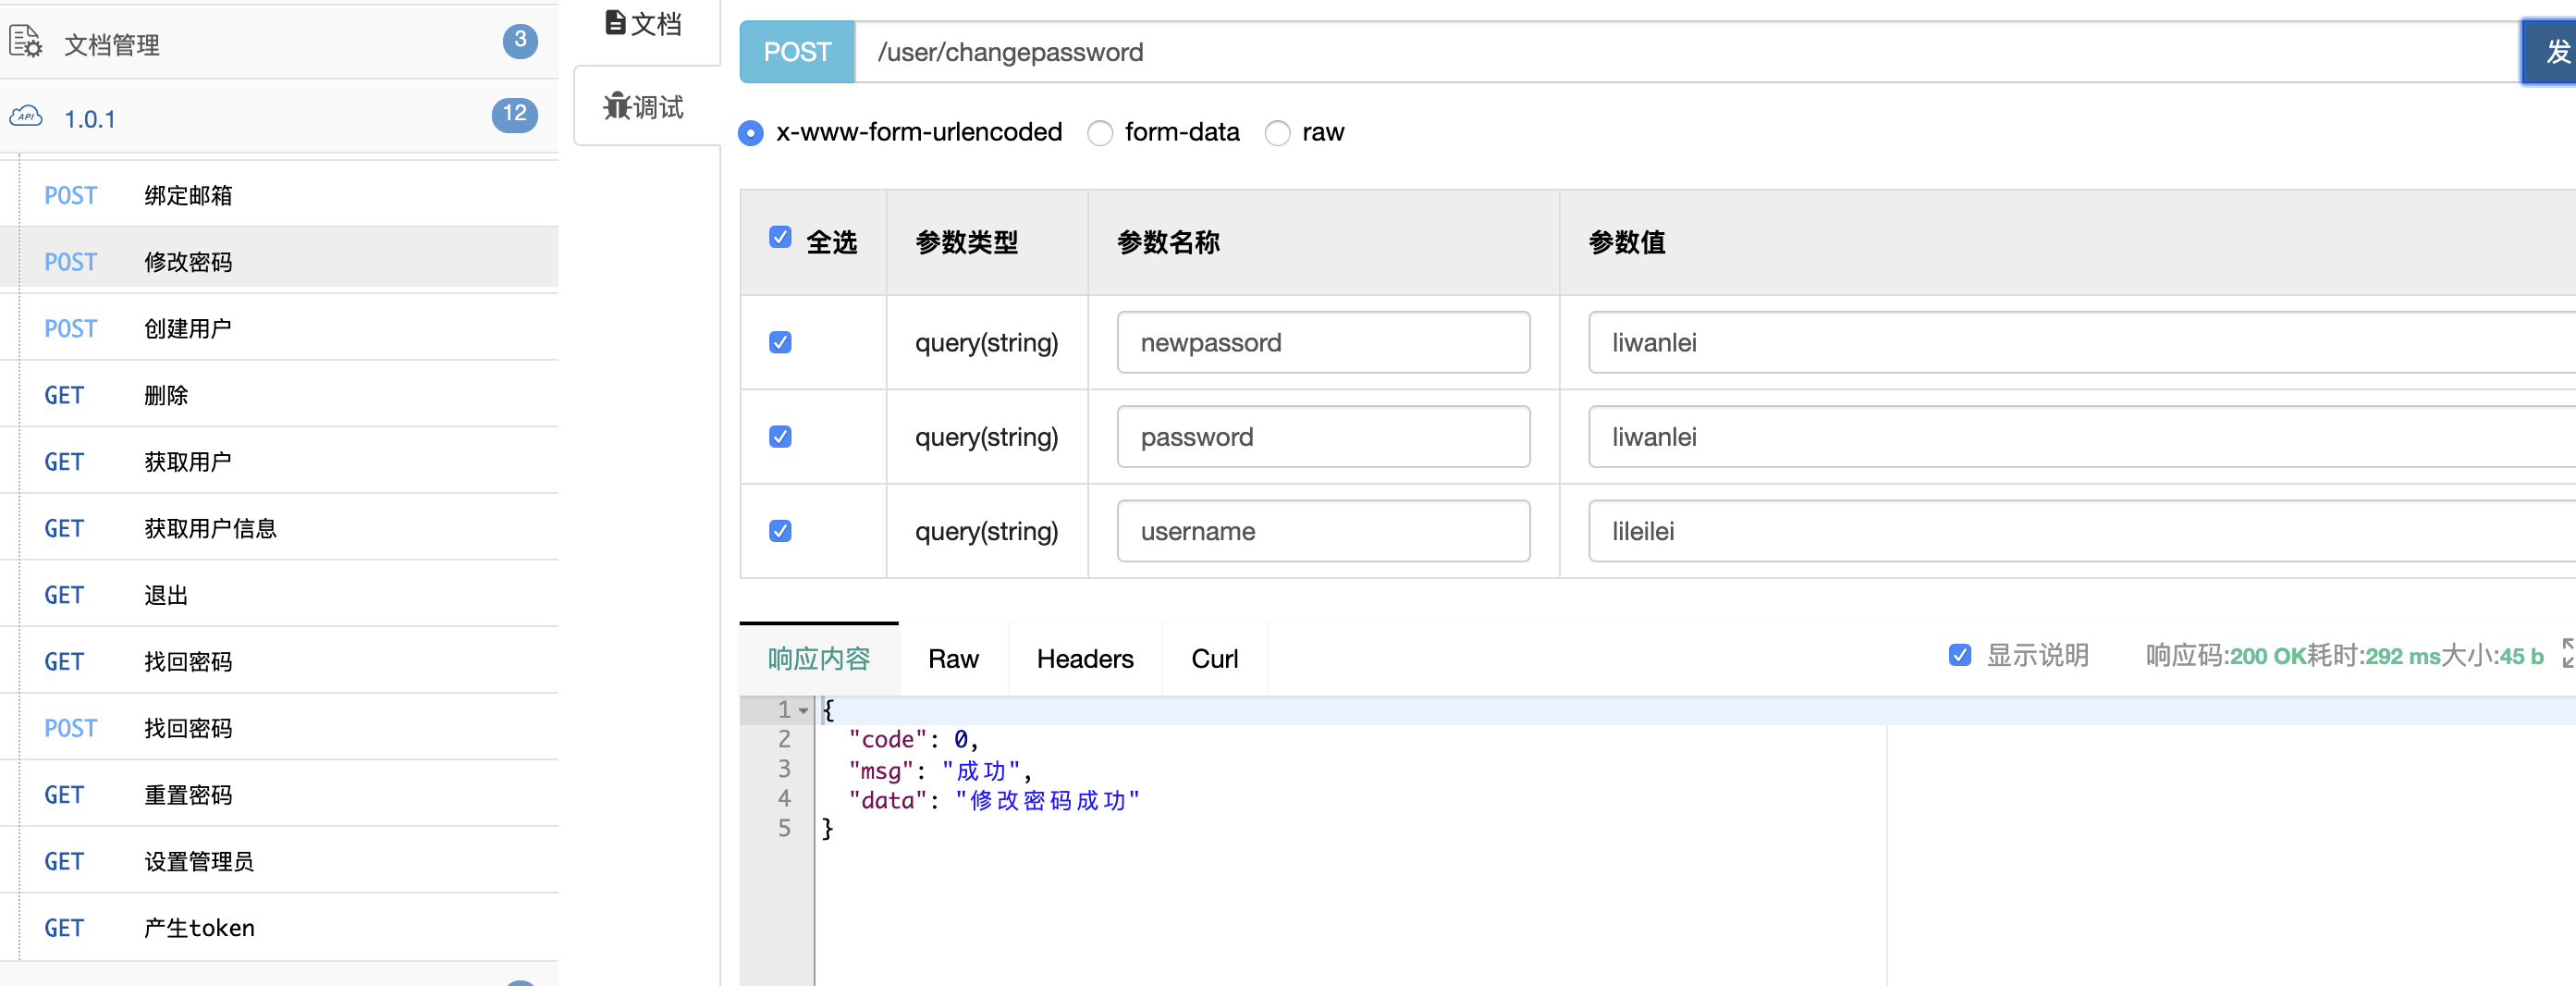
测试完毕,接口返回正常,我们去看下,我们的日志有没有执行我们的发送邮件。
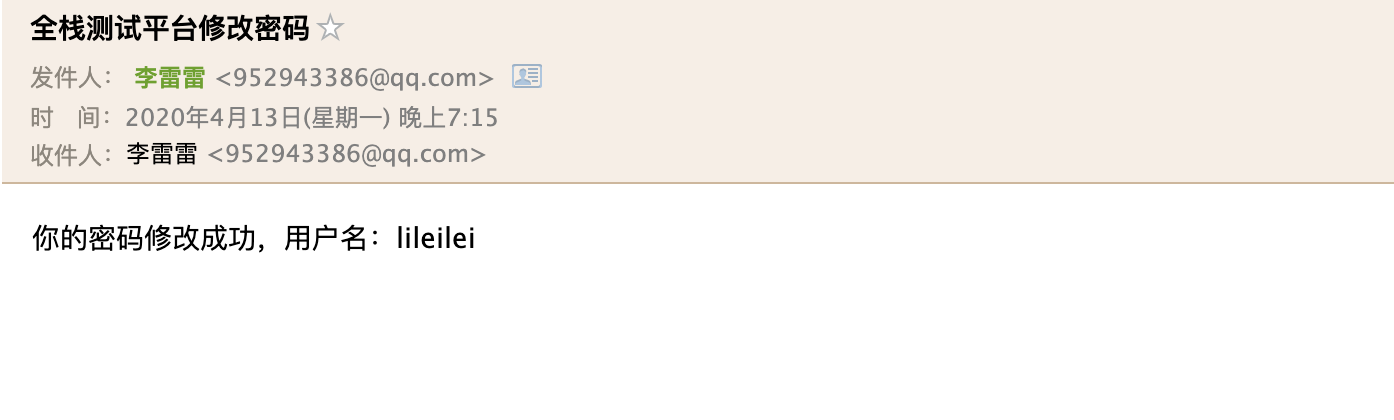
Hibernate: select user0_.id as id1_70_, user0_.admin as admin2_70_, user0_.email as email3_70_, user0_.errornum as errornum4_70_, user0_.freeze as freeze5_70_, user0_.freezetime as freezeti6_70_, user0_.iphone as iphone7_70_, user0_.password as password8_70_, user0_.status as status9_70_, user0_.token as token10_70_, user0_.username as usernam11_70_ from user user0_ where user0_.username=?
。。。。。。。。

250 OK: queued as.
DEBUG SMTP: message successfully delivered to mail server
QUIT
221 Bye.
日志打印,我们看下正常我们应该可以看到邮件的,打开qq邮箱,收到了这封邮件。
这样我们的异步发送邮件就修改成功了,完成了我们异步的发送邮件开发。后续封装下发送其他类型的模块,就可以完成了,我们的异步发送邮件的