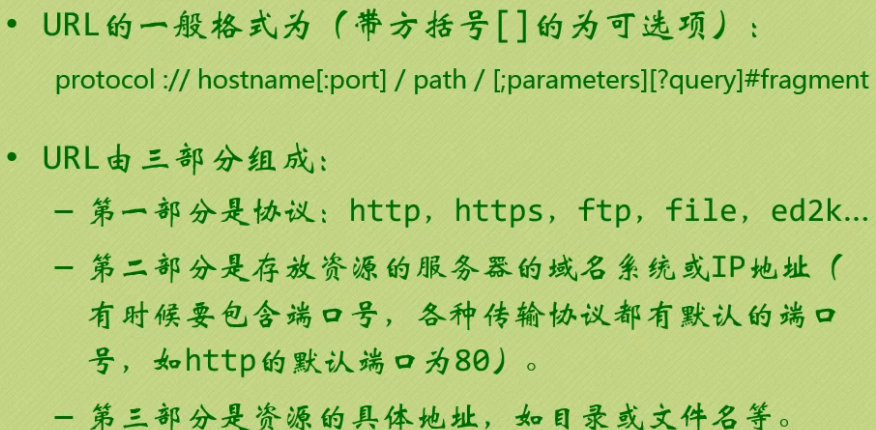
1、Url的格式简单介绍,如下图:

2、我们要对网站进行访问,需要用到python中的一个模块或者说一个包吧,urllib(这个在python2中是urllib+urllib2,python3将这两个合并为一)
Urllib这个包内有几个模块,我们用最难的那个就可以啦,哈哈哈,request模块。
-
urllib.request.urlopen(url, data=None, [timeout, ]*, cafile=None, capath=None, cadefault=False, context=None)
url: 网站地址 data:Post要提交的数据 (不写的话默认为get请求) timeout:设置网站的访问超时时间
直接用urllib.request模块的urlopen()获取页面,html的数据格式为bytes类型,需要decode()解码,转换成str类型。
举个简单的实例,我们爬取百度的网址:
import urllib.request as urt   #模块别名
response = urt.urlopen(r"https://www.cnblogs.com/")    #获取博客地址内容
html = response.read()                  #因为是一个对象,所以用读的方式将内容读出
html = html.decode('utf-8')      #因为是二进制(byte的类型)的字符串,要解码成unicode
print(html)
urlopen返回对象提供方法:
- read() , readline() ,readlines() , fileno() , close() :对HTTPResponse类型数据进行操作。
- info():返回HTTPMessage对象,即服务器返回的头信息。
- getcode():返回Http状态码。
- geturl():返回请求的url地址。
urllib.request.urlopen实际上执行的是两个动作,先是urllib.request.Request(url)然后再urlopen这个对象,因此我们可以通过Request来包装请求,然后再通过urlopen来访问地址。
-
urllib.request.Request(url, data=None, headers={}, method=None)
import urllib.request

url = r'http://www.lagou.com/zhaopin/Python/?labelWords=label'
#以字典形式添加,当然有些只需要添加User-Agent 即可
headers = {
    'User-Agent': r'Mozilla/5.0 (Windows NT 6.1; Win64; x64) AppleWebKit/537.36 (KHTML, like Gecko) Chrome/56.0.2924.87 Safari/537.36',
    'Referer': r'http://www.lagou.com/zhaopin/Python/?labelWords=label',
    'Connection': 'keep-alive'
}

req = urllib.request.Request(url, headers=headers)        #这里可以添加header头
page = urllib.request.urlopen(req).read()
page = page.decode('utf-8')
print(page)
用来包装头部的数据:
- User-Agent :这个头部可以携带如下几条信息:浏览器名和版本号、操作系统名和版本号等
- Referer:可以用来防止盗链,有一些网站图片显示来源http://***.com,就是检查Referer来鉴定的
- Connection:表示连接状态,记录Session的状态。
刚刚开始的时候我们用urlopen做了get请求,现在我们试试post请求,以下面实例进行讲解:
from urllib import request, parse

url = r'https://www.lagou.com/jobs/companyAjax.json?needAddtionalResult=false&isSchoolJob=0'

headers = {
    'User-Agent': r'Mozilla/5.0 (Windows NT 6.1; Win64; x64) AppleWebKit/537.36 (KHTML, like Gecko) Chrome/56.0.2924.87 Safari/537.36',
    'Referer': r'http://www.lagou.com/zhaopin/Python/?labelWords=label',
    'Connection': 'keep-alive'
}

data = {
    'first': 'true',
    'pn': 1,
    'kd': 'Java'
}

data = parse.urlencode(data).encode('utf-8')      #Post的数据必须是bytes或者iterable of bytes,不能是str,因此需要进行encode()编码
req = request.Request(url, headers=headers, data=data)     #也可以将data数据在urlopen中再传入
page = request.urlopen(req).read()
page = page.decode('utf-8')
print(page)
这里需要注意下:urllib.parse.urlencode(query, doseq=False, safe='', encoding=None, errors=None),这个是将数据格式变成人家能看懂的数据,经过urlencode()转换后的data数据为URL后面加上?first=true?pn=1?kd=Java
当然,有些网站为了防止别人爬虫或者恶意访问,可能会做诸多限制,比如发现同一个ip一秒内下载了几十张图片,那么这肯定就有可能不是正常访问,因此很可能就会判断为爬虫或者其它,然后发个验证码让你输入,为了避免这种情况出现,于是乎我们使用代理的方式进行访问,例子如下:
-
urllib.request.ProxyHandler(proxies=None)
import urllib.request
import random

url = 'http://www.whatismyip.com.tw'
iplist = ['180.149.131.67:80','27.221.93.217:80','111.2.122.46:8080']

proxy_support = urllib.request.ProxyHandler({'http':random.choice(iplist)})
opener = urllib.request.build_opener(proxy_support)
opener.addheaders = [('User-Agent','Mozilla/5.0 (Windows NT 6.1; Win64; x64) AppleWebKit/537.36 (KHTML, like Gecko) Chrome/5')]
urllib.request.install_opener(opener)
response = urllib.request.urlopen(url)
html = response.read().decode('utf-8')

print(html)
上面是代码,我们来详细说下整个过程:
1、首先我们先创建一个代理处理器 ProxyHandler,ProxyHandler是一个类,其参数是一个字典,上面就是我们的iplist,我们本来也可以写一个ip,但是由于免费的代理ip不稳定,因此我们写成了一个列表,然后每次随机从列表中取出一个代理Ip。
什么是Handler?Handler也叫作处理器,每个handlers知道如何通过特定协议打开URLs,或者如何处理URL打开时的各个方面,例如HTTP重定向或者HTTP cookies。
2、定制(创建)一个opener,opener = urllib.request.build_opener(proxy_support)
什么是opener?python在打开一个url链接时,就会使用opener。其实,urllib.request.urlopen()函数实际上是使用的是默认的opener,只不过在这里我们需要定制一个opener来指定handler。
3、安装opener,urllib.request.install_opener(opener),install_opener 用来创建(全局)默认opener,这个表示调用urlopen将使用你安装的opener,当然你也可以不用安装,你可以直接opener.open(url),修改上面的代码为:
import urllib.request
import random

url = 'http://www.whatismyip.com.tw'
iplist = ['180.149.131.67:80','27.221.93.217:80','111.2.122.46:8080']

proxy_support = urllib.request.ProxyHandler({'http':random.choice(iplist)})
opener = urllib.request.build_opener(proxy_support)
opener.addheaders = [('User-Agent','Mozilla/5.0 (Windows NT 6.1; Win64; x64) AppleWebKit/537.36 (KHTML, like Gecko) Chrome/5')]
#urllib.request.install_opener(opener)   #注释了这一行,下一行修改为 opener.open(url),但是我们这样修改如果使用urlopen的话就不会打开我们特制的opener,因此这个看需求而定。
response = opener.open(url)
html = response.read().decode('utf-8')

print(html)
下面说下异常处理,详细就不多说了,看下就知道了,如下:
from urllib import request, parse

url = r'https://www.lagou.com/jobs/companyAjax.json?needAddtionalResult=false&isSchoolJob=0'

headers = {
    'User-Agent': r'Mozilla/5.0 (Windows NT 6.1; Win64; x64) AppleWebKit/537.36 (KHTML, like Gecko) Chrome/56.0.2924.87 Safari/537.36',
    'Referer': r'http://www.lagou.com/zhaopin/Python/?labelWords=label',
    'Connection': 'keep-alive'
}

data = {
    'first': 'true',
    'pn': 1,
    'kd': 'Java'
}

data = parse.urlencode(data).encode('utf-8')      #Post的数据必须是bytes或者iterable of bytes,不能是str,因此需要进行encode()编码
try:
    req = request.Request(url, headers=headers, data=data)     #也可以将data数据在urlopen中再传入
    page = request.urlopen(req).read()
    page = page.decode('utf-8')
    print(page)
except error.HTTPError as e:
    print(e.code())
    print(e.read().decode('utf-8'))