上一篇博客大概总结了tomcat 的组件以及其组织方式,对于tomcat 的启动过程也进行进行了简单的总结,下面这篇博客,继续研究tomcat 处理请求的相关组件,其实就是主要研究Connectors 以及Container 的工作过程,以此加深对tomcat 工作过程的理解,不足之处,请各路大神指正哈!
下面是这篇博客的主要内容:
1、Connectors的基本组件以及作用
2、Connectors 的工作机制
3、Container 的基本组件以及作用
4、tomcat 的管道以及以及责任链模型介绍
5、最后的感悟
一、Connectors 的初步认识
在上一篇博客中,我有说到,Connectors 是负责专门处理外部请求,并请求封装为对应的request 对象,然后给Container 容器进行处理的,可以理解为它利用java 实现 了web中的http 协议。
1、Connects的基本组件
下面先粗略介绍下Connectors 下的组件各个组件的作用以及他们之间的关系。首先看下下面这张个人画的丑图,这张图大体说明了Connector 处理请求的过程:

在Connectors 处理请求的过程,其主要利用了一个叫做protocolhandler 的组件,不同的连接类型有不同的protocolHandler (例如,普通socket 就是Http11Protocal,NioSocket 就是Http11NioProtocal),该组件处理过程又主要涉及到以下组件:endpoint 、process以及adaptor 三个组件,他们工作的过程大概如下:当客户端发起请求的时候,endpoint 通过底层的Socket 机制进行端口监听,它负责监听客户端的请求,处理对应请求的socket 对象,并把Socekt 对象传给processor 对象;当processor 对象接收到socket 对象的时候,会利用把请求封装为request 对象(HttpRequest),当封装好request 对象之后,processor 吧request 对象传给一个适配器,该适配器负责连接Container 和adaptor 对象,最后,Container 得到的是一个已经封装好的request 对象。
总的来说,可以这样理解,endpoint 利用socket 处理了tcp 层面的协议,而processor 则在java 层面处理了http 协议,最后,adaptor 将Connectors 和 Container 连接起来,实现请求转发。下面,就针对protocolhandler 的这三个组件,看看,protocolhandler 到底是如何进行请求处理的。
2、Connectors 中处理tcp 协议的组件--endpoint
其实在endpoint 内部,它又是主要靠一下组件进行请求处理的,具体的话可以参考下面这张图:(不过在正式总结之前,读者注意了,其实如果你纯粹的看我这篇博客来了解endpoint 工作过程的话,会感觉好头大的,推荐自己下一份源码,自己点开源码看看才能正真理解的,因为不同组件之间都相互调用,方法之间调用的关系也是挺复杂的(反正我一开始是头都大了的),对着源码才更好理解,废话不多说,上图)

首先,我们看Acceptor,从名字其实我们可以看出来,它是一个接受器,就是专门负责接收请求,然后开启Socket ,其实,Acceptor是 AbstractEndpoint的内部类,具体的实现又是由子类NioEndpoint 实现的,下面看看AbstractEndpoint的源码和NioEndpoint 源码,看卡Acceptor是如何实现请求监听的:
这个是AbstractEndpoint的内部类,这个类其实不难理解:它是一个继承了Runnable 接口的抽象类,但是并没有实现run方法,另外定义了一些比较常规的方法例如获取运行状态等,具体不说

public abstract static class Acceptor implements Runnable {
        public enum AcceptorState {
            NEW, RUNNING, PAUSED, ENDED
        }

        protected volatile AcceptorState state = AcceptorState.NEW;
        public final AcceptorState getState() {
            return state;
        }

        private String threadName;
        protected final void setThreadName(final String threadName) {
            this.threadName = threadName;
        }
        protected final String getThreadName() {
            return threadName;
        }
    }
下面,主要看看AbstractEndpoint的子类是怎样工作的,下面简单粘上AbstractEndpoint的内部类Acceptor源码,它继承了AbstractEndpoint的Acceptor这个内部类:

protected class Acceptor extends AbstractEndpoint.Acceptor {

        @Override
        public void run() {

            int errorDelay = 0;

            // Loop until we receive a shutdown command
            while (running) {

                // Loop if endpoint is paused
                while (paused && running) {
                    state = AcceptorState.PAUSED;
                    try {
                        Thread.sleep(50);
                    } catch (InterruptedException e) {
                        // Ignore
                    }
                }

                if (!running) {
                    break;
                }
                state = AcceptorState.RUNNING;

                try {
                    //if we have reached max connections, wait
                    countUpOrAwaitConnection();

                    SocketChannel socket = null;
                    try {
                        // Accept the next incoming connection from the server
                        // socket
                        socket = serverSock.accept();
                    } catch (IOException ioe) {
                        //we didn't get a socket
                        countDownConnection();
                        // Introduce delay if necessary
                        errorDelay = handleExceptionWithDelay(errorDelay);
                        // re-throw
                        throw ioe;
                    }
                    // Successful accept, reset the error delay
                    errorDelay = 0;

                    // setSocketOptions() will add channel to the poller
                    // if successful
                    if (running && !paused) {
                        if (!setSocketOptions(socket)) {
                            countDownConnection();
                            closeSocket(socket);
                        }
                    } else {
                        countDownConnection();
                        closeSocket(socket);
                    }
                } catch (SocketTimeoutException sx) {
                    // Ignore: Normal condition
                } catch (IOException x) {
                    if (running) {
                        log.error(sm.getString("endpoint.accept.fail"), x);
                    }
                } catch (OutOfMemoryError oom) {
                    try {
                        oomParachuteData = null;
                        releaseCaches();
                        log.error("", oom);
                    }catch ( Throwable oomt ) {
                        try {
                            try {
                                System.err.println(oomParachuteMsg);
                                oomt.printStackTrace();
                            }catch (Throwable letsHopeWeDontGetHere){
                                ExceptionUtils.handleThrowable(letsHopeWeDontGetHere);
                            }
                        }catch (Throwable letsHopeWeDontGetHere){
                            ExceptionUtils.handleThrowable(letsHopeWeDontGetHere);
                        }
                    }
                } catch (Throwable t) {
                    ExceptionUtils.handleThrowable(t);
                    log.error(sm.getString("endpoint.accept.fail"), t);
                }
            }
            state = AcceptorState.ENDED;
        }
    }
其实这个类,主要就是实现了Runnable 的run方法而已,其实它的核心代码主要就是下面这两句(其他例如判断运行状态是否是在运行以及关闭Socket 等管理工作等等代码略过了,这部分就请读者自己看看源码啦):
socket = serverSock.accept();
// setSocketOptions() will add channel to the poller
setSocketOptions(socket);
上面两句代码:首先监听端口,获取socket ,然后调用setSocketOptions把socket 对应的channel 传递给poller,这样,就完成了请求的监听,超简单有木有。OK,现在请求到了poller了,下面再看看源码看看poller 又是怎么工作的;
Poller 也实现了Runnable 接口,但是由于Poller 的方法太多,下面就粘上主要Poller代码中run方法相关的代码就好了,先看看Poller 这个线程类启动之后干什么:

public void run() {
            // Loop until destroy() is called
            while (true) {
                try {
                    // Loop if endpoint is paused
                    while (paused && (!close) ) {
                        try {
                            Thread.sleep(100);
                        } catch (InterruptedException e) {
                            // Ignore
                        }
                    }

                    boolean hasEvents = false;

                    // Time to terminate?
                    if (close) {
                        events();
                        timeout(0, false);
                        try {
                            selector.close();
                        } catch (IOException ioe) {
                            log.error(sm.getString(
                                    "endpoint.nio.selectorCloseFail"), ioe);
                        }
                        break;
                    } else {
                        hasEvents = events();
                    }
                    try {
                        if ( !close ) {
                            if (wakeupCounter.getAndSet(-1) > 0) {
                                //if we are here, means we have other stuff to do
                                //do a non blocking select
                                keyCount = selector.selectNow();
                            } else {
                                keyCount = selector.select(selectorTimeout);
                            }
                            wakeupCounter.set(0);
                        }
                        if (close) {
                            events();
                            timeout(0, false);
                            try {
                                selector.close();
                            } catch (IOException ioe) {
                                log.error(sm.getString(
                                        "endpoint.nio.selectorCloseFail"), ioe);
                            }
                            break;
                        }
                    } catch ( NullPointerException x ) {
                        //sun bug 5076772 on windows JDK 1.5
                        if ( log.isDebugEnabled() ) log.debug("Possibly encountered sun bug 5076772 on windows JDK 1.5",x);
                        if ( wakeupCounter == null || selector == null ) throw x;
                        continue;
                    } catch ( CancelledKeyException x ) {
                        //sun bug 5076772 on windows JDK 1.5
                        if ( log.isDebugEnabled() ) log.debug("Possibly encountered sun bug 5076772 on windows JDK 1.5",x);
                        if ( wakeupCounter == null || selector == null ) throw x;
                        continue;
                    } catch (Throwable x) {
                        ExceptionUtils.handleThrowable(x);
                        log.error("",x);
                        continue;
                    }
                    //either we timed out or we woke up, process events first
                    if ( keyCount == 0 ) hasEvents = (hasEvents | events());

                    Iterator<SelectionKey> iterator =
                        keyCount > 0 ? selector.selectedKeys().iterator() : null;
                    // Walk through the collection of ready keys and dispatch
                    // any active event.
                    while (iterator != null && iterator.hasNext()) {
                        SelectionKey sk = iterator.next();
                        KeyAttachment attachment = (KeyAttachment)sk.attachment();
                        // Attachment may be null if another thread has called
                        // cancelledKey()
                        if (attachment == null) {
                            iterator.remove();
                        } else {
                            attachment.access();
                            iterator.remove();
                            processKey(sk, attachment);
                        }
                    }//while

                    //process timeouts
                    timeout(keyCount,hasEvents);
                    if ( oomParachute > 0 && oomParachuteData == null ) checkParachute();
                } catch (OutOfMemoryError oom) {
                    try {
                        oomParachuteData = null;
                        releaseCaches();
                        log.error("", oom);
                    }catch ( Throwable oomt ) {
                        try {
                            System.err.println(oomParachuteMsg);
                            oomt.printStackTrace();
                        }catch (Throwable letsHopeWeDontGetHere){
                            ExceptionUtils.handleThrowable(letsHopeWeDontGetHere);
                        }
                    }
                }
            }//while

            stopLatch.countDown();
        }
run方法大概就是干了下面事情:从selector中,选择一个key,该key代表这一个已经准备好的Channel 的输入输出流(听说说叫管道更合适?),这里的Nio具体工作机制不展开了(汗颜,其实我对这部分也不太了解,后面必须研究下),然后,下面就是核心代码了:
processKey(sk, attachment);
这个方法就是,调用processKey方法把获取到的请求对应的channel ,传递给process 这个方法,然后,查看这个方法的代码,我们可以发现,它会将channel 以及socket 传递给下一个对象:SocketProcessor,下面看看这个方法的源码吧:

 protected boolean processKey(SelectionKey sk, KeyAttachment attachment) {
            boolean result = true;
            try {
                if ( close ) {
                    cancelledKey(sk, SocketStatus.STOP, attachment.comet);
                } else if ( sk.isValid() && attachment != null ) {
                    attachment.access();//make sure we don't time out valid sockets
                    sk.attach(attachment);//cant remember why this is here
                    NioChannel channel = attachment.getChannel();
                    if (sk.isReadable() || sk.isWritable() ) {
                        if ( attachment.getSendfileData() != null ) {
                            processSendfile(sk,attachment, false);
                        } else {
                            if ( isWorkerAvailable() ) {
                                unreg(sk, attachment, sk.readyOps());
                                boolean closeSocket = false;
                                // Read goes before write
                                if (sk.isReadable()) {
                                    if (!processSocket(channel, SocketStatus.OPEN_READ, true)) {
                                        closeSocket = true;
                                    }
                                }
                                if (!closeSocket && sk.isWritable()) {
                                    if (!processSocket(channel, SocketStatus.OPEN_WRITE, true)) {
                                        closeSocket = true;
                                    }
                                }
                                if (closeSocket) {
                                    cancelledKey(sk,SocketStatus.DISCONNECT,false);
                                }
                            } else {
                                result = false;
                            }
                        }
                    }
                } else {
                    //invalid key
                    cancelledKey(sk, SocketStatus.ERROR,false);
                }
            } catch ( CancelledKeyException ckx ) {
                cancelledKey(sk, SocketStatus.ERROR,false);
            } catch (Throwable t) {
                ExceptionUtils.handleThrowable(t);
                log.error("",t);
            }
            return result;
        }
好吧,其实这个这么长的代码,我们只要看下面这行代码就行了(当然,中间很多编码技巧的确值得我们仔细琢磨),下面代码主要是调用一个processSocket的方法:
processSocket(channel, SocketStatus.OPEN_READ, true)
下面我们看看processSocket又是干嘛的,这个是方法源码:

public boolean processSocket(NioChannel socket, SocketStatus status, boolean dispatch) {
        try {
            KeyAttachment attachment = (KeyAttachment)socket.getAttachment();
            if (attachment == null) {
                return false;
            }
            attachment.setCometNotify(false); //will get reset upon next reg
            SocketProcessor sc = processorCache.poll();
            if ( sc == null ) sc = new SocketProcessor(socket,status);
            else sc.reset(socket,status);
            if ( dispatch && getExecutor()!=null ) getExecutor().execute(sc);
            else sc.run();
        } catch (RejectedExecutionException rx) {
            log.warn("Socket processing request was rejected for:"+socket,rx);
            return false;
        } catch (Throwable t) {
            ExceptionUtils.handleThrowable(t);
            // This means we got an OOM or similar creating a thread, or that
            // the pool and its queue are full
            log.error(sm.getString("endpoint.process.fail"), t);
            return false;
        }
        return true;
    }
核心代码看下面:
 attachment.setCometNotify(false); //will get reset upon next reg
 SocketProcessor sc = processorCache.poll();
if ( sc == null ) sc = new SocketProcessor(socket,status);
 else sc.reset(socket,status);
 if ( dispatch && getExecutor()!=null ) getExecutor().execute(sc);
else sc.run();
这个方法可以看到,processSocket方法把Socket 相关的类传递给了SocketProcessor ,然后利用并发框架Executor进行管理SocketProcessor ,继续往下处理请求,此时,请求已经到达了SocketProcessor 这个类。
经历重重困难,请求终于到了SocketProcessor 这个类了,这个类是也实现了Runnable 接口,下面再研究下这个类的源码,主要就是研究两个方法,一个是run方法,一个是doRun方法:

public void run() {
            SelectionKey key = socket.getIOChannel().keyFor(
                    socket.getPoller().getSelector());
            KeyAttachment ka = null;

            if (key != null) {
                ka = (KeyAttachment)key.attachment();
            }

            // Upgraded connections need to allow multiple threads to access the
            // connection at the same time to enable blocking IO to be used when
            // NIO has been configured
            if (ka != null && ka.isUpgraded() &&
                    SocketStatus.OPEN_WRITE == status) {
                synchronized (ka.getWriteThreadLock()) {
                    doRun(key, ka);
                }
            } else {
                synchronized (socket) {
                    doRun(key, ka);
                }
            }
        }

        private void doRun(SelectionKey key, KeyAttachment ka) {
            try {
                int handshake = -1;

                try {
                    if (key != null) {
                        // For STOP there is no point trying to handshake as the
                        // Poller has been stopped.
                        if (socket.isHandshakeComplete() ||
                                status == SocketStatus.STOP) {
                            handshake = 0;
                        } else {
                            handshake = socket.handshake(
                                    key.isReadable(), key.isWritable());
                            // The handshake process reads/writes from/to the
                            // socket. status may therefore be OPEN_WRITE once
                            // the handshake completes. However, the handshake
                            // happens when the socket is opened so the status
                            // must always be OPEN_READ after it completes. It
                            // is OK to always set this as it is only used if
                            // the handshake completes.
                            status = SocketStatus.OPEN_READ;
                        }
                    }
                }catch ( IOException x ) {
                    handshake = -1;
                    if ( log.isDebugEnabled() ) log.debug("Error during SSL handshake",x);
                }catch ( CancelledKeyException ckx ) {
                    handshake = -1;
                }
                if ( handshake == 0 ) {
                    SocketState state = SocketState.OPEN;
                    // Process the request from this socket
                    if (status == null) {
                        state = handler.process(ka, SocketStatus.OPEN_READ);
                    } else {
                        state = handler.process(ka, status);
                    }
                    if (state == SocketState.CLOSED) {
                        // Close socket and pool
                        close(ka, socket, key, SocketStatus.ERROR);
                    }
                } else if (handshake == -1 ) {
                    close(ka, socket, key, SocketStatus.DISCONNECT);
                } else {
                    ka.getPoller().add(socket, handshake);
                }
            } catch (CancelledKeyException cx) {
                socket.getPoller().cancelledKey(key, null, false);
            } catch (OutOfMemoryError oom) {
                try {
                    oomParachuteData = null;
                    log.error("", oom);
                    if (socket != null) {
                        socket.getPoller().cancelledKey(key,SocketStatus.ERROR, false);
                    }
                    releaseCaches();
                }catch ( Throwable oomt ) {
                    try {
                        System.err.println(oomParachuteMsg);
                        oomt.printStackTrace();
                    }catch (Throwable letsHopeWeDontGetHere){
                        ExceptionUtils.handleThrowable(letsHopeWeDontGetHere);
                    }
                }
            } catch (VirtualMachineError vme) {
                ExceptionUtils.handleThrowable(vme);
            }catch ( Throwable t ) {
                log.error("",t);
                if (socket != null) {
                    socket.getPoller().cancelledKey(key,SocketStatus.ERROR,false);
                }
            } finally {
                socket = null;
                status = null;
                //return to cache
                if (running && !paused) {
                    processorCache.offer(this);
                }
            }
        }
核心代码就这句:
state = handler.process(ka, SocketStatus.OPEN_READ);
恩,就是那么简单,吧socket 相关的类传给一个Handler 类进行处理。
总的来说,endpoint 的工作过程分为这几个部分:首先是Acceptor进行请求的监听,当监听到请求的时候,会将代表该次请求的socket 转发给poller 进行处理,poller 主要负责Socket中 流(Nio中的通道)的处理,当然,期间还有涉及到很多其他的额外工作,这里不详细展开;最后,SocketProcess会吧poller的处理结果,以队里的形式传递给Handler(不知道这里理解是否有偏差,欢迎指正),最终吧处理好的请求发送到Processor进行下一步处理,封装为request 对象。
3、Processor 和Adaptor
Processor 对象主要实现了tcp到http层面的数据转换,它主要是吧socket输入输出流封装为request、response 对应对象,可以先看看该接口的源码:

public interface Processor<S> {
    Executor getExecutor();

    SocketState process(SocketWrapper<S> socketWrapper) throws IOException;

    SocketState event(SocketStatus status) throws IOException;

    SocketState asyncDispatch(SocketStatus status);
    SocketState asyncPostProcess();

    /**
     * @deprecated  Will be removed in Tomcat 8.0.x.
     */
    @Deprecated
    org.apache.coyote.http11.upgrade.UpgradeInbound getUpgradeInbound();
    /**
     * @deprecated  Will be removed in Tomcat 8.0.x.
     */
    @Deprecated
    SocketState upgradeDispatch() throws IOException;

    HttpUpgradeHandler getHttpUpgradeHandler();
    SocketState upgradeDispatch(SocketStatus status) throws IOException;

    void errorDispatch();

    boolean isComet();
    boolean isAsync();
    boolean isUpgrade();

    Request getRequest();

    void recycle(boolean socketClosing);

    void setSslSupport(SSLSupport sslSupport);
}
从代码中我们可以知道:这个接口主要定义了一些错误处理方法errorDispatch、异步处理的方法等等,当然,其实实现tcp到http 转换的过程以及封装request 对象的过程主要是由process这个方法 完成的,不过本人看了下源码实在太复杂了,在这里详细展开的估计要搞好久(囧,原谅我,其实我也看不懂process这个方法内部实现,感觉实在有点复杂)
当Processor处理完后,会得到对应的request 对象,也就是我们熟悉的HttpRequest对象了,这个时候,request 对象便会由一个适配器传递给Container 容器,该容器会进一步处理request 对象(感觉到这里这篇博客写崩了,本来是想好好看看Processor怎么处理tcp请求的,无奈看到源码头都大了,感觉功力不够就没敢看了,尴尬)
好吧,下面继续硬着头皮,研究下Container 的工作过程。
二、Container 处理请求的过程
1、Container 的组件
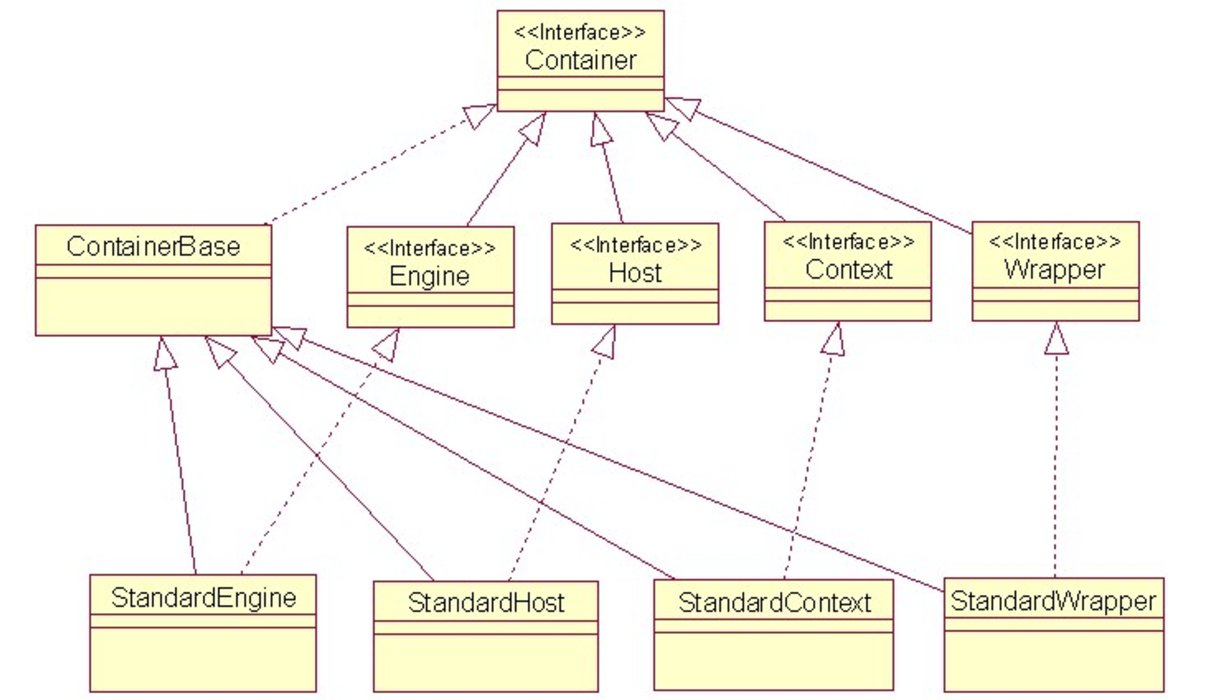
Container 是一个接口,其实它的下面有这是个字接口:Engine,Host,Context,Wrapper 。下面网上盗的继承关系图:

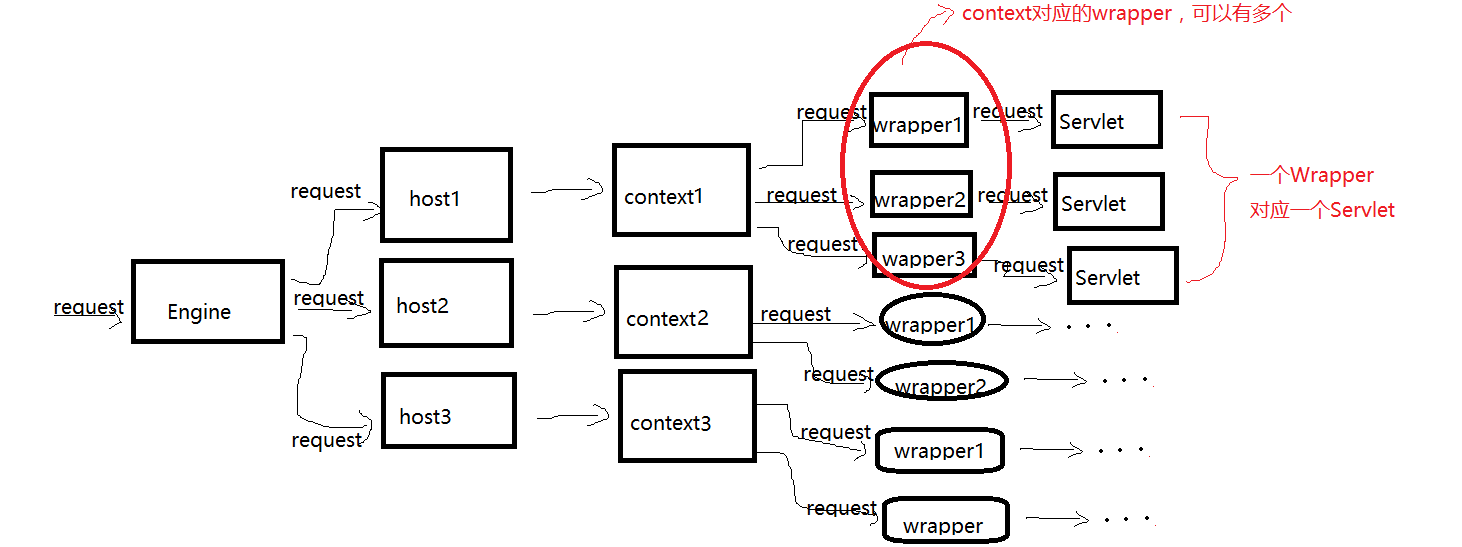
有点乱是吧,我也觉得。下面简单解释下各个接口(类)的意义:Engine,是一个service 下的管理站点的一个引擎,Host 就是主机,是的,我也是才知道,原来一个tomcat 还可以管理不同主机的,当然,这里的主机是虚拟的,并不是一个tomcat 可以管理不同服务器,不同host 仅仅代表不同站点而已,Engine 和host 的关系大概可以理解为:Engine 管理着不同的host ,一个service 可以对应多个host 却仅仅有一个Engine;而Context 代表的是一个引用程序,狭隘地理解,其实就是一个可运行的web项目,反正一个项目中的web.xml就可以理解为对应一个context 对象;最后就是Wrapper了,这个是一个处理Servlet 的类,其实就是相当于在Servlet 包一层东西的类,不同Servlet 对应不同的Wrapper 类,Wrappper专门用来处理Servlet。Ok,他们之间的关系如果你还是觉得有点模糊的话,可以看下图:

好吧,图是丑了点,不过估计都能看懂吧。下面详细说说请求又是怎么真正从最初的Engine 入口处到最后的Servlet ,这里需要引出一个概念:tomcat 中的管道。
2、tomcat 中的pipeline - value
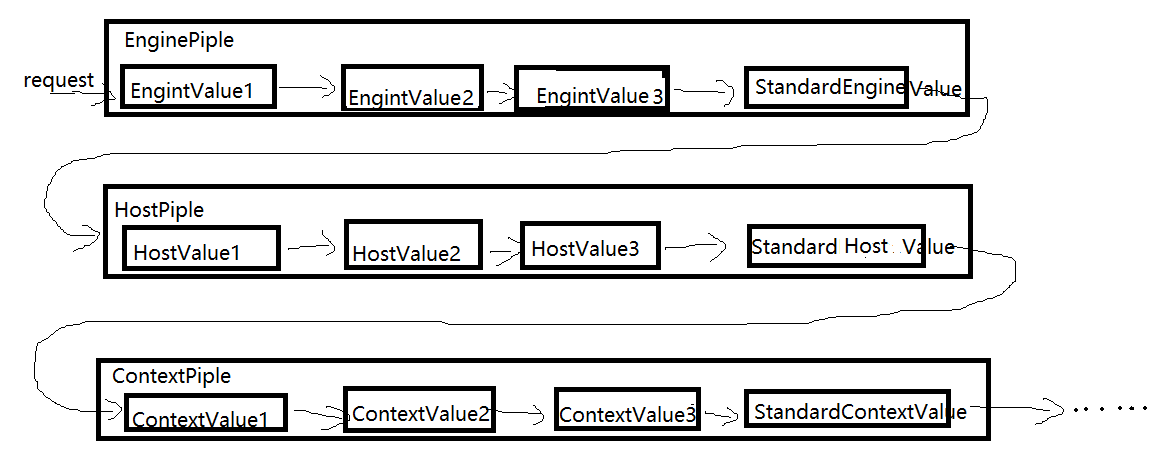
相信,用过tomcat 的对过滤器应该不陌生?我们只要实现Filter 对应的方法,然后再server.xml中配置filter 即可让filter 起作用,其实这个过程就是利用到了管道。在tomcat 中的管道,利用责任链模式进行实现的,具体的过程是这样的:Engine,host ,context 以及Wrapper 都是一个管道,在每个管道中,会存放不同的Value ,这些Value 代表的是各个类对请求的处理,就像一个车间中的生产线一样,整条生产线可以理解为一个管道,生产线上每个工人就是一value ,每个工人加工完产品之后,会把加工之后的产品交给下一个工人,直到所有工人都加完工过产品。不过,在tomcat 的管道中,有一个baseValue ,这个Value 是肯定会执行的,而且是在所有value 执行完再执行,这就类似于工厂中质检的机器,最后一定会检查产品的质量。value 对应的是某个处理请求的类,而BaseValue在四个组件中对应的分别是下面这几个类:StandardEngineValue、StandardHostValue、StandardContextValue、StandardWrapperValue,也就是说,这四个类对请求的处理是一定会被管道锁执行的。如果还是无法理解,可以看下面的示意图理解管道:

下面我们就以一个StandardEngin以及它对应的value StandardEngineValue研究下,什么是value ,管道又是如何进行工作的,首先,我们看看StandardEngineValue的源码(主要是看其中的invoke 方法,该方法被调用时,对应的StandardEngine的invoke 方法将会被执行 ):

public final void invoke(Request request, Response response)
        throws IOException, ServletException {

        // Select the Host to be used for this Request
        Host host = request.getHost();
        if (host == null) {
            response.sendError
                (HttpServletResponse.SC_BAD_REQUEST,
                 sm.getString("standardEngine.noHost",
                              request.getServerName()));
            return;
        }
        if (request.isAsyncSupported()) {
            request.setAsyncSupported(host.getPipeline().isAsyncSupported());
        }

        // Ask this Host to process this request
        host.getPipeline().getFirst().invoke(request, response);

    }
可以看到,作为Engine管道中最后执行的Value ,StandardEngineValue的invoke 会获取Host管道中第一个HostValue,然后调用对应的invoke ,当第一个HostValue的invoke 方法执行完的时候,会继续获取Host管道中下一个HostValue,然后一直这个过程,直到所有Value 执行完,到Host的StandardHostValue的时候,StandardHostValue的invoke方法会调用context 通道的第一个Value,进行执行,context通道重复这个过程,直到请求到达Wrapper 通道中时,Wrapper 会调用FilterChain ,我们的Filter 便会在其中被执行了。总而言之,这个过程,BaseValue的作用便是调用下一个组件的通道,让整个责任链可以继续执行下去。
三、感悟
在写这篇博客的时候,其实感觉蛮痛苦的,毕竟很多源码的确看不懂,很多都只是只能了解个大概,好像前面的关于Connectors 的总结,自己很多都是走马观花地进行大体的梳理,对于组件工作的具体原理还是不了解,而且,其实很多代码是可以看懂是什么意思,但是却很难懂:为什么编码的人要这样做。确实,自己的功力还是不够,无论是线程并发、Socket 等基础,还是整体的框架思维层面,都有待提高。开源框架的魅力,其实不仅仅是让你有一个很好的工具可以用,更重要的是,可以让你知道自己和真正大牛的差距在哪,让你的思维方式不断靠近他们,让你有非常好的途径,去学习与模仿,最后转化为自己的东西。
废话不多说,个人感觉这篇博客并写得有点水,归根到底还是很多核心的思想没有正真领悟,不过这篇博客也花了我挺长时间整理的,所以还是硬着头皮发出来吧,不足地方欢迎各位大神指正!
秋招干巴爹!
