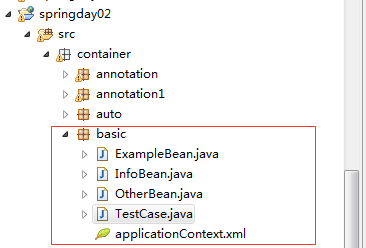
1.复制xml到container/basic包下
2.ExampleBean中设置属性,包括基本类型(String和age)和集合类型(List,Set,Map),Properties类型
3.添加无参构造器,toString方法,get/set方法
4.使用value进行基本值注入,主要基本类型和集合类型的区别
5.test1测试:对ExampleBean进行测试

ExampleBean.java:
package container.basic;
import java.util.List;
import java.util.Map;
import java.util.Properties;
import java.util.Set;
//演示注入基本类型的值和集合类型的值
public class ExampleBean {
private String name;
private int age;
private List<String> interest;
private Set<String> cities;
private Map<String,Double> scores;
private Properties db;
@Override
public String toString() {
return "ExampleBean [age="+age+",interest="+interest+
",cities="+cities+",scores="+scores+",Properties="+db+
",name="+name+"]";
}
public ExampleBean(){
System.out.println("ExampleBean的无参构造器");
}
public String getName() {
return name;
}
public void setName(String name) {
this.name = name;
}
public int getAge() {
return age;
}
public void setAge(int age) {
this.age = age;
}
public List<String> getInterest() {
return interest;
}
public void setInterest(List<String> interest) {
this.interest = interest;
}
public Set<String> getCities() {
return cities;
}
public void setCities(Set<String> cities) {
this.cities = cities;
}
public Map<String, Double> getScores() {
return scores;
}
public void setScores(Map<String, Double> scores) {
this.scores = scores;
}
public Properties getDb() {
return db;
}
public void setDb(Properties db) {
this.db = db;
}
}
xml:
<bean id="eb1" class="container.basic.ExampleBean">
<property name="name" value="黛玉"></property>
<property name="age" value="16"></property>
<property name="interest">
<list>
<value>snooker</value>
<value>football</value>
<value>fishing</value>
</list>
</property>
<property name="cities">
<set>
<value>北京</value>
<value>上海</value>
<value>岳阳</value>
</set>
</property>
<property name="scores">
<map>
<entry key="english" value="100"/>
<entry key="math" value="90"/>
<entry key="music" value="100"/>
</map>
</property>
<property name="db" >
<props>
<prop key="username">Tom</prop>
<prop key="password">1234</prop>
</props>
</property>
</bean>
TestCase:
@Test
public void test1(){
String cfg = "container/basic/applicationContext.xml";
ApplicationContext ac =
new ClassPathXmlApplicationContext(cfg);
ExampleBean eb1 = ac.getBean("eb1",ExampleBean.class);
System.out.println(eb1.getAge());
System.out.println(eb1.getName());
System.out.println(eb1);
}
运行结果如下:

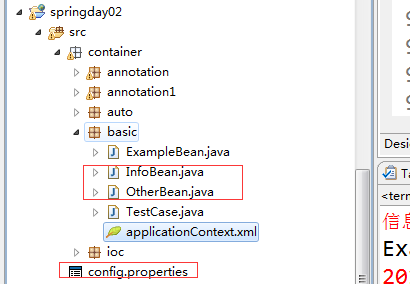
6.同理,添加一个OtherBean类,
7.在src下面新建一个config.properties文件,当然,也可以存在别的地方
8.再修改xml文件,此时不采用上述方法配置xml,而是采用将集合当作一个bean来配置
9.test2测试OtherBean这个类,test3测试读取配置文件dbInfo
10.新建InfoBean类,实现无参构造器,toString方法,get/set方法
11.使用spring表达式来读取其他bean属性的值。即将当前infoBean属性的值设置为别的bean属性的值。
12.test4测试:对infoBean进行测试

OtherBean.java:
package container.basic;
import java.util.List;
import java.util.Map;
import java.util.Properties;
import java.util.Set;
public class OtherBean {
private List<String> interest;
private Set<String> cities;
private Map<String,Double> scores;
private Properties db;
private String pageSize;
@Override
public String toString() {
return "OtherBean [interest=" + interest + ", cities=" + cities
+ ", scores=" + scores + ", db=" + db + ", pageSize="
+ pageSize + "]";
}
public OtherBean() {
System.out.println("other的无参构造器");
}
public List<String> getInterest() {
return interest;
}
public void setInterest(List<String> interest) {
this.interest = interest;
}
public Set<String> getCities() {
return cities;
}
public void setCities(Set<String> cities) {
this.cities = cities;
}
public Map<String, Double> getScores() {
return scores;
}
public void setScores(Map<String, Double> scores) {
this.scores = scores;
}
public Properties getDb() {
return db;
}
public void setDb(Properties db) {
this.db = db;
}
public String getPageSize() {
return pageSize;
}
public void setPageSize(String pageSize) {
this.pageSize = pageSize;
}
}
config.properties:
pageSize=10
InfoBean.java:
package container.basic;
//使用spring表达式来读取bean属性值
public class InfoBean {
private String name;
private String interest;
private double score;
private String pageSize;
public InfoBean() {
System.out.println("InfoBean的无参构造器");
}
@Override
public String toString() {
return "InfoBean [name=" + name + ", interest=" + interest + ", score="
+ score + ", pageSize=" + pageSize + "]";
}
public String getName() {
return name;
}
public void setName(String name) {
this.name = name;
}
public String getInterest() {
return interest;
}
public void setInterest(String interest) {
this.interest = interest;
}
public double getScore() {
return score;
}
public void setScore(double score) {
this.score = score;
}
public String getPageSize() {
return pageSize;
}
public void setPageSize(String pageSize) {
this.pageSize = pageSize;
}
}
修改xml,添加代码如下:
<!-- 将集合当做一个bean来配置
命名空间:为了区分同名的元素而在元素之前添加一个前缀
<%@taglib uri="" prefix=""%>
<c:if></c:if>
-->
<util:list id="interestBean">
<value>snooker</value>
<value>football</value>
<value>fishing</value>
</util:list>
<util:set id="citiesBean">
<value>北京</value>
<value>上海</value>
<value>岳阳</value>
</util:set>
<util:map id="scoresBean">
<entry key="english" value="100"/>
<entry key="math" value="90"/>
<entry key="music" value="100"/>
</util:map>
<util:properties id="dbBean">
<prop key="username">Tom</prop>
<prop key="password">1234</prop>
</util:properties>
<!-- 将指定位置的properties文件的内容读入到id为dbInfo的bean对象 -->
<util:properties id="dbInfo"
location="classpath:config.properties">
<!-- 注意,以上的Properties一种是直接设定值,一种是通过读取文件读取内容 -->
</util:properties>
<bean id="otherBean" class="container.basic.OtherBean">
<property name="interest" ref="interestBean"/>
<property name="cities" ref="citiesBean"/>
<property name="scores" ref="scoresBean"/>
<property name="db" ref="dbBean"/>
<property name="pageSize" value="#{dbInfo.pageSize}"/>
</bean>
<!-- 注意ref和value区别,若为对象,则ref,若为基本类型值,则为value -->
<!-- 使用spring表达式来读取其他bean的属性值 -->
<bean id="infoBean" class="container.basic.InfoBean">
<property name="name" value="#{eb1.name}"/>
<property name="interest" value="#{eb1.interest[1]}"/>
<property name="score" value="#{eb1.scores.english}"/>
<property name="pageSize" value="#{dbInfo.pageSize}"/>
</bean>
测试代码:
@Test
public void test1(){
String cfg = "container/basic/applicationContext.xml";
ApplicationContext ac =
new ClassPathXmlApplicationContext(cfg);
ExampleBean eb1 = ac.getBean("eb1",ExampleBean.class);
System.out.println(eb1.getAge());
System.out.println(eb1.getName());
System.out.println(eb1);
}
运行结果:

@Test
public void test2(){
String cfg = "container/basic/applicationContext.xml";
ApplicationContext ac =
new ClassPathXmlApplicationContext(cfg);
OtherBean ob = ac.getBean("otherBean",OtherBean.class);
System.out.println(ob);
}
运行结果如下:

@Test
public void test3(){
String cfg = "container/basic/applicationContext.xml";
ApplicationContext ac =
new ClassPathXmlApplicationContext(cfg);
System.out.println(ac.getBean("dbInfo"));
}
运行结果如下:

@Test
public void test4(){
String cfg = "container/basic/applicationContext.xml";
ApplicationContext ac =
new ClassPathXmlApplicationContext(cfg);
InfoBean ib = ac.getBean("infoBean",InfoBean.class);
System.out.println(ib);
}
运行结果如下:
