创建自定义路由事件大体可分为三个步骤:
- 声明并注册路由事件。
- 为路由事件添加CLR事件包装。
- 创建可以激发路由事件的方法。
下面以从ButtonBase类中抽取出的代码为例来展示这3个步骤。
public abstract class ButtonBase:ContentControl,ICommandSource
    {
        //声明并注册路由事件
        public static readonly RoutedEvent ClickEvent = /*注册路由事件*/;

        //为路由事件添加CLR事件包装器
        public event RoutedEventHandler Click
        {
            add{this.AddHandler(ClickEvent,value);}
            remove{this.RemoveHandler(ClickEvent,value);}
        }

        //激发路由事件的方法。此方法在用户单击鼠标的时候会被windows系统调用
        protected virtual void OnClick()
        {
            RoutedEventArgs newEvent = new RoutedEventArgs(ButtonBase.ClickEvent,this);
            this.RaiseEvent(newEvent);
        }
    }
声明并注册路由事件的完整代码如下:
//声明并注册路由事件
public static readonly RoutedEvent ClickEvent = EventManager.RegisterRoutedEvent("Click", RoutingStrategy.Bubble,typeof(RoutedEventHandler), typeof(ButtonBase));
第一个参数为String类型,被称为路由事件名称;第二个参数为路由事件的策略。第三个参数用于指定事件处理器的类型,第四个参数用于指明路由事件宿主是哪个类型。
下面自己动手创建一个路由事件,这个事件的用途是报告事件发生的事件。
为了让事件消息能够携带按钮被单击时的时间,我们创建一个RoutedEventArgs类的派生类,并为其添加ClickTimer属性:
public class ReportTimeEventArgs:RoutedEventArgs
    {
        public ReportTimeEventArgs(RoutedEvent routedEvent, Object source) : base(routedEvent, source) { }
        public DateTime ClickTime { get; set; }
    }
然后再创建一个Button的派生类并按照前述步骤为其添加路由事件:
class TimeButton : Button
        {
            //声明和注册路由事件
            public static readonly RoutedEvent ReportTimerEvent = EventManager.RegisterRoutedEvent("ReportTime",RoutingStrategy.Bubble,typeof(EventHandler<ReportTimeEventArgs>),typeof(TimeButton));
            //CLR事件包装器
            public event RoutedEventHandler ReportTime
            {
                add { this.AddHandler(ReportTimerEvent, value); }
                remove { this.RemoveHandler(ReportTimerEvent, value); }
            }
            //激发路由事件,借用Click事件激发方法
            protected override void OnClick()
            {
                base.OnClick();//保证Button原有功能能够正常使用、Click事件能被激发

                ReportTimeEventArgs args = new ReportTimeEventArgs(ReportTimerEvent, this);
                args.ClickTime = DateTime.Now;
                this.RaiseEvent(args);
            }
        }
下面是程序的XAML代码:
<Window x:Class="myRoutedEvent.MainWindow"
        xmlns="http://schemas.microsoft.com/winfx/2006/xaml/presentation"
        xmlns:x="http://schemas.microsoft.com/winfx/2006/xaml"
        xmlns:local="clr-namespace:myRoutedEvent" x:Name="myWindow"
        Title="Routed Event" Height="300" Width="300">
    <Grid x:Name="grid_1" >
        <Grid x:Name="grid_2" >
            <Grid x:Name="grid_3" >
                <StackPanel x:Name="stackPanel_1">
                    <ListBox x:Name="listBox"/>
                    <local:TimeButton x:Name="timeButton" Width="80" Height="80"
                                      Content="报时" local:TimeButton.ReportTime="ReportTimeHandler"/>
                </StackPanel>
            </Grid>
        </Grid>
    </Grid>
</Window>
ReportTimeHandler的代码如下:
//ReportTimerEvent路由事件处理器
        private void ReportTimeHandler(object sender, ReportTimeEventArgs e)
        {
            FrameworkElement element = sender as FrameworkElement;
            string timeStr = e.ClickTime.ToString();
            string content = string.Format("{0}到达{1}", timeStr, element.Name);
            this.listBox.Items.Add(content);
        }
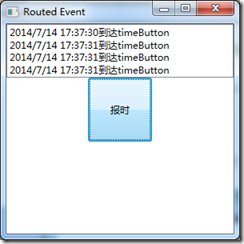
运行结果如图:
