Seam provides two nice additions to JBPM the first one (which this tutorial is about) is a powerful integration between Seam components + JSF and JBPM, the second one is Page Flow Definition : we'll treat this latter in a separate tutorial as it's simply a different way to describe your application flow and what actions and decisions can happen in each place.
How seam integrates with JBPM ?
Seam folds business processes into the Seam container by relying on three key coordinators:
- The business process context: Seam assimilates the stateful context bound to the process instance as one of its own. Business process-scoped context variables are exchanged with the jBPM process context transparently, but are otherwise treated just like any other context variable. They can participate in bijection and be resolved using EL notation. Value expressions can also be used in the process definition descriptor to resolve context variables in the Seam container.
- Declarative business process controls: A set of annotations and page descriptor tags are included that can initiate or resume a process instance, start and end tasks, and bring variables from an active process into scope, all without calling out directly to jBPM. Seam as includes a set of UI controls for selecting the process or task instance on which to operate.
- Identity management: Seam provides a basic component named actor for registering the actor id and group ids that will be passed on to the process instance to record the current participant. The actor component is typically populated during the authentication routine.
Configuring Seam to work with JBPM
Step 1 : Add JBPM libraries
The JAR file jbpm-3.X.X.jar is required for jBPM and it is located
under the lib directory of the Seam distribution. We need to place this
JAR file at the root of the EAR and then add a reference to the JAR in
the application.xml file.
Here's a sample of your application.xml file with JBPM libs in it
- <application>
- <display-name>Sample JBPM Seam Application</display-name>
- <module>
- <web>
- <web-uri>seamJbpm.war</web-uri>
- <context-root>/seamJbpm</context-root>
- </web>
- </module>
- <module>
- <java>jboss-seam.jar</java>
- </module>
- <module>
- <java>jbpm-3.1.2.jar</java>
- </module>
- </application>
Step 2: Add hibernate config file
As we saw in our previous tutorial, jBPM works by interacting with a
database, and it uses Hibernate as its persistence mechanism for the
database. You can pickup the hibernate.cfg.xml file that comes with the jBPM release. This file needs to be inserted into the root of your ear.
Step 3: Tell seam which are your process definitions (and pageflows)
In your components.xml you need to declare the process definitions used by your applications
- <bpm:jbpm>
- <bpm:process-definitions>
- <value>processDefinition.xml</value>
- </bpm:process-definitions>
- </bpm:jbpm>
(Besides this you must declare here you pageflows, but we'll explore Page Flows in the next tutorial)
Step 4: Let Seam manage transactions
JBPM used in a standalone environment uses its own resource-local transactions when performing persistence operations. However when used in combination with Seam this can lead to transaction conflicts: so you need simply tell JBPM to participate in the global transaction managed by Seam (and not use its own)
Add this line to jbpm.cfg.xml file:
- <jbpm-configuration>
- <jbpm-context>
- <service name="persistence">
- <factory>
- <bean class="org.jbpm.persistence.db.DbPersistenceServiceFactory">
- <field name="isTransactionEnabled"><false/></field>
- </bean>
- </factory>
- </service>
- <service name="tx" factory="org.jbpm.tx.TxServiceFactory" />
- <service name="message" factory="org.jbpm.msg.db.DbMessageServiceFactory" />
- <service name="scheduler" factory="org.jbpm.scheduler.db.DbSchedulerServiceFactory" />
- <service name="logging" factory="org.jbpm.logging.db.DbLoggingServiceFactory" />
- <service name="authentication" factory="org.jbpm.security.authentication.DefaultAuthenticationServiceFactory" />
- </jbpm-context>
- </jbpm-configuration>
(Also this file will stay in the root of the ear)
A Sample application
Piece 1: the processdefinition
Here we'll show a simple process which has 2 Tasks in it.
An order is placed at the beggining of the process and then the order
needs to be delivered. Just to keep it simple we have only one actor in
this process which will be the used logged in.

Picture 1: the process view designed with Eclipse plugin
- <process-definition xmlns="urn:jbpm.org:jpdl-3.2" name="simple">
- <start-state name="start">
- <transition name="trPlaceOrder" to="PlaceOrder" />
- </start-state>
- <task-node name="PlaceOrder">
- <task name="placeOrderTask">
- <assignment actor-id="#{actor.id}" />
- </task>
- <transition name="next" to="Deliver" />
- <transition name="cancel" to="error" />
- </task-node>
- <task-node name="Deliver">
- <task name="getFromStock">
- <assignment actor-id="#{actor.id}" />
- </task>
- <transition name="next" to="end" />
- <transition name="cancel" to="error" />
- </task-node>
- <end-state name="error" />
- <end-state name="end" />
- </process-definition>
Notice the expression #{actor.id}. This is an example of how to inject a seam component into your process definition. In the next module everything will be clear.
Piece 2: the login module & login view:
The login module and the login view are showed here :
This is the login view:
- <%@ taglib uri="<a href="http://java.sun.com/jsf/html">http://java.sun.com/jsf/html</a>" prefix="h"%>
- <%@ taglib uri="<a href="http://java.sun.com/jsf/core">http://java.sun.com/jsf/core</a>" prefix="f"%>
- <html>
- <head>
- <title>Login</title>
- </head>
- <body>
- Enter your username
- <f:view>
- <h:form>
- <div>
- <h:inputText value="#{login.user}"/>
- <h:commandButton value="Login" action="#{login.login}"/>
- </div>
- </h:form>
- </f:view>
- </body>
- </html>
This is the login Module
- import org.jboss.seam.annotations.In;
- import org.jboss.seam.annotations.Name;
- import org.jboss.seam.bpm.Actor;
- @Name("login")
- public class LoginModule
- {
- @In private Actor actor;
- private String user;
- public String getUser() {
- return user;
- }
- public void setUser(String user) {
- this.user = user;
- }
- public String login()
- {
- actor.setId(user);
- return "/todo.jsp";
- }
- }
Here's the actor object we've seen before.
 What is the Actor ? it's
a Seam component that is stored in the session. In general, you should
create your actor component when you are logging in to the website.
:
The actor will be used later on to assign the Task to an actor-id:
<task name="getFromStock">
<assignment actor-id="#{actor.id}"/>
</task>
Piece n. 3 : the POJO process manager.
Believe it or not this little POJO does all the job that is needed to Create a task, and handle @Start and @Stop
- import org.jboss.seam.annotations.bpm.CreateProcess;
- import org.jboss.seam.annotations.bpm.EndTask;
- import org.jboss.seam.annotations.Name;
- import org.jboss.seam.annotations.bpm.StartTask;
- import org.jboss.seam.annotations.*;
- import org.jboss.seam.ScopeType;
- @Name("orderStock")
- public class OrderStock
- {
- @Out(scope=ScopeType.BUSINESS_PROCESS, required=false)
- Long processQuantity;
- private int quantity ;
- public int getQuantity()
- {
- return quantity;
- }
- public void setQuantity(int quantity) {
- this.quantity = quantity;
- }
- @CreateProcess(definition="simple")
- public void startProcess() {
- processQuantity = new Long(getQuantity());
- }
- @StartTask
- @EndTask(transition="next")
- public void done() {
- }
- @StartTask
- @EndTask(transition="cancel")
- public void cancel() {
- }
- }
It's most intuitive: the method startProcess will be recalled by JSF to start the JBPM process
@CreateProcess(definition="simple")
public void startProcess() {
.....
}
You see, process definition is passed as parameter to the annotation. The Seam @StartTask annotation starts work on a task. The @EndTask ends the task, and allows the business process execution to resume.
In this sample we've two methods done and cancel which will be used to drive our process : calling done moves the Token to the transition "next" while calling cancel moves to the transition "cancel". (Here
for keeping it simple the methods handle both @StartTask and @EndTask
but you're free to use a separate method for each of this phases)
A last thing: maybe you've noticed the expression:
@Out(scope=ScopeType.BUSINESS_PROCESS, required=false)
Long processQuantity;
this outjects the process variable processQuantity and makes it available to the view.
Piece n. 4 : the view component
Ok so we need a last piece of this puzzle: the view component. this will be a standard JSF page BUT....with special Seam annotations in it:
- <%@ taglib uri="http://java.sun.com/jsf/html" prefix="h"%>
- <%@ taglib uri="http://java.sun.com/jsf/core" prefix="f"%>
- <%@ taglib uri="http://jboss.com/products/seam/taglib" prefix="s"%>
- <html>
- <body>
- <h2>Order system</h2>
- <f:view>
- <h:form id="list">
- <div>
- <h:outputText value="There are no order at the moment." rendered="#{empty taskInstancePriorityList}"/>
- <h:dataTable value="#{taskInstancePriorityList}"
- var="task" rendered="#{not empty taskInstancePriorityList}"
- bgcolor="#F1F1F1" border="10">
- <h:column>
- <f:facet name="header">
- <h:outputText value="Created"/>
- </f:facet>
- <h:outputText value="#{task.taskMgmtInstance.processInstance.start}">
- <s:convertDateTime type="date"/>
- </h:outputText>
- </h:column>
- <h:column>
- <f:facet name="header">
- <h:outputText value="Name"/>
- </f:facet>
- <h:outputText value="#{task.name}"/>
- </h:column>
- <h:column>
- <f:facet name="header">
- <h:outputText value="Quantity"/>
- </f:facet>
- <h:outputText value="#{task.variables['processQuantity']}"/>
- </h:column>
- <h:column>
- <s:button action="#{orderStock.done}" taskInstance="#{task}" value="Done"/>
- </h:column>
- <h:column>
- <s:button action="#{orderStock.cancel}" taskInstance="#{task}" value="Cancel"/>
- </h:column>
- </h:dataTable>
- </div>
- <div>
- <h:messages/>
- </div>
- </h:form>
- <h:form id="new">
- <div>
- <h:inputText value="#{orderStock.quantity}" />
- <h:commandButton value="Enter order quantity" action="#{orderStock.startProcess}"/>
- </div>
- </h:form>
- </f:view>
- </body>
- </html>
Here's a little explanation to the expression you find in the JSF:
#{taskInstancePriorityList} Loads the Datatable with an array of Tasks
#{task.taskMgmtInstance.processInstance.start} Displays the start date of the process
#{task.name} recalls task.getName()
#{task.variables['processQuantity']} Displays the task variable processQuantity
#{task} the reference to the TaskInstance
#{orderStock.done} Simple invocation of method done
#{orderStock.cancel} Simple invocation of method cancel
When the view is render you'll see a simple Datatable with 2 buttons in
it, one for Advancing the process state and another to Drop it.

So can you see the beauty of Seam ? you have already lots of built-in to manage your process:
in a JBPM standalone application you have to request the JBPM Context,
query the Task list, fill the Task list in a Collection, feed this
collection to JSF...simply to show your task.
When you became practical with Seam configuration file creating a JBPM tabular-data view of your process is a matter of minutes.
Packaging your application:
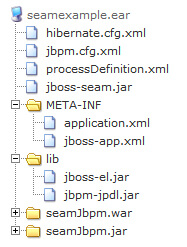
Here's a view of your ear file:

At the root of your ear file you have the main configuration files: hibernate config file, jbpm config file and your process definition.
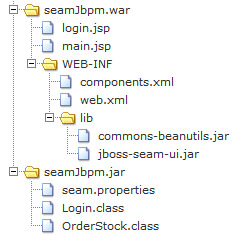
Exploring further the jar and war files:

Nothing new here, you should already know from the previous tutorial about seam.properties and components.xml. As said before components.xml holds the list of process definition used by this sample.
I suggest you when you're beginning your Seam experiments to make use of the build.xml files that come with the distribution examples. There you don't have to worry about where to place your configuration files: they're already configured to go in the right place, just edit them and add classes under "src" and jsp pages ander "view".
Conclusion
The hard work of loading the business process definition, creating a
process execution, putting the process instance in scope, transferring
variables to and from the business process context, and sending signals
to the process execution is hidden here behind declarative controls in
the form of annotations and page descriptor tags, controls you should
feel comfortable with based on your conversation experience.
转自:http://www.mastertheboss.com/en/seam/90-seam-jbpm.html