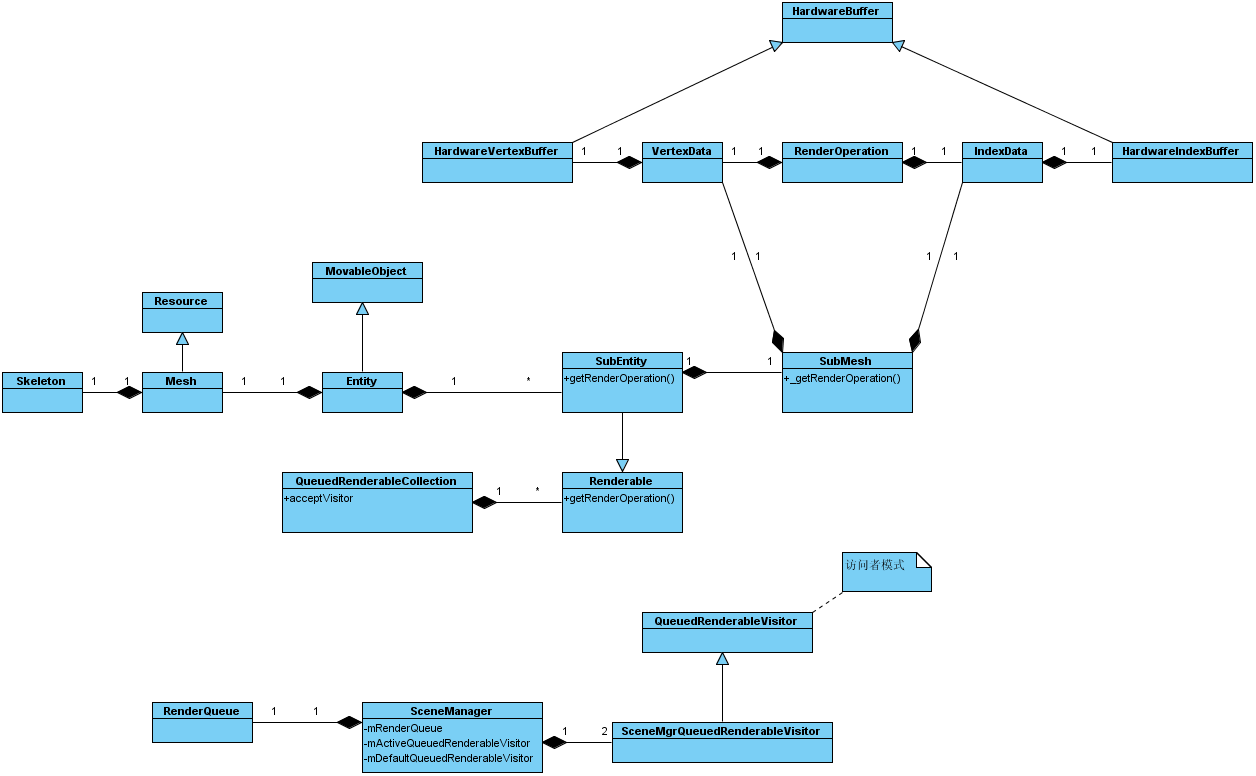
12.Ogre的渲染流程?
A:

一个pass,最多16层贴图,8盏灯
OgreConfig.h
/** Define max number of texture layers allowed per pass on any card.
*/
#define OGRE_MAX_TEXTURE_LAYERS 16
/** Define max number of lights allowed per pass.
*/
#define OGRE_MAX_SIMULTANEOUS_LIGHTS 8
好多管理器啊!
13.在渲染的时候,材质是如何起作用的?
A:
一个物体的渲染看这里
SceneManager::renderSingleObject
在QueuedRenderableCollection::acceptVisitorGrouped里
// Visit Pass - allow skip 设置pass
if (!visitor->visit(ipass->first))
continue;
RenderableList* rendList = ipass->second;
RenderableList::const_iterator irend, irendend;
irendend = rendList->end();
// 迭代每个SubEntity,即每个SubMesh
for (irend = rendList->begin(); irend != irendend; ++irend)
{
// Visit Renderable 用设置的pass渲染
visitor->visit(const_cast<Renderable*>(*irend));
}
如OgreHead.mesh里
在SceneManager::_setPass这里把gpu程序绑到render system上的
if (pass->hasVertexProgram())
{
mDestRenderSystem->bindGpuProgram(pass->getVertexProgram()->_getBindingDelegate());
// bind parameters later since they can be per-object
// does the vertex program want surface and light params passed to rendersystem?
passSurfaceAndLightParams = pass->getVertexProgram()->getPassSurfaceAndLightStates();
}
就是这么起作用的!
14.材质加载和解析
这个是程序一开始就加载配置文件
ogre-v1-6-2\ogre\Samples\Common\bin\resources.cfg
# Resource locations to be added to the 'boostrap' path
# This also contains the minimum you need to use the Ogre example framework
[Bootstrap]
Zip=http://www.cnblogs.com/Media/packs/OgreCore.zip
# Resource locations to be added to the default path
[General]
FileSystem=http://www.cnblogs.com/Media
FileSystem=http://www.cnblogs.com/Media/fonts
FileSystem=http://www.cnblogs.com/Media/materials/programs
FileSystem=http://www.cnblogs.com/Media/materials/scripts
FileSystem=http://www.cnblogs.com/Media/materials/textures
FileSystem=http://www.cnblogs.com/Media/models
FileSystem=http://www.cnblogs.com/Media/overlays
FileSystem=http://www.cnblogs.com/Media/particle
FileSystem=http://www.cnblogs.com/Media/gui
FileSystem=http://www.cnblogs.com/Media/DeferredShadingMedia
FileSystem=http://www.cnblogs.com/Media/PCZAppMedia
Zip=http://www.cnblogs.com/Media/packs/cubemap.zip
Zip=http://www.cnblogs.com/Media/packs/cubemapsJS.zip
Zip=http://www.cnblogs.com/Media/packs/dragon.zip
Zip=http://www.cnblogs.com/Media/packs/fresneldemo.zip
Zip=http://www.cnblogs.com/Media/packs/ogretestmap.zip
Zip=http://www.cnblogs.com/Media/packs/skybox.zip


