(1) 相关博文地址:
学习一下 SpringCloud (一)-- 从单体架构到微服务架构、代码拆分(maven 聚合): https://www.cnblogs.com/l-y-h/p/14105682.html
(2)代码地址:
https://github.com/lyh-man/SpringCloudDemo
一、从零开始 搭建、优化 微服务
1、项目说明
【基本说明:】
    上一篇介绍了 架构演变 以及 代码拆分,详见:https://www.cnblogs.com/l-y-h/p/14105682.html
    从这篇开始,将从零开始搭建微服务,逐步对 代码进行 优化,并选择相关技术解决 微服务相关问题。

【基本环境:】
    开发工具:IDEA
    编码环境:Java8 + MySQL 8
    框架:SpringBoot 2.3.5 + SpringCloud Hoxton.SR9 + MyBatisPlus 3.3.1
注:
    微服务相关技术此处不一一列举出来了,有些技术仅会简单使用、原理部分并没有全弄懂(持续学习中,有不对的地方还望不吝赐教)。
    MyBatisPlus 基本使用可参考:https://www.cnblogs.com/l-y-h/p/12859477.html
    搭建 SpringBoot 项目可参考:https://www.cnblogs.com/l-y-h/p/13083375.html
2、基本项目创建
(1)项目简介
【项目简介:】
    上一篇介绍了 垂直拆分 代码,详见:https://www.cnblogs.com/l-y-h/p/14105682.html#_label1_2
    此处以此为基础,逐步优化、并使用相关微服务技术去搭建。

【项目基本模块:(从最简单开始,后续模块视情况添加)】
    项目分为两个模块:生产者模块(producer)、消费者模块(consumer)。
    生产者模块 用于 提供 各种服务。
    消费者模块 用于 访问 各种服务。
注:
    生产者提供各种服务,其需要与数据库进行交互(controller、service、mapper 都需要)。
    消费者访问服务,只需要编写 controller 即可,消费者 去 远程访问 生产者服务。
    可以使用 RestTemplate 进行远程服务调用。

【项目命名约定:】
    为了便于区分各服务模块,各个模块服务名 命名规则为: 模块名 + _ + 端口号。
    比如:生产者模块为 producer_8000、消费者模块为 consumer_9000
(2)采用 maven 聚合 SpringBoot 子模块的方式创建项目
基本操作详见上一篇:https://www.cnblogs.com/l-y-h/p/14105682.html#_label1_2
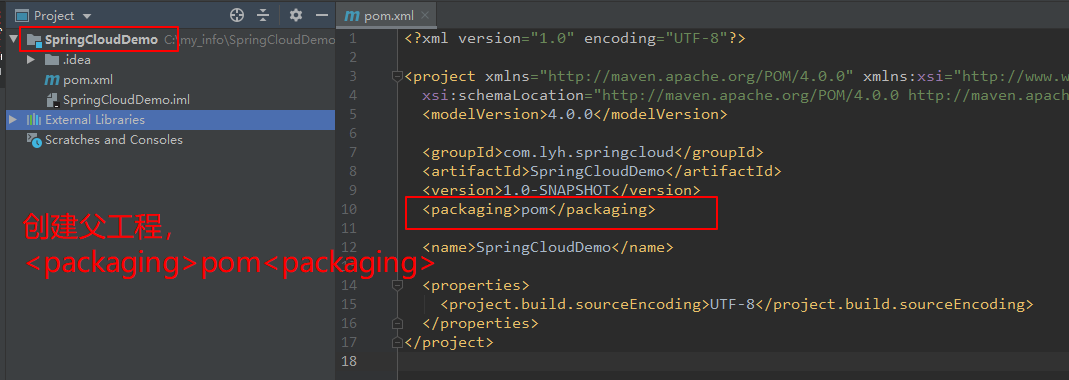
Step1:创建 maven 聚合工程(SpringCloudDemo)。
Step2:创建 SpringBoot 子模块(producer_8000)。
修改子模块配置文件(端口号为 8000、服务名为 producer)。
修改子模块 pom.xml 中 <parent> 标签,指向父工程。
修改父工程 pom.xml 中 <module> 标签,指向子模块。.

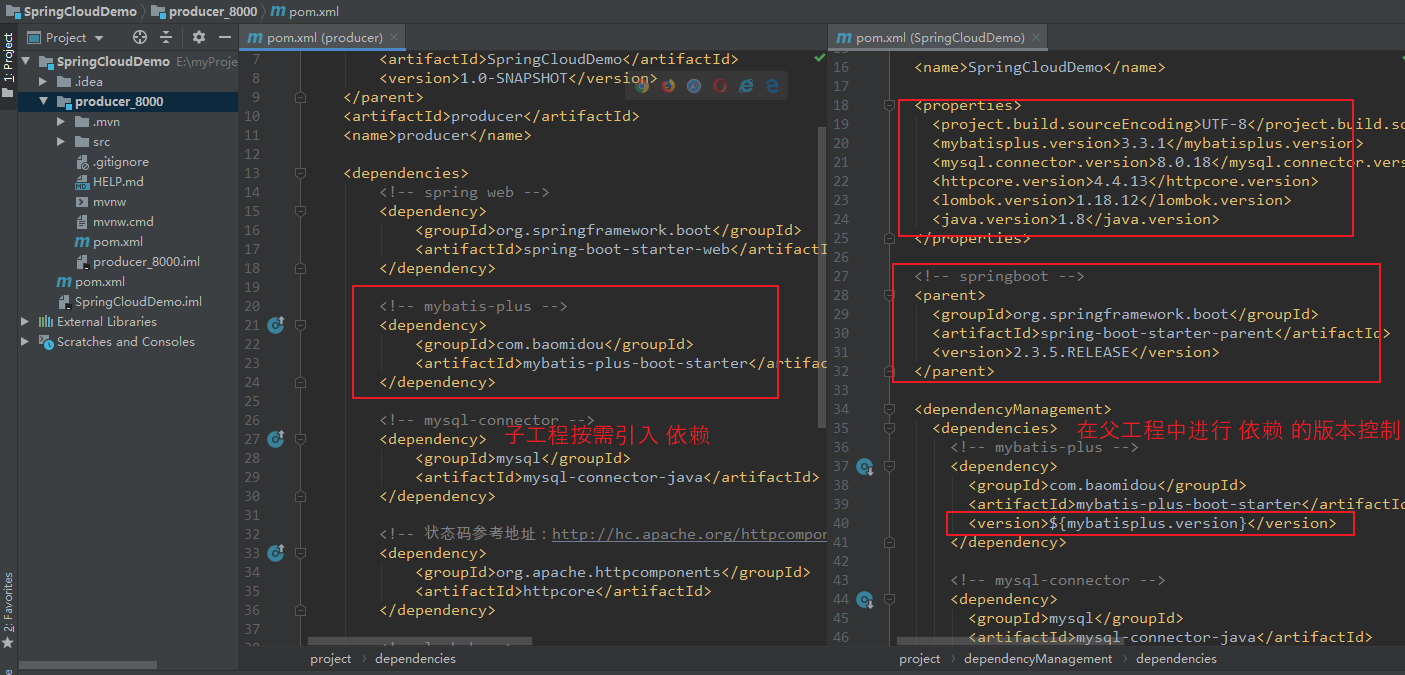
Step3:引入 producer_8000 所需依赖。
引入 MyBatisPlus 以及 MySQL 等依赖,在 父工程 进行版本控制。
【建一个表(producer_user),SQL 如下:】
DROP DATABASE IF EXISTS producer;

CREATE DATABASE producer;

USE producer;

CREATE TABLE producer_user(
    id BIGINT(20) AUTO_INCREMENT COMMENT 'ID',
    name VARCHAR(100) COMMENT 'Name',
    PRIMARY KEY (id)
) ENGINE=INNODB DEFAULT CHARSET=utf8mb4 COMMENT 'user';

【在父工程(SpringCloudDemo)中进行版本控制:】
<?xml version="1.0" encoding="UTF-8"?>

<project xmlns="http://maven.apache.org/POM/4.0.0" xmlns:xsi="http://www.w3.org/2001/XMLSchema-instance"
  xsi:schemaLocation="http://maven.apache.org/POM/4.0.0 http://maven.apache.org/xsd/maven-4.0.0.xsd">
  <modelVersion>4.0.0</modelVersion>

  <groupId>com.lyh.springcloud</groupId>
  <artifactId>SpringCloudDemo</artifactId>
  <version>1.0-SNAPSHOT</version>
  <packaging>pom</packaging>

  <modules>
    <module>producer_8000</module>
    <module>consumer_9000</module>
  </modules>

  <name>SpringCloudDemo</name>

  <properties>
    <project.build.sourceEncoding>UTF-8</project.build.sourceEncoding>
    <mybatisplus.version>3.3.1.tmp</mybatisplus.version>
    <mysql.connector.version>8.0.18</mysql.connector.version>
    <httpcore.version>4.4.13</httpcore.version>
    <lombok.version>1.18.12</lombok.version>
    <java.version>1.8</java.version>
  </properties>

  <!-- springboot -->
  <parent>
    <groupId>org.springframework.boot</groupId>
    <artifactId>spring-boot-starter-parent</artifactId>
    <version>2.3.5.RELEASE</version>
  </parent>

  <dependencyManagement>
    <dependencies>
      <!-- mybatis-plus -->
      <dependency>
        <groupId>com.baomidou</groupId>
        <artifactId>mybatis-plus-boot-starter</artifactId>
        <version>${mybatisplus.version}</version>
      </dependency>

      <!-- mybatis-plus 代码生成器相关依赖 -->
      <dependency>
        <groupId>com.baomidou</groupId>
        <artifactId>mybatis-plus-generator</artifactId>
        <version>${mybatisplus.version}</version>
      </dependency>
      <!-- 添加 mybatis-plus 模板引擎 依赖 -->
      <dependency>
        <groupId>org.apache.velocity</groupId>
        <artifactId>velocity-engine-core</artifactId>
        <version>2.2</version>
      </dependency>

      <!-- mysql-connector -->
      <dependency>
        <groupId>mysql</groupId>
        <artifactId>mysql-connector-java</artifactId>
        <version>${mysql.connector.version}</version>
      </dependency>

      <!-- 状态码参考地址:http://hc.apache.org/httpcomponents-core-ga/httpcore/apidocs/org/apache/http/HttpStatus.html -->
      <dependency>
        <groupId>org.apache.httpcomponents</groupId>
        <artifactId>httpcore</artifactId>
        <version>${httpcore.version}</version>
      </dependency>

      <!-- lombok -->
      <dependency>
        <groupId>org.projectlombok</groupId>
        <artifactId>lombok</artifactId>
        <version>${lombok.version}</version>
        <scope>provided</scope>
      </dependency>
    </dependencies>
  </dependencyManagement>
</project>

【在子工程(producer_8000)中进行依赖引入:】
<?xml version="1.0" encoding="UTF-8"?>
<project xmlns="http://maven.apache.org/POM/4.0.0" xmlns:xsi="http://www.w3.org/2001/XMLSchema-instance"
         xsi:schemaLocation="http://maven.apache.org/POM/4.0.0 https://maven.apache.org/xsd/maven-4.0.0.xsd">
    <modelVersion>4.0.0</modelVersion>
    <parent>
        <groupId>com.lyh.springcloud</groupId>
        <artifactId>SpringCloudDemo</artifactId>
        <version>1.0-SNAPSHOT</version>
    </parent>
    <artifactId>producer</artifactId>
    <name>producer</name>

    <dependencies>
        <!-- spring web -->
        <dependency>
            <groupId>org.springframework.boot</groupId>
            <artifactId>spring-boot-starter-web</artifactId>
        </dependency>

        <!-- mybatis-plus -->
        <dependency>
            <groupId>com.baomidou</groupId>
            <artifactId>mybatis-plus-boot-starter</artifactId>
        </dependency>

        <!-- mysql-connector -->
        <dependency>
            <groupId>mysql</groupId>
            <artifactId>mysql-connector-java</artifactId>
        </dependency>

        <!-- 状态码参考地址:http://hc.apache.org/httpcomponents-core-ga/httpcore/apidocs/org/apache/http/HttpStatus.html -->
        <dependency>
            <groupId>org.apache.httpcomponents</groupId>
            <artifactId>httpcore</artifactId>
        </dependency>

        <!-- lombok -->
        <dependency>
            <groupId>org.projectlombok</groupId>
            <artifactId>lombok</artifactId>
            <scope>provided</scope>
        </dependency>

        <!-- test -->
        <dependency>
            <groupId>org.springframework.boot</groupId>
            <artifactId>spring-boot-starter-test</artifactId>
            <scope>test</scope>
        </dependency>

        <!-- mybatis-plus 代码生成器相关依赖 -->
        <dependency>
            <groupId>com.baomidou</groupId>
            <artifactId>mybatis-plus-generator</artifactId>
        </dependency>
        <!-- 添加 mybatis-plus 模板引擎 依赖 -->
        <dependency>
            <groupId>org.apache.velocity</groupId>
            <artifactId>velocity-engine-core</artifactId>
        </dependency>
    </dependencies>
</project>
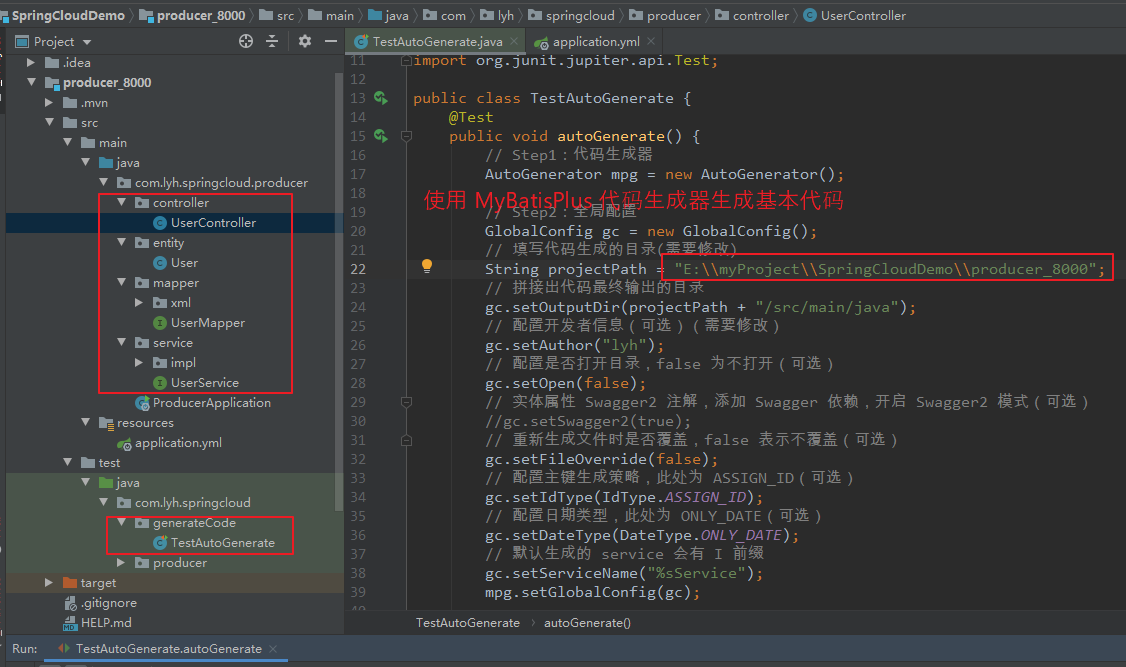
Step4:编写 producer_8000 所需基本代码。
配置 MySQL 数据源。
【配置 MySQL 数据源:】
server:
  port: 8000

spring:
  application:
    name: producer
  datasource:
    driver-class-name: com.mysql.cj.jdbc.Driver
    username: root
    password: 123456
    url: jdbc:mysql://120.26.184.41:3306/producer?useUnicode=true&characterEncoding=utf8

编写相关 bean、mapper、service、controller 等代码。
此处通过 mybatis-plus 代码生成器生成相关代码,也可以手动创建。
代码生成器相关操作详见:https://www.cnblogs.com/l-y-h/p/12859477.html#_label1_2
【TestAutoGenerate:】
package com.lyh.springcloud.generateCode;

import com.baomidou.mybatisplus.annotation.IdType;
import com.baomidou.mybatisplus.generator.AutoGenerator;
import com.baomidou.mybatisplus.generator.config.DataSourceConfig;
import com.baomidou.mybatisplus.generator.config.GlobalConfig;
import com.baomidou.mybatisplus.generator.config.PackageConfig;
import com.baomidou.mybatisplus.generator.config.StrategyConfig;
import com.baomidou.mybatisplus.generator.config.rules.DateType;
import com.baomidou.mybatisplus.generator.config.rules.NamingStrategy;
import org.junit.jupiter.api.Test;

public class TestAutoGenerate {
    @Test
    public void autoGenerate() {
        // Step1:代码生成器
        AutoGenerator mpg = new AutoGenerator();

        // Step2:全局配置
        GlobalConfig gc = new GlobalConfig();
        // 填写代码生成的目录(需要修改)
        String projectPath = "E:\myProject\SpringCloudDemo\producer_8000";
        // 拼接出代码最终输出的目录
        gc.setOutputDir(projectPath + "/src/main/java");
        // 配置开发者信息(可选)(需要修改)
        gc.setAuthor("lyh");
        // 配置是否打开目录,false 为不打开(可选)
        gc.setOpen(false);
        // 实体属性 Swagger2 注解,添加 Swagger 依赖,开启 Swagger2 模式(可选)
        //gc.setSwagger2(true);
        // 重新生成文件时是否覆盖,false 表示不覆盖(可选)
        gc.setFileOverride(false);
        // 配置主键生成策略,此处为 ASSIGN_ID(可选)
        gc.setIdType(IdType.ASSIGN_ID);
        // 配置日期类型,此处为 ONLY_DATE(可选)
        gc.setDateType(DateType.ONLY_DATE);
        // 默认生成的 service 会有 I 前缀
        gc.setServiceName("%sService");
        mpg.setGlobalConfig(gc);

        // Step3:数据源配置(需要修改)
        DataSourceConfig dsc = new DataSourceConfig();
        // 配置数据库 url 地址
        dsc.setUrl("jdbc:mysql://120.26.184.41:3306/producer?useUnicode=true&characterEncoding=utf8");
        // dsc.setSchemaName("testMyBatisPlus"); // 可以直接在 url 中指定数据库名
        // 配置数据库驱动
        dsc.setDriverName("com.mysql.cj.jdbc.Driver");
        // 配置数据库连接用户名
        dsc.setUsername("root");
        // 配置数据库连接密码
        dsc.setPassword("123456");
        mpg.setDataSource(dsc);

        // Step:4:包配置
        PackageConfig pc = new PackageConfig();
        // 配置父包名(需要修改)
        pc.setParent("com.lyh.springcloud");
        // 配置模块名(需要修改)
        pc.setModuleName("producer");
        // 配置 entity 包名
        pc.setEntity("entity");
        // 配置 mapper 包名
        pc.setMapper("mapper");
        // 配置 service 包名
        pc.setService("service");
        // 配置 controller 包名
        pc.setController("controller");
        mpg.setPackageInfo(pc);

        // Step5:策略配置(数据库表配置)
        StrategyConfig strategy = new StrategyConfig();
        // 指定表名(可以同时操作多个表,使用 , 隔开)(需要修改)
        strategy.setInclude("producer_user");
        // 配置数据表与实体类名之间映射的策略
        strategy.setNaming(NamingStrategy.underline_to_camel);
        // 配置数据表的字段与实体类的属性名之间映射的策略
        strategy.setColumnNaming(NamingStrategy.underline_to_camel);
        // 配置 lombok 模式
        strategy.setEntityLombokModel(true);
        // 配置 rest 风格的控制器(@RestController)
        strategy.setRestControllerStyle(true);
        // 配置驼峰转连字符
        strategy.setControllerMappingHyphenStyle(true);
        // 配置表前缀,生成实体时去除表前缀
        // 此处的表名为 test_mybatis_plus_user,模块名为 test_mybatis_plus,去除前缀后剩下为 user。
        strategy.setTablePrefix(pc.getModuleName() + "_");
        mpg.setStrategy(strategy);

        // Step6:执行代码生成操作
        mpg.execute();
    }
}
Step5:统一结果处理
为了统一返回的数据格式,自定义一个包装类,用于包装并返回数据。
详见:https://www.cnblogs.com/l-y-h/p/13083375.html#_label1_1
【Result】
package com.lyh.springcloud.producer.common.tools;

import lombok.Data;
import org.apache.http.HttpStatus;

import java.util.HashMap;
import java.util.Map;

/**
 * 统一结果返回类。方法采用链式调用的写法(即返回类本身 return this)。
 * 构造器私有,不允许进行实例化,但提供静态方法 ok、error 返回一个实例。
 * 静态方法说明:
 *      ok     返回一个 成功操作 的结果(实例对象)。
 *      error  返回一个 失败操作 的结果(实例对象)。
 *
 * 普通方法说明:
 *      success      用于自定义响应是否成功
 *      code         用于自定义响应状态码
 *      message      用于自定义响应消息
 *      data         用于自定义响应数据
 *
 * 依赖信息说明:
 *      此处使用 @Data 注解,需导入 lombok 相关依赖文件。
 *      使用 HttpStatus 的常量表示 响应状态码,需导入 httpcore 相关依赖文件。
 */
@Data
public class Result {
    /**
     * 响应是否成功,true 为成功,false 为失败
     */
    private Boolean success;

    /**
     * 响应状态码, 200 成功,500 系统异常
     */
    private Integer code;

    /**
     * 响应消息
     */
    private String message;

    /**
     * 响应数据
     */
    private Map<String, Object> data = new HashMap<>();

    /**
     * 默认私有构造器
     */
    private Result(){}

    /**
     * 私有自定义构造器
     * @param success 响应是否成功
     * @param code 响应状态码
     * @param message 响应消息
     */
    private Result(Boolean success, Integer code, String message){
        this.success = success;
        this.code = code;
        this.message = message;
    }

    /**
     * 返回一个默认的 成功操作 的结果,默认响应状态码 200
     * @return 成功操作的实例对象
     */
    public static Result ok() {
        return new Result(true, HttpStatus.SC_OK, "success");
    }

    /**
     * 返回一个自定义 成功操作 的结果
     * @param success 响应是否成功
     * @param code 响应状态码
     * @param message 响应消息
     * @return 成功操作的实例对象
     */
    public static Result ok(Boolean success, Integer code, String message) {
        return new Result(success, code, message);
    }

    /**
     * 返回一个默认的 失败操作 的结果,默认响应状态码为 500
     * @return 失败操作的实例对象
     */
    public static Result error() {
        return new Result(false, HttpStatus.SC_INTERNAL_SERVER_ERROR, "error");
    }

    /**
     * 返回一个自定义 失败操作 的结果
     * @param success 响应是否成功
     * @param code 响应状态码
     * @param message 相应消息
     * @return 失败操作的实例对象
     */
    public static Result error(Boolean success, Integer code, String message) {
        return new Result(success, code, message);
    }

    /**
     * 自定义响应是否成功
     * @param success 响应是否成功
     * @return 当前实例对象
     */
    public Result success(Boolean success) {
        this.setSuccess(success);
        return this;
    }

    /**
     * 自定义响应状态码
     * @param code 响应状态码
     * @return 当前实例对象
     */
    public Result code(Integer code) {
        this.setCode(code);
        return this;
    }

    /**
     * 自定义响应消息
     * @param message 响应消息
     * @return 当前实例对象
     */
    public Result message(String message) {
        this.setMessage(message);
        return this;
    }

    /**
     * 自定义响应数据,一次设置一个 map 集合
     * @param map 响应数据
     * @return 当前实例对象
     */
    public Result data(Map<String, Object> map) {
        this.data.putAll(map);
        return this;
    }

    /**
     * 通用设置响应数据,一次设置一个 key - value 键值对
     * @param key 键
     * @param value 数据
     * @return 当前实例对象
     */
    public Result data(String key, Object value) {
        this.data.put(key, value);
        return this;
    }
}

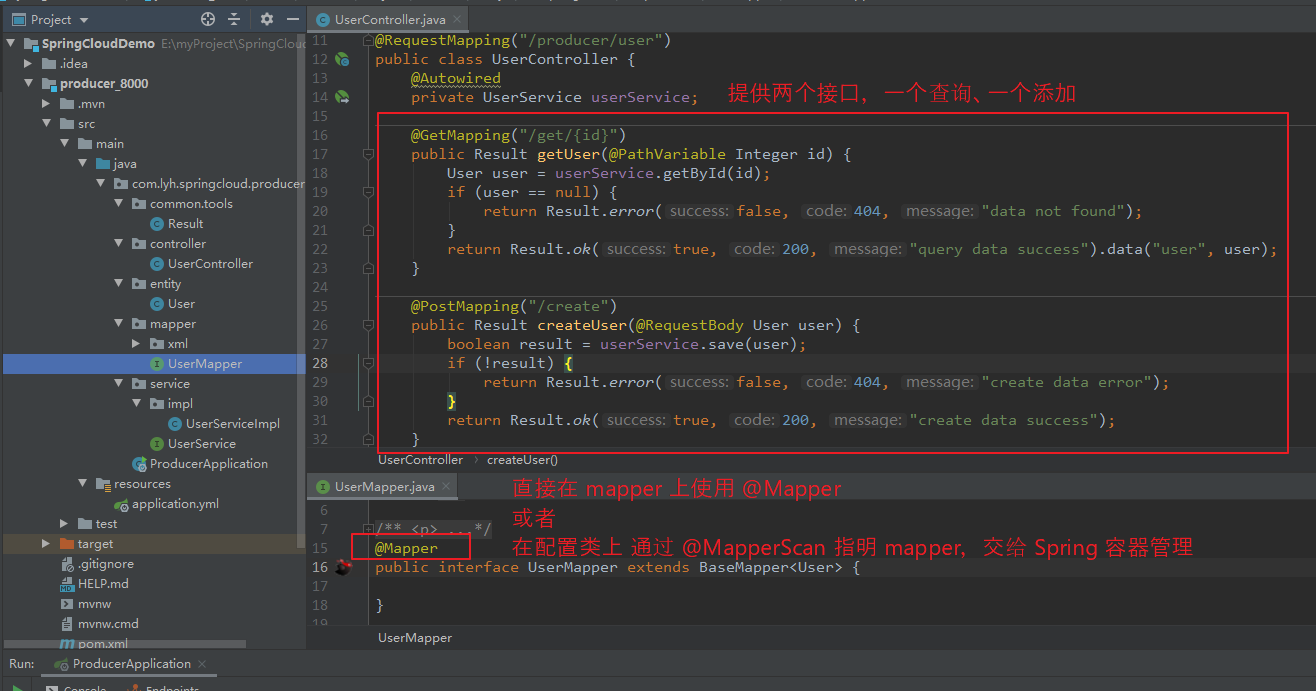
Step6:编写两个接口,也即 生产者 对外提供的功能。
此处定义一个 查询接口(根据 id 返回数据),一个添加接口(向数据库中添加数据)。
使用代码生成器生成的 UserService 中实现了 IService 接口,其内部定义了许多方法,此处可以直接使用,而不用 通过 xml 编写 SQL 语句。
注:
想要使用 MyBatisPlus,不要忘记使用 @Mapper 或者 @MapperScan 指定 mapper 的位置。
【controller:】
package com.lyh.springcloud.producer.controller;


import com.lyh.springcloud.producer.common.tools.Result;
import com.lyh.springcloud.producer.entity.User;
import com.lyh.springcloud.producer.service.UserService;
import org.springframework.beans.factory.annotation.Autowired;
import org.springframework.web.bind.annotation.*;

@RestController
@RequestMapping("/producer/user")
public class UserController {
    @Autowired
    private UserService userService;

    @GetMapping("/get/{id}")
    public Result getUser(@PathVariable Integer id) {
        User user = userService.getById(id);
        if (user == null) {
            return Result.error(false, 404, "data not found");
        }
        return Result.ok(true, 200, "query data success").data("user", user);
    }

    @PostMapping("/create")
    public Result createUser(@RequestBody User user) {
        boolean result = userService.save(user);
        if (!result) {
            return Result.error(false, 404, "create data error");
        }
        return Result.ok(true, 200, "create data success");
    }
}
此处暂时使用 postman 测试一下两个接口的功能,也可以 整合 Swagger 进行测试。
SpringBoot 整合 Swagger 可以参考:https://www.cnblogs.com/l-y-h/p/13083375.html#_label2_0

通过上面操作,producer 已经能基本调通了(细节并没有过多处理),能够对外提供服务了。
接下来就是对 consumer 进行操作了(创建流程与 producer 类似)。
Step7:创建 SpringBoot 子模块(consumer_9000)。
修改子模块配置文件(端口号为 9000、服务名为 consumer)。
修改子模块 pom.xml 中 <parent> 标签,指向父工程。
修改父工程 pom.xml 中 <module> 标签,指向子模块。
注意:
consumer 也属于 web 工程,所以得添加 web 相关依赖。
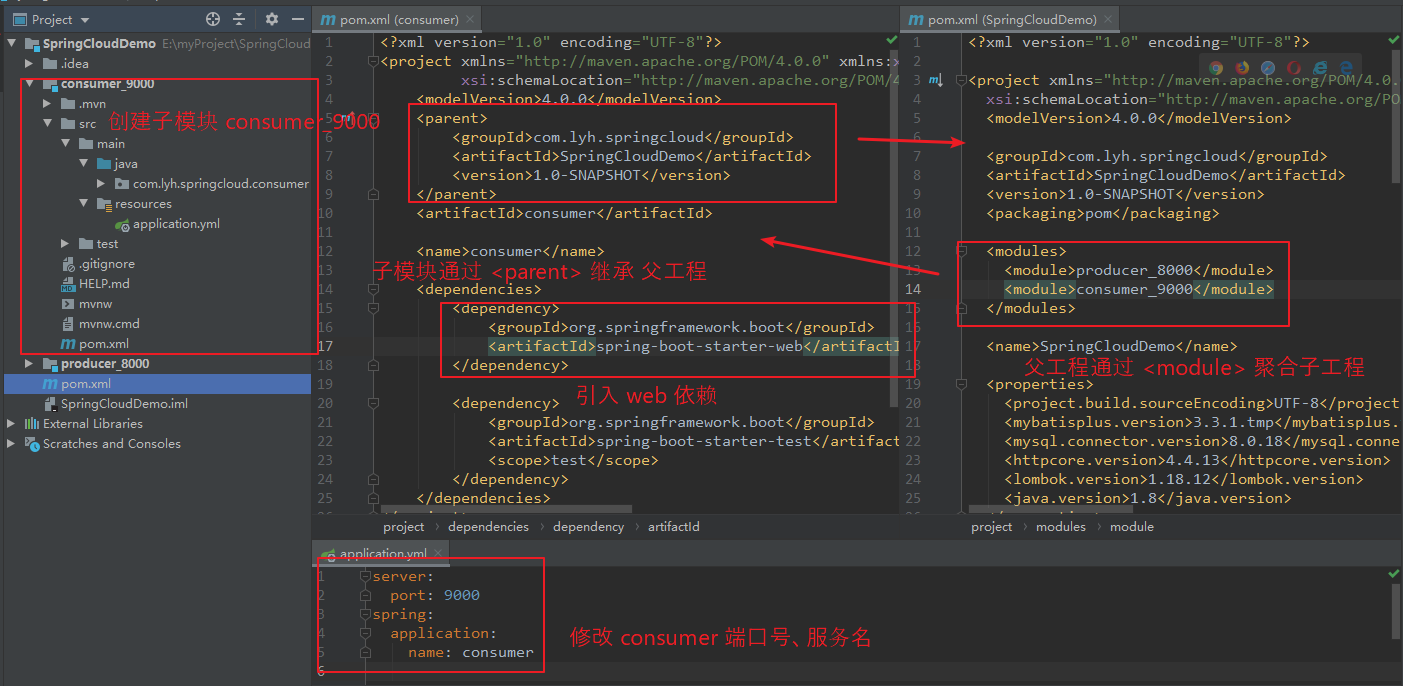
Step8:编写 consumer 基本代码。
由于 consumer 只用于访问 producer 的服务,所以只需编写 controller 代码即可。
此处通过 RestTemplate 进行远程调用(见下一小节)。
3、使用 RestTemplate 进行远程调用
(1)什么是 RestTemplate?
【RestTemplate:】
    RestTemplate 是 Spring 提供的用于访问 Rest 服务的客户端模板工具集,提供一种简单、便捷的模板类 来访问 restful 服务。

简单的理解:
    RestTemplate 提供了多种 简单便捷的 访问远程 Http 服务的方法。
注:
    需要引入 Spring-web 依赖。

【文档地址:(Spring 5.2.8)】
    https://docs.spring.io/spring-framework/docs/5.2.8.RELEASE/javadoc-api/org/springframework/web/client/RestTemplate.html
(2)RestTemplate 常用方法
【发送 POST 请求:】
    postForObject(URI url, Object args, Class<T> class)
注:
    url 指的是 远程调用 地址,即 需要访问的接口的 请求地址。
    args 指的是 请求参数。
    class 指的是 HTTP 响应结果 被转换的 对象类型(即 对返回结果进行 包装)。

【发送 GET 请求:】
    getForObject(String url, Class<T> class)
注:
    参数同上。
(3)使用 RestTemplate?
Step1:先得声明一下 RestTemplate(在配置类中通过 @Bean 创建并交给 Spring 容器管理)
【ApplicationConfig】
package com.lyh.springcloud.consumer.config;

import org.springframework.context.annotation.Bean;
import org.springframework.context.annotation.Configuration;
import org.springframework.web.client.RestTemplate;

@Configuration
public class ApplicationConfig {

    @Bean
    public RestTemplate getRestTemplate() {
        return new RestTemplate();
    }
}
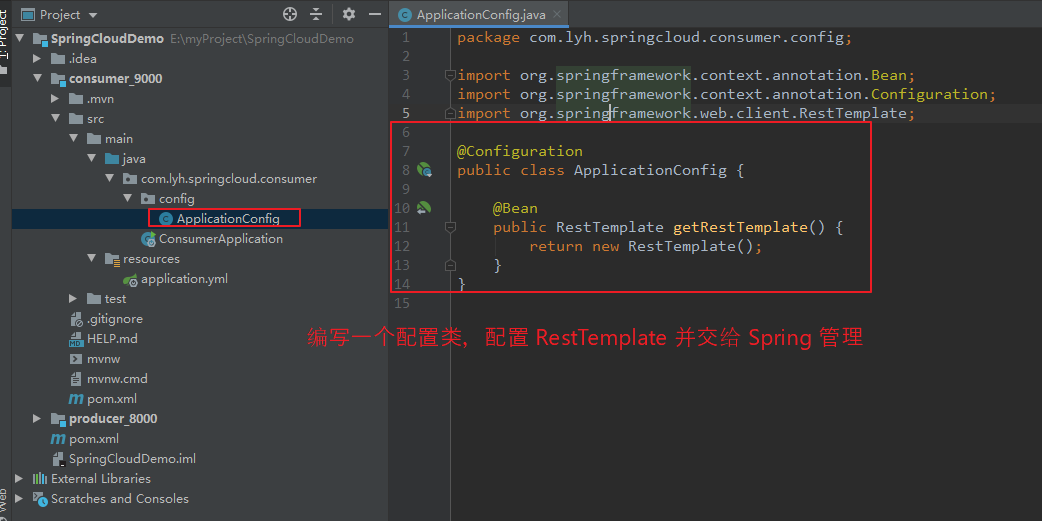
Step2:编写相关代码。
由于 consumer 调用 Producer 服务,且为了 返回结果的统一,所以在 consumer 中还需要引入 Result 以及 User 两个类 以及 这两个类所需的依赖。
【ConsumerController】
package com.lyh.springcloud.consumer.controller;

import com.lyh.springcloud.consumer.entity.User;
import com.lyh.springcloud.consumer.tools.Result;
import org.springframework.beans.factory.annotation.Autowired;
import org.springframework.web.bind.annotation.*;
import org.springframework.web.client.RestTemplate;

@RestController
@RequestMapping("/consumer/user")
public class ConsumerController {

    // 注意,此处 url 写死的,仅用于演示,实际项目中不能这么干。
    public static final String PRODUCER_URL = "http://localhost:8000/producer/";

    @Autowired
    private RestTemplate restTemplate;

    @GetMapping("/get/{id}")
    public Result getUser(@PathVariable Integer id) {
        return restTemplate.getForObject(PRODUCER_URL + "/user/get/" + id, Result.class);
    }

    @PostMapping("/create")
    public Result createUser(@RequestBody User user) {
        return restTemplate.postForObject(PRODUCER_URL + "/user/create", user, Result.class);
    }
}
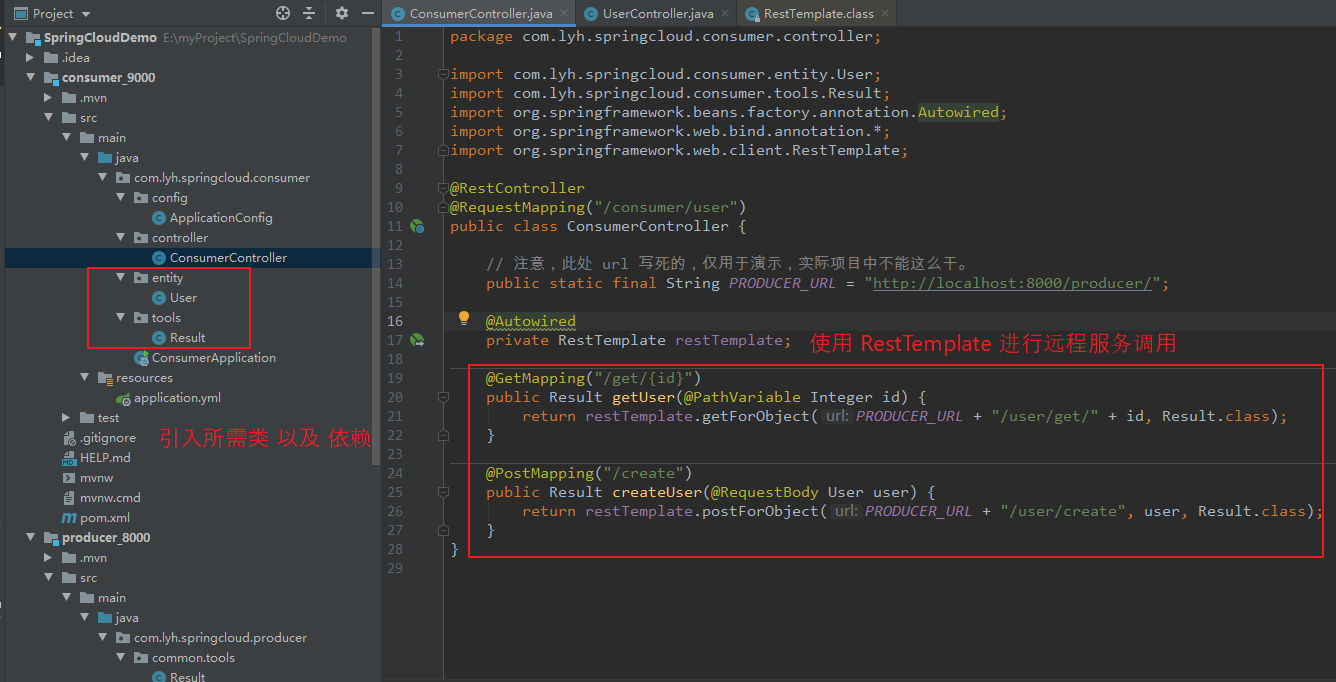
Step3:使用 postman 测试一下。
producer 端口号为 8000,consumer 端口号为 9000,

【访问流程举例:】
    通过 POST 请求 访问地址 http://localhost:9000/consumer/user/create,
    经过 consumer 内部转换,会通过 RestTemplate 访问 http://localhost:8000/producer/user/create 。

4、热部署、IDEA 开启 Run Dashboard 窗口(提高开发效率)
(1)热部署
详见:https://www.cnblogs.com/l-y-h/p/13083375.html#_label2_3
(2)IDEA 开启 Run Dashboard 窗口
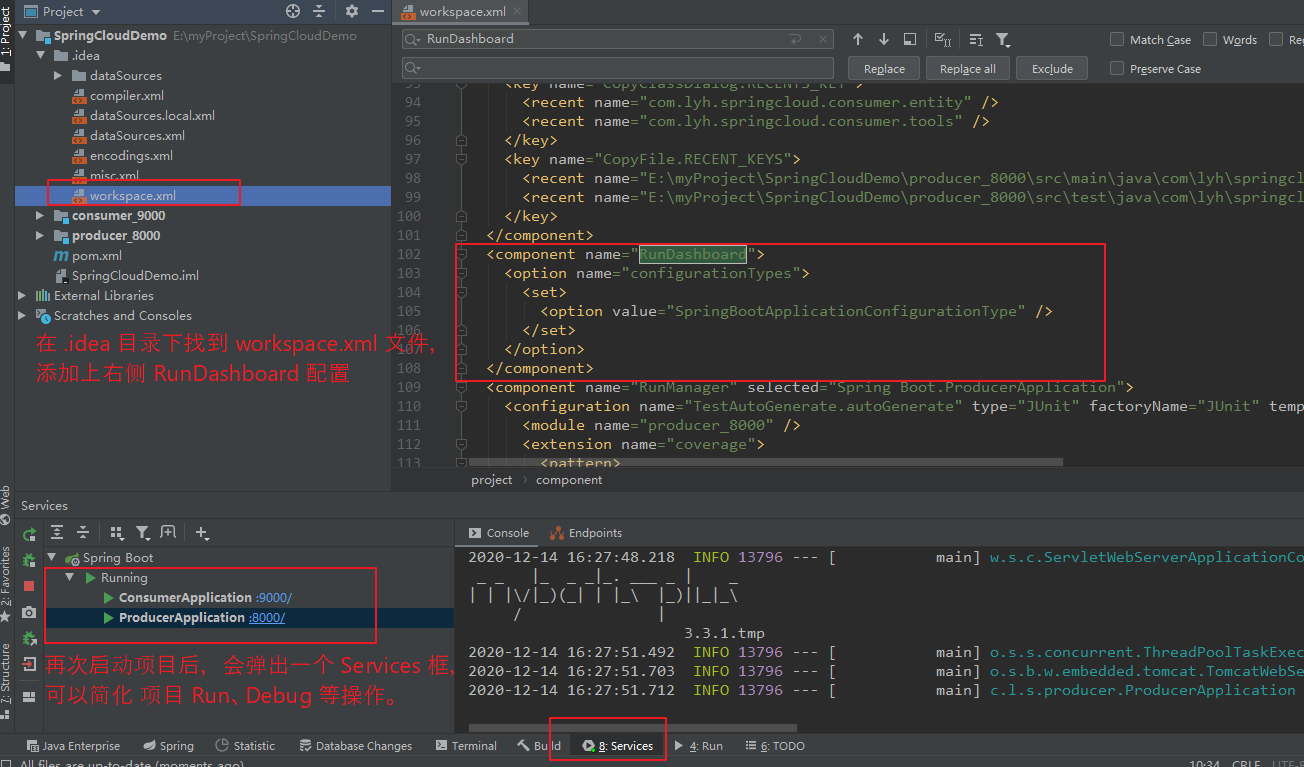
一般项目启动后,可以在 run 窗口中看到 项目情况,但项目启动的越多,关闭、停止等控制就很麻烦,可以通过开启 Run Dashboard 窗口,简化项目 Run、Debug 等操作。
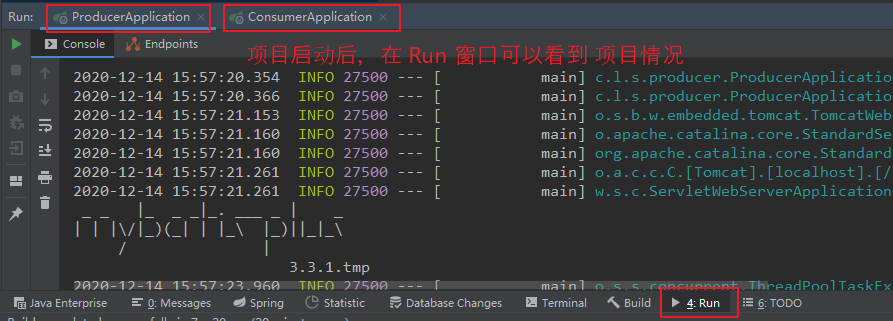
在项目目录下找到 .idea 文件夹,打开 workspace.xml 文件,并添加如下配置,然后启动项目即可。
<component name="RunDashboard">
  <option name="configurationTypes">
    <set>
      <option value="SpringBootApplicationConfigurationType" />
    </set>
  </option>
</component>
5、项目优化(提取能复用的公共代码)
(1)相关代码
上面演示的相关代码可以在 GitHub 中获取到。
【git 地址:】
    https://github.com/lyh-man/SpringCloudDemo.git
(2)抽取公共代码,使其变成一个公共模块
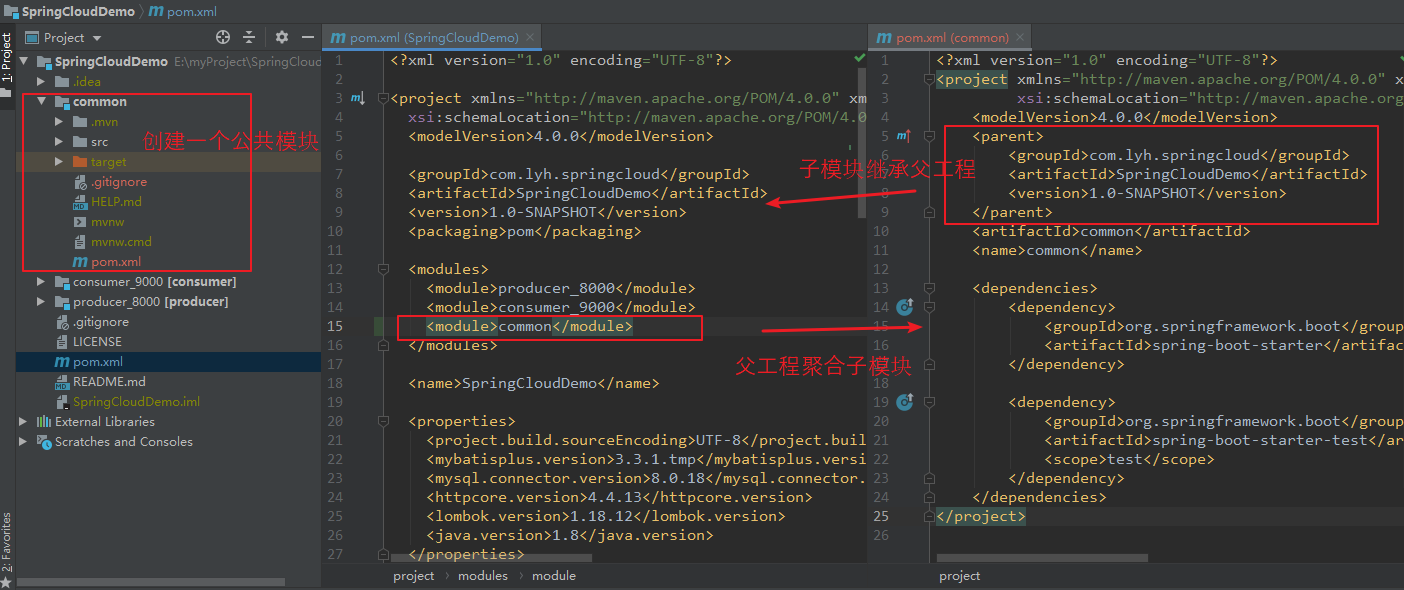
通过上面两个模块的编写,可以发现 会出现相同的 代码,比如:Result、User。若模块过多时,每个模块都写一遍这些代码,则代码冗余。若代码需要修改时,还得一个一个模块进行修改,增加了不必要的工作量。
可以将这些相同代码抽取出来,形成一个 公共模块,此时只需要引入这个公共模块即可。修改代码时,只需要针对 公共模块 进行修改、添加即可。
Step1:创建一个子模块 common。
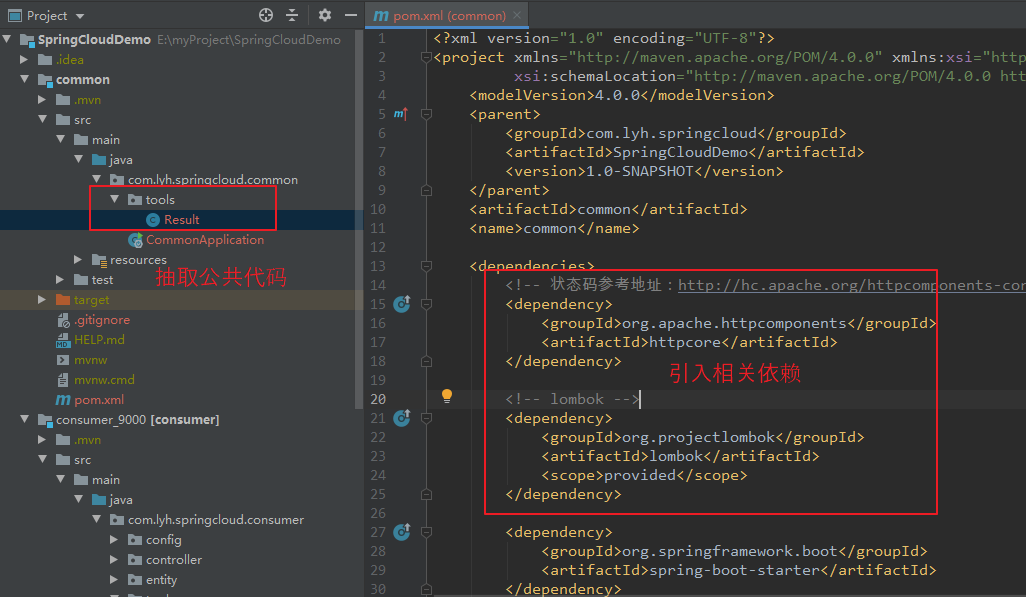
Step2:抽取 其他子模块 公共代码 放入 公共模块 中(比如:Result)。相关依赖也需要引入。
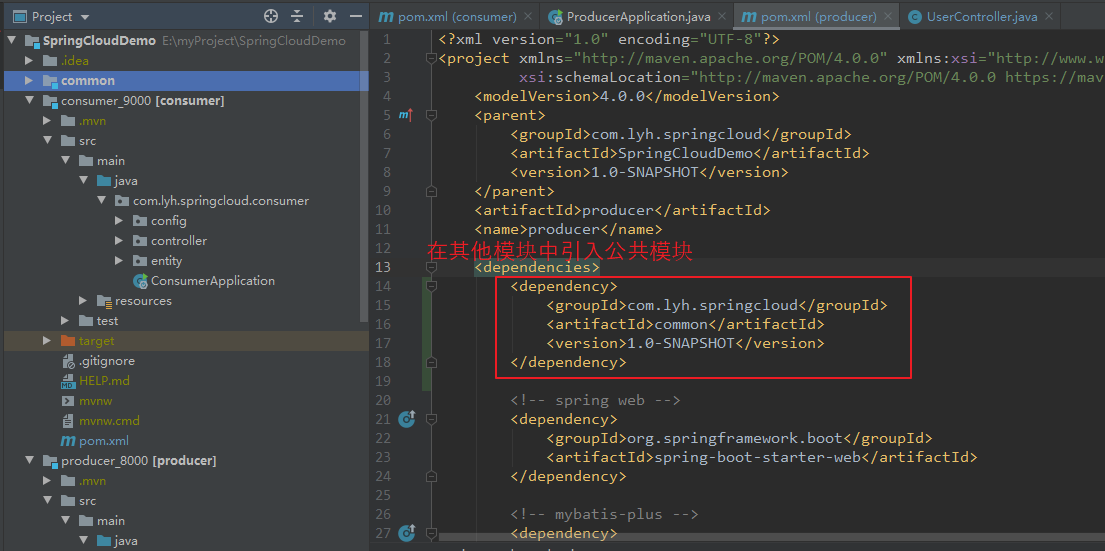
Step3:剔除 其他子模块 中的公共代码,并在 pom.xml 文件中引入 公共模块。
若启动报错,先 mvn install 执行一下 common 模块。
通过上面一系列步骤,已经简单的搭建了一个项目。现在就是考虑 微服务 的问题了,逐步引入 微服务 的各种技术 来解决问题。
二、引入服务注册 与 发现
1、问题 与 解决
【问题:】
    首先要解决的就是 服务 注册 与 发现的问题。
    现在项目中存在 两个模块 consumer_9000 与 producer_8000,实际工作环境中,这两个模块 一般都是以 集群 方式进行部署。
比如:
    consumer_9000、consumer_9001、consumer_9002 构成集群来提供 消费者服务。
    producer_8000、producer_8001、producer_8002 构成集群来提供 生产者服务。

    那么如何去管理这些服务?集群的各服务之间通信怎么处理?这些服务挂掉了怎么办?哪些服务可用 与 不可用? ... 一系列问题

    由于 服务与服务 之间依赖关系复杂、管理难度大,所以提出 服务注册与发现 的概念。

【常见服务注册与发现的 技术实现:】
    Eureka     停止维护了,不推荐使用。
    ZooKeeper
    Consul
    Nacos      阿里开源的产品,功能还是很强悍的,推荐使用

【服务注册与发现:】
    服务注册与发现,顾名思义,就是 服务如何注册,以及 服务如何发现。
服务注册:
    存在一个注册中心,当服务启动时,会将当前服务 的元数据信息 以别名的方式 注册到 注册中心中(比如:主机号、端口号等),使用心跳检测的方式判断当前服务是否可用、剔除。
服务发现:
    获取服务时,会向注册中心查询服务别名,用来获取真实服务信息(主机、端口号),再通过 远程调用 的方式访问真实服务。
2、CAP 原则、BASE 理论
(1)什么是 CAP?
【CAP:】
    CAP 原则指的是一个分布式系统中,无法同时满足 C、A、P 三点,最多只能满足两点(AP、CP、AC)。

【C(Consistency 一致性)】
    指的是 数据的一致性,即执行某个操作后,保证所有节点上的数据 同步更新。
比如:
    分布式系统中,某个服务执行了更新数据的操作后,那么所有取得该数据的用户 应该获取的是 最新的值。即所有节点访问 同一份最新的数据副本。

【A(Availability 可用性)】
    指的是 服务的高可用性。即一个操作能在一定的时间内返回结果(不管结果是成功还是失败)。
比如:
    分布式系统中,某个服务挂掉了(宕机),系统整体 应保证 还能正常运行、响应请求(不会整体崩溃)。

【P(Partition tolerance 分区容错性)】
    指的是 网络分区 情况下,仍能正常对外提供服务。
比如:
    分布式系统中,各个节点组成的网络应该是连通的,
    若因 软件、硬件 故障导致 某些节点之间不连通了,即 网络分为几个区域(网络分区)。
    此时节点服务没有挂掉(宕机),但是不能正常通信,系统整体 应保证 还能正常运行、响应请求。

分区容错:
    网络分区出现时,数据分布在 这些不连通的区域中,即 节点之间不能相互通信、数据不能同步。
    而容错解决的问题 就是 即使两个节点不能通信,仍要对外提供服务,不能因为分区而使整个系统瘫痪。
(2)CAP 选择
【CAP 选择:】
    在分布式系统中,分区是不可避免的。
    提高分区容错性的方式一般为 服务部署在多个节点上(即 数据放置在多个节点上),当一个节点断开后,可以从其他节点获取到数据,保证系统正常运行。

    但是一个服务存在多个节点后,多个节点之间的数据 为了保证数据一致,就会带来 数据一致性问题(C)。

    要保证数据一致性,则 每次操作数据后 均得等待 所有数据同步一致后 才能正常返回结果,
    而在 数据同步的过程中,节点之间可能出现 网络阻塞、故障等 导致响应超时(服务调用失败),这又带来了 可用性问题(A)。

    若要保证 可用性,即 不管数据是否同步成功,直接返回结果,那就有可能导致 多个节点之间数据不一致,即 数据一致性问题。

    当然若一定要保证 数据一致性,可以不做分区(每个服务都是单节点),此时也不用担心数据同步问题(可用性也解决了),但服务一旦挂了,系统就崩溃了(容错性低),不适用于 高可用的分布式系统。

综上所述:
    分布式系统中,服务部署节点越多,分区容错性越高,但数据同步操作也就更复杂、耗时(一致性难保证)。
    若想保证一致性,就需要牺牲可用性。
    若想保证可用性,就需要牺牲一致性(只是牺牲强一致性,数据最终还是一致的)。

【CAP 组合方式:】
    CAP 组合方式有 AP、CP、CA。
    CA 不适用于 分布式系统。
    AP 常见组件:Eureka。
    CP 常见组件:Zookeeper、Consul。
    Nacos 可以实现 AP 与 CP 的切换。
(3)BASE 理论
【BASE 理论:】
    BASE 理论基于 CAP 演变而来,权衡 A 与 C 对系统的影响(理解为对 AP 的补充),对系统要求降低。
    在无法做到 强一致性 的情况下,应该使系统基本可用、数据最终一致。
    BASE 是 BA、S、E 缩写。

【BA(Basically Available 基本可用):】
    指的是  系统 发生不可预知的故障时,允许损失部分可用性,但是系统整体是可用的。
注:
    损失部分可用性(举例:)
        时间上的损失:正常情况下,系统处理请求可能需要 0.5 秒,但由于系统故障,可能需要 3 秒才能处理完请求,保证请求能正常处理完成。
        非系统核心功能的损失:正常情况下,用户可以访问系统所有功能,但是访问量突然变大时,可以减少非核心功能的使用 保证 核心功能的正常运行。

【S(Soft state 软状态):】
    指的是 允许系统中数据存在中间状态(各节点间的数据不一致),但数据中间状态不会影响到系统的整体可用性。
    即允许节点之间 数据同步 可以存在 延时的过程。

【E(Eventually consistent 最终一致性):】
    指的是 系统各节点经过一段时间 数据同步后,最终的数据都是一致的。
注:
    强一致性:某个节点执行写操作后,则各个节点执行 读操作 读取的结果都是一致的、且是最新的数据。
    弱一致性:读操作执行后,读取的 不一定是 最新的数据。
    最终一致性:系统在一定时间内 肯定会 达到数据一致的状态。
三、服务注册与发现 -- Eureka
1、什么是 Eureka ?
Eureka 是 NetFlix 公司开发的 实现服务注册与发现的 技术框架,遵循 AP 原则。
SpringCloud 已将其集成到 spring-cloud-netflix 中,实现 SpringCloud 的服务注册与发现。
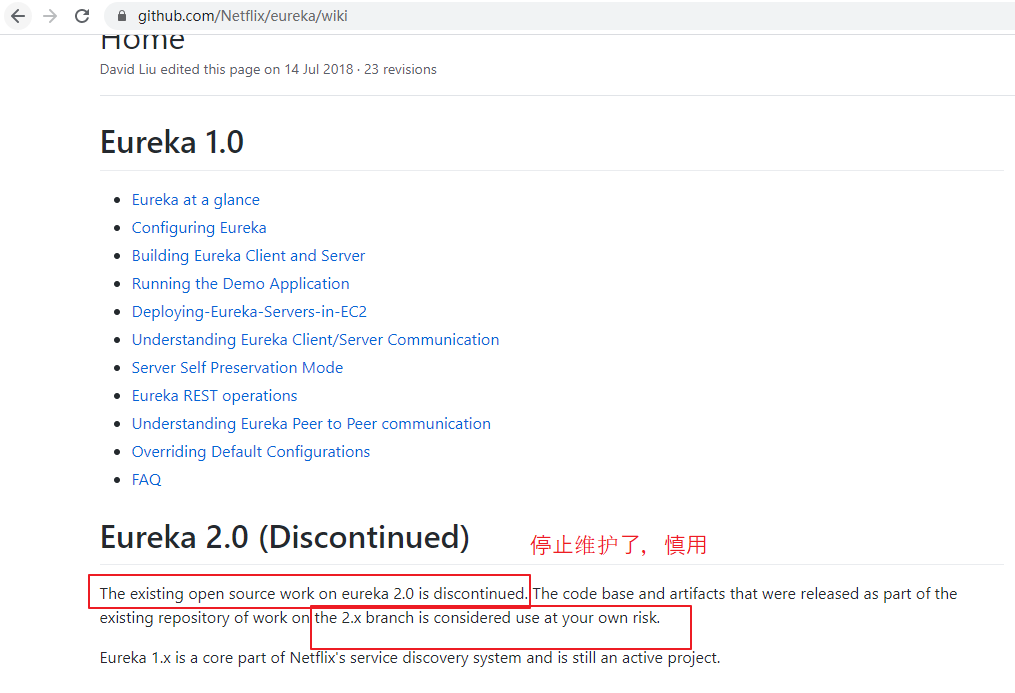
官方已经停止维护 Eureka,虽然不推荐使用,但还是可以学习一下基本思想、以及使用。
【官方文档:】
    https://github.com/Netflix/eureka/wiki
(2)Eureka Server、Eureka Client。
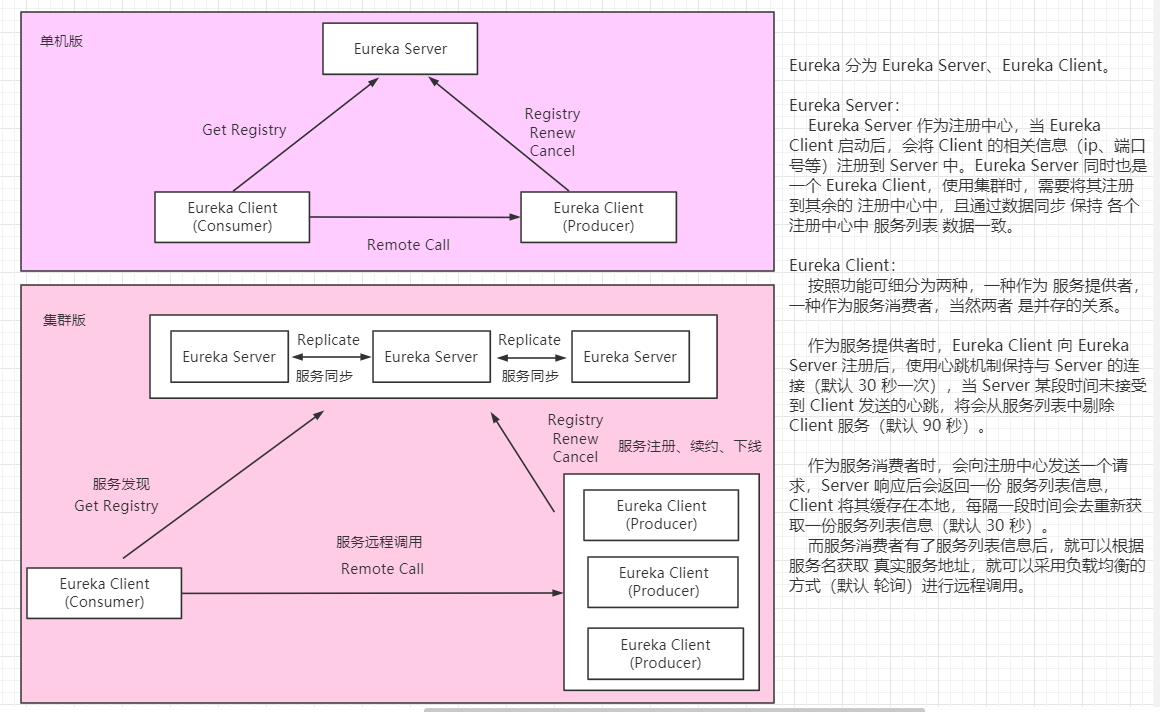
Eureka 采用 C/S 架构设计,分为 Eureka Server、Eureka Client。
【Eureka Server:】
    Eureka Server 作为服务注册的服务器(即 注册中心),当服务启动后,会在注册中心注册。
    也即通过 Eureka Server 中的服务注册表 可以知道所有可用的 服务节点信息。
注:
    Eureka Server 本身也是一个服务,默认会自动注册进 注册中心。
    若是单机版的 Eureka Server,一般取消自动注册自身的逻辑(自己注册自己,没啥意义)。

【Eureka Client:】
    Eureka Client 作为客户端,简化与 Eureka Server 的交互,拥有一个内置的、轮询的负载均衡器(提供基本的负载均衡)。
    Eureka Client 既可以作为 服务提供者,又可以是 服务的消费者。
    作为服务提供者时,服务启动后,会在 Eureka Server 注册中心进行注册。
    作为服务消费者时,即 调用服务提供者提供的服务,会从注册中心 获取到 服务提供者的真实地址,将地址缓存在本地,向 Eureka Server 发送心跳(默认周期 30s)。
    如果 Eureka Server 在多个心跳周期内没有接收到某个节点的心跳(默认 90s),Eureka Server 将会从注册中心中移除 该服务节点。
(3)Eureka 1.x 与 2.x 的依赖区别
【Eureka 1.x】
    Eureka Server 与 Eureka Client 引用的是同一个依赖。
如下:
<dependency>
    <groupId>org.springframework.cloud</groupId>
    <artifactId>spring-cloud-starter-eureka</artifactId>
    <version>1.4.7.RELEASE</version>
</dependency>

【Eureka 2.x】
    Eureka Server 与 Eureka Client 引用的是不同的依赖。
如下:
<dependency>
    <groupId>org.springframework.cloud</groupId>
    <artifactId>spring-cloud-starter-netflix-eureka-server</artifactId>
    <version>2.2.6.RELEASE</version>
</dependency>

<dependency>
    <groupId>org.springframework.cloud</groupId>
    <artifactId>spring-cloud-starter-netflix-eureka-client</artifactId>
    <version>2.2.6.RELEASE</version>
</dependency>
(4)Eureka 常用配置参数
【前缀为 eureka.instance 的参数:】
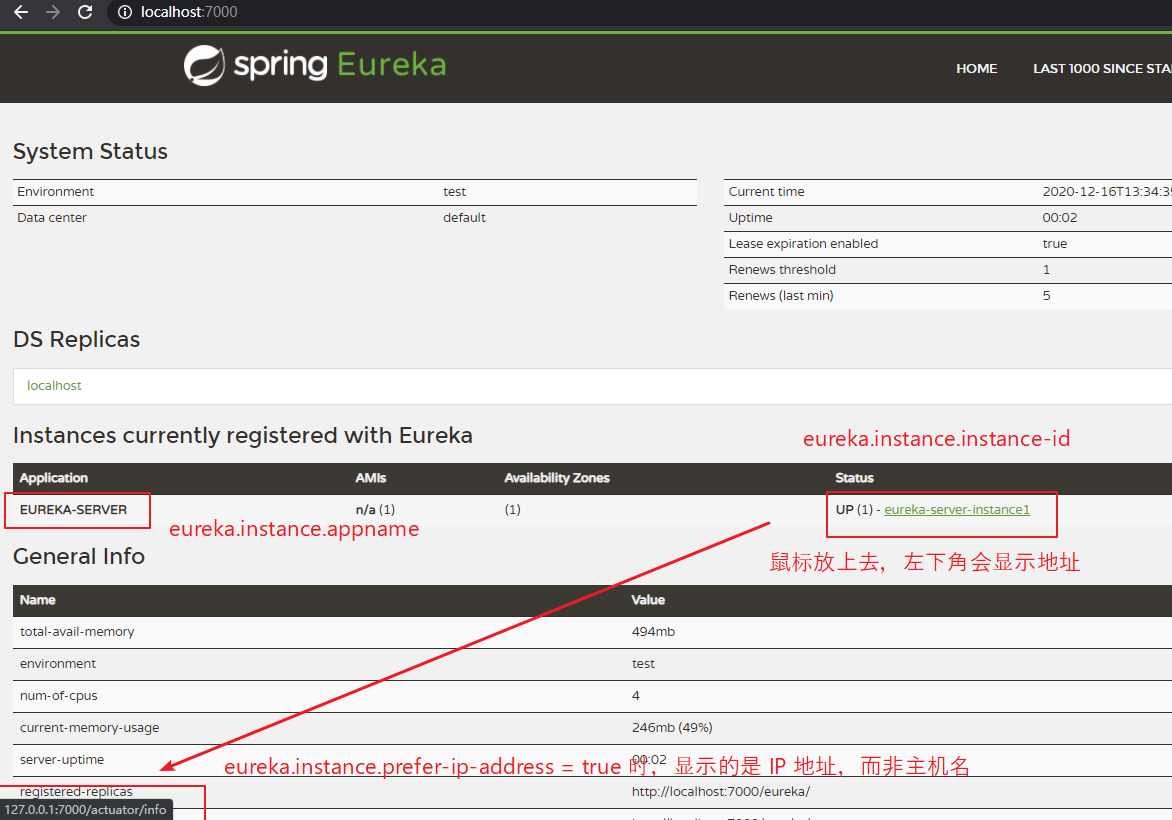
hostname:
    即 eureka.instance.hostname
    配置当前实例的主机名。

appname:
    即 eureka.instance.appname
    设置服务端实例名称,优先级高于 spring.application.name。
注:
    服务名 不要 使用下划线 _ 作为连接符,可以使用 - 作为连接符。

instance-id:
    即 eureka.instance.instance-id
    设置当前实例 ID。

lease-expiration-duration-in-seconds:
    即 eureka.instance.lease-expiration-duration-in-seconds
    设置服务失效时间,默认 90 秒

lease-renewal-interval-in-seconds:
    即 eureka.instance.lease-renewal-interval-in-seconds
    设置心跳时间,默认 30 秒

ip-address:
    即 eureka.instance.ip-address
    设置当前实例 IP 地址。

prefer-ip-address:
    即 eureka.instance.prefer-ip-address
    默认为 false,设置为 true 时,则显示在注册中心的 是 IP 地址 而非 主机名。

【前缀为 eureka.server 的参数:】
enable-self-preservation:
    即 eureka.server.enable-self-preservation
    默认为 true,设置 false 表示关闭自我保护模式(Eureka Server 短时间内丢失客户端时,自我保护模式 使 Server 不删除失去连接的客户端)

eviction-interval-timer-in-ms:
    即 eureka.server.eviction-interval-timer-in-ms
    设置 Eureka Server 清理无效节点的时间间隔,单位:毫秒,默认为 60000 毫秒。

【前缀为 eureka.client 的参数:】
register-with-eureka:
    即 eureka.client.register-with-eureka
    默认为 true,设置 false 表示不向注册中心注册自己(Eureka Server 一般设置为 false)。

fetch-registry:
    即 eureka.client.fetch-registry
    默认为 true,设置 false 表示不去注册中心 获取 注册信息(Eureka Server 一般设置为 false)。

service-url.defaultZone:
    即 eureka.client.service-url.defaultZone
    设置 Eureka 服务器地址,类型为 HashMap,默认为:serviceUrl.put("defaultZone", "http://localhost:8761/eureka/");
2、Eureka 使用 -- 单机版
(1)基本说明
【基本说明:】
    Eureka 使用 分为 server 与 client。
    首先需要创建一个 Eureka Server 模块(eureka_server_7000),作为 服务注册中心。
    前面创建的两个模块 consumer_9000、producer_8000 可以作为 Eureka Client 模块。
注:
    producer_8000 作为 服务提供者,向 Eureka Server 中注册。
    consumer_9000 作为 服务消费者,从 Eureka Server 中发现服务。
    创建与 consumer_9000 一样的 eureka_client_consumer_9001 作为服务消费者进行演示。
    创建与 producer_8000 一样的 eureka_client_producer_8001 作为服务提供者进行演示。

    单机版没使用价值,主要是为了由浅入深,为后面的集群版做铺垫。
也即:
    单机版需要创建三个子工程。
        eureka_server_7000                作为服务注册中心
        eureka_client_producer_8001       作为服务提供者(提供服务)
        eureka_client_consumer_9001       作为服务消费者(调用服务)

    eureka_client_producer_8001 与 eureka_client_consumer_9001 都会注册进 eureka_server_7000。
    eureka_client_consumer_9001 通过 eureka_client_producer_8001 配置的服务名,在 eureka_server_7000 注册中心中找到 eureka_client_producer_8001 真实地址。
    然后再通过 RestTemplate 远程调用该地址,从而完成 服务之间的交互。

(2)创建一个 Eureka Server 子模块(eureka_server_7000)
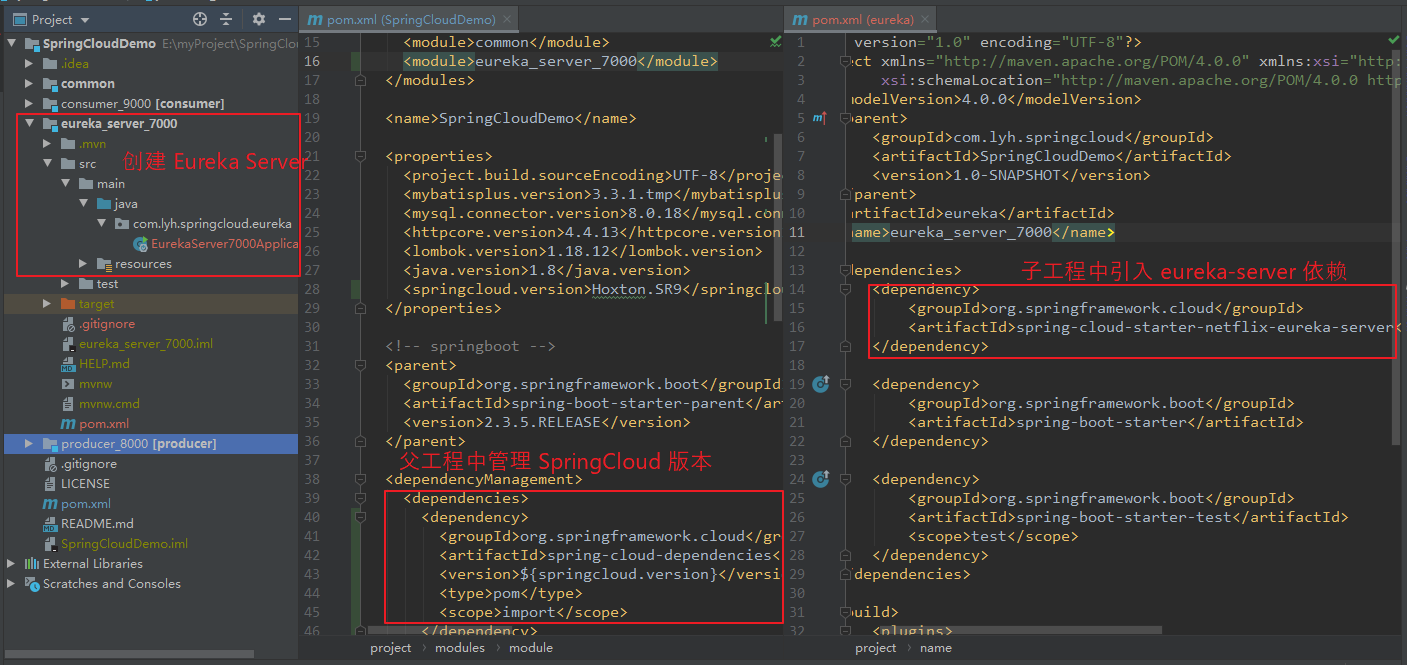
创建一个 Eureka Server 子模块 eureka_server_7000,作为服务注册中心。
Step1:引入 Eureka Servers 依赖
在父工程中管理 springcloud 版本。
在子模块中引入 eureka-server 依赖。
【父工程管理 springcloud 版本:】
<properties>
  <springcloud.version>Hoxton.SR9</springcloud.version>
</properties>

<dependencyManagement>
  <dependencies>
    <dependency>
      <groupId>org.springframework.cloud</groupId>
      <artifactId>spring-cloud-dependencies</artifactId>
      <version>${springcloud.version}</version>
      <type>pom</type>
      <scope>import</scope>
    </dependency>
  </dependencies>
</dependencyManagement>

【子工程引入 eureka-server 依赖】
<dependency>
    <groupId>org.springframework.cloud</groupId>
    <artifactId>spring-cloud-starter-netflix-eureka-server</artifactId>
</dependency>
Step2:配置 Eureka Server
编写 Eureka Server 配置文件。
【application.yml】
server:
  port: 7000

eureka:
  instance:
    hostname: localhost
    appname: Eureka-Server # 设置服务端实例名称,优先级高于 spring.application.name
    instance-id: eureka-server-instance1 # 设置实例 ID
  client:
    register-with-eureka: false # 默认为 true,设置 false 表示不向注册中心注册自己
    fetch-registry: false # 默认为 true,设置 false 表示不去注册中心 获取 注册信息
    # 设置 Eureka 服务器地址,类型为 HashMap,默认为:serviceUrl.put("defaultZone", "http://localhost:8761/eureka/");
    service-url:
      defaultZone: http://${eureka.instance.hostname}:${server.port}/eureka

Step3:启动 Eureka Server 服务
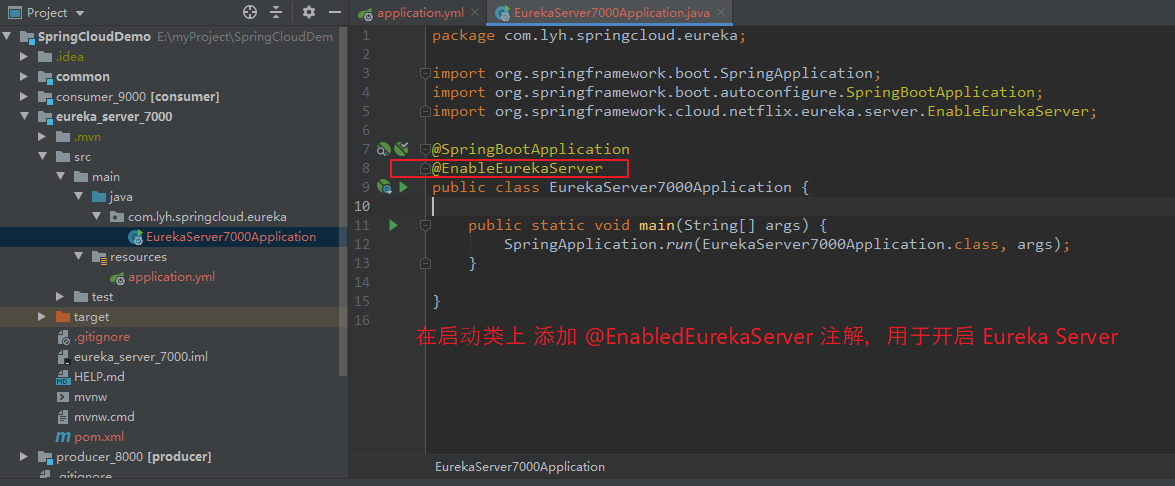
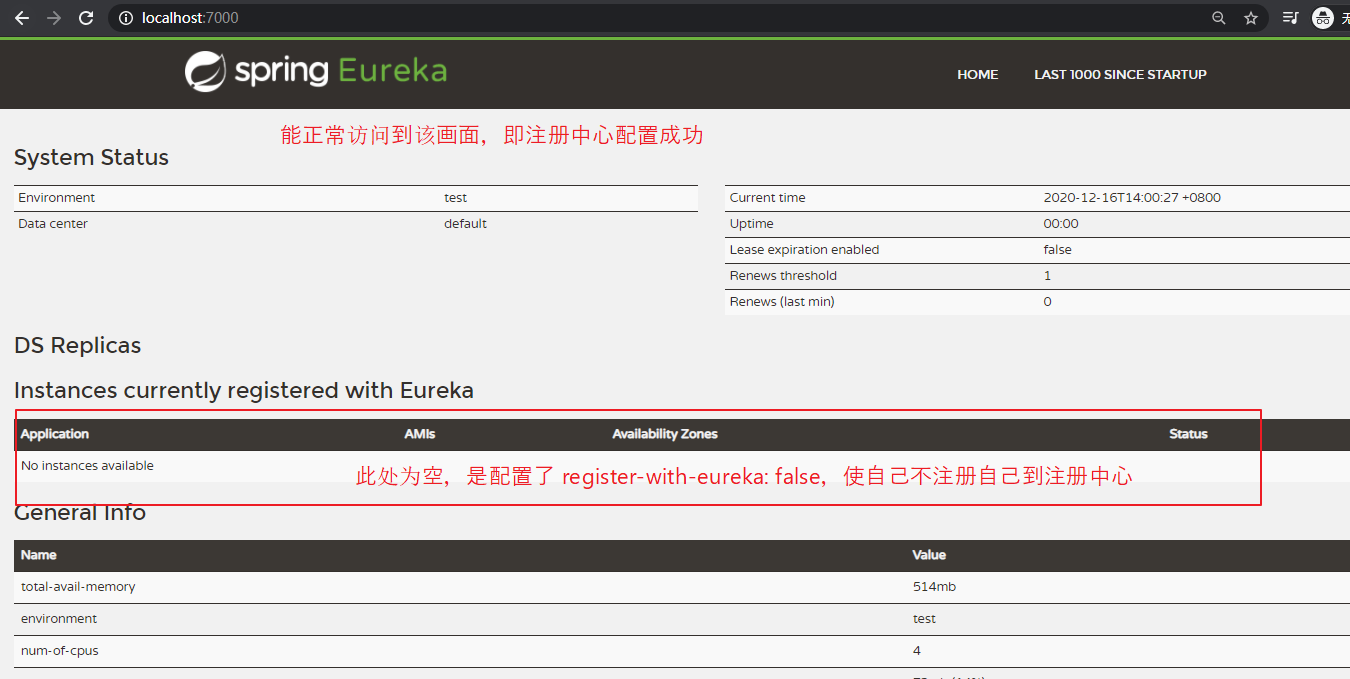
在启动类上,添加 @EnableEurekaServer 注解,用于开启 EurekaServer。
(3)创建子工程 eureka_client_producer_8001
创建一个与 producer_8000 相同的子工程 eureka_client_producer_8001 。
作为 Eureka Client,并注册到 注册中心中。
Step1:创建子工程 eureka_client_producer_8001,并引入 eureka-client 依赖。
与 producer_8000 流程相同,直接 copy 然后修改亦可(此处不再重复截图)。
【eureka_client_producer_8001 引入 eureka-client 依赖:】
<dependency>
    <groupId>org.springframework.cloud</groupId>
    <artifactId>spring-cloud-starter-netflix-eureka-client</artifactId>
</dependency>

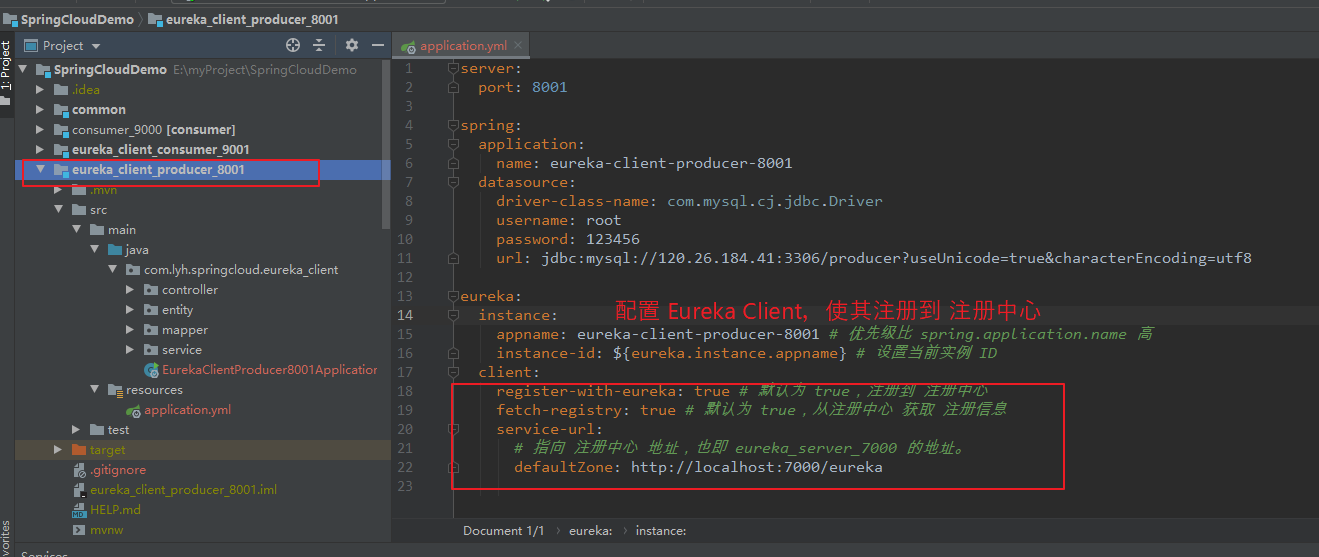
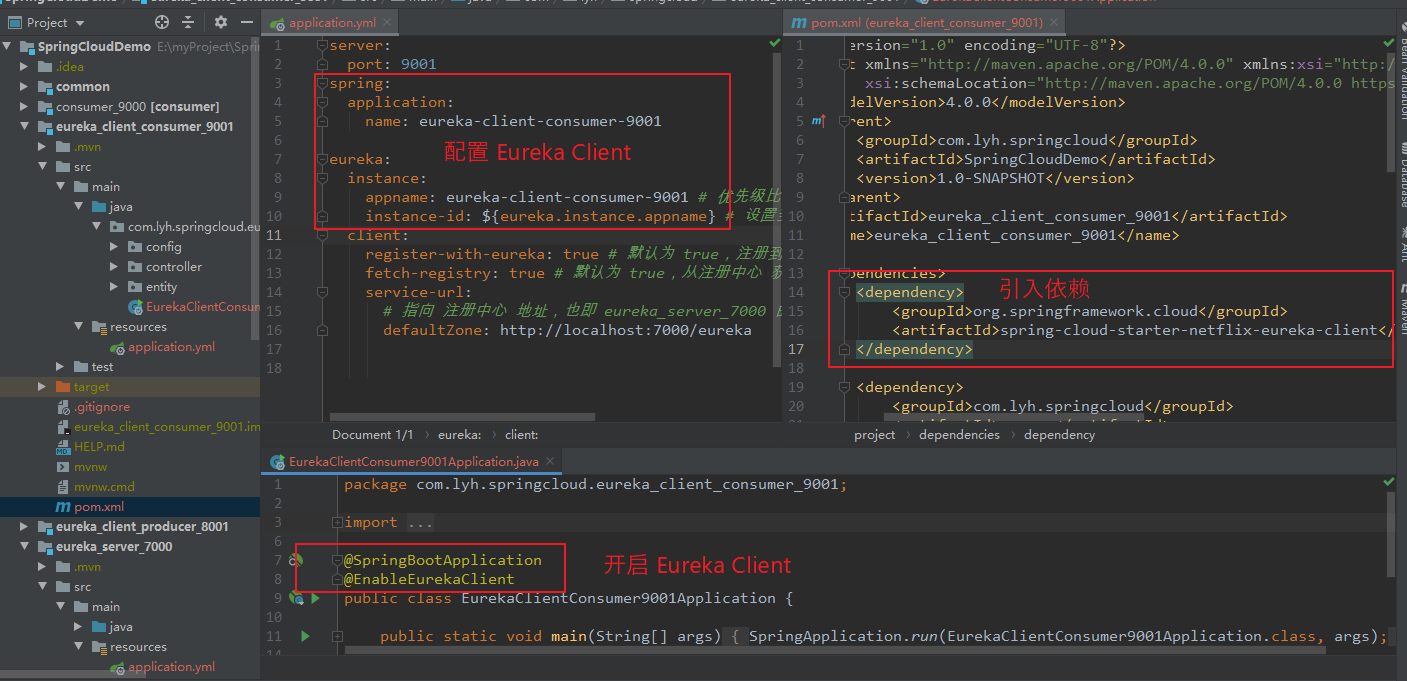
Step2:配置 Eureka Client。
【application.yml】
server:
  port: 8001

spring:
  application:
    name: eureka-client-producer-8001
  datasource:
    driver-class-name: com.mysql.cj.jdbc.Driver
    username: root
    password: 123456
    url: jdbc:mysql://120.26.184.41:3306/producer?useUnicode=true&characterEncoding=utf8

eureka:
  instance:
    appname: eureka-client-producer-8001 # 优先级比 spring.application.name 高
    instance-id: ${eureka.instance.appname} # 设置当前实例 ID
  client:
    register-with-eureka: true # 默认为 true,注册到 注册中心
    fetch-registry: true # 默认为 true,从注册中心 获取 注册信息
    service-url:
      # 指向 注册中心 地址,也即 eureka_server_7000 的地址。
      defaultZone: http://localhost:7000/eureka
Step3:启动 Eureka Client 服务
在启动类上,添加 @EnableEurekaClient 注解,用于开启 EurekaClient(不添加也能正常注册到 注册中心)。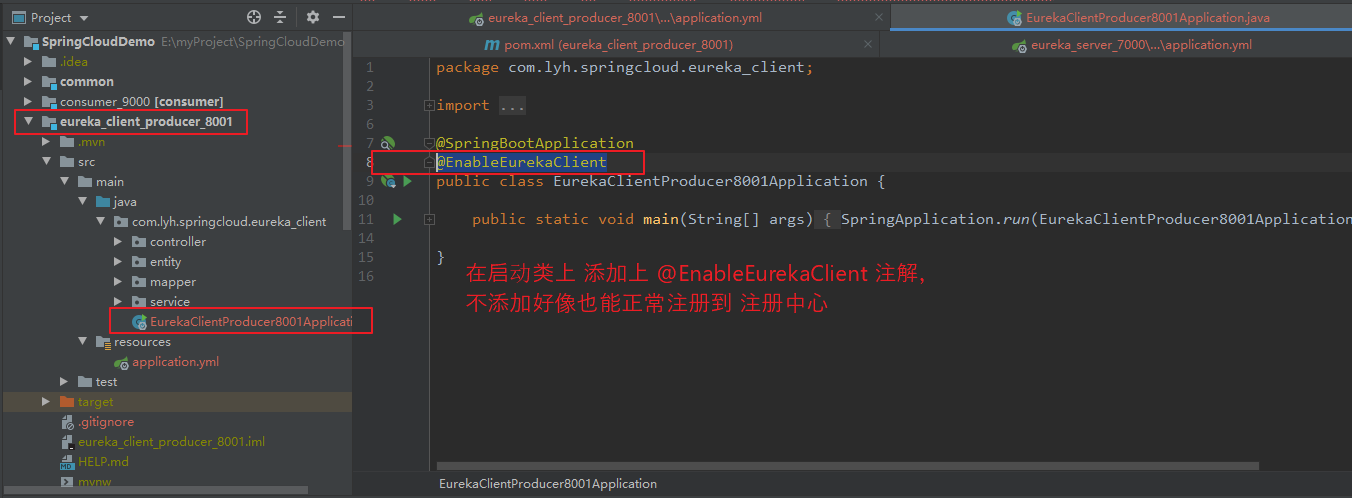

(4)创建子工程 eureka_client_consumer_9001
创建一个与 consumer_9000 相同的子工程 eureka_client_consumer_9001。
作为 Eureka Client,并注册到 注册中心中。
Step1:创建 eureka_client_consumer_9001
与创建 eureka_client_producer_8001 类似,此处不重复截图。
可以直接 copy 一份 consumer_9000 代码进行修改。
引入 Eureka Client 依赖。
配置 Eureka Client,然后在启动类上添加 @EnableEurekaClient 注解。
【eureka_client_consumer_9001 引入 eureka-client 依赖:】
<dependency>
    <groupId>org.springframework.cloud</groupId>
    <artifactId>spring-cloud-starter-netflix-eureka-client</artifactId>
</dependency>

【application.yml:】
server:
  port: 9001
spring:
  application:
    name: eureka-client-consumer-9001

eureka:
  instance:
    appname: eureka-client-consumer-9001 # 优先级比 spring.application.name 高
    instance-id: ${eureka.instance.appname} # 设置当前实例 ID
  client:
    register-with-eureka: true # 默认为 true,注册到 注册中心
    fetch-registry: true # 默认为 true,从注册中心 获取 注册信息
    service-url:
      # 指向 注册中心 地址,也即 eureka_server_7000 的地址。
      defaultZone: http://localhost:7000/eureka
Step2:更换 RestTemplate 访问的 URL。
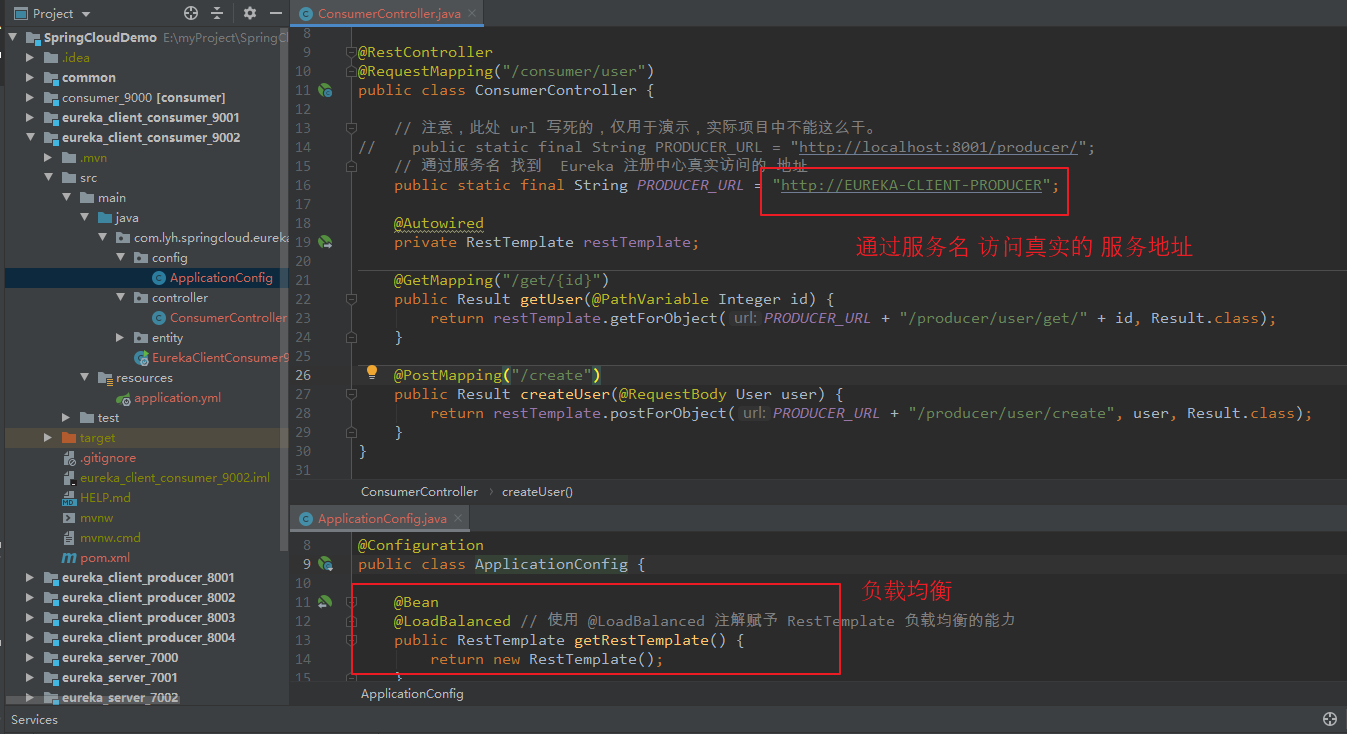
配置了 Eureka 后,consumer 调用 producer 不能直接写死了,应该在 Eureka Server 注册中心通过 服务名 找到 真实对应的 地址后 再去 远程访问。
此处需要更换 RestTemplate 的访问地址(为 Eureka Client 注册时的 服务名)。
在配置 RestTemplate 时需要添加上 @LoadBalanced 注解。
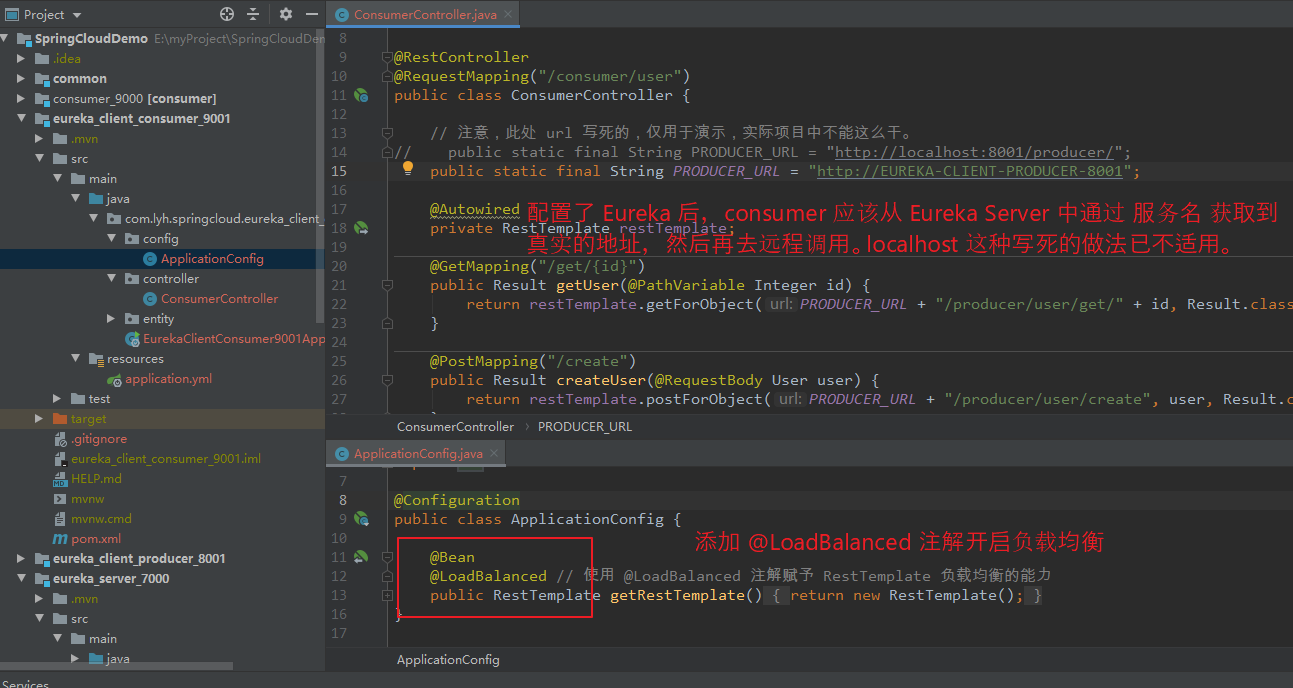
【访问流程:】
    访问 http://localhost:9001/consumer/user/get/2
    内部通过 EUREKA-CLIENT-PRODUCER-8001 服务名找到对应的 地址 localhost:8001。
    然后转为远程调用 http://localhost:8001/producer/user/get/2
即
    consumer 根据 服务注册中心 找到 producer 的地址,
    然后通过 远程调用 该地址,达到 访问 producer 服务的目的。


3、Eureka 填坑(通过服务名访问 服务遇到的坑)
(1)说明
【场景:】
    没有配置 Eureka 时,consumer 通过 RestTemplate 调用 producer 服务。
    此时调用地址是写死的,比如:http://localhost:8001/

    配置了 Eureka 后,consumer、producer 已经注册到 Eureka Server 中。
    此时 consumer 应该从 Eureka 中通过 服务名 获取到 producer 的真实地址,然后再通过 RestTemplate 去调用。
    此时调用地址写的是 被调用的服务名,比如:http://EUREKA_CLIENT_PRODUCER_8001/
注:
    此处 替换地址后 遇到的三个坑(通过注册中心 服务名 访问真实服务遇到的坑)。
(2)错误一:(未添加 @LoadBalanced 注解)
【错误信息:】
    java.net.UnknownHostException: EUREKA_CLIENT_PRODUCER_8001

【解决:】
    使用 @Bean 配置 RestTemplate 时,同时添加上 @LoadBalanced 注解即可。

(3)错误二:(服务名使用了 下划线 _ 作为连接符 )
【错误信息:】
    java.lang.IllegalStateException: Request URI does not contain a valid hostname:http://EUREKA_CLIENT_PRODUCER_8001/

【解决:】
    配置服务名时,将下划线 _ 改为 - 作为连接符。
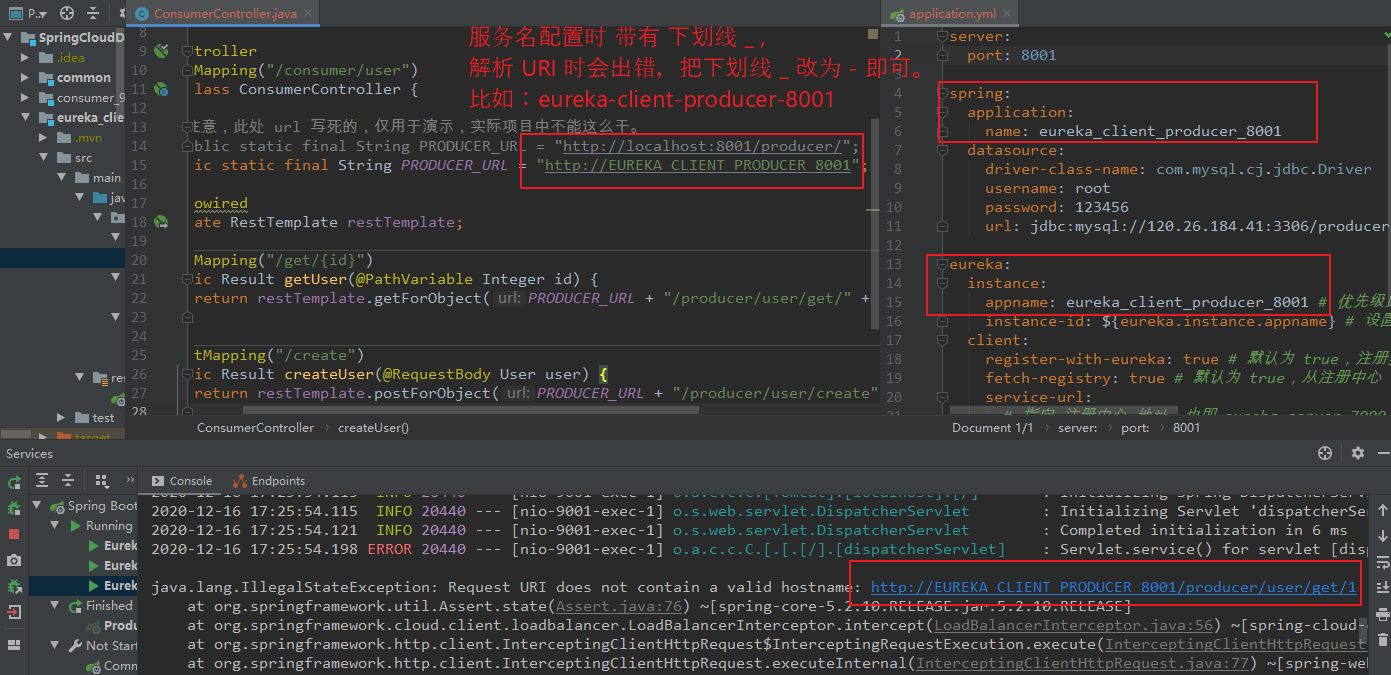
(4)错误三:(解析主机号、域名失败)
【错误信息:】
    java.net.UnknownHostException: eureka.client.producer.8002

【解决:】
    打开 hosts 文件,并配置域名映射(在后面构建集群版 Eureka 时可能遇到)。

4、Eureka 伪集群版
(1)基本说明
【为什么使用集群:】
    远程服务调用 最重要的一个问题 就是 高可用,如果只有一个服务,那么当服务挂掉了,整个系统将会崩溃,
    所以需要部署多个服务(集群),除非所有服务都挂掉了,整个系统才会崩溃。
    同样的,注册中心也需要部署多个(集群)。
    采用集群方式部署、并实现负载均衡以及故障容错 从而提高 可用性。

【集群搭建基本说明:】
    前面单机版创建了 eureka_server_7000、eureka_client_producer_8001、eureka_client_consumer_9001 三个工程。
    此处为了区分,并演示集群的操作,
        创建与 eureka_server_7000 一样的 eureka_server_7001、eureka_server_7002、eureka_server_7003 作为 注册中心 集群。
        创建与 eureka_client_producer_8001 一样的 eureka_client_producer_8002、eureka_client_producer_8003、eureka_client_producer_8004 作为 服务提供者 集群。
        创建与 eureka_client_consumer_9001  一样的 eureka_client_consumer_9002 作为 服务消费者(可以不做集群)。
注:
    创建流程基本一致,但是配置文件有些许差别。

(2)创建 Eureka Server 集群。
Step1:创建与 eureka_server_7000 相同的 eureka_server_7001。
修改 pom.xml 引入 eureka-server 依赖。
配置 eureka-server。
在启动类上添加 @EnableEurekaServer 注解。
【引入依赖:】
<dependency>
    <groupId>org.springframework.cloud</groupId>
    <artifactId>spring-cloud-starter-netflix-eureka-server</artifactId>
</dependency>

【配置 Eureka Server:】
server:
  port: 7001

eureka:
  instance:
    hostname: eureka.server.7001.com # 定义主机名
    appname: Eureka-Server # 设置服务端实例名称,优先级高于 spring.application.name
    instance-id: eureka-server-instance2 # 设置实例 ID
  client:
    register-with-eureka: false # 默认为 true,设置 false 表示不向注册中心注册自己
    fetch-registry: false # 默认为 true,设置 false 表示不去注册中心 获取 注册信息
    # 指向集群中 其他的 注册中心
    service-url:
      defaultZone: http://eureka.server.7002.com:7002/eureka,http://eureka.server.7003.com:7003/eureka
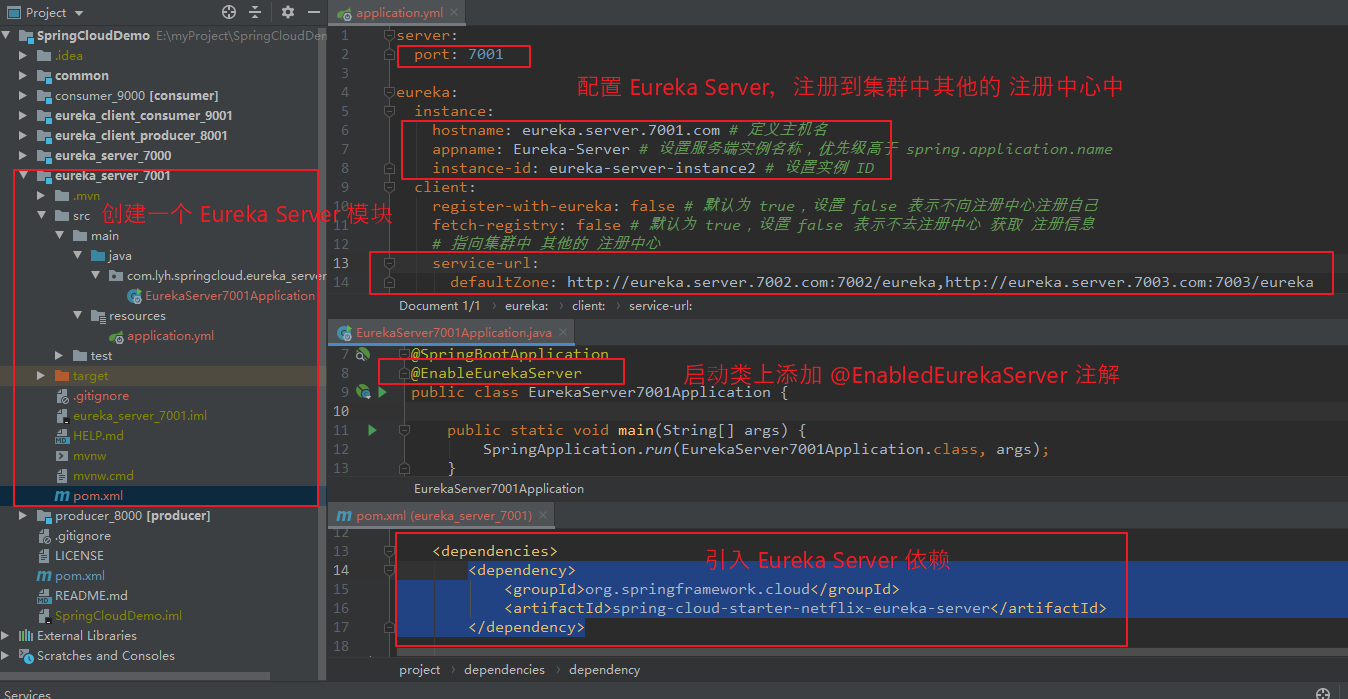
Step2:同理创建 eureka_server_7002、eureka_server_7003
【eureka_server_7002 的 application.yml:】
server:
  port: 7002

eureka:
  instance:
    hostname: eureka.server.7002.com # 定义主机名
    appname: Eureka-Server # 设置服务端实例名称,优先级高于 spring.application.name
    instance-id: eureka-server-instance3 # 设置实例 ID
  client:
    register-with-eureka: false # 默认为 true,设置 false 表示不向注册中心注册自己
    fetch-registry: false # 默认为 true,设置 false 表示不去注册中心 获取 注册信息
    # 指向集群中 其他的 注册中心
    service-url:
      defaultZone: http://eureka.server.7001.com:7001/eureka,http://eureka.server.7003.com:7003/eureka

【eureka_server_7003 的 application.yml:】
server:
  port: 7003

eureka:
  instance:
    hostname: eureka.server.7003.com # 定义主机名
    appname: Eureka-Server # 设置服务端实例名称,优先级高于 spring.application.name
    instance-id: eureka-server-instance4 # 设置实例 ID
  client:
    register-with-eureka: false # 默认为 true,设置 false 表示不向注册中心注册自己
    fetch-registry: false # 默认为 true,设置 false 表示不去注册中心 获取 注册信息
    # 指向集群中 其他的 注册中心
    service-url:
      defaultZone: http://eureka.server.7001.com:7001/eureka,http://eureka.server.7002.com:7002/eureka
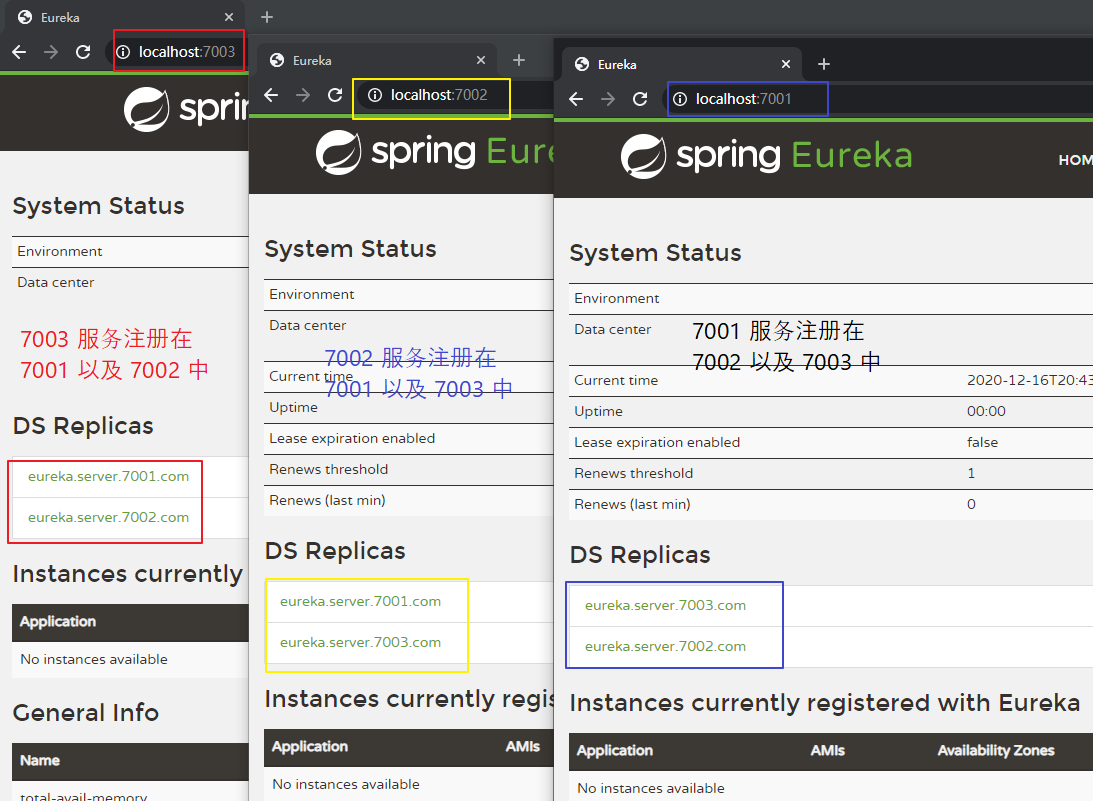
Step3:修改 hosts 文件,进行域名映射。
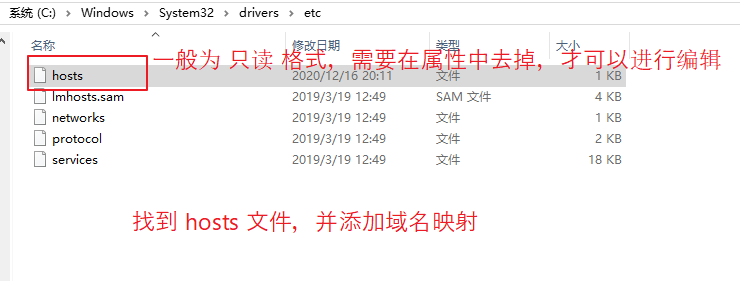
若服务启动后,各个服务无法正常显示在 Eureka 页面中,可以配置域名映射试试。
若未配置映射,则 Eureka Client 注册时可能会出现问题。
【hosts 文件位置:】
    windows 的 hosts 文件位置:C:WindowsSystem32driversetchosts
    linux 的 hosts 文件位置:/etc/hosts

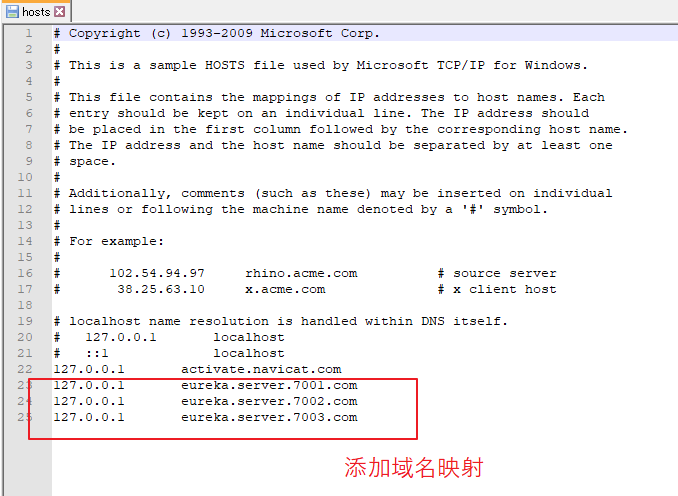
【添加端口映射:】
127.0.0.1       eureka.server.7001.com
127.0.0.1       eureka.server.7002.com
127.0.0.1       eureka.server.7003.com
(3)创建 eureka_client_producer 集群。
Step1:创建与 eureka_client_producer_8001 相同的 eureka_client_producer_8002。
引入 eureka_client 依赖。
修改 application.yml 配置文件。
在启动类上添加 @EnableEurekaClient 注解。
【引入依赖:】
<dependency>
    <groupId>org.springframework.cloud</groupId>
    <artifactId>spring-cloud-starter-netflix-eureka-client</artifactId>
</dependency>

【application.yml】
server:
  port: 8002

spring:
  application:
    name: eureka-client-producer
  datasource:
    driver-class-name: com.mysql.cj.jdbc.Driver
    username: root
    password: 123456
    url: jdbc:mysql://120.26.184.41:3306/producer?useUnicode=true&characterEncoding=utf8

eureka:
  instance:
    appname: eureka-client-producer # 优先级比 spring.application.name 高
    instance-id: eureka-client-producer.instance1 # 设置当前实例 ID
    hostname: eureka.client.producer.8002 # 设置主机名
  client:
    register-with-eureka: true # 默认为 true,注册到 注册中心
    fetch-registry: true # 默认为 true,从注册中心 获取 注册信息
    service-url:
      # 指向 注册中心 地址,注册到 集群所有的 注册中心。
      defaultZone: http://eureka.server.7001.com:7001/eureka,http://eureka.server.7002.com:7002/eureka,http://eureka.server.7003.com:7003/eureka
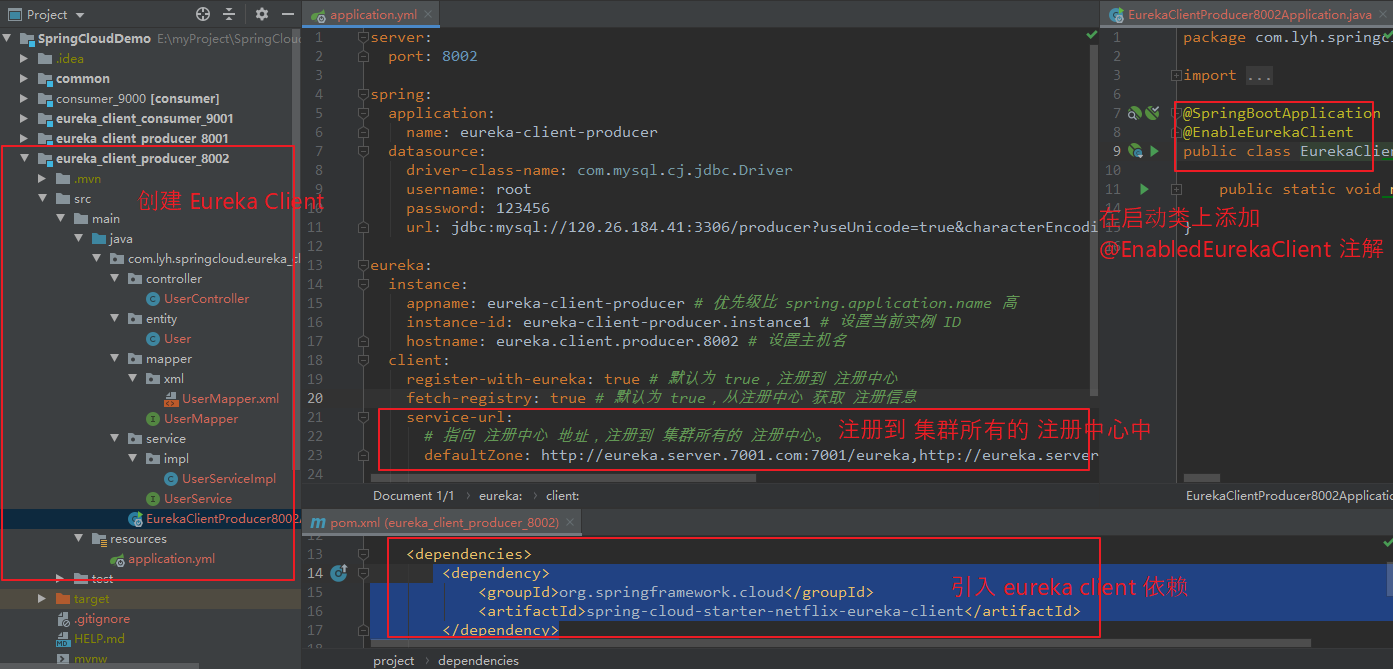
Step2:同理创建 eureka_client_producer_8003、eureka_client_producer_8004
【eureka_client_producer_8003 的 application.yml:】
server:
  port: 8003

spring:
  application:
    name: eureka-client-producer
  datasource:
    driver-class-name: com.mysql.cj.jdbc.Driver
    username: root
    password: 123456
    url: jdbc:mysql://120.26.184.41:3306/producer?useUnicode=true&characterEncoding=utf8

eureka:
  instance:
    appname: eureka-client-producer # 优先级比 spring.application.name 高
    instance-id: eureka-client-producer.instance2 # 设置当前实例 ID
    hostname: eureka.client.producer.8003 # 设置主机名
  client:
    register-with-eureka: true # 默认为 true,注册到 注册中心
    fetch-registry: true # 默认为 true,从注册中心 获取 注册信息
    service-url:
      # 指向 注册中心 地址,注册到 集群所有的 注册中心。
      defaultZone: http://eureka.server.7001.com:7001/eureka,http://eureka.server.7002.com:7002/eureka,http://eureka.server.7003.com:7003/eureka

【eureka_client_producer_8004 的 application.yml:】
server:
  port: 8004

spring:
  application:
    name: eureka-client-producer
  datasource:
    driver-class-name: com.mysql.cj.jdbc.Driver
    username: root
    password: 123456
    url: jdbc:mysql://120.26.184.41:3306/producer?useUnicode=true&characterEncoding=utf8

eureka:
  instance:
    appname: eureka-client-producer # 优先级比 spring.application.name 高
    instance-id: eureka-client-producer.instance3 # 设置当前实例 ID
    hostname: eureka.client.producer.8004 # 设置主机名
  client:
    register-with-eureka: true # 默认为 true,注册到 注册中心
    fetch-registry: true # 默认为 true,从注册中心 获取 注册信息
    service-url:
      # 指向 注册中心 地址,注册到 集群所有的 注册中心。
      defaultZone: http://eureka.server.7001.com:7001/eureka,http://eureka.server.7002.com:7002/eureka,http://eureka.server.7003.com:7003/eureka
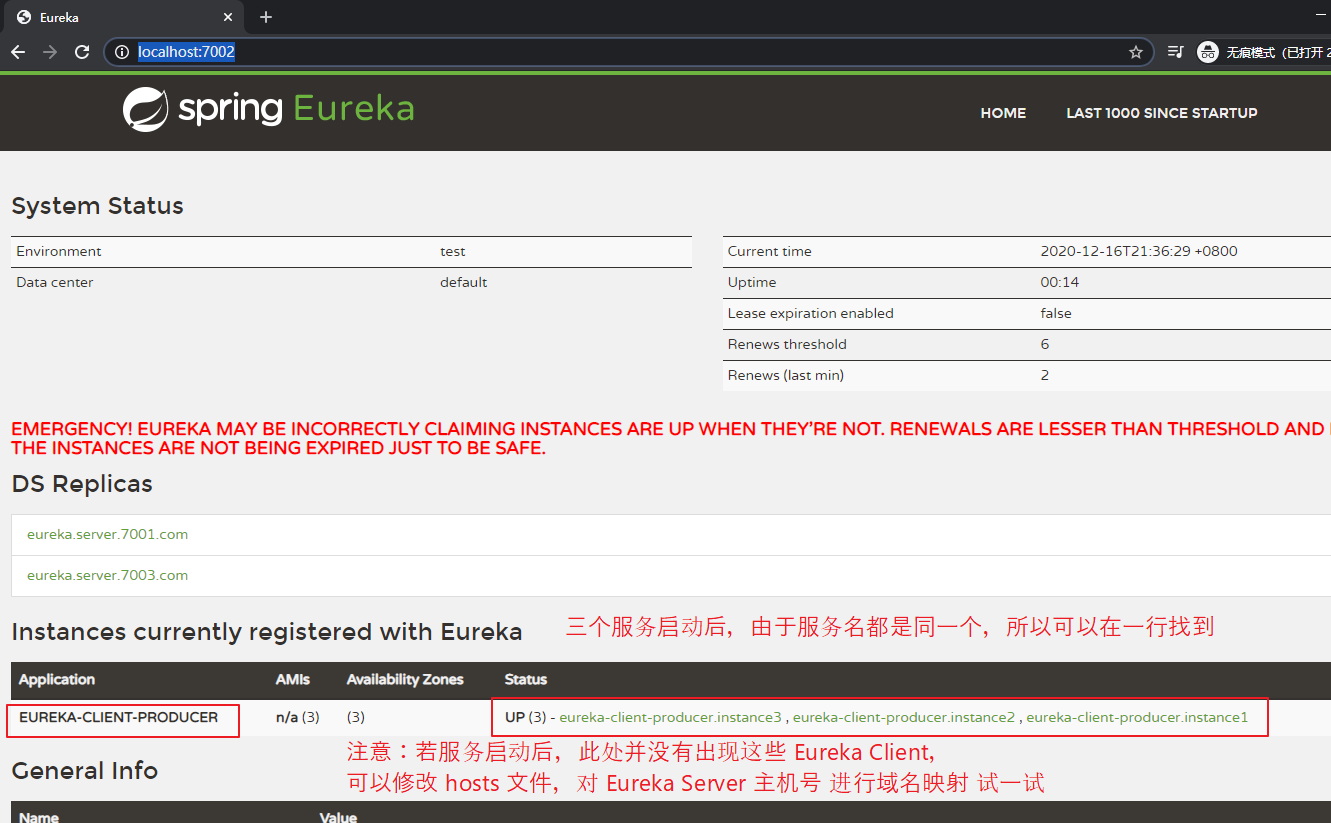
Step3:为了防止服务访问失败,修改 hosts 文件,添加域名映射。
【域名映射:】
127.0.0.1       eureka.client.producer.8002
127.0.0.1       eureka.client.producer.8003
127.0.0.1       eureka.client.producer.8004

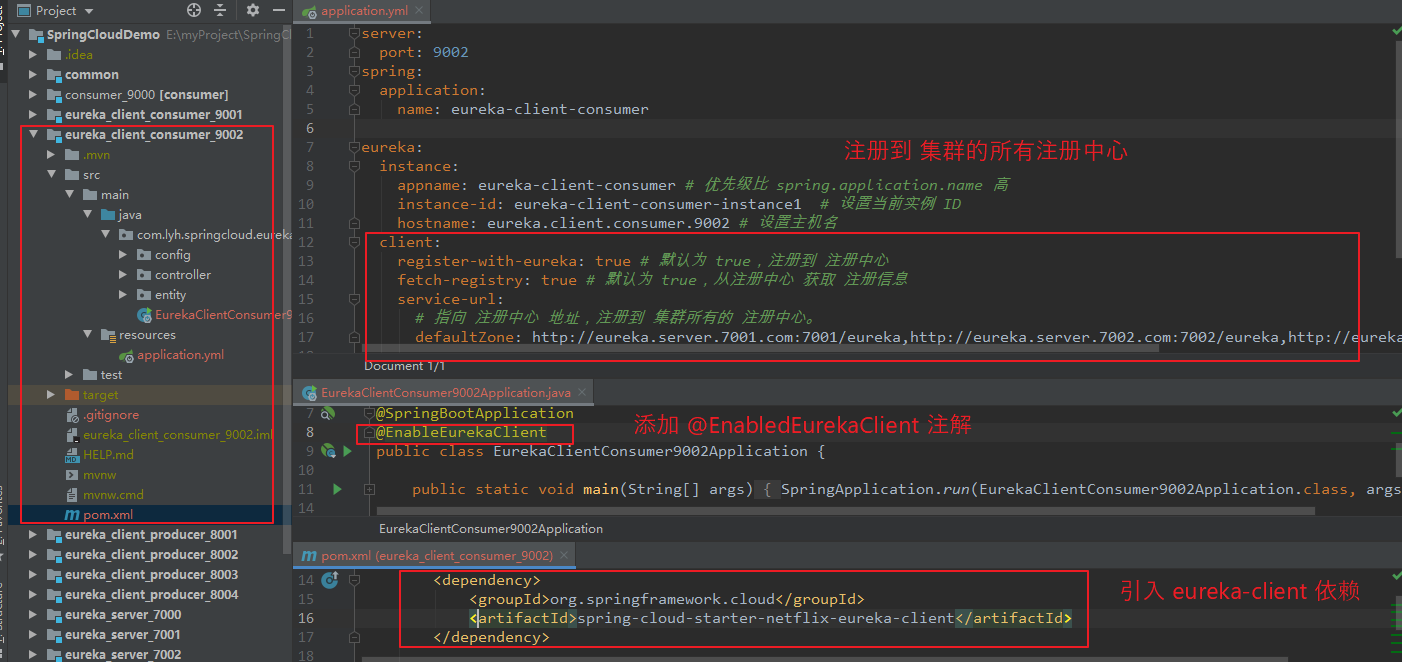
(4)创建 eureka_client_consumer_9002
Step1:创建与 eureka_client_consumer_9001 相同的 eureka_client_consumer_9002。
引入 eureka_client 依赖。
修改 application.yml 配置文件。
在启动类上添加 @EnableEurekaClient 注解。
【引入依赖:】
<dependency>
    <groupId>org.springframework.cloud</groupId>
    <artifactId>spring-cloud-starter-netflix-eureka-client</artifactId>
</dependency>

【application.yml】
server:
  port: 9002
spring:
  application:
    name: eureka-client-consumer

eureka:
  instance:
    appname: eureka-client-consumer # 优先级比 spring.application.name 高
    instance-id: eureka-client-consumer-instance1  # 设置当前实例 ID
    hostname: eureka.client.consumer.9002 # 设置主机名
  client:
    register-with-eureka: true # 默认为 true,注册到 注册中心
    fetch-registry: true # 默认为 true,从注册中心 获取 注册信息
    service-url:
      # 指向 注册中心 地址,注册到 集群所有的 注册中心。
      defaultZone: http://eureka.server.7001.com:7001/eureka,http://eureka.server.7002.com:7002/eureka,http://eureka.server.7003.com:7003/eureka
Step2:修改 RestTemplate 发送的 URL 地址。
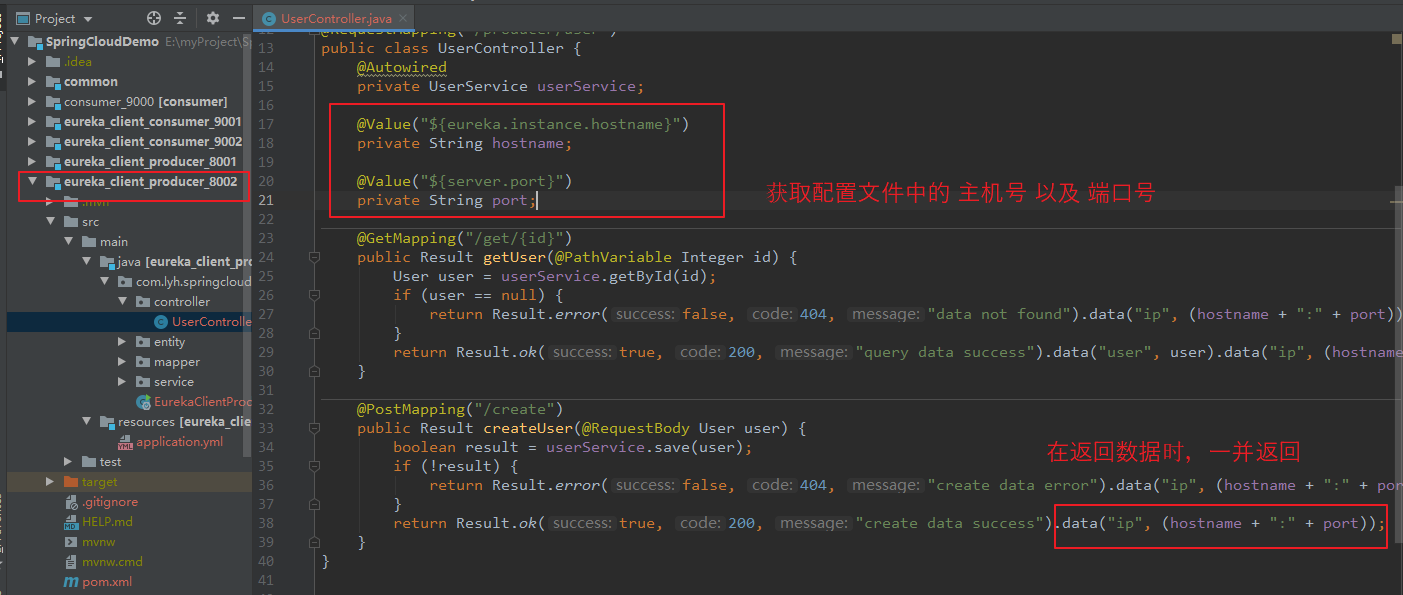
Step3:
为了区分究竟调用的是 哪一个 producer 服务,在 producer 服务接口返回时,返回端口号以及主机名,对 三个 producer 服务进行如下修改。
package com.lyh.springcloud.eureka_client_producer_8002.controller;


import com.lyh.springcloud.common.tools.Result;
import com.lyh.springcloud.eureka_client_producer_8002.entity.User;
import com.lyh.springcloud.eureka_client_producer_8002.service.UserService;
import org.springframework.beans.factory.annotation.Autowired;
import org.springframework.beans.factory.annotation.Value;
import org.springframework.web.bind.annotation.*;

@RestController
@RequestMapping("/producer/user")
public class UserController {
    @Autowired
    private UserService userService;

    @Value("${eureka.instance.hostname}")
    private String hostname;

    @Value("${server.port}")
    private String port;

    @GetMapping("/get/{id}")
    public Result getUser(@PathVariable Integer id) {
        User user = userService.getById(id);
        if (user == null) {
            return Result.error(false, 404, "data not found").data("ip", (hostname + ":" + port));
        }
        return Result.ok(true, 200, "query data success").data("user", user).data("ip", (hostname + ":" + port));
    }

    @PostMapping("/create")
    public Result createUser(@RequestBody User user) {
        boolean result = userService.save(user);
        if (!result) {
            return Result.error(false, 404, "create data error").data("ip", (hostname + ":" + port));
        }
        return Result.ok(true, 200, "create data success").data("ip", (hostname + ":" + port));
    }
}
(5)启动项目 并访问。
【访问流程:】
    访问 http://localhost:9002/consumer/user/get/2 时,
    根据服务名 EUREKA-CLIENT-PRODUCER 会得到三个 producer 服务。
    会根据负载均衡,轮询三个服务中的某个进行远程调用。
注:
    若访问出错为 java.net.UnknownHostException: eureka.client.producer.8002 时,
    可以修改 hosts 文件,进行 域名映射。
    比如:
        127.0.0.1       eureka.client.producer.8002


5、配置 actuator、服务发现、自我保护机制
(1)配置 actuator
用于监控 springboot 应用,比如:查看状态、健康检查等。
【引入 actuator 依赖:】
<dependency>
    <groupId>org.springframework.boot</groupId>
    <artifactId>spring-boot-starter-actuator</artifactId>
</dependency>

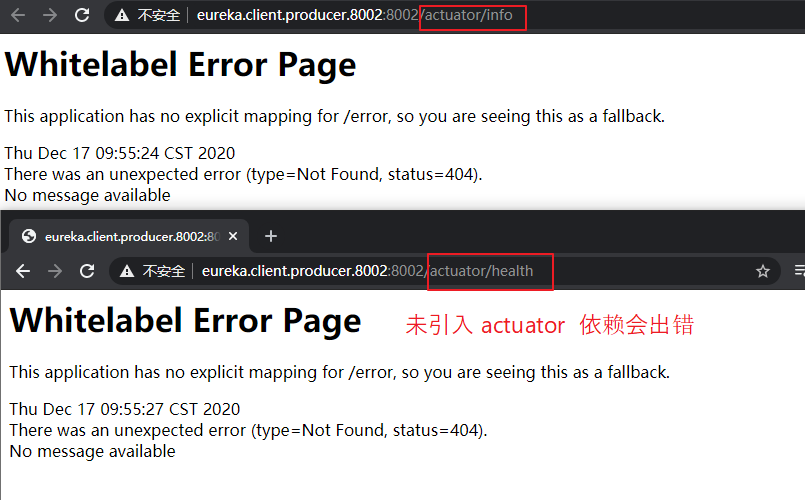
未配置 actuator 时,出现如下图所示错误。
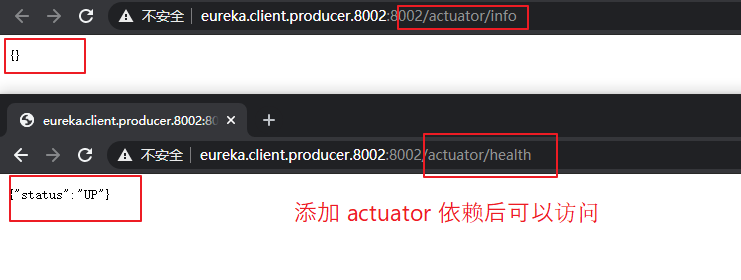
配置 actuator 后,再次访问如下图所示。
(2)服务发现
对于注册进 注册中心 的服务,可以通过服务发现来获取 服务列表的信息。
以 eureka_client_producer_8002 为例,在其中编写一个 接口,用于返回 服务信息。
在启动类上添加 @EnableDiscoveryClient 注解(不添加好像也可以获取服务信息)。
【编写一个接口:】
package com.lyh.springcloud.eureka_client_producer_8002.controller;

import com.lyh.springcloud.common.tools.Result;
import com.lyh.springcloud.eureka_client_producer_8002.entity.User;
import com.lyh.springcloud.eureka_client_producer_8002.service.UserService;
import org.springframework.beans.factory.annotation.Autowired;
import org.springframework.beans.factory.annotation.Value;
import org.springframework.cloud.client.ServiceInstance;
import org.springframework.cloud.client.discovery.DiscoveryClient;
import org.springframework.web.bind.annotation.*;

import java.util.HashMap;
import java.util.List;
import java.util.Map;

@RestController
@RequestMapping("/producer/user")
public class UserController {
    @Autowired
    private UserService userService;

    @Value("${eureka.instance.hostname}")
    private String hostname;

    @Value("${server.port}")
    private String port;

    @Autowired
    private DiscoveryClient discoveryClient;

    @GetMapping("/discovery")
    public Result discovery() {
        // 获取服务名列表
        List<String> servicesList = discoveryClient.getServices();

        // 根据服务名 获取 每个服务名下的 各个服务的信息
        Map<String, List<ServiceInstance>> map = new HashMap<>();
        servicesList.stream().forEach(service -> {
            map.put(service, discoveryClient.getInstances(service));
        });

        return Result.ok(true, 200, "discovery services success").data("services", map);
    }

    @GetMapping("/get/{id}")
    public Result getUser(@PathVariable Integer id) {
        User user = userService.getById(id);
        if (user == null) {
            return Result.error(false, 404, "data not found").data("ip", (hostname + ":" + port));
        }
        return Result.ok(true, 200, "query data success").data("user", user).data("ip", (hostname + ":" + port));
    }

    @PostMapping("/create")
    public Result createUser(@RequestBody User user) {
        boolean result = userService.save(user);
        if (!result) {
            return Result.error(false, 404, "create data error").data("ip", (hostname + ":" + port));
        }
        return Result.ok(true, 200, "create data success").data("ip", (hostname + ":" + port));
    }
}

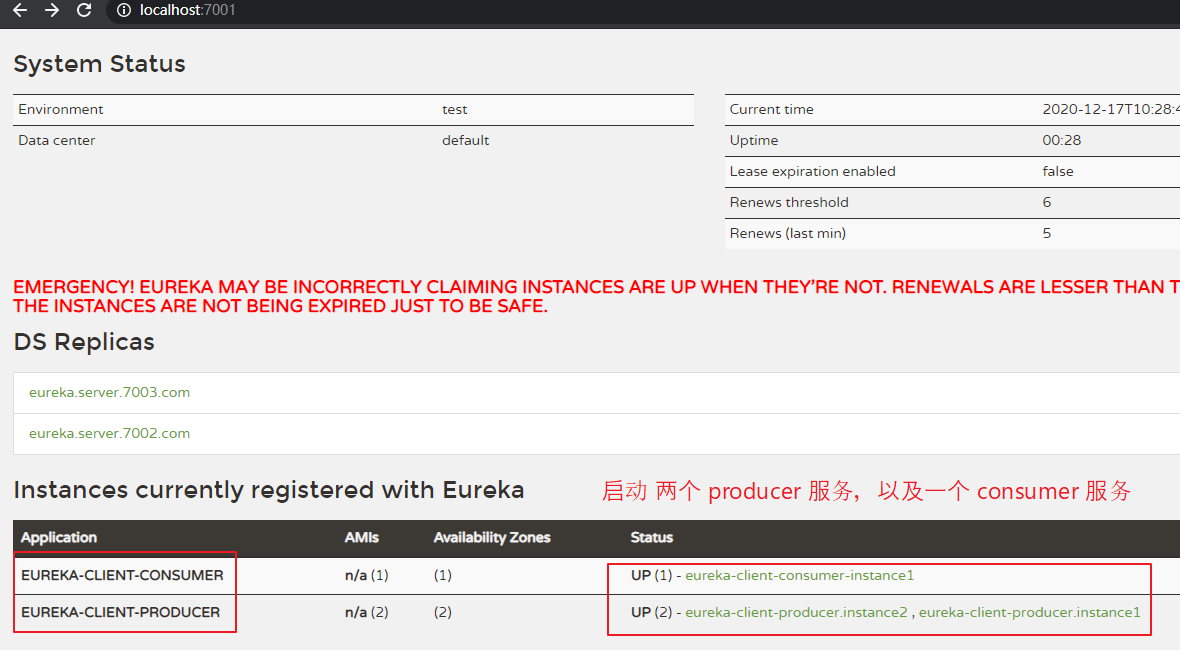
启动服务 eureka_server_7001、eureka_client_producer_8002、eureka_client_producer_8003、eureka_client_consumer_9002,并通过 postman 测试一下。
【测试 url:】
    http://localhost:8002/producer/user/discovery

【测试结果:】
{
    "success": true,
    "code": 200,
    "message": "create data success",
    "data": {
        "services": {
            "eureka-client-producer": [
                {
                    "scheme": "http",
                    "host": "eureka.client.producer.8003",
                    "port": 8003,
                    "metadata": {
                        "management.port": "8003"
                    },
                    "secure": false,
                    "uri": "http://eureka.client.producer.8003:8003",
                    "serviceId": "EUREKA-CLIENT-PRODUCER",
                    "instanceId": "eureka-client-producer.instance2",
                    "instanceInfo": {
                        "instanceId": "eureka-client-producer.instance2",
                        "app": "EUREKA-CLIENT-PRODUCER",
                        "appGroupName": null,
                        "ipAddr": "192.168.217.1",
                        "sid": "na",
                        "homePageUrl": "http://eureka.client.producer.8003:8003/",
                        "statusPageUrl": "http://eureka.client.producer.8003:8003/actuator/info",
                        "healthCheckUrl": "http://eureka.client.producer.8003:8003/actuator/health",
                        "secureHealthCheckUrl": null,
                        "vipAddress": "eureka-client-producer",
                        "secureVipAddress": "eureka-client-producer",
                        "countryId": 1,
                        "dataCenterInfo": {
                            "@class": "com.netflix.appinfo.InstanceInfo$DefaultDataCenterInfo",
                            "name": "MyOwn"
                        },
                        "hostName": "eureka.client.producer.8003",
                        "status": "UP",
                        "overriddenStatus": "UNKNOWN",
                        "leaseInfo": {
                            "renewalIntervalInSecs": 30,
                            "durationInSecs": 90,
                            "registrationTimestamp": 1608171423023,
                            "lastRenewalTimestamp": 1608172078443,
                            "evictionTimestamp": 0,
                            "serviceUpTimestamp": 1608171423023
                        },
                        "isCoordinatingDiscoveryServer": false,
                        "metadata": {
                            "management.port": "8003"
                        },
                        "lastUpdatedTimestamp": 1608171423023,
                        "lastDirtyTimestamp": 1608171418248,
                        "actionType": "ADDED",
                        "asgName": null
                    }
                },
                {
                    "scheme": "http",
                    "host": "eureka.client.producer.8002",
                    "port": 8002,
                    "metadata": {
                        "management.port": "8002"
                    },
                    "secure": false,
                    "uri": "http://eureka.client.producer.8002:8002",
                    "serviceId": "EUREKA-CLIENT-PRODUCER",
                    "instanceId": "eureka-client-producer.instance1",
                    "instanceInfo": {
                        "instanceId": "eureka-client-producer.instance1",
                        "app": "EUREKA-CLIENT-PRODUCER",
                        "appGroupName": null,
                        "ipAddr": "192.168.217.1",
                        "sid": "na",
                        "homePageUrl": "http://eureka.client.producer.8002:8002/",
                        "statusPageUrl": "http://eureka.client.producer.8002:8002/actuator/info",
                        "healthCheckUrl": "http://eureka.client.producer.8002:8002/actuator/health",
                        "secureHealthCheckUrl": null,
                        "vipAddress": "eureka-client-producer",
                        "secureVipAddress": "eureka-client-producer",
                        "countryId": 1,
                        "dataCenterInfo": {
                            "@class": "com.netflix.appinfo.InstanceInfo$DefaultDataCenterInfo",
                            "name": "MyOwn"
                        },
                        "hostName": "eureka.client.producer.8002",
                        "status": "UP",
                        "overriddenStatus": "UNKNOWN",
                        "leaseInfo": {
                            "renewalIntervalInSecs": 30,
                            "durationInSecs": 90,
                            "registrationTimestamp": 1608172121773,
                            "lastRenewalTimestamp": 1608172121773,
                            "evictionTimestamp": 0,
                            "serviceUpTimestamp": 1608170460627
                        },
                        "isCoordinatingDiscoveryServer": false,
                        "metadata": {
                            "management.port": "8002"
                        },
                        "lastUpdatedTimestamp": 1608172121773,
                        "lastDirtyTimestamp": 1608172117716,
                        "actionType": "ADDED",
                        "asgName": null
                    }
                }
            ],
            "eureka-client-consumer": [
                {
                    "scheme": "http",
                    "host": "eureka.client.consumer.9002",
                    "port": 9002,
                    "metadata": {
                        "management.port": "9002"
                    },
                    "secure": false,
                    "uri": "http://eureka.client.consumer.9002:9002",
                    "serviceId": "EUREKA-CLIENT-CONSUMER",
                    "instanceId": "eureka-client-consumer-instance1",
                    "instanceInfo": {
                        "instanceId": "eureka-client-consumer-instance1",
                        "app": "EUREKA-CLIENT-CONSUMER",
                        "appGroupName": null,
                        "ipAddr": "192.168.217.1",
                        "sid": "na",
                        "homePageUrl": "http://eureka.client.consumer.9002:9002/",
                        "statusPageUrl": "http://eureka.client.consumer.9002:9002/actuator/info",
                        "healthCheckUrl": "http://eureka.client.consumer.9002:9002/actuator/health",
                        "secureHealthCheckUrl": null,
                        "vipAddress": "eureka-client-consumer",
                        "secureVipAddress": "eureka-client-consumer",
                        "countryId": 1,
                        "dataCenterInfo": {
                            "@class": "com.netflix.appinfo.InstanceInfo$DefaultDataCenterInfo",
                            "name": "MyOwn"
                        },
                        "hostName": "eureka.client.consumer.9002",
                        "status": "UP",
                        "overriddenStatus": "UNKNOWN",
                        "leaseInfo": {
                            "renewalIntervalInSecs": 30,
                            "durationInSecs": 90,
                            "registrationTimestamp": 1608171433871,
                            "lastRenewalTimestamp": 1608172060016,
                            "evictionTimestamp": 0,
                            "serviceUpTimestamp": 1608171433872
                        },
                        "isCoordinatingDiscoveryServer": false,
                        "metadata": {
                            "management.port": "9002"
                        },
                        "lastUpdatedTimestamp": 1608171433872,
                        "lastDirtyTimestamp": 1608171429809,
                        "actionType": "ADDED",
                        "asgName": null
                    }
                }
            ]
        }
    }
}

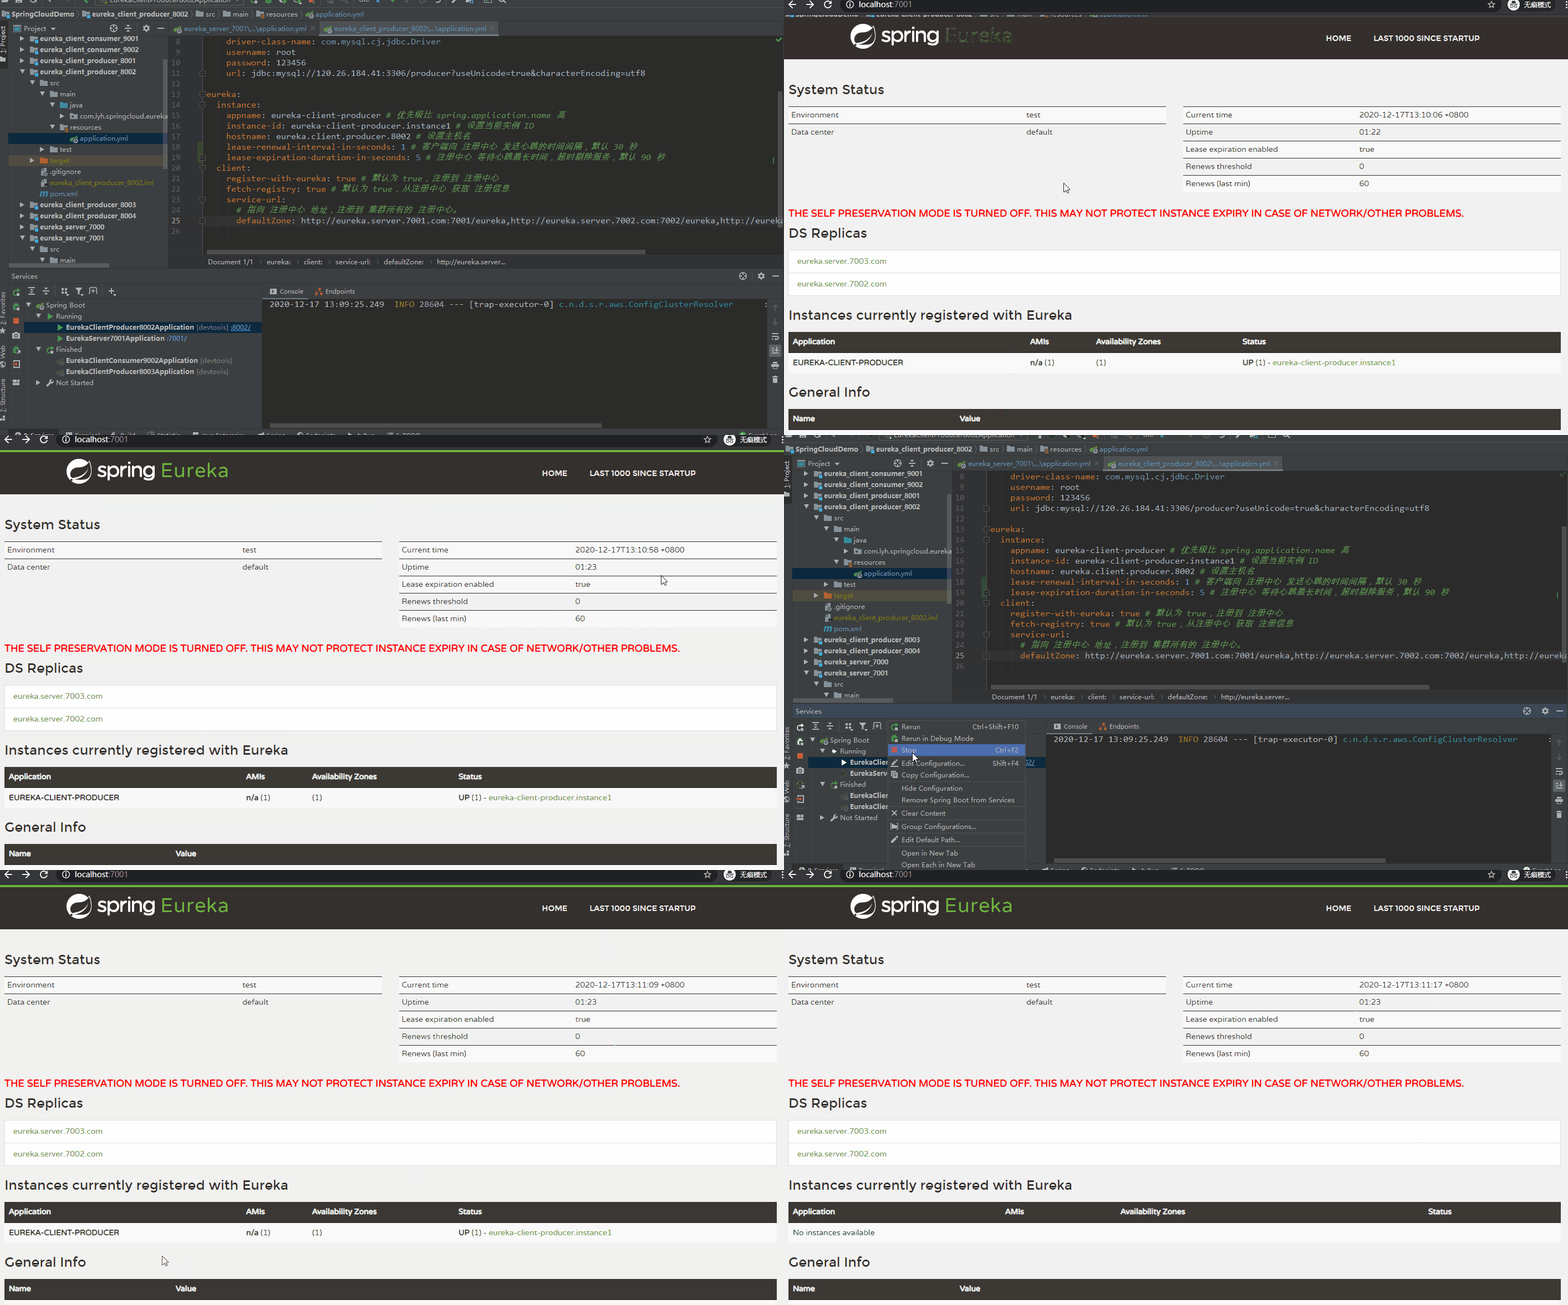
(3)自我保护机制
【自我保护机制:】
    自我保护机制主要用于 Eureka Client 与 Eureka Server 之间存在 网络分区(中断了连接)时 对服务注册表信息的保护。
    当自我保护机制开启时,Eureka Server 不再删除 服务注册表中的数据,即不会注销、剔除 任何服务(即使 Eureka Client 宕机了)。
注:
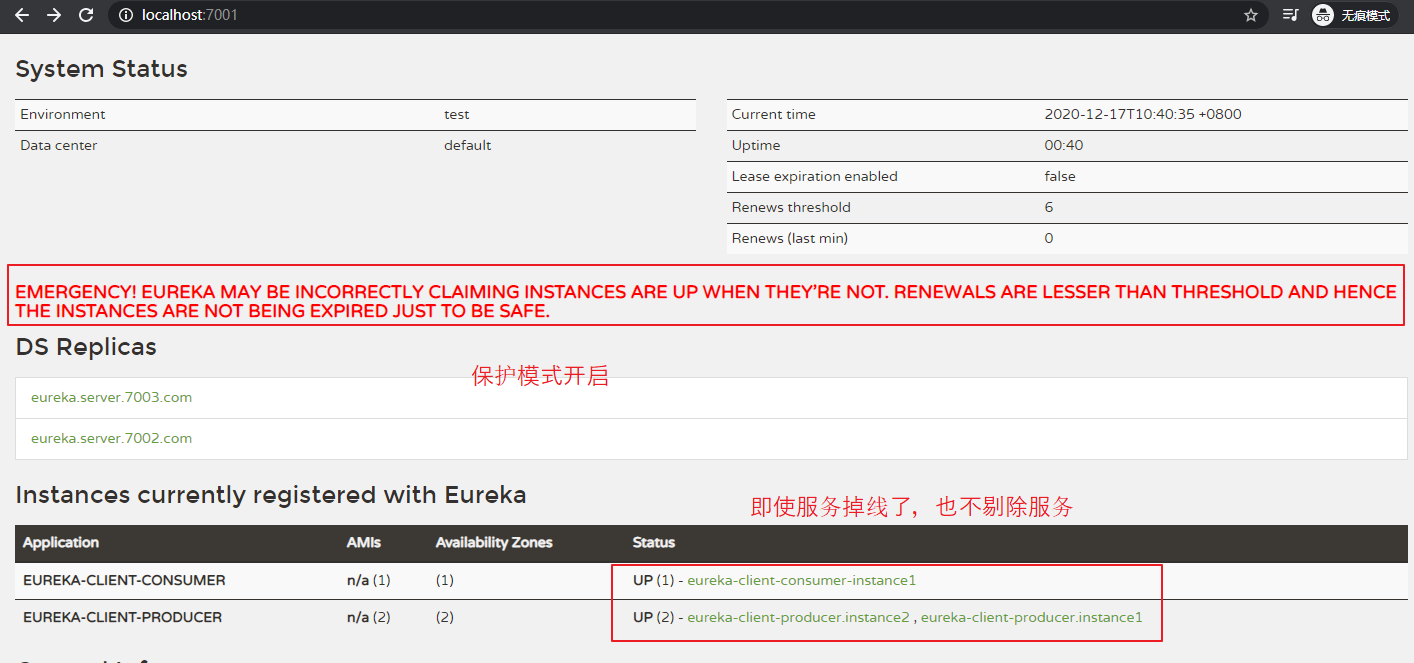
    Eureka Server 出现如下提示时,即表示进入了保护模式。
    EMERGENCY! EUREKA MAY BE INCORRECTLY CLAIMING INSTANCES ARE UP WHEN THEY'RE NOT. RENEWALS ARE LESSER THAN THRESHOLD AND HENCE THE INSTANCES ARE NOT BEING EXPIRED JUST TO BE SAFE.

【为什么产生 自我保护机制:】
    自我保护机制属于 CAP 原则里的 AP(即在 网络分区时,保证服务的可用性)。
    一般情况下,Eureka Server 在一定时间内没有收到 某个服务的心跳(默认 30 秒发一次心跳),Eureka Server 将会注销该实例(默认 90 秒收不到心跳就剔除)。
    但是存在特殊情况:发生网络分区故障(比如:延时、拥堵、卡顿)等情况时,服务 与 Eureka Server 之间无法正常通信,此时若直接 剔除服务,那就可能造成很大的影响(此时的服务 本身并没有问题,注销服务 是不合理的)。

    为了解决上面的特殊情况,引入了 自我保护 的概念,当 Eureka Server 短时间内丢失过多服务时,将会开启自我保护模式。
    自我保护模式一旦开启,将不会注销任何服务实例(宁愿保留错误的服务信息,也不删除正常的服务)。

    而自我保护模式一开,客户端访问时就容易访问到 已经不存在的服务信息,将会出现服务调用失败的情况,所以客户端必须进行容错处理(比如:请求重试、断路器等)。

【自我保护机制触发条件:】
    经过一分钟,Renews(last min) < Renews threshold * 0.85,就会触发自我保护机制。
注:
    Renews(last min) 表示 Eureka 最后一分钟接收的心跳数。
    Renews threshold 表示 Eureka 最后一分钟应该接收的心跳数。
关闭自我保护模式:
【举例:】
    以 eureka_server_7001、eureka_client_producer_8002 为例。
    eureka_server_7001 为 Eureka Server。
    eureka_client_producer_8002 为 Eureka Client。
    当 eureka_server_7001 在一定时间内没有接收到 eureka_client_producer_8002 的心跳,将会从服务列表中 剔除 eureka_client_producer_8002  服务。

在 Eureka Server 端配置 关闭自我保护模式。
eureka:
  server:
    enable-self-preservation: false # 关闭自我保护模式
    eviction-interval-timer-in-ms: 2000 # 清理无效服务的间隔

在 Eureka Client 端配置 心跳发送时间间隔、以及超时等待时间。
eureka:
  instance:
    lease-renewal-interval-in-seconds: 1 # 客户端向 注册中心 发送心跳的时间间隔,默认 30 秒
    lease-expiration-duration-in-seconds: 5 # 注册中心 等待心跳最长时间,超时剔除服务,默认 90 秒

【在 eureka_server_7001 中 配置关闭自我保护模式:】
server:
  port: 7001

eureka:
  server:
    enable-self-preservation: false # 关闭自我保护模式
    eviction-interval-timer-in-ms: 2000 # 清理无效服务的间隔
  instance:
    hostname: eureka.server.7001.com # 定义主机名
    appname: Eureka-Server # 设置服务端实例名称,优先级高于 spring.application.name
    instance-id: eureka-server-instance2 # 设置实例 ID
  client:
    register-with-eureka: false # 默认为 true,设置 false 表示不向注册中心注册自己
    fetch-registry: false # 默认为 true,设置 false 表示不去注册中心 获取 注册信息
    # 指向集群中 其他的 注册中心
    service-url:
      defaultZone: http://eureka.server.7002.com:7002/eureka,http://eureka.server.7003.com:7003/eureka

【在 eureka_client_producer_8002 中配置 心跳发送时间间隔、以及超时等待时间:】
server:
  port: 8002

spring:
  application:
    name: eureka-client-producer
  datasource:
    driver-class-name: com.mysql.cj.jdbc.Driver
    username: root
    password: 123456
    url: jdbc:mysql://120.26.184.41:3306/producer?useUnicode=true&characterEncoding=utf8

eureka:
  instance:
    appname: eureka-client-producer # 优先级比 spring.application.name 高
    instance-id: eureka-client-producer.instance1 # 设置当前实例 ID
    hostname: eureka.client.producer.8002 # 设置主机名
    lease-renewal-interval-in-seconds: 1 # 客户端向 注册中心 发送心跳的时间间隔,默认 30 秒
    lease-expiration-duration-in-seconds: 5 # 注册中心 等待心跳最长时间,超时剔除服务,默认 90 秒
  client:
    register-with-eureka: true # 默认为 true,注册到 注册中心
    fetch-registry: true # 默认为 true,从注册中心 获取 注册信息
    service-url:
      # 指向 注册中心 地址,注册到 集群所有的 注册中心。
      defaultZone: http://eureka.server.7001.com:7001/eureka,http://eureka.server.7002.com:7002/eureka,http://eureka.server.7003.com:7003/eureka

6、Eureka 保证 AP、基本工作流程
(1)Eureka 保证 AP
前面搭建集群版 Eureka 时,存在多个 Eureka Server 节点,这些节点不分 主、从 节点(所有节点平等),节点之间 相互注册,每个节点通过 service-url 指向其他的 Eureka Server。
当一个 Eureka Server 节点宕机后,会自动切换到其他可用的 Eureka Server 节点,也就意味着 只要有一台 Eureka Server 正常工作,那么系统就不会崩溃(提高了可用性)。
但是 Eureka Server 各节点间采用异步方式进行数据同步,不保证节点间数据强一致性,也即各个 Server 保存的服务列表信息可能不一致,但是数据最终是一致的。也即 保证 AP。
(2)基本工作流程
通过前面一系列操作,应该大致理解了 Eureka 工作流程,此处总结一下。
【基本工作流程:】
Step1:
    Eureka Server 启动后,会等待 Eureka Client 注册,并将其保存在 服务列表中。
    如果配置了 Eureka Server 集群,那么集群各节点之间会同步服务列表信息。

Step2:
    Eureka Client 启动后,会根据配置去 Eureka Server 注册中心进行 服务注册。

Step3:
    Eureka Client 默认每隔 30 秒向 Eureka Server 发送一次心跳请求,保持与注册中心的连接(保证 Client 是正常的)。

Step4:
    Eureka Server 默认 90 秒没有收到 Eureka Client 心跳请求,则视其为 失效服务,会从 注册中心将 Client 服务剔除。

Step5:
    单位时间内,若 Eureka Server 统计到大量 Eureka Client 心跳丢失,则认定出现了 网络异常,
    将会开启 自动保护模式,此时不会剔除 Client 服务(即使服务宕机 也会将其保留)。

Step6:
    Eureka Client 心跳恢复正常后,Eureka Server 将会自动退出 自动保护模式。

Step7:
    Eureka Client 默认 30 秒从注册中心 获取 服务列表信息,并将其信息缓存在本地。

Step8:
    Eureka Client 进行服务调用时,先从本地缓存查询 服务,获取不到时服务时 会去 注册中心 获取最新的 服务列表信息 并保存在本地。

Step9:
    Eureka Client 获取到 目标服务信息后,通过 远程调用、负载均衡(默认轮询)的方式 发起服务调用。

Step10:
    Eureka Client 正常关闭时,会向 Eureka Server 发送取消请求,Eureka Server 将其从服务列表中剔除。
四、服务注册与发现 -- Zookeeper
1、什么是 Zookeeper?
(1)什么是 Zookeeper ?
【Zookeeper:】
    Zookeeper 是一个开源、分布式的服务管理框架,属于 Apache Hadoop 的一个子项目,
    为分布式应用提供协调服务的(比如:状态同步、集群管理、分布式应用配置管理 等)。

【官网地址:】
    https://zookeeper.apache.org/
    https://github.com/apache/zookeeper
(2)本质
【本质:】
    Zookeeper 可以看成一个基于 观察者模式 设计的分布式服务管理框架。
    在服务器端可以 存储、管理 数据,并接受 客户端(观察者)的注册,一旦数据变化,将通知这些 观察者 作出相应的动作。

    简单的理解:Zookeeper 就是 文件系统 加上 监听通知机制 来工作。

【文件系统:】
    Zookeeper 维护一个类似 Linux 文件目录 的数据结构。
    每个子目录称为一个 znode 节点(可以通过唯一路径进行标识),znode 可用于存储数据(不宜存放大数据,一般存储上限 1 M),相同层级的 znode 不能重名。

【监听通知机制:】
    客户端注册后,会监听 znode 节点 是否变化,一旦节点变化(数据改变、节点删除、增加子节点 等),Zookeeper 将会通知客户端。

【znode 类型:】
持久节点(persistent):
    客户端与 zookeeper 断开连接后,节点仍然存在。

持久有序节点(persistent sequential):
    客户端与 Zookeeper 建立连接后,会给节点按照顺序进行编号(比如:/znode 变为 /znode0000000001)。
    客户端与 zookeeper 断开连接后,节点仍然存在。

临时节点(ephemeral):
    客户端与 zookeeper 断开连接后,节点会被删除。

临时有序节点(ephemeral sequential):
    客户端与 Zookeeper 建立连接后,会给节点按照顺序进行编号。
    客户端与 zookeeper 断开连接后,节点会被删除。

注:
    编号由父节点维护,是一个单调递增的计数器,可用于全局事件的排序(便于推断分布式系统中事件的执行先后顺序)。
(3)Zookeeper 功能举例 -- 分布式应用配置管理
在实际工作中,一个服务经常以集群的方式进行部署,如果此时需要修改服务的配置,
若不对配置进行管理,那么将需要 逐个服务 进行修改,非常麻烦、易出错。
通过 Zookeeper 可以对配置进行管理,将配置放在 Zookeeper 某个目录节点中,然后让这些服务 去监听 该节点,
此时修改节点中的数据(配置信息),那么每个服务都会监听到数据的变化,获取到最新的配置信息。

(4)zookeeper 选举机制
选举发生在 zookeeper 集群中,单机版不存在选举。
注:
此处仅简单介绍一下,篇幅有限,后续再补充,详情可自行查阅相关文档。
常见概念有 选举机制、ZAB 协议、两阶段提交、写操作流程等。
【zookeeper 集群特点:】
    Zookeeper 集群由一个 Leader 以及 多个 Follower 组成。
    集群中只要有半数以上的节点正常工作,那么集群将能正常提供服务,zookeeper 集群一般为奇数节点。
注:
    对于写请求,请求会同时发送给其他 zookeeper 服务器,达成一致后,请求才会返回成功。
    所以提高集群的机器数量,虽然提高了读效率,但是降低了写效率。

【选举发生场合:】
    场合一:zookeeper 服务器集群初始化启动时会选取 Leader。
    场合二:集群中 Leader 故障(宕机)时从剩余节点中选取新的 Leader。

【zxid、myid】
    myid 全局唯一的数字(一般 1-255),每个数字表示 zookeeper 服务器集群中的一个 服务器。
    zxid 指的是 zookeeper transaction id,zookeeper 每一次状态改变(增加、删除节点,修改节点数据等),都将对应一个递增的 transaction id,即 zxid。
注:
    zxid 越大,表示当前数据越新。

【选举基本原则:】
    每个节点先投自己一票。
    然后与其他节点进行比较,如果有其他节点 A 被更多人选择,那么跟随大部队(将票投给节点 A)。
    若节点 A 被超过一半节点选择,那么将结束选举过程,并将节点 A 视为 Leader。

节点比较规则:
    两个节点 zxid 进行比较,zxid 大的节点作为 leader。
    若 zxid 相同时,根据 myid 进行比较,myid 大的节点作为 leader。
2、使用 Docker 安装、使用 Zookeeper
(1)安装
此处使用 Docker-compose 进行镜像下载 以及 启动容器。
注:
Docker 以及 Docker-compose 使用可参考:
https://www.cnblogs.com/l-y-h/p/12622730.html
https://www.cnblogs.com/l-y-h/p/12622730.html#_label8_2
【docker-compose.yml】
# 指定 compose 文件版本,与 docker 兼容,高版本的 docker 一般使用 3.x。
version: '3.7'

services:
  # 设置服务名
  zookeeper_service1:
    # 配置所使用的镜像
    image: zookeeper
    # 容器总是重启
    restart: always
    # 容器名称
    container_name: zookeeper_service1
    #与宿主机的端口映射
    ports:
      - 2181:2181
    #容器目录映射
    volumes:
      - /usr/mydata/zookeeper/zookeeper_service1/data:/data
      - /usr/mydata/zookeeper/zookeeper_service1/datalog:/datalog

(2)常用命令
可以直接进入 容器内部 进行相关操作。
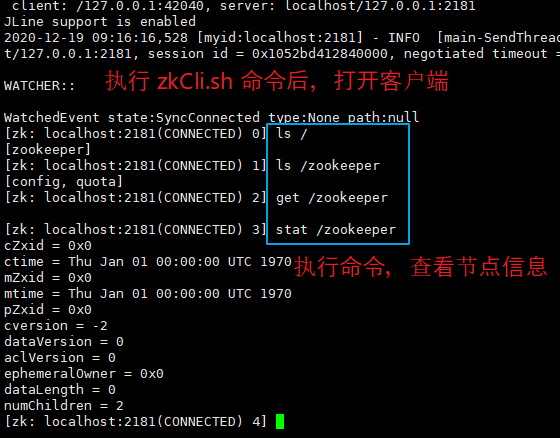
进入 zookeeper_service1 的 bin 目录,并执行 zkCli.sh 命令,可以开启客户端。
【进入 zookeeper_service1 容器的命令:】
    docker exec -it zookeeper_service1 /bin/bash

【退出 zookeeper_service1 容器的命令:】
    exit

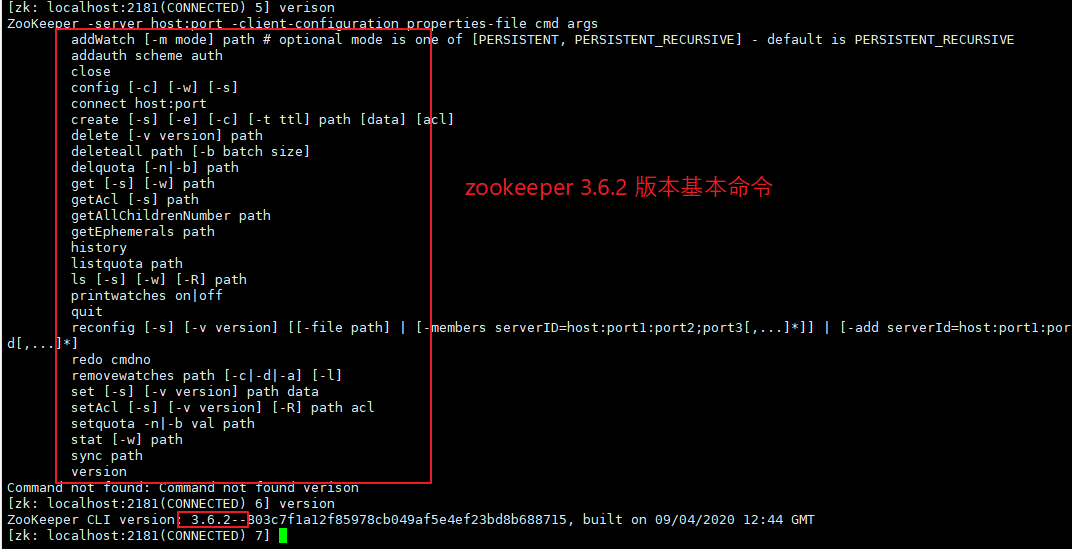
客户端常用命令:
不同版本的命令可能稍微不同,但大体还是一致的。
【查询当前节点下的全部子节点:】
    ls 节点名称
注:
    节点名称 就是 节点路径,比如:/、/zookeeper、/test/zookeeper 等
比如:
    ls /         查询根目录下全部子节点

【查询当前节点下的数据:】
    get 节点名称
比如:
    get /zookeeper     获取 /zookeeper 节点的数据

【查询节点信息:】
    stat 节点名称
比如:
    stat /zookeeper   获取 /zookeeper 节点的信息

【创建节点:】
    create [-s] [-e] 节点名称 节点数据
注:
    -s 为 sequential,即当前节点类型为 有序节点。
    -e 为 ephemeral,即当前节点类型为 临时节点。
    若不存在 -s 、-e 参数,则默认为 持久节点。
比如:
    create -e /ephemeralZnode ephemeralData     创建一个临时节点,名为 ephemeralZnode。
    create -s -e /ephemeralSequentialZnode ephemeralSequentialData     创建一个临时有序的节点,系统会自动编号,比如: ephemeralSequentialZnode0000000003

【修改节点数据:】
    set 节点名称 节点新数据
比如:
    set /ephemeralZnode newEphemeralData   修改 /ephemeralZnode 数据为 newEphemeralData

【删除节点数据:】
    delete 节点名称
或者
    deleteall 节点名称
注:
    delete 删除的是没有子节点的节点。
    deleteall 删除的是当前节点 以及 其全部子节点

【离开客户端:】
    quit

3、SpringCloud 整合 Zookeeper 单机版
(1)说明
在之前学习 Eureka 时,SpringCloud 整合了 Eureka 服务端 以及 客户端的实现,
而此处 Zookeeper 已经提供了服务端的实现,所以只需要使用 SpringCloud 整合 Zookeeper 客户端即可。

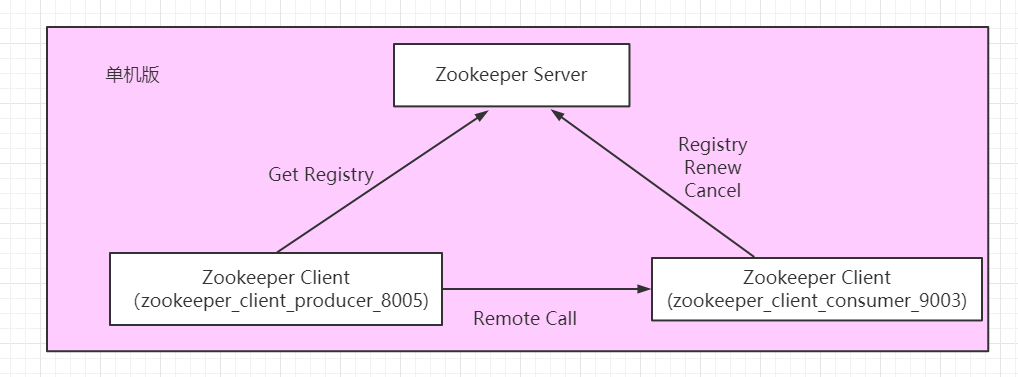
与 Eureka 类似,客户端也可分为 服务提供者、服务消费者。

创建与 eureka_client_producer_8001 类似的 zookeeper_client_producer_8005 作为 服务提供者。
创建与 eureka_client_consumer_9001 类似的 zookeeper_client_consumer_9003 作为 服务消费者。
(2)创建 zookeeper_client_producer_8005 子模块。
修改子模块 与 父模块 pom.xml 文件(与前面创建模块类似,此处省略)。
引入 zookeeper_discovery 依赖。
修改 application.yml 配置文件。
在启动类上添加 @EnableDiscoveryClient 注解(不添加好像也可以正常注册)。
【pom.xml:】
<dependency>
    <groupId>org.springframework.cloud</groupId>
    <artifactId>spring-cloud-starter-zookeeper-discovery</artifactId>
</dependency>

【application.yml】
server:
  port: 8005

spring:
  application:
    name: zookeeper-client-producer
  datasource:
    driver-class-name: com.mysql.cj.jdbc.Driver
    username: root
    password: 123456
    url: jdbc:mysql://120.26.184.41:3306/producer?useUnicode=true&characterEncoding=utf8
  cloud:
    # zookeeper 配置
    zookeeper:
      # 配置连接 zookeeper 服务器的地址
      connect-string: 120.26.184.41:2181
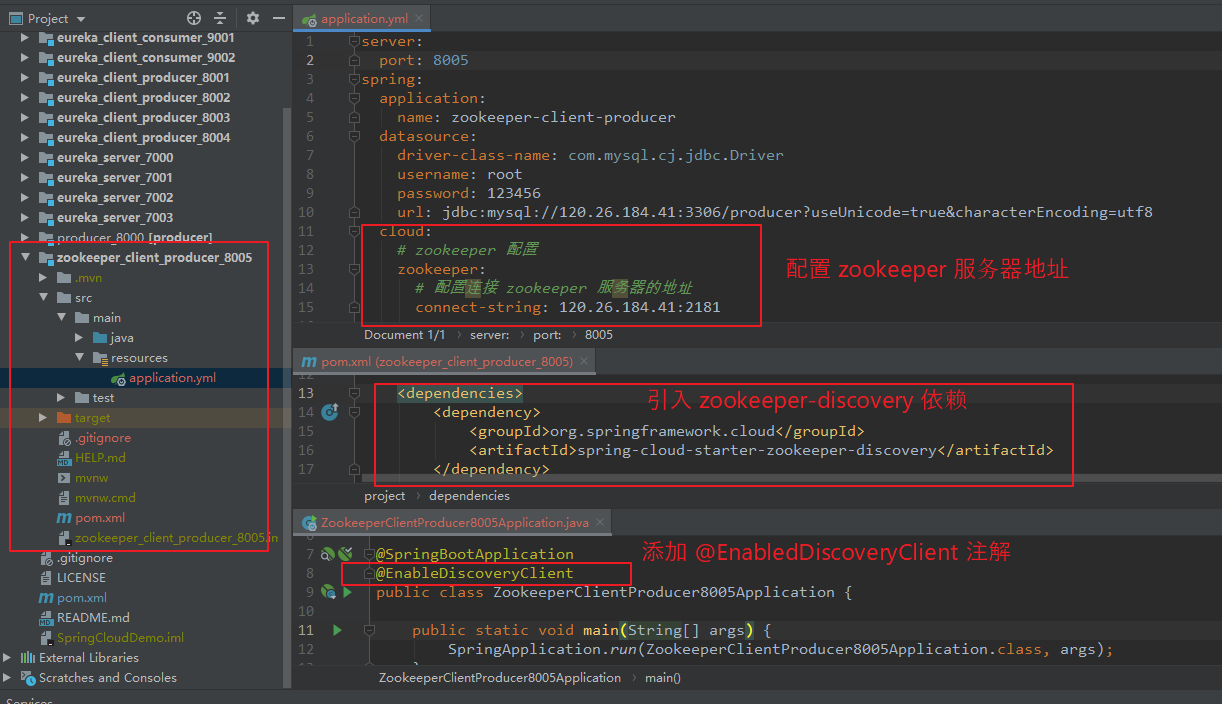
启动服务,在 zookeeper 服务器端,执行 zkCli.sh 进入客户端,可以查看到 注册节点 的信息。
注:
默认是临时节点,服务一旦宕机,zookeeper 将会将该节点移除。

(3)同理创建 zookeeper_client_consumer_9003 模块
修改子模块 与 父模块 pom.xml 文件(与前面创建模块类似,此处省略)。
引入 zookeeper_discovery 依赖。
修改 application.yml 配置文件。
在启动类上添加 @EnableDiscoveryClient 注解(不添加好像也可以正常注册)。
引入 RestTemplate 时,需要添加 @LoadBalanced,并修改访问地址为 服务名。
【依赖:】
<dependency>
    <groupId>org.springframework.cloud</groupId>
    <artifactId>spring-cloud-starter-zookeeper-discovery</artifactId>
</dependency>

【application.yml】
server:
  port: 9003
spring:
  application:
    name: zookeeper-client-consumer
  cloud:
    zookeeper:
      connect-string: 120.26.184.41:2181
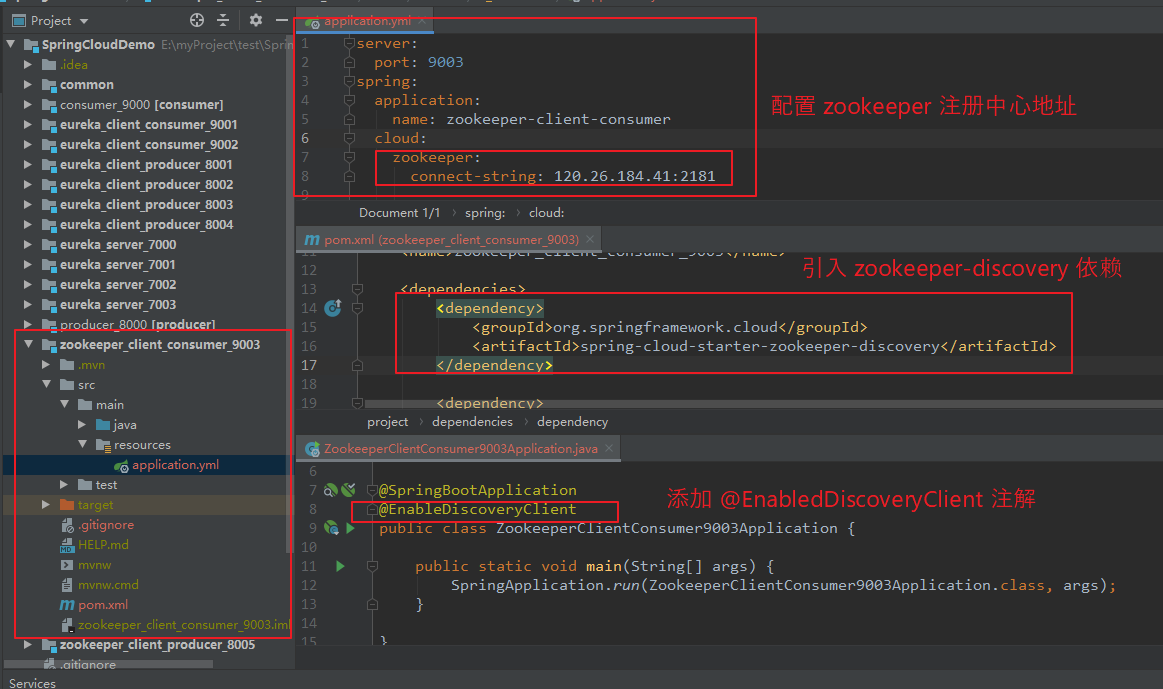
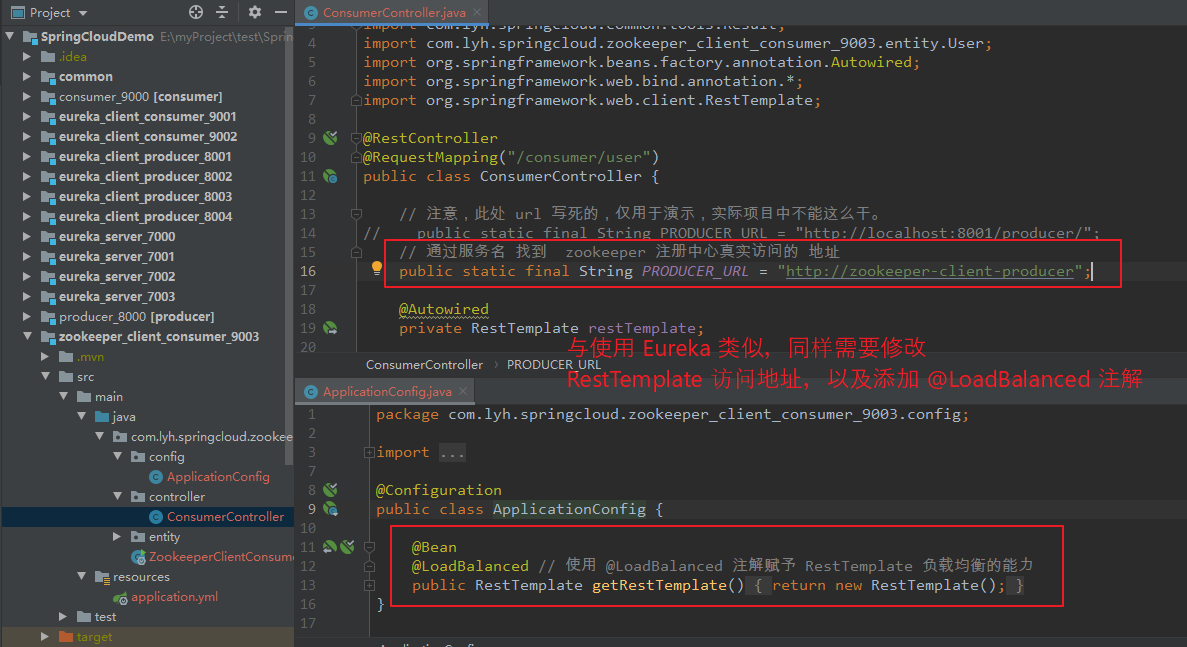
启动服务,可以在注册中心看到已经注册的服务。


4、Zookeeper 伪集群版(docker-compose 启动)
(1)集群角色说明
Zookeeper Server 集群不同于 Eureka,其节点之间存在主从之分,其一个 Server 断开后,将会在剩余节点中 重新选举出一个 Leader。
【Server 节点角色:】
    Leader       主节点
    Follower     从节点(参与选举主节点)
    Observer     从节点(不参与选举主节点)
进入 zookeeper 容器的 bin 目录后,可以通过 zkServer.sh status 查看当前服务的角色。

(2)项目说明:
【项目说明:】
    与 Eureka 类似,需要对 Server 以及 producer 作出集群处理。
    此处使用 docker-compose 进行 Server 集群(伪集群)处理。
    创建 zookeeper_client_producer_8006、zookeeper_client_producer_8007、zookeeper_client_producer_8008 作为 producer 集群。
    创建 zookeeper_client_consumer_9004 作为服务消费者,进行服务调用。
(3) 通过 docker-compose 启动 Zookeeper 集群
【docker-compose.yml】
# 指定 compose 文件版本,与 docker 兼容,高版本的 docker 一般使用 3.x。
version: '3.7'

services:
  # 设置服务名
  zookeeper_service2:
    # 配置所使用的镜像
    image: zookeeper
    # 容器总是重启
    restart: always
    # 容器名称
    container_name: zookeeper_service2
    #与宿主机的端口映射
    ports:
      - 2182:2181
    #容器目录映射
    volumes:
      - /usr/mydata/zookeeper/zookeeper_service2/data:/data
      - /usr/mydata/zookeeper/zookeeper_service2/datalog:/datalog
    # 设置环境变量
    environment:
      # Server 唯一标识(1 - 255)
      ZOO_MY_ID: 2
      # 指定服务信息,格式: server.A=B:C:D;E
      # 其中: A 表示服务器标识,B 是服务器 ip(服务名),C 是服务器与集群中 Leader 进行交互的端口,D 是用来选取新 Leader 进行交互的端口, E 为端口号
      ZOO_SERVERS: server.2=zookeeper_service2:2888:3888;2181 server.3=zookeeper_service3:2888:3888;2181 server.4=zookeeper_service4:2888:3888;2181

  # 设置服务名
  zookeeper_service3:
    # 配置所使用的镜像
    image: zookeeper
    # 容器总是重启
    restart: always
    # 容器名称
    container_name: zookeeper_service3
    #与宿主机的端口映射
    ports:
      - 2183:2181
    #容器目录映射
    volumes:
      - /usr/mydata/zookeeper/zookeeper_service3/data:/data
      - /usr/mydata/zookeeper/zookeeper_service3/datalog:/datalog
    # 设置环境变量
    environment:
      # Server 唯一标识(自然数)
      ZOO_MY_ID: 3
      # 指定服务信息,格式: server.A=B:C:D;E
      # 其中: A 表示服务器标识,B 是服务器 ip(服务名),C 是服务器与集群中 Leader 进行交互的端口,D 是用来选取新 Leader 进行交互的端口, E 为端口号
      ZOO_SERVERS: server.2=zookeeper_service2:2888:3888;2181 server.3=zookeeper_service3:2888:3888;2181 server.4=zookeeper_service4:2888:3888;2181

  # 设置服务名
  zookeeper_service4:
    # 配置所使用的镜像
    image: zookeeper
    # 容器总是重启
    restart: always
    # 容器名称
    container_name: zookeeper_service4
    #与宿主机的端口映射
    ports:
      - 2184:2181
    #容器目录映射
    volumes:
      - /usr/mydata/zookeeper/zookeeper_service4/data:/data
      - /usr/mydata/zookeeper/zookeeper_service4/datalog:/datalog
    # 设置环境变量
    environment:
      # Server 唯一标识(自然数)
      ZOO_MY_ID: 4
      # 指定服务信息,格式: server.A=B:C:D;E
      # 其中: A 表示服务器标识,B 是服务器 ip(服务名),C 是服务器与集群中 Leader 进行交互的端口,D 是用来选取新 Leader 进行交互的端口, E 为端口号
      ZOO_SERVERS: server.2=zookeeper_service2:2888:3888;2181 server.3=zookeeper_service3:2888:3888;2181 server.4=zookeeper_service4:2888:3888;2181

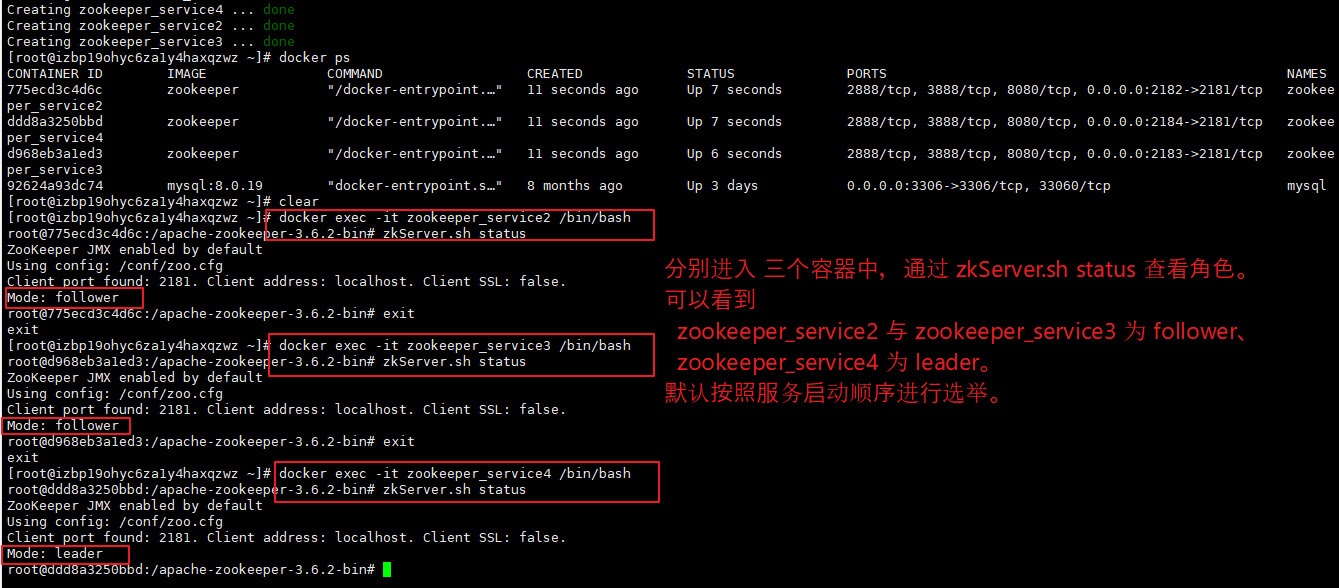
(4)创建 producer 集群。
与单机版创建 zookeeper_client_producer_8005 同样的流程创建 zookeeper_client_producer_8006、zookeeper_client_producer_8007、zookeeper_client_producer_8008。
此处省略创建过程。
唯一区别在于,配置注册中心地址时,配置集群上所有的 server 地址(以逗号隔开)。
【zookeeper_client_producer_8006 的 application.yml】
server:
  port: 8006
spring:
  application:
    name: zookeeper-client-producer
  datasource:
    driver-class-name: com.mysql.cj.jdbc.Driver
    username: root
    password: 123456
    url: jdbc:mysql://120.26.184.41:3306/producer?useUnicode=true&characterEncoding=utf8
  cloud:
    # zookeeper 配置
    zookeeper:
      # 配置连接 zookeeper 服务器的地址
      connect-string: 120.26.184.41:2181, 120.26.184.41:2182, 120.26.184.41:2183

【zookeeper_client_producer_8007 的 application.yml】
server:
  port: 8007
spring:
  application:
    name: zookeeper-client-producer
  datasource:
    driver-class-name: com.mysql.cj.jdbc.Driver
    username: root
    password: 123456
    url: jdbc:mysql://120.26.184.41:3306/producer?useUnicode=true&characterEncoding=utf8
  cloud:
    # zookeeper 配置
    zookeeper:
      # 配置连接 zookeeper 服务器的地址
      connect-string: 120.26.184.41:2181, 120.26.184.41:2182, 120.26.184.41:2183

【zookeeper_client_producer_8008 的 application.yml】
server:
  port: 8008
spring:
  application:
    name: zookeeper-client-producer
  datasource:
    driver-class-name: com.mysql.cj.jdbc.Driver
    username: root
    password: 123456
    url: jdbc:mysql://120.26.184.41:3306/producer?useUnicode=true&characterEncoding=utf8
  cloud:
    # zookeeper 配置
    zookeeper:
      # 配置连接 zookeeper 服务器的地址
      connect-string: 120.26.184.41:2181, 120.26.184.41:2182, 120.26.184.41:2183
启动三个服务,可以在 服务器查看到 三个服务的 节点。

(5)创建 consumer
与创建 zookeeper_client_consumer_9003 同样流程创建 zookeeper_client_consumer_9004,
此处创建流程省略。
唯一区别在于,配置注册中心地址时,配置集群上所有的 server 地址(以逗号隔开)。
【application.yml】
server:
  port: 9004
spring:
  application:
    name: zookeeper-client-consumer
  cloud:
    zookeeper:
      connect-string: 120.26.184.41:2181, 120.26.184.41:2182, 120.26.184.41:2183

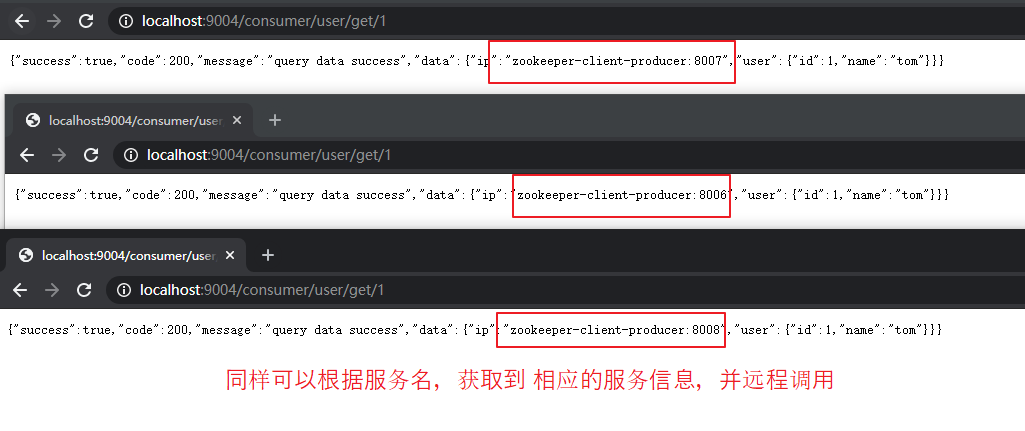
(6)实现 Discovery
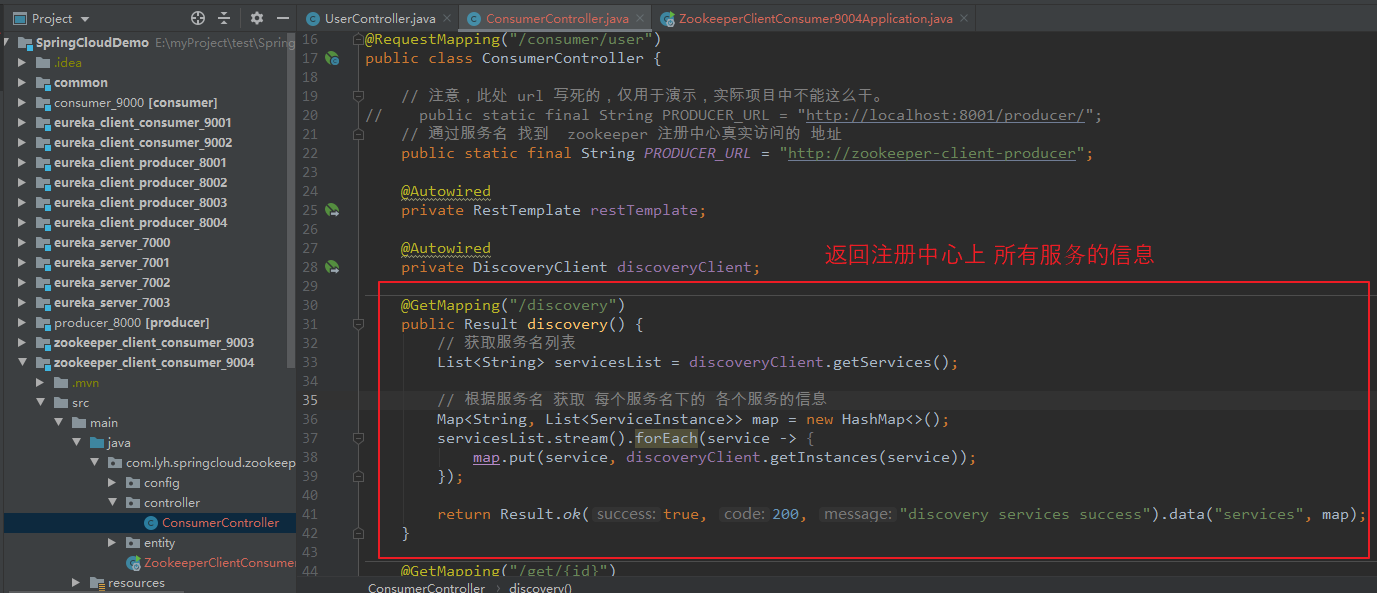
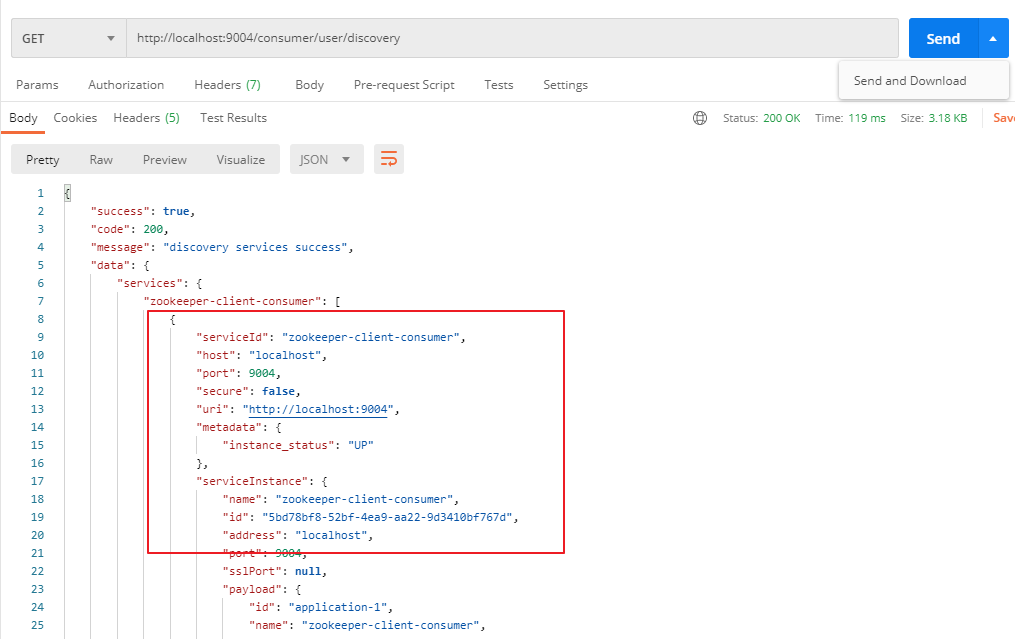
Discovery 代码与 Eureka 代码一致(同样通过 DiscoveryClient 进行操作)。
【ConsumerController:】
package com.lyh.springcloud.zookeeper_client_consumer_9004.controller;

import com.lyh.springcloud.common.tools.Result;
import com.lyh.springcloud.zookeeper_client_consumer_9004.entity.User;
import org.springframework.beans.factory.annotation.Autowired;
import org.springframework.cloud.client.ServiceInstance;
import org.springframework.cloud.client.discovery.DiscoveryClient;
import org.springframework.web.bind.annotation.*;
import org.springframework.web.client.RestTemplate;

import java.util.HashMap;
import java.util.List;
import java.util.Map;

@RestController
@RequestMapping("/consumer/user")
public class ConsumerController {

    // 注意,此处 url 写死的,仅用于演示,实际项目中不能这么干。
//    public static final String PRODUCER_URL = "http://localhost:8001/producer/";
    // 通过服务名 找到  zookeeper 注册中心真实访问的 地址
    public static final String PRODUCER_URL = "http://zookeeper-client-producer";

    @Autowired
    private RestTemplate restTemplate;

    @Autowired
    private DiscoveryClient discoveryClient;

    @GetMapping("/discovery")
    public Result discovery() {
        // 获取服务名列表
        List<String> servicesList = discoveryClient.getServices();

        // 根据服务名 获取 每个服务名下的 各个服务的信息
        Map<String, List<ServiceInstance>> map = new HashMap<>();
        servicesList.stream().forEach(service -> {
            map.put(service, discoveryClient.getInstances(service));
        });

        return Result.ok(true, 200, "discovery services success").data("services", map);
    }

    @GetMapping("/get/{id}")
    public Result getUser(@PathVariable Integer id) {
        return restTemplate.getForObject(PRODUCER_URL + "/producer/user/get/" + id, Result.class);
    }

    @PostMapping("/create")
    public Result createUser(@RequestBody User user) {
        return restTemplate.postForObject(PRODUCER_URL + "/producer/user/create", user, Result.class);
    }
}
5、Zookeeper 真集群版(docker-compose 启动)
(1)说明
【说明:】
    真集群版 与 伪集群版 基本操作还是一致的,除了 docker-compose.yml 有些许区别。
    此处仅搭建出 server 真集群环境(以及解决搭建环境遇到的坑),其余操作均与伪集群类似,不在重复讲述。

【环境:】
    zookeeper 集群节点数量一般为 奇数。
    此处使用的是 阿里云两台服务器(财力有限,凑合一下)。
云服务器:
    120.26.184.41
    182.92.120.184
(2)前提条件(开放端口)
【服务器 通过 端口 进行 数据交互:】
    由于 zookeeper server 部署在不同的服务器上,而服务器 选举 以及 数据同步 需要进行交互,
    之前搭建伪集群时也提到了三个端口 2181、2888、3888,想要服务器之间正常交互,就需要开放这三个端口、并对其进行映射。
注:
    2181 是对客户端提供服务的端口。
    2888 是服务器与集群中 Leader 进行数据交互的端口。
    3888 是用来选取新 Leader 进行交互的端口。

若需要开放端口,进入 阿里云 官网,找到相应的阿里云服务器,并添加 安全组 规则(在入方向中开放指定的端口)。

(3)搭建环境遇到的坑 以及 解决
【问题一:】
    docker-compose up -d 启动容器后,
    通过 docker-compose logs -f 查看日志发现,无法通过 3888 或者 2888 进行通信。

在 182.92.120.184 查看日志报错信息:
    Cannot open channel to 3 at election address /120.26.184.41:3888

在 120.26.184.41 查看日志报错信息:
    Cannot open channel to 3 at election address /182.92.120.184:3888

注:
    极大的可能是因为 端口未开放 或者 端口未做映射。

【问题二:】
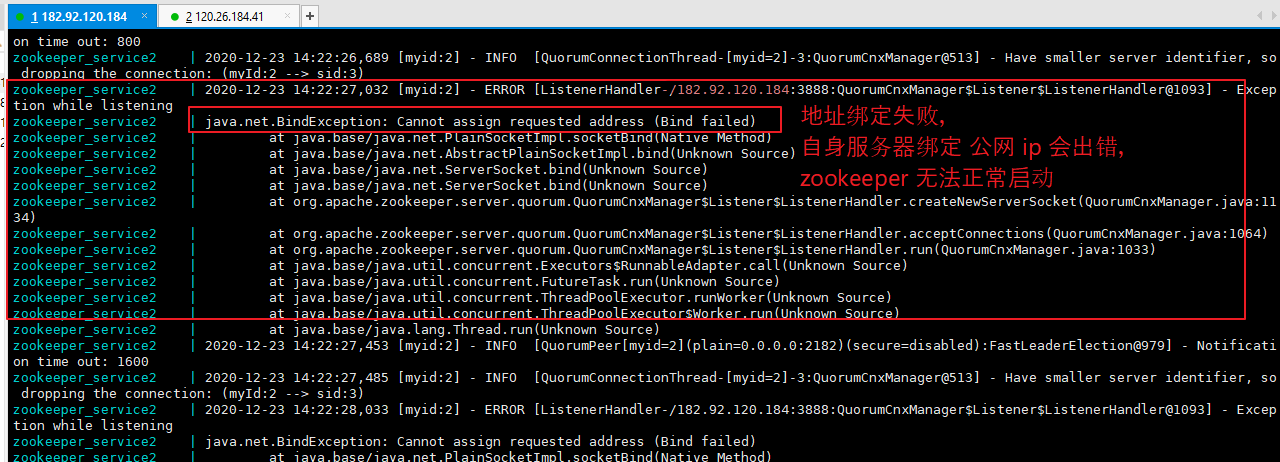
在 182.92.120.184 查看日志报错信息:
    /182.92.120.184:3888:QuorumCnxManager$Listener$ListenerHandler@1093] - Exception while listening
    java.net.BindException: Cannot assign requested address (Bind failed)

注:
    极大的可能是配置 自身服务器 ip 时,使用了公网 ip.

【如何解决(标准步骤、亲测有效):】
对于某个服务器配置步骤如下:
Step1:
    进入阿里云官网,找到对应的服务器,并配置安全组规则,开放 2182、2888、3888 端口。

Step2:
    指定端口映射,将开放的端口与 2181、2888、3888 进行映射。
注:
    服务器端口开放后,如果不进行映射,端口效果等同于未开放。

Step3:
    指定服务器 ip 时(配置),
    对于本身服务器地址,可以使用 服务名 或者 0.0.0.0 进行替代,不要使用 公网 ip(会出错)。
    对于其他服务器,直接使用公网 ip 即可。

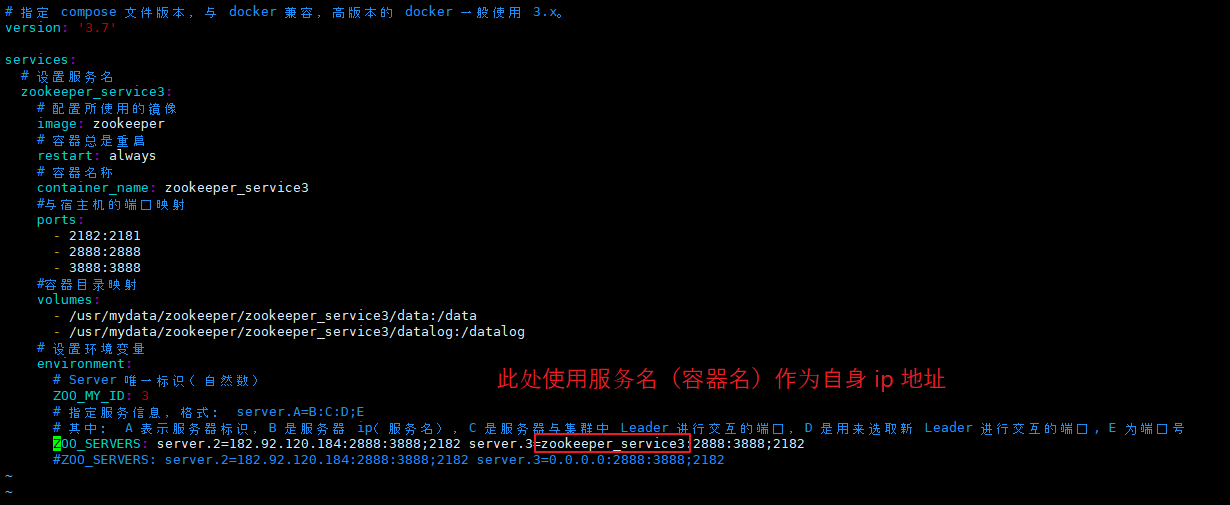
(4)在 120.26.184.41 服务器上通过 docker-compose.yml 启动 zookeeper。
此处使用 服务名(容器名)替代 自身 ip 地址。
【docker-compose.yml】
# 指定 compose 文件版本,与 docker 兼容,高版本的 docker 一般使用 3.x。
version: '3.7'

services:
  # 设置服务名
  zookeeper_service3:
    # 配置所使用的镜像
    image: zookeeper
    # 容器总是重启
    restart: always
    # 容器名称
    container_name: zookeeper_service3
    #与宿主机的端口映射
    ports:
      - 2182:2181
      - 2888:2888
      - 3888:3888
    #容器目录映射
    volumes:
      - /usr/mydata/zookeeper/zookeeper_service3/data:/data
      - /usr/mydata/zookeeper/zookeeper_service3/datalog:/datalog
    # 设置环境变量
    environment:
      # Server 唯一标识(自然数)
      ZOO_MY_ID: 3
      # 指定服务信息,格式: server.A=B:C:D;E
      # 其中: A 表示服务器标识,B 是服务器 ip(服务名),C 是服务器与集群中 Leader 进行交互的端口,D 是用来选取新 Leader 进行交互的端口, E 为端口号
      ZOO_SERVERS: server.2=182.92.120.184:2888:3888;2182 server.3=zookeeper_service3:2888:3888;2182
      #ZOO_SERVERS: server.2=182.92.120.184:2888:3888;2182 server.3=0.0.0.0:2888:3888;2182
(5)在 182.92.120.184 服务器上通过 docker-compose.yml 启动 zookeeper。
此处使用 0.0.0.0 替代 自身 ip 地址。
【docker-compose.yml】
# 指定 compose 文件版本,与 docker 兼容,高版本的 docker 一般使用 3.x。
version: '3.7'

services:
  # 设置服务名
  zookeeper_service2:
    # 配置所使用的镜像
    image: zookeeper
    # 容器总是重启
    restart: always
    # 容器名称
    container_name: zookeeper_service2
    #与宿主机的端口映射
    ports:
      - 2182:2181
      - 2888:2888
      - 3888:3888
    #容器目录映射
    volumes:
      - /usr/mydata/zookeeper/zookeeper_service2/data:/data
      - /usr/mydata/zookeeper/zookeeper_service2/datalog:/datalog
    # 设置环境变量
    environment:
      # Server 唯一标识(1 - 255)
      ZOO_MY_ID: 2
      # 指定服务信息,格式: server.A=B:C:D;E
      # 其中: A 表示服务器标识,B 是服务器 ip(服务名),C 是服务器与集群中 Leader 进行交互的端口,D 是用来选取新 Leader 进行交互的端口, E 为端口号
      ZOO_SERVERS: server.2=0.0.0.0:2888:3888;2182 server.3=120.26.184.41:2888:3888;2182
      #ZOO_SERVERS: server.2=zookeeper_service2:2888:3888;2182 server.3=120.26.184.41:2888:3888;2182

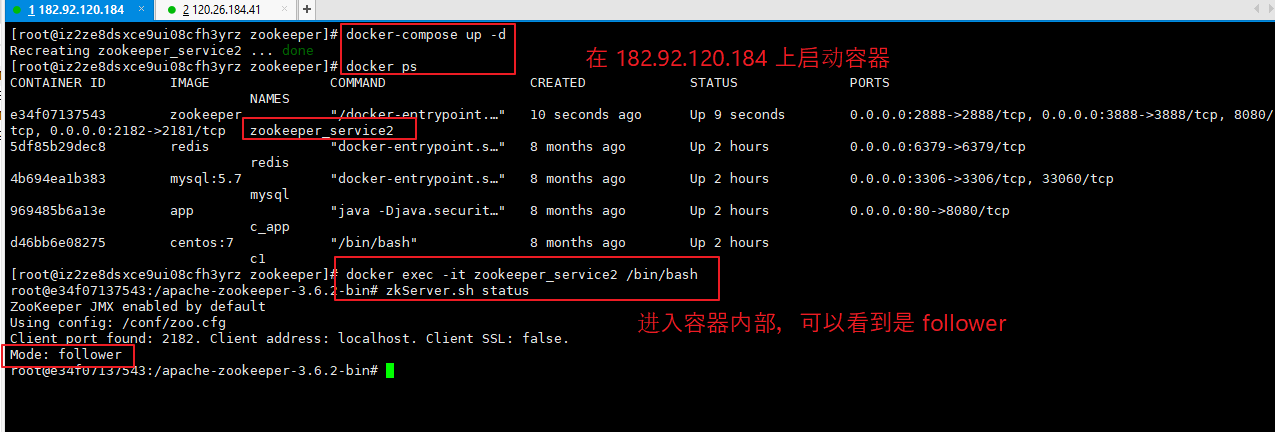
(6)分别在两个服务器上通过 docker-compose up -d 启动。
先在 182.92.120.184 上启动,然后在 120.26.184.41 上启动。
正常搭建后,server 角色 如下所示。
同理,若需要增加节点,按照上面三步操作即可。

五、服务注册与发现 -- Consul
1、什么是 Consul ?
(1)什么是 Consul ?
【Consul:】
    Consul 是一套开源的分布式服务发现和配置管理系统,由 HashiCorp 公司使用 Go 语言开发。
    提供了微服务系统中 服务发现、配置中心 等功能。

【官网地址:】
    https://www.consul.io/docs/intro
    https://learn.hashicorp.com/consul
    https://github.com/hashicorp/consul

注:
    官网解释还是挺详细的,请自行查阅。
    此处仅简单使用一下 Consul,具体原理没有仔细研究,后续有时间再补充。
(2)consul 角色
consul 与 zookeeper 类似,提供了可执行程序作为 服务端。
但其可以细分为两种角色(client、server)。
【角色:】
client:
    客户端, 无状态。
    consul agent --client
    将 HTTP 和 DNS 接口请求转发给局域网内的服务端集群。

server:
    服务端, 保存配置信息。
    可作为高可用集群, 在局域网内与本地客户端 client 通讯, 通过广域网与其他数据中心通讯。
    每个数据中心的 server 数量推荐为 3 个或是 5 个(奇数个)。
(3)常用端口说明:
【常用端口说明:】
8300:通常用于 server 节点,处理集群内部的请求(数据读写、复制)。
8301:通常用于单个数据中心的所有节点间相互通信(局域网 LAN 内信息同步)。
8302:通常用于单个或多个数据中心之间节点的相互通信(广域网 WAN 内信息同步)。
8500:通常用于提供 UI 服务、获取服务列表、注册服务、注销服务 等 HTTP 接口。
8600:通常作为 DNS 服务器,提供服务发现功能(通过节点名查询节点信息)。
2、官网下载、安装 consul -- windows
(1)从官网下载。
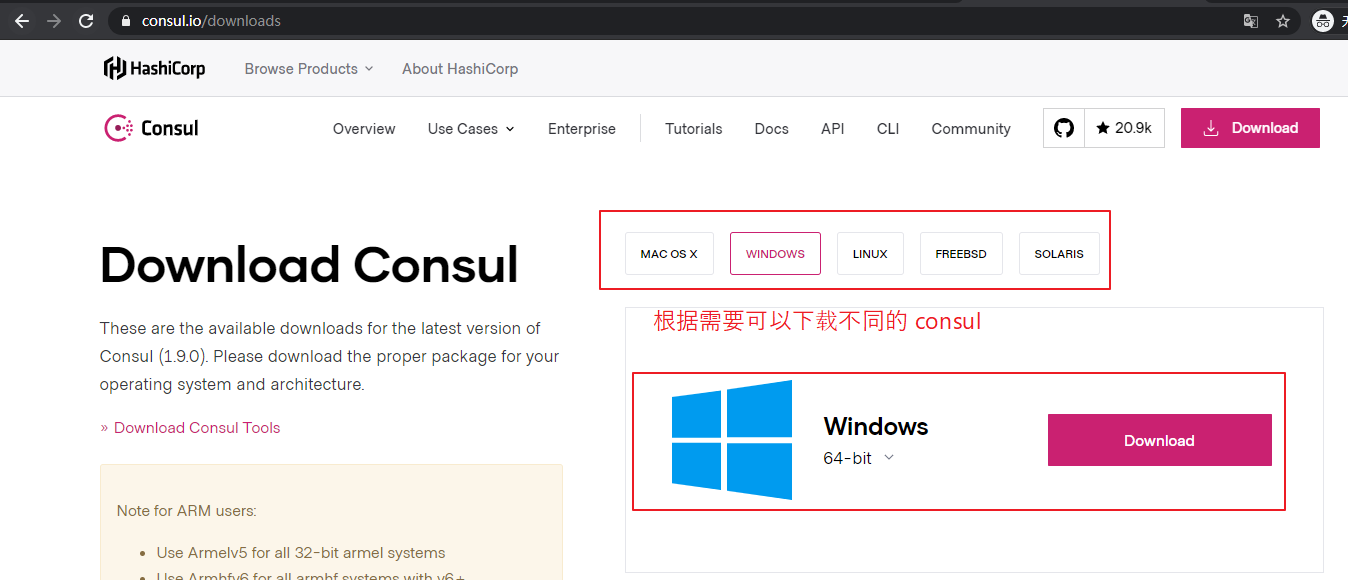
官网提供了各种版本的可执行程序,下载相应版本即可。
此处下载 windows 版本的 consul 为例,并使用。
【官网下载地址:】
    https://www.consul.io/downloads
(2)安装 consul
下载之后,可以得到一个可执行文件(consul.exe),双击即可运行(会闪一下弹窗)。
判断是否安装成功,可以进入命令行模式,输入 consul -version。
若正常输出版本号,则安装成功。


(3)启动 consul
命令行启动,默认通过 8500 端口可以访问 ui 界面。
【命令行输入:】
    consul agent -dev -client=0.0.0.0 -bootstrap-expect=1 -ui -node=consul_server1
参数说明:
    -client   指定客户端可以访问的 ip,默认为 127.0.0.1(不对外提供服务),设置成 0.0.0.0 表示不对客户端 ip 进行限制(对外提供服务)。
    -dev      以开发模式启动。
    -ui       可以使用 web 界面访问。
    -bootstrap-expect  表示集群中 server 节点个数,一般为奇数。
    -node     表示节点在 web ui 界面中显示的名称。

3、SpringCloud 整合 consul -- 单机版
(1)说明:
【说明:】
    SpringCloud 整合 consul,与 SpringCloud 整合 Zookeeper 是非常类似的。
    通过上面步骤已经成功启动了 Server 节点,现在只需要将服务注册进 Server 即可。

与 Zookeeper 类似,客户端也可分为 服务提供者、服务消费者。

创建与 zookeeper_client_producer_8005 类似的 consul_client_producer_8009 作为 服务提供者。
创建与 zookeeper_client_consumer_9003 类似的 consul_client_consumer_9005 作为 服务消费者。
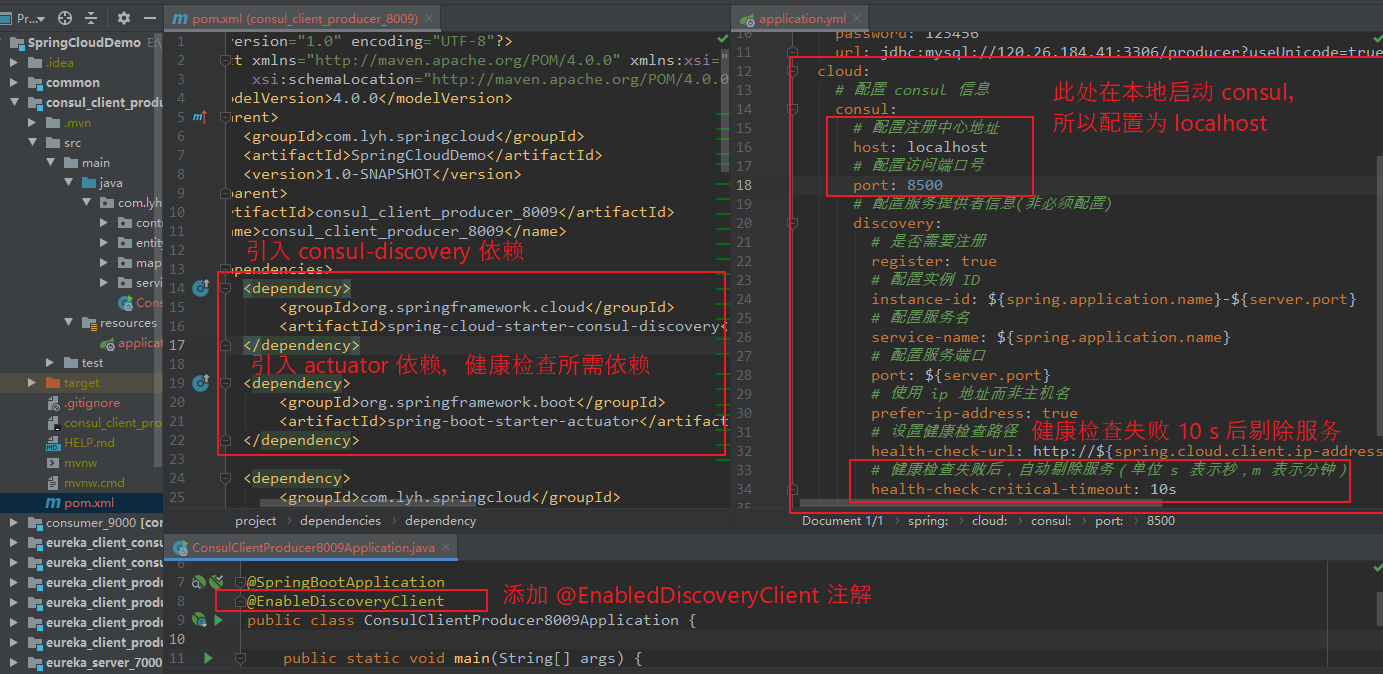
(2)创建 consul_client_producer_8009 子模块。
修改子模块 与 父模块 pom.xml 文件(与前面创建模块类似,此处省略)。
引入 consul_discovery 依赖 以及 actuator 依赖。
修改 application.yml 配置文件。
在启动类上添加 @EnableDiscoveryClient 注解(不添加好像也可以正常注册)。
【依赖:】
<dependency>
    <groupId>org.springframework.cloud</groupId>
    <artifactId>spring-cloud-starter-consul-discovery</artifactId>
</dependency>
<dependency>
    <groupId>org.springframework.boot</groupId>
    <artifactId>spring-boot-starter-actuator</artifactId>
</dependency>

【application.yml】
server:
  port: 8009

spring:
  application:
    name: consul_client_producer
  datasource:
    driver-class-name: com.mysql.cj.jdbc.Driver
    username: root
    password: 123456
    url: jdbc:mysql://120.26.184.41:3306/producer?useUnicode=true&characterEncoding=utf8
  cloud:
    # 配置 consul 信息
    consul:
      # 配置注册中心地址
      host: localhost
      # 配置访问端口号
      port: 8500
      # 配置服务提供者信息(非必须配置)
      discovery:
        # 是否需要注册
        register: true
        # 配置实例 ID
        instance-id: ${spring.application.name}-${server.port}
        # 配置服务名
        service-name: ${spring.application.name}
        # 配置服务端口
        port: ${server.port}
        # 使用 ip 地址而非主机名
        prefer-ip-address: true
        # 设置健康检查路径
        health-check-url: http://${spring.cloud.client.ip-address}:${server.port}/actuator/health
        # 健康检查失败后,自动剔除服务(单位 s 表示秒,m 表示分钟)
        health-check-critical-timeout: 10s
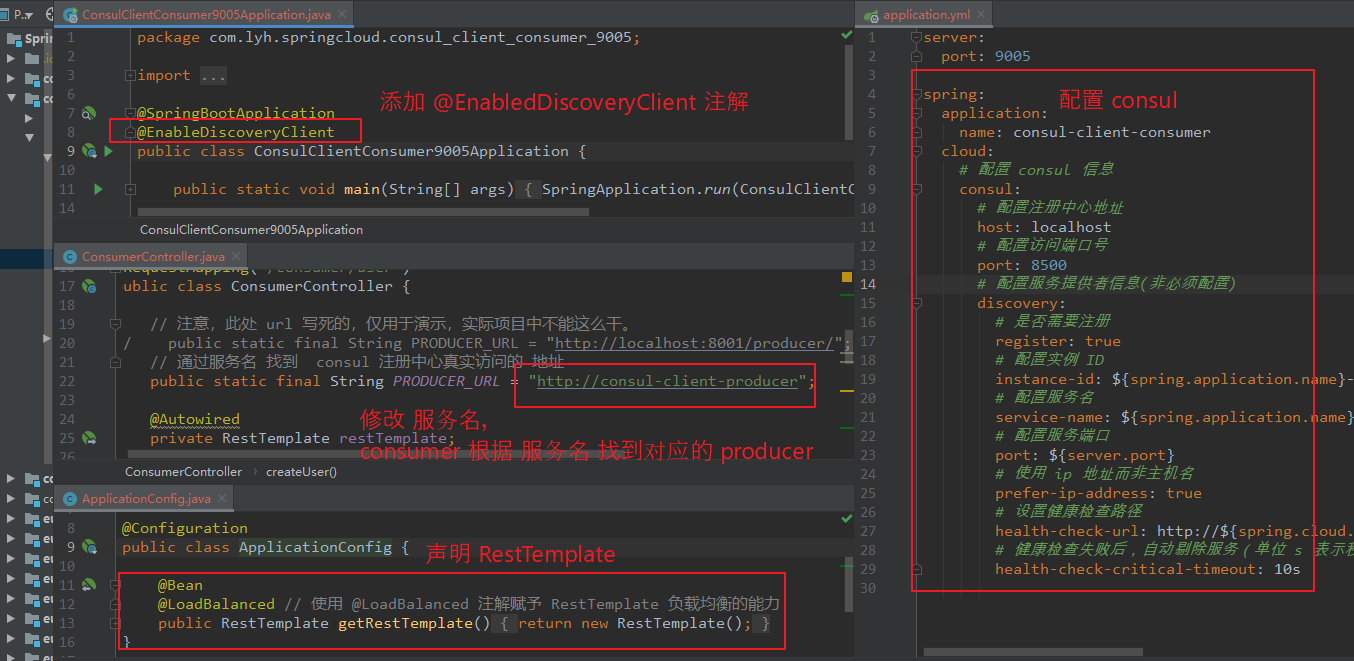
(3)创建 consul_client_consumer_9005 模块。
修改子模块 与 父模块 pom.xml 文件(与前面创建模块类似,此处省略)。
引入 consul_discovery 依赖 以及 actuator 依赖。
修改 application.yml 配置文件。
在启动类上添加 @EnableDiscoveryClient 注解(不添加好像也可以正常注册)。
引入 RestTemplate 时,需要添加 @LoadBalanced,并修改访问地址为 服务名。
【依赖:】
<dependency>
    <groupId>org.springframework.cloud</groupId>
    <artifactId>spring-cloud-starter-consul-discovery</artifactId>
</dependency>
<dependency>
    <groupId>org.springframework.boot</groupId>
    <artifactId>spring-boot-starter-actuator</artifactId>
</dependency>

【application.yml】
server:
  port: 9005

spring:
  application:
    name: consul-client-consumer
  cloud:
    # 配置 consul 信息
    consul:
      # 配置注册中心地址
      host: localhost
      # 配置访问端口号
      port: 8500
      # 配置服务提供者信息(非必须配置)
      discovery:
        # 是否需要注册
        register: true
        # 配置实例 ID
        instance-id: ${spring.application.name}-${server.port}
        # 配置服务名
        service-name: ${spring.application.name}
        # 配置服务端口
        port: ${server.port}
        # 使用 ip 地址而非主机名
        prefer-ip-address: true
        # 设置健康检查路径
        health-check-url: http://${spring.cloud.client.ip-address}:${server.port}/actuator/health
        # 健康检查失败后,自动剔除服务(单位 s 表示秒,m 表示分钟)
        health-check-critical-timeout: 10s
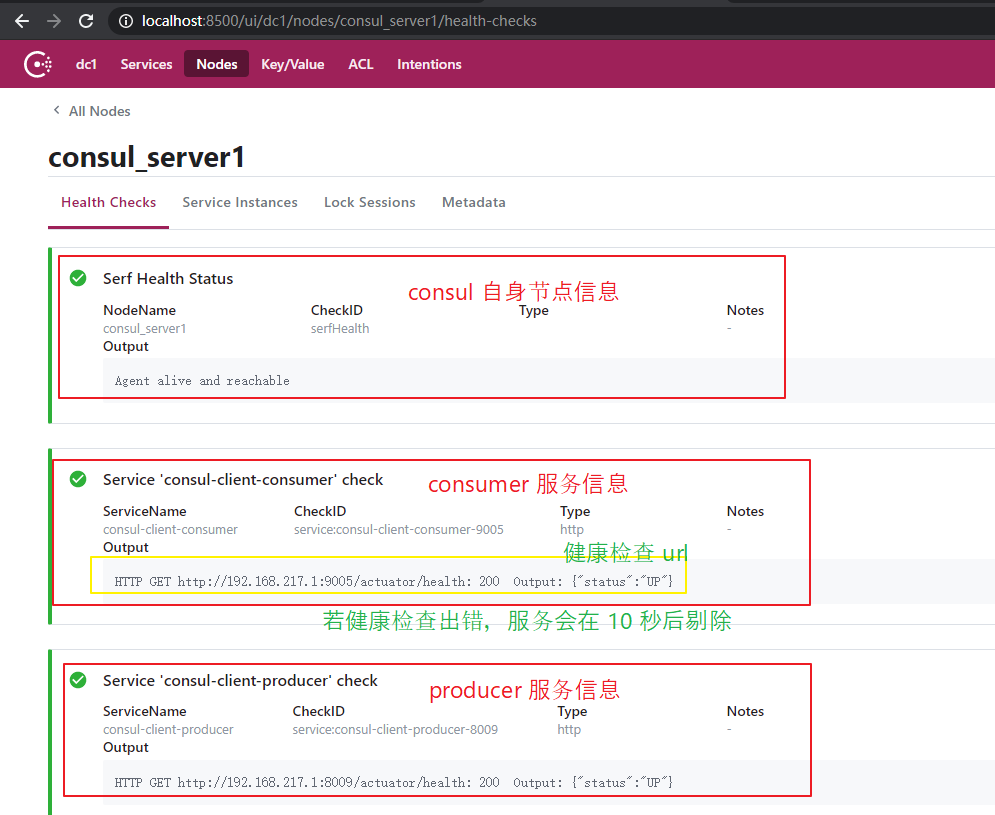
(4)分别启动两个服务
可以在 consul UI 界面看到服务信息。

4、健康检查出错问题
(1)健康检查出错分析
分析一:
一般是 actuator 依赖未添加(能解决大部分问题)。
分析二:
如果添加 actuator 依赖后仍出错,可能是服务器的问题。
一般是通过健康检查的 URL 无法访问服务。
比如:
若使用 云服务器安装并部署 consul,而在本地启动 服务时,此时 健康检查 可能会出错,服务器调用健康检查请求 被拒绝(因为此时 健康检查 URL 非公网 IP 地址,无法访问到服务)。将服务同样部署在 服务器上,将服务器公网 IP 作为健康检查 URL 地址(并开放相关端口),此时通过公网 IP 可以访问到服务,从而健康检查成功。
详见后面 docker-compose 启动 consul 单机版。
(2)添加 actuator 依赖
大多数情况下,添加上 actuator 依赖即可解决问题。
<dependency>
    <groupId>org.springframework.boot</groupId>
    <artifactId>spring-boot-starter-actuator</artifactId>
</dependency>

5、docker-compose 启动 consul 单机版
(1)docker-compose.yml 文件如下:
【docker-compose.yml:】
# 指定 compose 文件版本,与 docker 兼容,高版本的 docker 一般使用 3.x。
version: '3.7'

services:
  # 设置服务名
  consul_server1:
    # 配置所使用的镜像
    image: consul
    # 容器总是重启
    restart: always
    # 容器名称
    container_name: consul_server1
    #与宿主机的端口映射
    ports:
      - 8500:8500
      - 8300:8300
      - 8301:8301
      - 8302:8302
      - 8600:8600
    #容器目录映射
    volumes:
      - /usr/mydata/consul/consul_server1/data:/consul/data
      - /usr/mydata/consul/consul_server1/config:/consul/config
    # 覆盖容器默认启动命令
    command: agent -server -bind=0.0.0.0 -client=0.0.0.0 -bootstrap-expect=1 -ui -node=consul_server1

【command 参数解释:】
    -server   以服务端角色启动。
    -client   指定客户端可以访问的 ip,默认为 127.0.0.1(不对外提供服务),设置成 0.0.0.0 表示不对客户端 ip 进行限制(对外提供服务)。
    -dev      以开发模式启动。
    -bind     表示绑定到指定 ip。
    -ui       可以使用 web 界面访问。
    -bootstrap-expect  表示集群中 server 节点个数,一般为奇数。
    -node     表示节点在 web ui 界面中显示的名称。
    -retry-join 表示加入集群中去,加入失败后可以重新加入
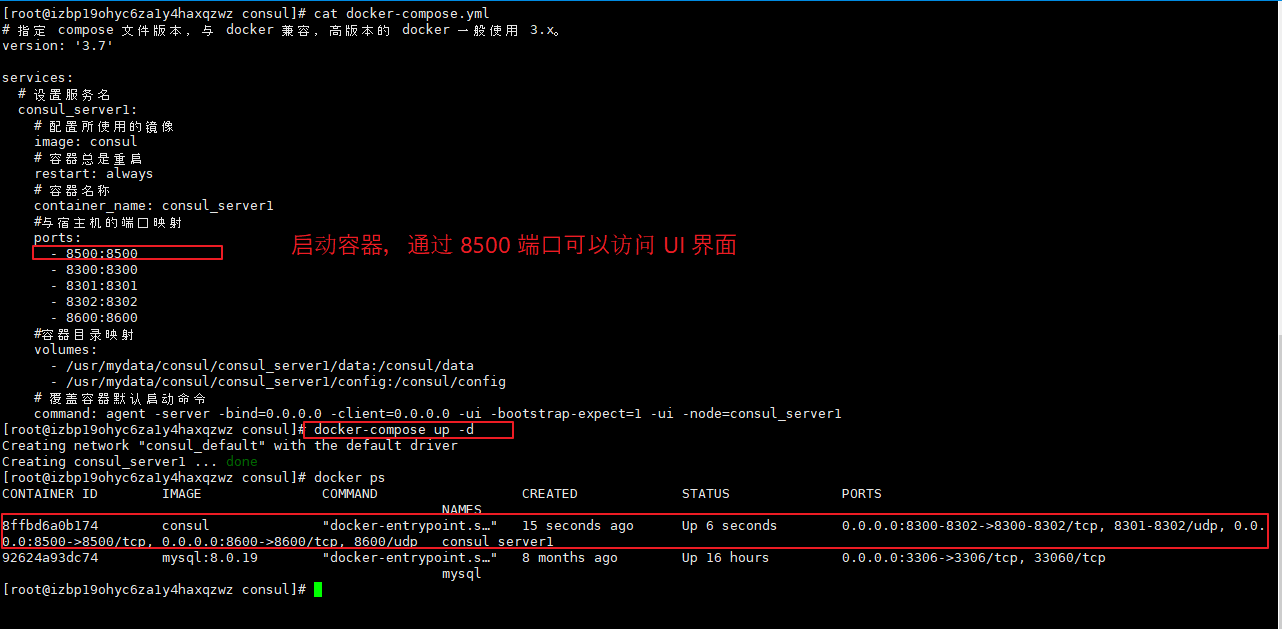
(2)查看集群中成员
通过 consul members 可以查看集群中成员状态。
比如:
docker exec -t consul_server1 consul members
注:
consul_server1 是容器名称。

(3)访问 UI 界面,可以查看到节点情况。
启动正常情况,访问界面如下:
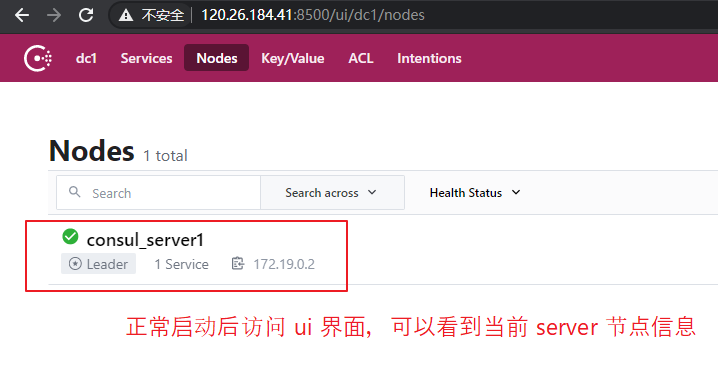
启动失败情况,访问页面出现 500 错误,如下:
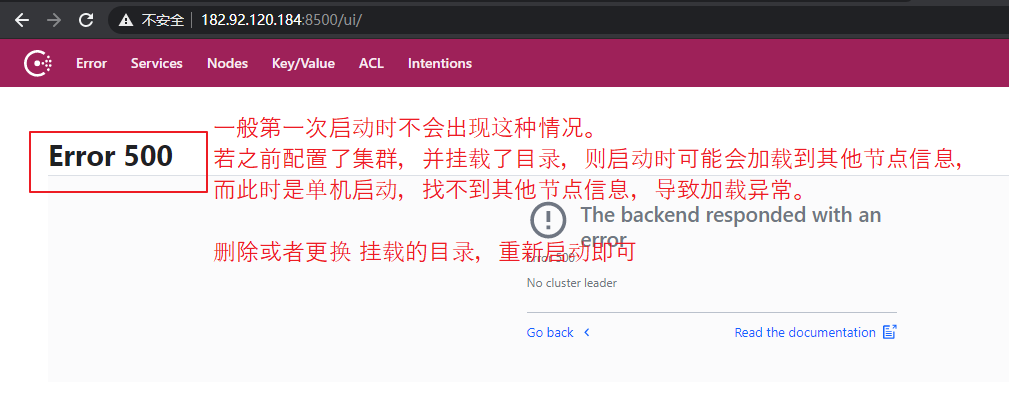
(4)演示健康检查出错
由于此处在 云服务器上启动 consul 服务器,而服务还是在本地启动。
修改服务的 配置文件,将其注册中心地址改为云服务器公网 IP 地址: 120.26.184.41。
以 consul_client_consumer_9005 为例,修改如下图所示:
server:
  port: 9005

spring:
  application:
    name: consul-client-consumer
  cloud:
    # 配置 consul 信息
    consul:
      # 配置注册中心地址
      host: 120.26.184.41
      # 配置访问端口号
      port: 8500
      # 配置服务提供者信息(非必须配置)
      discovery:
        # 是否需要注册
        register: true
        # 配置实例 ID
        instance-id: ${spring.application.name}-${server.port}
        # 配置服务名
        service-name: ${spring.application.name}
        # 配置服务端口
        port: ${server.port}
        # 使用 ip 地址而非主机名
        prefer-ip-address: true
        # 设置健康检查路径
        health-check-url: http://${spring.cloud.client.ip-address}:${server.port}/actuator/health
        # 健康检查失败后,自动剔除服务(单位 s 表示秒,m 表示分钟)
        health-check-critical-timeout: 10s
management:
  endpoint:
    health:
      #显示健康具体信息,默认不会显示详细信息
      show-details: always
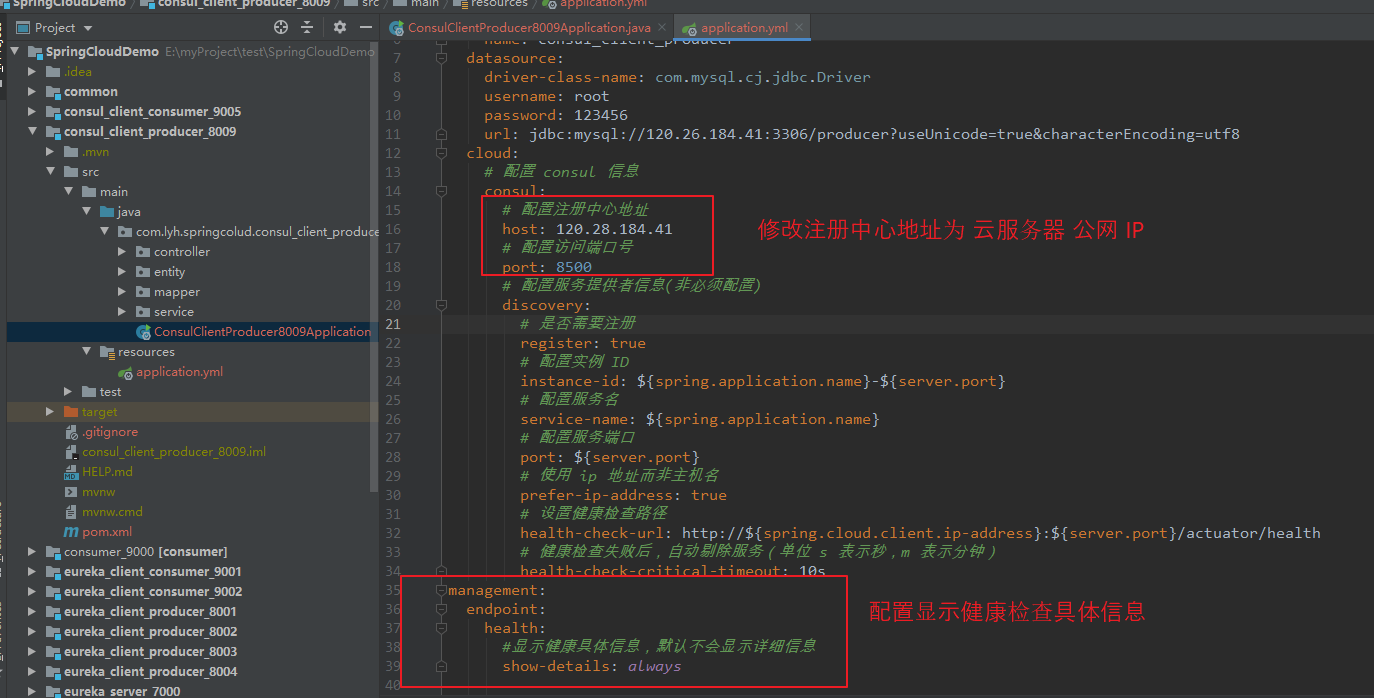
重新启动服务后,发现健康检查出错。
注:
服务本地启动是没问题的,但是服务器 通过 健康检查 URL 访问不到服务。

修改服务配置文件,将健康检查 URL 设置成 服务器公网 IP 地址,并将服务打包部署到 服务器上(需要配置安全组,开放端口),此时健康检查通过公网 IP 可以访问到 服务。
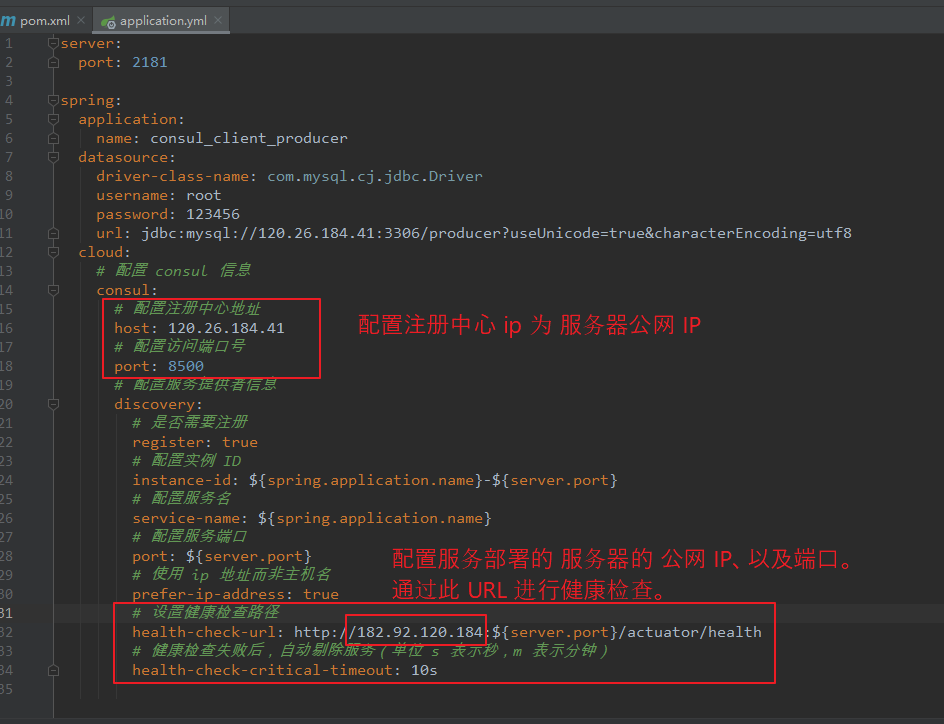

6、docker-compose 启动 consul 伪集群
(1)说明
篇幅有限,此处仅演示 docker-compose 启动伪集群,不创建服务模块进行演示。
(2)伪集群
docker-compose.yml 文件如下。
启动三个容器,consul_server1、consul_server2、consul_server3 均以 server 模式启动。
【docker-compose.yml】
# 指定 compose 文件版本,与 docker 兼容,高版本的 docker 一般使用 3.x。
version: '3.7'

services:
  # 设置服务名
  consul_server1:
    # 配置所使用的镜像
    image: consul
    # 容器总是重启
    restart: always
    # 容器名称
    container_name: consul_server1
    #与宿主机的端口映射
    ports:
      - 8500:8500
    #容器目录映射
    volumes:
      - /usr/mydata/consul/consul_server1/data:/consul/data
      - /usr/mydata/consul/consul_server1/config:/consul/config
    # 覆盖容器默认启动命令
    command: agent -server -bind=0.0.0.0 -client=0.0.0.0 -ui -bootstrap-expect=3 -ui -node=consul_server1

  # 设置服务名
  consul_server2:
    # 配置所使用的镜像
    image: consul
    # 容器总是重启
    restart: always
    # 容器名称
    container_name: consul_server2
    #与宿主机的端口映射
    ports:
      - 8501:8500
    #容器目录映射
    volumes:
      - /usr/mydata/consul/consul_server2/data:/consul/data
      - /usr/mydata/consul/consul_server2/config:/consul/config
    # 覆盖容器默认启动命令
    command: agent -server -bind=0.0.0.0 -client=0.0.0.0 -ui -bootstrap-expect=3 -ui -node=consul_server2 -join=consul_server1

  # 设置服务名
  consul_server3:
    # 配置所使用的镜像
    image: consul
    # 容器总是重启
    restart: always
    # 容器名称
    container_name: consul_server3
    #与宿主机的端口映射
    ports:
      - 8502:8500
    #容器目录映射
    volumes:
      - /usr/mydata/consul/consul_server3/data:/consul/data
      - /usr/mydata/consul/consul_server3/config:/consul/config
    # 覆盖容器默认启动命令
    command: agent -server -bind=0.0.0.0 -client=0.0.0.0 -ui -bootstrap-expect=3 -ui -node=consul_server3 -join=consul_server1

【command 参数解释:】
    -server   以服务端角色启动。
    -client   指定客户端可以访问的 ip,默认为 127.0.0.1(不对外提供服务),设置成 0.0.0.0 表示不对客户端 ip 进行限制(对外提供服务)。
    -dev      以开发模式启动。
    -bind     表示绑定到指定 ip。
    -ui       可以使用 web 界面访问。
    -bootstrap-expect  表示集群中 server 节点个数,一般为奇数。
    -node     表示节点在 web ui 界面中显示的名称。
    -join       表示加入集群中去。
    -retry-join 表示加入集群中去,加入失败后可以重新加入


consul 就简单介绍到这了,没有在实际工作中使用过,用到的时候再去研究一下。
有什么不对的地方,希望不吝赐教。