K近邻算法
给定一个训练数据集,对新的输入实例,在训练数据集中找到跟它最近的k个实例,根据这k个实例的类判断它自己的类(一般采用多数表决的方法)。
算法详解:
输入:训练数据集

其中, 为实例的特征向量,
 为实例的类别,
 实例特征向量
 ;
;
输出:实例 所属的类
所属的类 ;
;
(1)根据给定的距离度量,在训练集 中找出与最邻近的
 个点,涵盖这
 个点的的邻域记作
 ;
;
(2)在 中根据分类决策规则(如多数表决)决定的类别 :

注: 为指示函数,即当
 时
时 为1,否则
为1,否则 为0
为0
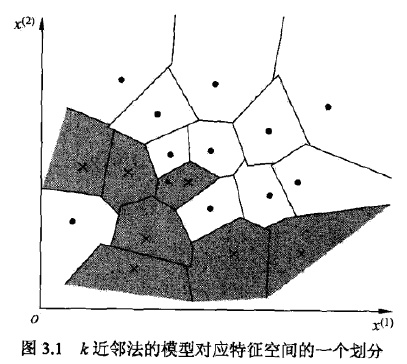
K近邻模型
模型三要素:距离度量方法、k值的选择和分类决策规则
当三要素确定的时候,对任何实例(训练或输入),它所属的类都是确定的,相当于将特征空间分为一些子空间。
距离度量
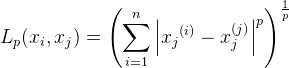
对n维实数向量空间Rn,经常用Lp距离或曼哈顿Minkowski距离。
Lp距离定义如下:
当p=2时,称为欧氏距离:

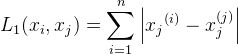
当p=1时,称为曼哈顿距离:
当p=∞,它是各个坐标距离的最大值,即:

用图表示如下:

k值的选择
k较小,容易被噪声影响,发生过拟合。
k较大,较远的训练实例也会对预测起作用,容易发生错误。
分类决策规则
使用0-1损失函数衡量,那么误分类率是:

 是近邻集合,要使左边最小,右边的
![]() 必须最大,所以多数表决=经验最小化 。
必须最大,所以多数表决=经验最小化 。
k近邻法的实现:kd树
算法核心在于怎么快速搜索k个近邻出来,朴素做法是线性扫描,不可取,这里介绍的方法是kd树。
构造kd树
对数据集T中的子集S初始化S=T,取当前节点node=root取维数的序数i=0,对S递归执行:找出S的第i维的中位数对应的点,通过该点,且垂直于第i维坐标轴做一个超平面。该点加入node的子节点。该超平面将空间分为两个部分,对这两个部分分别重复此操作(S=S',++i,node=current),直到不可再分。
例子:给定一个二维空间的数据集

构造一个平衡kd树 。
Python代码实现:


# -*- coding:utf-8 -*-

import copy
import itertools
from matplotlib import pyplot as plt
from matplotlib.patches import Rectangle
from matplotlib import animation

T = [[2, 3], [5, 4], [9, 6], [4, 7], [8, 1], [7, 2]]


def draw_point(data):
    X, Y = [], []
    for p in data:
        X.append(p[0])
        Y.append(p[1])
    plt.plot(X, Y, 'bo')


def draw_line(xy_list):
    for xy in xy_list:
        x, y = xy
        plt.plot(x, y, 'g', lw=2)


def draw_square(square_list):
    currentAxis = plt.gca()
    colors = itertools.cycle(["r", "b", "g", "c", "m", "y", '#EB70AA', '#0099FF'])
    for square in square_list:
        currentAxis.add_patch(
            Rectangle((square[0][0], square[0][1]), square[1][0] - square[0][0], square[1][1] - square[0][1],
                      color=next(colors)))


def median(lst):
    m = len(lst) / 2
    return lst[m], m


history_quare = []


def build_kdtree(data, d, square):
    history_quare.append(square)
    data = sorted(data, key=lambda x: x[d])
    p, m = median(data)

    del data[m]
    print data, p

    if m >= 0:
        sub_square = copy.deepcopy(square)
        if d == 0:
            sub_square[1][0] = p[0]
        else:
            sub_square[1][1] = p[1]
        history_quare.append(sub_square)
        if m > 0: build_kdtree(data[:m], not d, sub_square)
    if len(data) > 1:
        sub_square = copy.deepcopy(square)
        if d == 0:
            sub_square[0][0] = p[0]
        else:
            sub_square[0][1] = p[1]
        build_kdtree(data[m:], not d, sub_square)


build_kdtree(T, 0, [[0, 0], [10, 10]])
print history_quare

# draw an animation to show how it works, the data comes from history
# first set up the figure, the axis, and the plot element we want to animate
fig = plt.figure()
ax = plt.axes(xlim=(0, 2), ylim=(-2, 2))
line, = ax.plot([], [], 'g', lw=2)
label = ax.text([], [], '')


# initialization function: plot the background of each frame
def init():
    plt.axis([0, 10, 0, 10])
    plt.grid(True)
    plt.xlabel('x_1')
    plt.ylabel('x_2')
    plt.title('build kd tree (www.hankcs.com)')
    draw_point(T)


currentAxis = plt.gca()
colors = itertools.cycle(["#FF6633", "g", "#3366FF", "c", "m", "y", '#EB70AA', '#0099FF', '#66FFFF'])


# animation function.  this is called sequentially
def animate(i):
    square = history_quare[i]
    currentAxis.add_patch(
        Rectangle((square[0][0], square[0][1]), square[1][0] - square[0][0], square[1][1] - square[0][1],
                  color=next(colors)))
    return


# call the animator.  blit=true means only re-draw the parts that have changed.
anim = animation.FuncAnimation(fig, animate, init_func=init, frames=len(history_quare), interval=1000, repeat=False,
                               blit=False)
plt.show()
anim.save('kdtree_build.gif', fps=2, writer='imagemagick')

搜索kd树
上面的代码其实并没有搜索kd树,现在来实现搜索。
搜索跟二叉树一样来,是一个递归的过程。先找到目标点的插入位置,然后往上走,逐步用自己到目标点的距离画个超球体,用超球体圈住的点来更新最近邻(或k最近邻)。以最近邻为例,实现如下(本实现由于测试数据简单,没有做超球体与超立体相交的逻辑):
    # -*- coding:utf-8 -*-

    T = [[2, 3], [5, 4], [9, 6], [4, 7], [8, 1], [7, 2]]


    class node:
        def __init__(self, point):
            self.left = None
            self.right = None
            self.point = point
            self.parent = None
            pass

        def set_left(self, left):
            if left == None: pass
            left.parent = self
            self.left = left

        def set_right(self, right):
            if right == None: pass
            right.parent = self
            self.right = right


    def median(lst):
        m = len(lst) / 2
        return lst[m], m


    def build_kdtree(data, d):
        data = sorted(data, key=lambda x: x[d])
        p, m = median(data)
        tree = node(p)

        del data[m]

        if m > 0: tree.set_left(build_kdtree(data[:m], not d))
        if len(data) > 1: tree.set_right(build_kdtree(data[m:], not d))
        return tree


    def distance(a, b):
        print a, b
        return ((a[0] - b[0]) ** 2 + (a[1] - b[1]) ** 2) ** 0.5


    def search_kdtree(tree, d, target):
        if target[d] < tree.point[d]:
            if tree.left != None:
                return search_kdtree(tree.left, not d, target)
        else:
            if tree.right != None:
                return search_kdtree(tree.right, not d, target)

        def update_best(t, best):
            if t == None: return
            t = t.point
            d = distance(t, target)
            if d < best[1]:
                best[1] = d
                best[0] = t


        best = [tree.point, 100000.0]
        while (tree.parent != None):
            update_best(tree.parent.left, best)
            update_best(tree.parent.right, best)
            tree = tree.parent
        return best[0]


    kd_tree = build_kdtree(T, 0)
    print search_kdtree(kd_tree, 0, [9, 4])
输出:
[8, 1] [9, 4]
[5, 4] [9, 4]
[9, 6] [9, 4]
[9, 6]
可见对于点[9, 4],在n=6的数据集中,kdtree算法一共只进行了3次计算。
K-近邻算法实现手写数字识别
  1 #-*- coding: utf-8 -*-
  2
  3 from numpy import *
  4 from os import listdir
  5 import operator
  6
  7 # 读取数据到矩阵
  8 def img2vector(filename):
  9     # 创建向量
 10     returnVect = zeros((1,1024))
 11
 12     # 打开数据文件,读取每行内容
 13     fr = open(filename)
 14
 15     for i  in range(32):
 16         # 读取每一行
 17         lineStr = fr.readline()
 18
 19         # 将每行前32字符转成int存入向量
 20         for j in range(32):
 21             returnVect[0,32*i+j] = int(lineStr[j])
 22
 23     return returnVect
 24
 25 # kNN算法实现
 26 def classify0(inX, dataSet, labels, k):
 27     # 获取样本数据数量
 28     dataSetSize = dataSet.shape[0]
 29
 30     # 矩阵运算,计算测试数据与每个样本数据对应数据项的差值
 31     diffMat = tile(inX, (dataSetSize,1)) - dataSet
 32
 33     # sqDistances 上一步骤结果平方和
 34     sqDiffMat = diffMat**2
 35     sqDistances = sqDiffMat.sum(axis=1)
 36
 37     # 取平方根,得到距离向量
 38     distances = sqDistances**0.5
 39
 40     # 按照距离从低到高排序
 41     sortedDistIndicies = distances.argsort()
 42     classCount={}
 43
 44     # 依次取出最近的样本数据
 45     for i in range(k):
 46         # 记录该样本数据所属的类别
 47         voteIlabel = labels[sortedDistIndicies[i]]
 48         classCount[voteIlabel] = classCount.get(voteIlabel,0) + 1
 49
 50     # 对类别出现的频次进行排序,从高到低
 51     sortedClassCount = sorted(classCount.iteritems(), key=operator.itemgetter(1), reverse=True)
 52
 53     # 返回出现频次最高的类别
 54     return sortedClassCount[0][0]
 55
 56 # 算法测试
 57 def handwritingClassTest():
 58     # 样本数据的类标签列表
 59     hwLabels = []
 60
 61     # 样本数据文件列表
 62     trainingFileList = listdir('digits/trainingDigits')
 63     m = len(trainingFileList)
 64
 65     # 初始化样本数据矩阵(M*1024)
 66     trainingMat = zeros((m,1024))
 67
 68     # 依次读取所有样本数据到数据矩阵
 69     for i in range(m):
 70         # 提取文件名中的数字
 71         fileNameStr = trainingFileList[i]
 72         fileStr = fileNameStr.split('.')[0]
 73         classNumStr = int(fileStr.split('_')[0])
 74         hwLabels.append(classNumStr)
 75
 76         # 将样本数据存入矩阵
 77         trainingMat[i,:] = img2vector('digits/trainingDigits/%s' % fileNameStr)
 78
 79     # 循环读取测试数据
 80     testFileList = listdir('digits/testDigits')
 81
 82     # 初始化错误率
 83     errorCount = 0.0
 84     mTest = len(testFileList)
 85
 86     # 循环测试每个测试数据文件
 87     for i in range(mTest):
 88         # 提取文件名中的数字
 89         fileNameStr = testFileList[i]
 90         fileStr = fileNameStr.split('.')[0]
 91         classNumStr = int(fileStr.split('_')[0])
 92
 93         # 提取数据向量
 94         vectorUnderTest = img2vector('digits/testDigits/%s' % fileNameStr)
 95
 96         # 对数据文件进行分类
 97         classifierResult = classify0(vectorUnderTest, trainingMat, hwLabels, 3)
 98
 99         # 打印KNN算法分类结果和真实的分类
100         print "the classifier came back with: %d, the real answer is: %d" % (classifierResult, classNumStr)
101
102         # 判断KNN算法结果是否准确
103         if (classifierResult != classNumStr): errorCount += 1.0
104
105     # 打印错误率
106     print "
the total number of errors is: %d" % errorCount
107     print "
the total error rate is: %f" % (errorCount/float(mTest))
108
109 # 执行算法测试
110 handwritingClassTest()
