本篇基于centos7服务器进行部署开发
代码地址:https://github.com/chukaihong/docker-compose.喜欢的点个start
转载自:https://www.cnblogs.com/hckblogs/p/11186311.html
一.拉取redis镜像,使用如下命令
|
1
|
docker pull redis |
1.查看镜像是否拉取成功,使用如下命令
|
1
|
docker images |
显示如下则证明拉取成功

二.编写docker-compose.yml文件实现redis一主二从
|
1
2
3
4
5
6
7
8
9
10
11
12
13
14
15
16
17
18
19
20
21
22
23
24
25
26
27
28
29
30
31
32
|
version: '3.7'services: master: image: redis container_name: redis-master restart: always command: redis-server --port 6379 --requirepass test@dbuser2018 --appendonly yes ports: - 6379:6379 volumes: - ./data:/data slave1: image: redis container_name: redis-slave-1 restart: always command: redis-server --slaveof 192.168.8.188 6379 --port 6380 --requirepass test@dbuser2018 --masterauth test@dbuser2018 --appendonly yes ports: - 6380:6380 volumes: - ./data:/data slave2: image: redis container_name: redis-slave-2 restart: always command: redis-server --slaveof 192.168.8.188 6379 --port 6381 --requirepass test@dbuser2018 --masterauth test@dbuser2018 --appendonly yes ports: - 6381:6381 volumes: - ./data:/data |
1.名词解释
| 名词 | 描述 |
| version | docker文件的版本 |
| image | 指定容器镜像就是之前拉取的redis镜像 |
| container_name | 给这个镜像起一个别名 |
| restart | always:表名开机自启动 |
| command | 相当于执行一些命令 (--requirepass 指定redis密码 --appendonly yes 这个命令是用于开启redis数据持久化) |
| ports | 端口映射,将容器的端口映射到对应宿主机的端口 |
| volumes | 数据卷的映射.因为一旦容器停止了那么里面的数据也没有.所以我们需要把这个数据文件放在外面,然后映射到容器中 |
2. 启动redis,使用如下命令 -d 挂在后台
|
1
|
docker-compose up -d |
查看redis是否启动成功,使用如下命令,看到红框中的三个并且状态是 UP 则表明启动redis成功

如果使用失败了,可以使用如下命令查看日志,观察是什么原因造成的
|
1
|
docker logs -f 容器Id |
停止redis,使用如下命令
|
1
|
docker-compose down |
或者
|
1
2
|
docker stop 容器Iddocker rm 容器Id |
停止并移除所有容器可以使用如下命令
|
1
2
|
docker stop $(docker ps -a -q)docker rm $(docker ps -a -q) |
查看redis是否实现了一主二从的功能
进入主redis容器中,使用如下命令
|
1
|
docker exec -it 容器Id bash |
显示如下则表明进入到容器中

对主redis进行操作,证明该主redis具备正常的写入功能
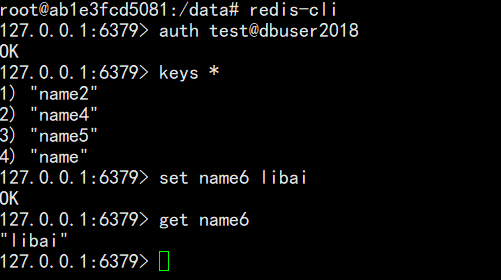
证明完毕,退出容器. ctrl+c退出redis,输入如下命令退出容器
|
1
|
exit |

同样方式进入到redis从服务器,查看是否能获取到name6且不具备写功能
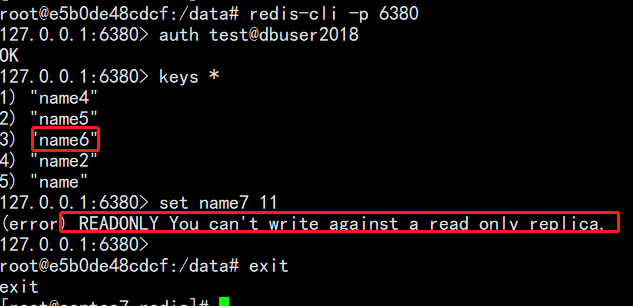
至此,redis一主二从完毕,如果想知道数据是否被持久化可以执行如下命令。查看是否有name6这个key,有则表明数据持久化成功。
|
1
2
|
docker-compose down docker-compose up -d |
三.部署redis-sentinel
1.编写docker-compose.yml
|
1
2
3
4
5
6
7
8
9
10
11
12
13
14
15
16
17
18
19
20
21
22
23
24
25
26
27
28
29
30
31
|
version: '3.7'services: sentinel1: image: redis container_name: redis-sentinel-1 command: redis-sentinel /usr/local/etc/redis/sentinel.conf restart: always ports: - 26379:26379 volumes: - ./sentinel1.conf:/usr/local/etc/redis/sentinel.conf sentinel2: image: redis container_name: redis-sentinel-2 command: redis-sentinel /usr/local/etc/redis/sentinel.conf restart: always ports: - 26380:26379 volumes: - ./sentinel2.conf:/usr/local/etc/redis/sentinel.conf sentinel3: image: redis container_name: redis-sentinel-3 command: redis-sentinel /usr/local/etc/redis/sentinel.conf restart: always ports: - 26381:26379 volumes: - ./sentinel3.conf:/usr/local/etc/redis/sentinel.conf |
2.编写sentinel.conf
|
1
2
3
4
5
6
7
8
9
|
port 26379dir /tmp# 自定义集群名,其中 192.168.8.188 为 redis-master 的 ip,6379 为 redis-master 的端口,2 为最小投票数(因为有 3 台 Sentinel 所以可以设置成 2)sentinel monitor mymaster 192.168.8.188 6379 2sentinel down-after-milliseconds mymaster 30000sentinel parallel-syncs mymaster 1sentinel auth-pass mymaster test@dbuser2018sentinel failover-timeout mymaster 180000sentinel deny-scripts-reconfig yes |
执行如下命令,复制3份redis-sentinel配置文件
|
1
2
3
|
cp sentinel.conf sentinel1.confcp sentinel.conf sentinel2.confcp sentinel.conf sentinel3.conf |
3.启动redis-sentinel
|
1
|
docker-compose up -d |
4.查看redis-sentinel是否启动成功

进入redis-sentinel容器中,查看redis连接状态
|
1
|
docker exec -it 容器Id bash<br>redis-cli -p 26379 |
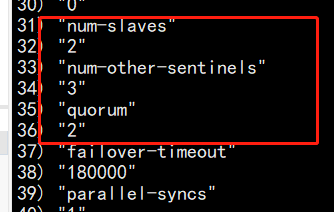
执行如下命令,查看redis主信息
|
1
|
sentinel master mymaster |
显示带红框的信息则表明成功
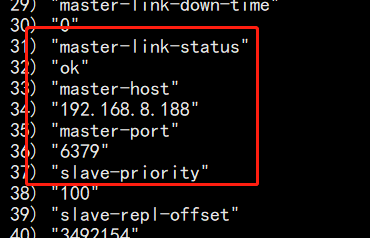
执行如下命令,查看从redis信息是否正常
|
1
|
sentinel slaves mymaster |
显示如下表明正常
四.测试主redis挂了之后,哨兵能否正常选举redis
使用如下命令,停掉主redis. [停掉容器也可以使用容器对应的NAMES来停掉]
|
1
|
docker stop redis-master |
显示红框则表明redis已经停了

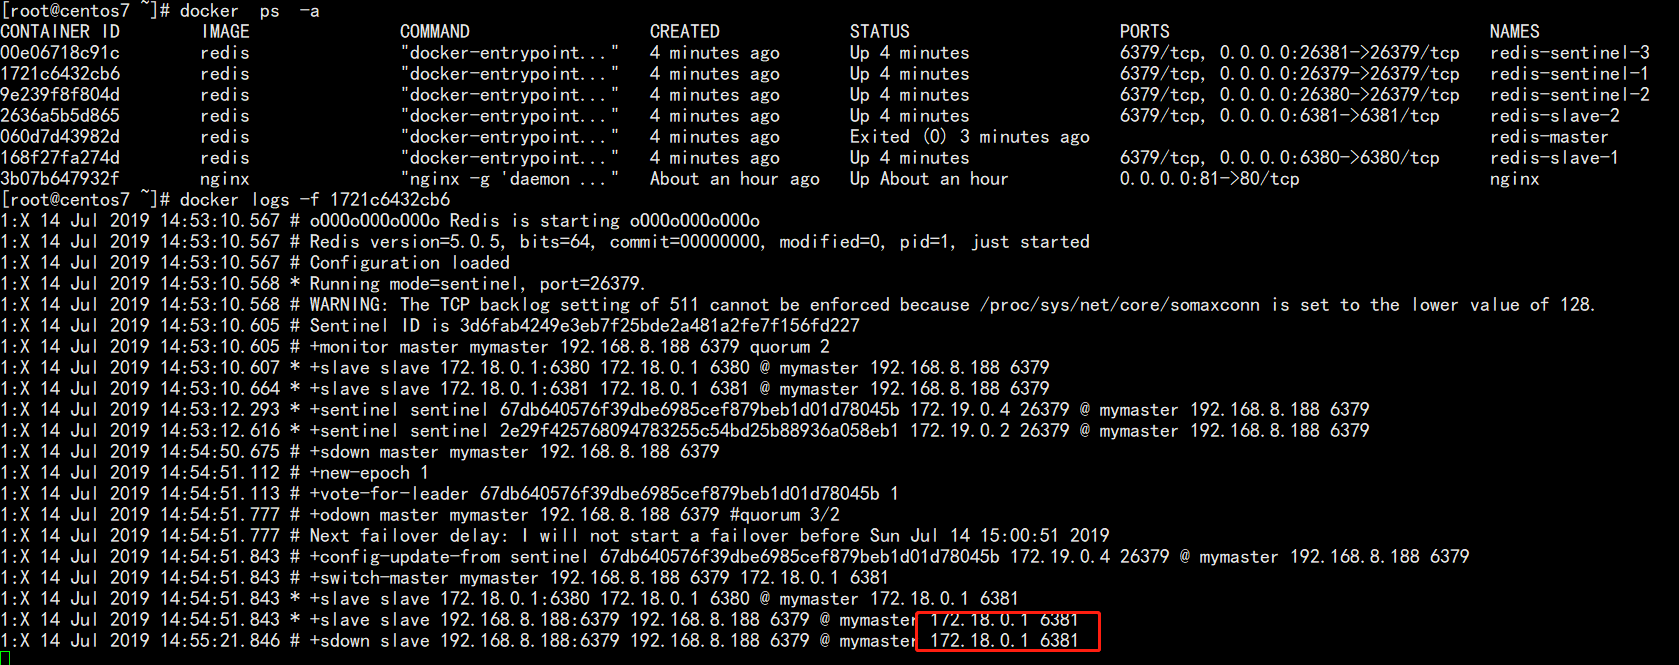
查看redis-sentinel日志,看其将那个redis选举为主,如下,其将端口位6381的redis选举为主
测试端口号为6381的redis是否具备写功能,如下则表明成功

至此,redis一主二从三哨兵模式部署成功.文中如有不妥,请在评论区留言,我将进行修改以免误人子弟--