部署django 项目
nginx +wsgi
步骤:
1. 给项目创建一个文件夹
mkdir /opt/luf
2.
xftp上传到服务器
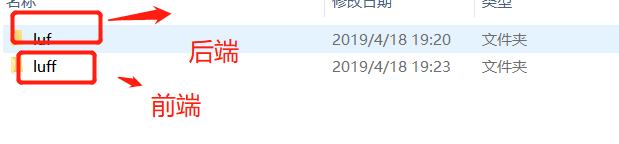
上传前端项目代码和后端项目代码
3.
此步骤:
1 安装虚拟环境virtualenv
2 安装virtualenvwrapper工具
3 确认virtualenvwrapper.sh脚本正常使用
4 确认用户环境变量配置文件,有virtualenvwrapper.sh的四行配置
WORKON_HOME=~/Envs
VIRTUALENVWRAPPER_VIRTUALENV_ARGS='--no-site-packages'
VIRTUALENVWRAPPER_PYTHON=/opt/python36/bin/python3
source /opt/python36/bin/virtualenvwrapper.sh
5 创建项目专用虚拟环境 luf_evn

6 上传requirements.txt到 /opt/下
先从原来项目的虚拟环境中导出项目需要的模块到requirements.txt


7 安装路飞学城项目所需要的所有模块
pip3 install -r requirements.txt
安装xadmin:
#centos7底下,mariadb就是mysql数据库,只是包名的不同 #启动mariadb服务端 #使用客户端去链接mysql服务端
有两种方法
第一种:
mysqldump -u root -p --all-databases >  luf.sql
第二种:
直接从navicat导出数据库的数据
   (1) 先从navicat导出数据库数据,导出为luf.sql
   (2) 将luf.sql上传到服务器的/opt目录下
   (3) 在服务器上进入mysql,然后创建数据库luf
   (4) 进入数据库luf
   (5) 使用命令source luf.sql导入luf.sql数据
   (6) 使用show tables命令查看数据是否成功导入

2 使用mysql -uroot -p 在linux上登陆mariadb
3 刷新授权表
允许并授权root远程访问
# 允许root用户远程登录,并且给予所有数据库所有表的所有权限
grant all privileges on *.* to root@'%' identified by 'nihao123';
flush privileges;

luf.sql
(1) 进入mysql
    mysql -u root -p
(2) 进入数据库
    use luf
(3) 导入数据
    source /opt/luf.sql
注意1,linux的数据库,需要对root用户设置远程链接的权限, 密码是123
注意2,SELinux和linux的防火墙要给关闭,否则windows去链接linux的3306端口可能被拒绝
注意3: 第4步一定要确认OK之后才能继续往下操作
ALLOW_HOSTS=["*"]
数据库连接配置
注意: mariadb就是mysql,这里的ENGINE不用修改
DATABASES = {
    'default': {
        'ENGINE': 'django.db.backends.mysql',
        "HOST": "127.0.0.1",
        "PORT": 3306,
        "USER": "root",
        "PASSWORD": "nihao123",
        "NAME": "luf",
    }
}
(2) 使用命令把django跑起来
python3 manage.py runserver 0.0.0.0:8000
7 完成uWSGI命令学习,使用uWSGI启动项目,支持多进程
(1) 进入luffy_city_env虚拟环境
    workon luf_env
(2) 安装uwsgi
    pip3 install uwsgi
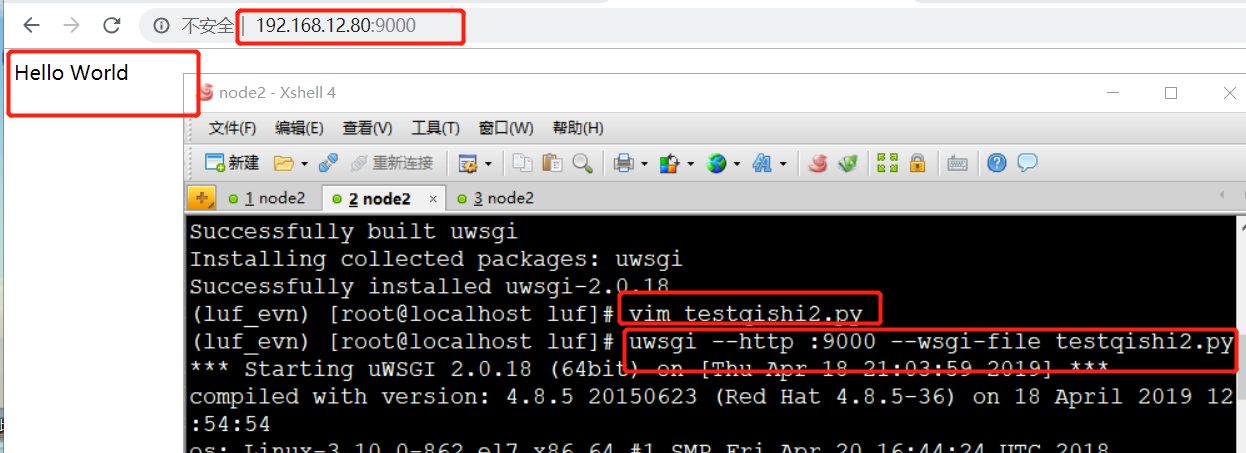
(1) 创建一个testqishi2.py
(2) 写入以下几行代码
def application(env, start_response):
    start_response('200 OK', [('Content-Type','text/html')])
    return [b"Hello World"] # python3
(3) 通过uwsgi命令将测试文件跑起来
uwsgi --http :9000 --wsgi-file testqishi2.py
(4) 测试通过IP+端口访问
http://192.168.12.80:9000
uwsgi --http :9000 --module luf.wsgi
可以看到没有样式,因为uwsgi 不支持静态文件。
4 uwsgi热加载启动项目
uwsgi支持热加载启动
uwsgi --http :9000 --module luf.wsgi --py-autoreload=1
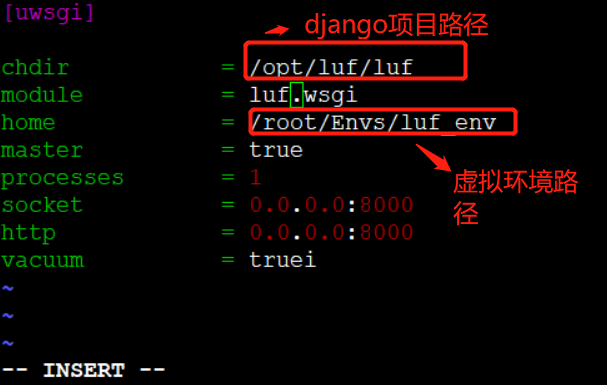
(1) 创建一个配置文件uwsgi.ini(注意,这个配置文件不管放在哪里都可以,但是启动的时候,需要找到这个配置文件)
(2) 写入以下配置
[uwsgi]

chdir           = /opt/luf/luf
module          = luf.wsgi
home            = /root/Envs/luf_env
master          = true
processes       = 1
socket          = 0.0.0.0:8000
http            = 0.0.0.0:8000
vacuum          = true

(3) 通过指定uwsgi.ini配置文件把django跑起来
uwsgi uwsgi.ini    #   用来启动django项目
[uwsgi]
# Django-related settings
# the base directory (full path)
# 写上项目的绝对路径
chdir           = /opt/book_manage
# Django's wsgi file
# 填写找到django的wsgi文件,填写相对路径,以chdir参数为相对路径
module          = book_manage.wsgi
# the virtualenv (full path)
# 填写虚拟环境的绝对路径
home            = /root/Envs/book_manage_env/
# process-related settings
# master
#启动uwsgi主进程
master          = true
# maximum number of worker processes
processes       = 1
# the socket (use the full path to be safe
#如果你使用了nginx,做反向代理,必须填写socket链接,而不是http参数
socket          = 0.0.0.0:8000
#如果你不用nginx,直接使用uwsgi,运行一个http服务端,就用这个http参数
http = 0.0.0.0:8000
# ... with appropriate permissions - may be needed
# chmod-socket    = 664
# clear environment on exit
vacuum          = true

由于uwsgi 不支持处理静态文件,所以,我们需要配置nginx与uwsgi结合,通过nginx来处理静态文件
1 收集静态文件
(1) 修改settings.py配置文件, 加入以下一行配置
STATIC_ROOT='/opt/luf/static'
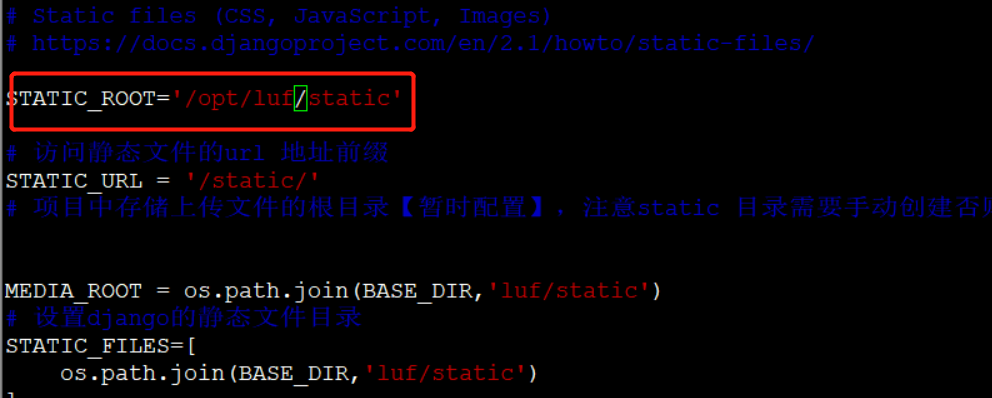
(2) 创建静态文件存放目录/opt/luf/static
mkdir -p /opt/luf/static

(3) 一条命令收集django项目下面的所有静态文件
python3 manage.py collectstatic


看到这个信息说明已经成功收集
2 配置nginx结合uwsgi进行转发
(1)在nginx.conf配置文件下添加以下配置文件
location / {
            include  /opt/nginx-1-12/conf/uwsgi_params;
            uwsgi_pass 0.0.0.0:9000;
        }
(2) 将uwsgi.ini配置文件里面的http注释掉,启用socket
socket = 0.0.0.0:8080 # 启用此行
# http = 0.0.0.0:8080 # 停用此行
(3) 在nginx.conf中添加静态文件地址
location /static {
            alias /opt/luf/static;
        }
后端nginx配置,/opt/nginx-1-12/conf/nginx.conf配置代码:
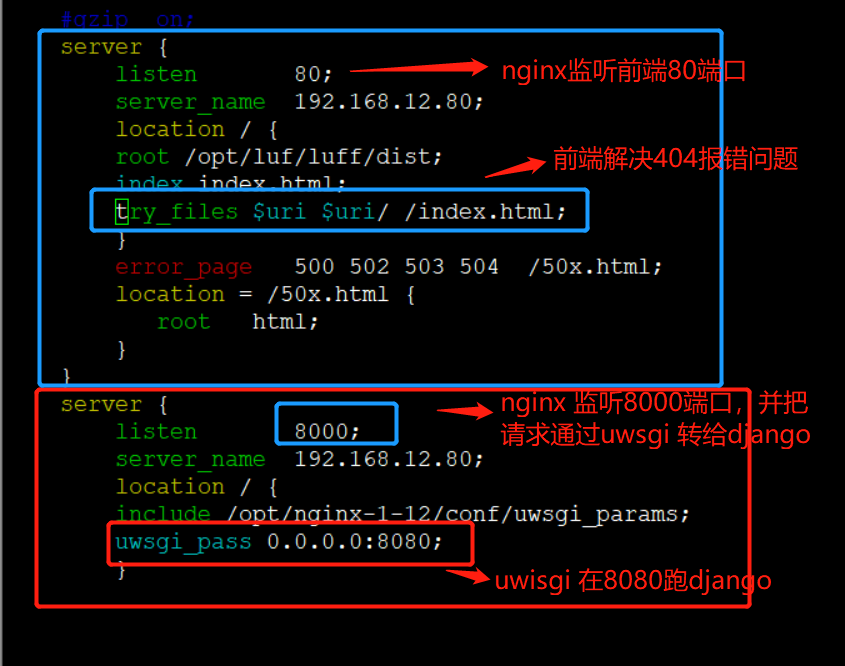
server {
        listen       8000;
        server_name  192.168.12.80;
        location / {
        include /opt/nginx-1-12/conf/uwsgi_params;
        uwsgi_pass 0.0.0.0:8080;
        }
(4)nginx 配置前端服务,nginx 监听80 端口
server {
        listen       80;
        server_name  192.168.12.80;
        location / {
        root /opt/luf/luff/dist;
        index index.html;
        try_files $uri $uri/ /index.html;
        }
        error_page   500 502 503 504  /50x.html;
        location = /50x.html {
           root   html;
        }
    }
nginx上配置 前后端配置:
server {
        listen       80;
        server_name  192.168.12.80;
        location / {
        root /opt/luf/luff/dist;
        index index.html;
        try_files $uri $uri/ /index.html;
        }
        error_page   500 502 503 504  /50x.html;
        location = /50x.html {
           root   html;
        }
    }
    server {
        listen       8000;
        server_name  192.168.12.80;
        location / {
        include /opt/nginx-1-12/conf/uwsgi_params;
        uwsgi_pass 0.0.0.0:8080;
        }

        error_page  404 401 402 403      /40x.html;
         location = /40x.html {
            root   /opt/qishi2douyu/;
        }

        location /static {

        alias /opt/luf/static;
        }
        # redirect server error pages to the static page /50x.html
        #
(5) 平滑重启nginx
/opt/nginx-1-12/sbin/nginx -s reload
(6) 在物理机上添加hosts
192.168.12.80 www.qishi2.com
浏览器可以用一下去访问:
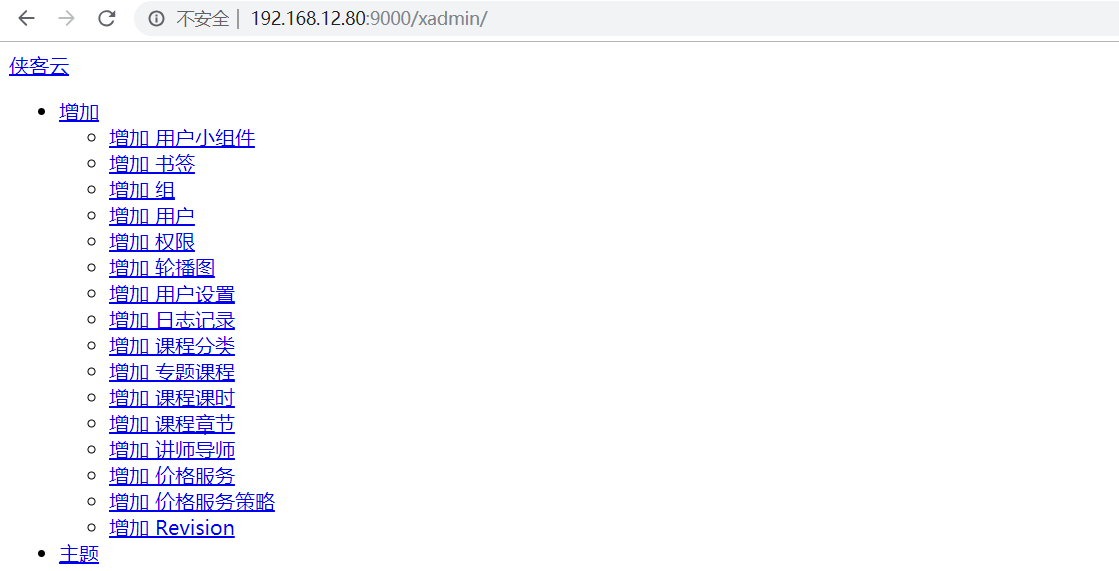
http://www.qishi2.com:8000/xadmin

9 验证所有流程是否正常
1 验证域名是否正常访问
http://192.168.12.80:8000/xadmin/
2 验证静态文件是否正常显示
3 验证mariadb数据库是否连接正常
4 验证redis数据库是否连接正常
5 验证uwsgi是否正常启动
cd  到 uwigi.ini 所在文件夹 : cd   /opt/luf/


uwsgi uwsgi.ini    # 启动项目。
注意: 每次nginx配置文件的修改都需要平滑重启nginx
/opt/nginx112/sbin/nginx -s reload
10 安装node , 配置vue前端
(1) 下载安装node软件包
wget https://nodejs.org/download/release/v8.6.0/node-v8.6.0-linux-x64.tar.gz
(2) 解压缩
tar -zxvf node-v8.6.0-linux-x64.tar.gz
(3) 添加环境变量(到这里了)
PATH=/opt/node-v8.6.0-linux-x64/bin:/opt/python36/bin:/usr/local/sbin:/usr/local/bin:/usr/sbin:/usr/bin:/root/bin
(4) 将vue项目里面的所有127.0.0.1和所有的localhost全部改为我们的服务器地址192.168.12.56
注意: 此步非常重要, vue项目里面,这个IP没有创建全局变量,导致127.0.0.1和localhost分布在很多个文件中,所以需要一个一个替换
(5) 进入到vue前端的项目目录, 使用npm run build生成dist项目静态文件
cd /opt/luf/luff
npm run build # vue前端每次需改之后需要重新 build
(6) 在luff目录下就可以看到dist文件夹
/opt/luf/luff/dist
整个项目的基本架构和请求流程如下图: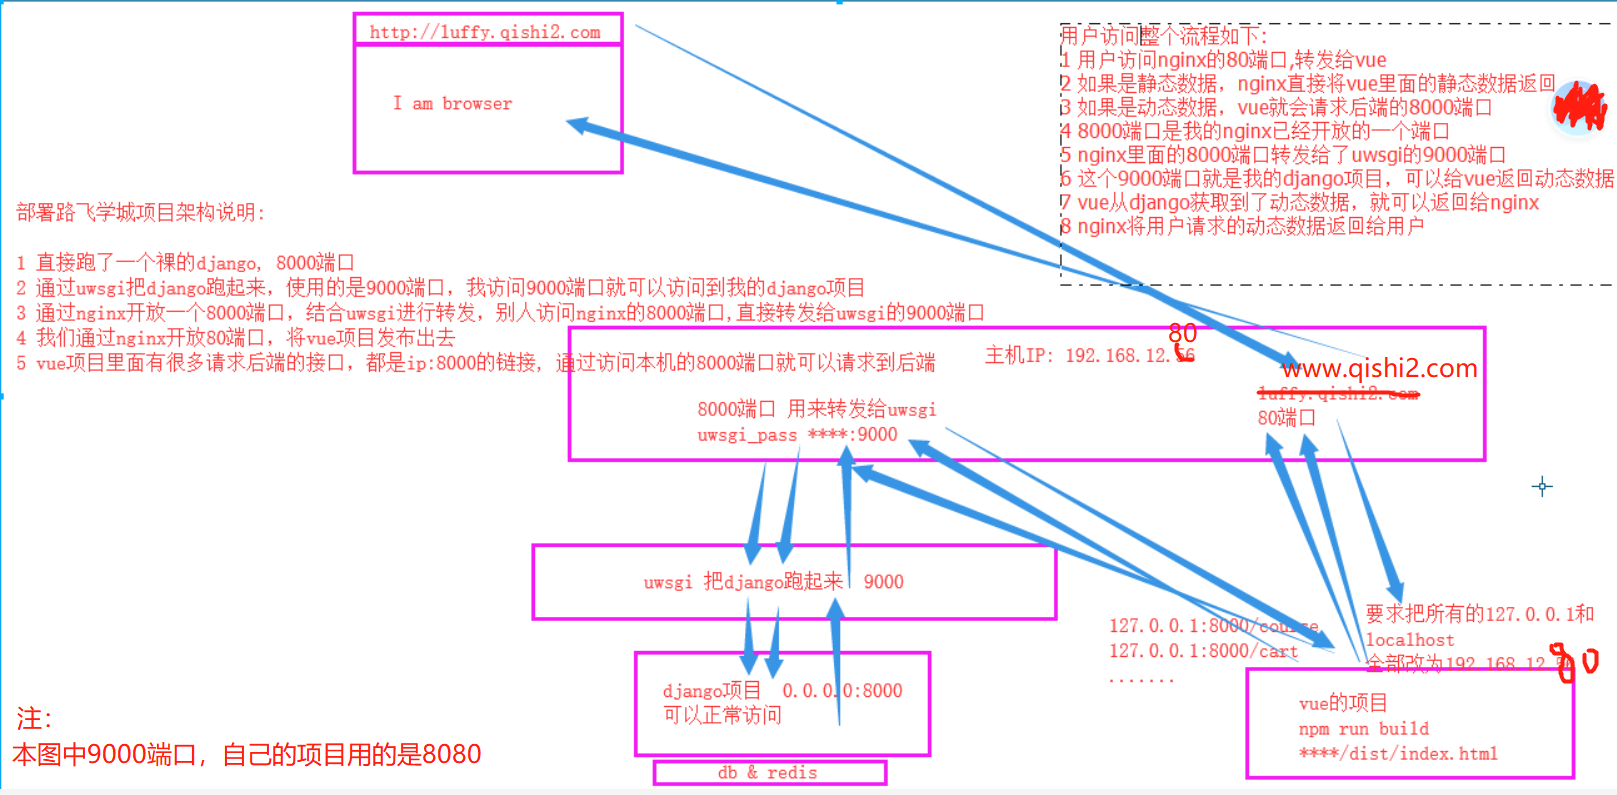
11 supervisor守护进程工具
1 安装supervisor
由于supervisor在python3下无法使用,因此只能用python2去下载!!!!!!
# 注意此时已经退出虚拟环境了!!!!!
easy_install supervisor
# 如果没有easy_install的话,就yum安装一个setuptools工具就可以用了
yum install python-setuptools
2 生成supervisord配置文件
echo_supervisord_conf > /etc/supervisord.conf
3 在/etc/supervisord.conf下添加以下两行配置
[program:luffy_city]
command=/root/Envs/luf_env/bin/uwsgi /opt/luf/luf/uwsgi.ini
4 启动supervisor
  supervisord -c /etc/supervisord.conf # 启动supervisor
  supervisorctl -c /etc/supervisord.conf # 启动和进入supervisor交互模式
5 查看supervisor运行状态
  supervisorctl  # 使用此命令后将会进入supervisor交互式管理界面
  status  # 查看进程运行状态

6 管理supervisor里面的进程
stop luf # 关闭luf进程
stop all # 关闭所有进程
start luf # 开启luf进程
start all # 开启所有进程
status # 查看所有进程运行状态
supervisorctl status # 可以不用进入交互模式查看
详细的项目部署