1.通过先定位到具体的元素然后通过text方法获取文本信息,如获取控件名称等
driver.find_element_by_xpath("//div[/h1").text
2.直接通过定位到的元素的属性直接获取属性名称,如输入框提示信息等
driver.find_element_by_id("XXX").get_attribute(YYY)
启发:元素的定位可以先定位到大的颗粒度,在向小的颗粒度定位,例如先定位到table,在定位到table中的行和列
代码如下:
此处为写的获取第一列元素的list的方法
-
def listcontent(driver, path):
-
table = driver.find_element_by_xpath(path)
-
rows = table.find_elements_by_tag_name("tr")
-
rowname = []
-
for row in rows[1:]:
-
col = row.find_element_by_xpath("td[1]/a")
-
rowname.append(col)
如果得到的文本只为空,而非我们期望的baidu,那么当前定位的元素可能被隐藏了。
1.判断是否被隐藏 。 driver.find_element_by_xx().is_displayed()
打印结果,如果得到 false的结果.那就说明被隐藏了
2.怎么解决?
方法一: 修改页面当前定位元素,或者当前元素父元素的CSS,使元素的is_displayed() 值为true.
方法二: is_displayed() 为false的元素,依然可以通过getAttribute()方法获取元素的属性.
由于
webdriver spec的定义,Selenium WebDriver 只会与可见元素交互,所以获取隐藏元素的文本总是会返回空字符串。
可是,在某些情况下,我们需要获取隐藏元素的文本。这些内容可以使用element.attribute('attributeName'), 通过textContent,innerText,innerHTML等属性获 取。(划重点)innerHTML会返回元素的内部 HTML, 包含所有的HTML标签。
例如,<div>Hello <p>World!</p></div>的innerHTML会得到Hello <p>World!</p>textContent和innerText只会得到文本内容,而不会包含 HTML 标签。
textContent是 W3C 兼容的文字内容属性,但是 IE 不支持innerText不是 W3C DOM 的指定内容,FireFox不支持
1、Select元素
1.打开百度-设置-搜索设置界面,如下图所示
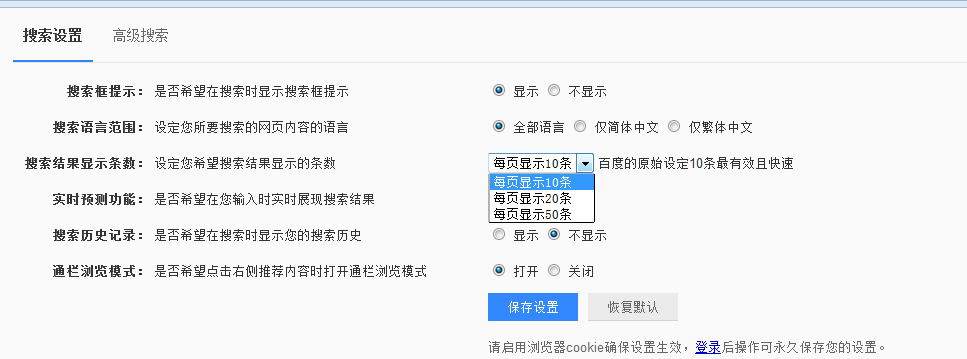
2.箭头所指位置,就是 select 选项框,打开页面元素定位,下方红色框框区域,可以看到 select 标签属性:
<select id="nr" name="NR">
3.选项有三个
<option selected="" value="10">每页显示 10 条</option>
<option value="20">每页显示 20 条</option>
<option value="50">每页显示 50 条</option>2、定位select
定位select有多种方法,下面进行一一介绍
2.1 二次定位
1.定位 select 里的选项有多种方式,这里先介绍一种简单的方法:二次定位
2.基本思路,先定位 select 框,再定位 select 里的选项完整代码如下:
123456789101112131415# coding:utf-8fromseleniumimportwebdriverfromselenium.webdriver.common.action_chainsimportActionChainsdriver=webdriver.Firefox()driver.get("https://www.baidu.com/")driver.implicitly_wait(20)mouse=driver.find_element_by_link_text("设置")ActionChains(driver).move_to_element(mouse).perform()driver.find_element_by_link_text("搜索设置").click()s=driver.find_element_by_id("nr")s.find_element_by_xpath("//option[@value='50']").click()# 二次定位另外一种写法driver.find_element_by_id("nr").find_element_by_xpath("//option[@value='50']").click()3.还有另外一种写法也是可以的,把最下面两步合并成为一步:
driver.find_element_by_id("nr").find_element_by_xpath("//option[@value='50']").click()
2.2 直接定位
1.有很多小伙伴说 firebug 只能定位到 select 框,还能定位里面的选项。
2.用 direbug 定位到 select 后,下方查看元素属性地方,点 select 标签前面的+号,就可以展开里面的选项内容了。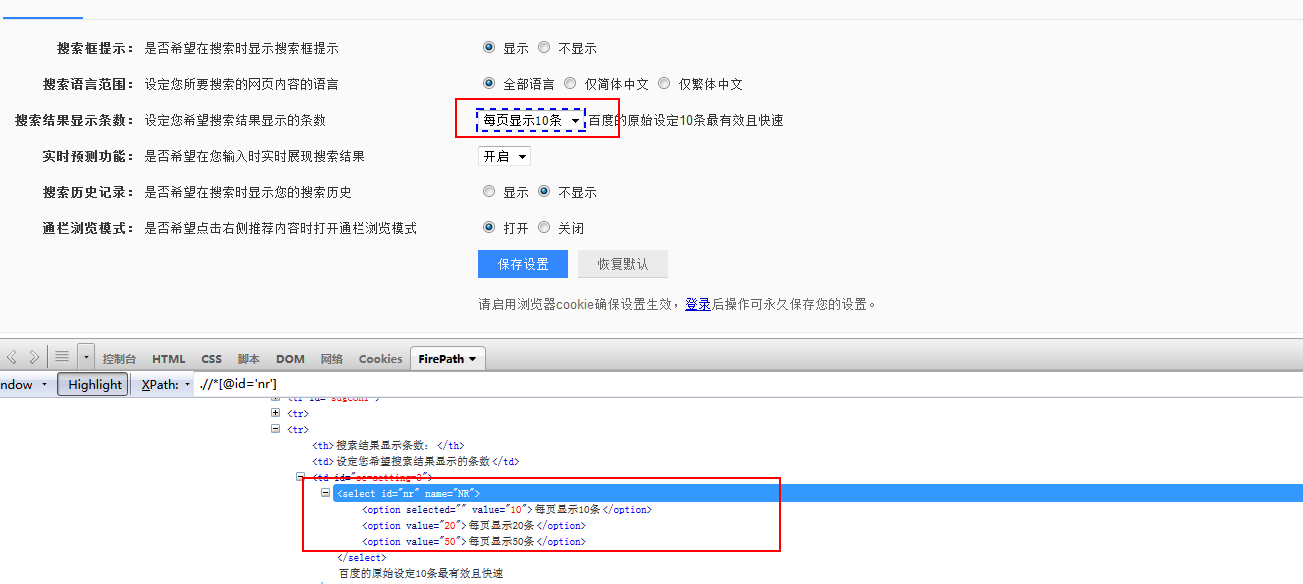
3.然后自己写 xpath 定位或者 css,一次性直接定位到 option 上的内容。
完整代码如下:
12345678910111213# coding:utf-8fromseleniumimportwebdriverfromselenium.webdriver.common.action_chainsimportActionChainsdriver=webdriver.Firefox()driver.get("https://www.baidu.com/")driver.implicitly_wait(20)mouse=driver.find_element_by_link_text("设置")ActionChains(driver).move_to_element(mouse).perform()driver.find_element_by_link_text("搜索设置").click()# 直接点位driver.find_element_by_xpath(".//*[@id='nr']/option[2]").click()2.3 Select 模块(index)点位
1.除了上面介绍的两种简单的方法定位到 select 选项,selenium 还提供了更高级的玩法,导入 Select 模块。直接根据属性或索引定位。
2.先要导入 select 方法:
from selenium.webdriver.support.select import Select
3.然后通过 select 选项的索引来定位选择对应选项(从 0 开始计数),如选择第三个选项:select_by_index(2)
完整代码如下:123456789101112131415# coding:utf-8fromseleniumimportwebdriverfromselenium.webdriver.common.action_chainsimportActionChainsfromselenium.webdriver.support.selectimportSelectdriver=webdriver.Firefox()driver.get("https://www.baidu.com/")driver.implicitly_wait(20)mouse=driver.find_element_by_link_text("设置")ActionChains(driver).move_to_element(mouse).perform()driver.find_element_by_link_text("搜索设置").click()# 通过索引:select_by_index()s=driver.find_element_by_id("nr")Select(s).select_by_index(2)2.4 Select 模块(value)定位
1.Select 模块里面除了 index 的方法,还有一个方法,通过选项的 value值来定位。每个选项,都有对应的 value 值,如
<select id="nr" name="NR">
<option selected="" value="10">每页显示 10 条</option>
<option value="20">每页显示 20 条</option>
<option value="50">每页显示 50 条</option>
2.第二个选项对应的 value 值就是“20”:select_by_value(2)完整代码如下:
123456789101112131415# coding:utf-8fromseleniumimportwebdriverfromselenium.webdriver.common.action_chainsimportActionChainsfromselenium.webdriver.support.selectimportSelectdriver=webdriver.Firefox()driver.get("https://www.baidu.com/")driver.implicitly_wait(20)mouse=driver.find_element_by_link_text("设置")ActionChains(driver).move_to_element(mouse).perform()driver.find_element_by_link_text("搜索设置").click()# 通过value定位:select_by_value()s=driver.find_element_by_id("nr")Select(s).select_by_value(20)2.5 Select 模块(text)定位
1.Select 模块里面还有一个更加高级的功能,可以直接通过选项的文本内容来定位。
2.定位“每页显示 50 条”:select_by_visible_text("每页显示 50 条")完整代码如下:
123456789101112131415# coding:utf-8fromseleniumimportwebdriverfromselenium.webdriver.common.action_chainsimportActionChainsfromselenium.webdriver.support.selectimportSelectdriver=webdriver.Firefox()driver.get("https://www.baidu.com/")driver.implicitly_wait(20)mouse=driver.find_element_by_link_text("设置")ActionChains(driver).move_to_element(mouse).perform()driver.find_element_by_link_text("搜索设置").click()# 通过select_by_visible_text定位s=driver.find_element_by_id("nr")Select(s).select_by_visible_text("每页显示50条")3.Select 模块其它方法
1.select 里面方法除了上面介绍的三种,还有更多的功能如下

select_by_index() :通过索引定位
select_by_value() :通过 value 值定位
select_by_visible_text() :通过文本值定位
deselect_all() :取消所有选项
deselect_by_index() :取消对应 index 选项
deselect_by_value() :取消对应 value 选项
deselect_by_visible_text() :取消对应文本选项
first_selected_option() :返回第一个选项
all_selected_options() :返回所有的选项
------------------------------------------签名---------------------------------------心简单,世界就简单,幸福才会生长;心自由,生活就自由,到哪都有快乐。方法获取textarea输入框中的输入信息") -------------------------------------------------------------------------------------
-------------------------------------------------------------------------------------
-