首先,我们要明确几件事。
聊天室需要具有什么功能?
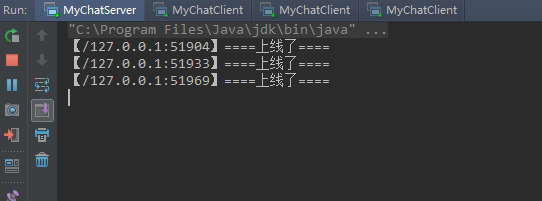
1、存在n个未与Server建立连接的Client。当第一个Client与Server建立连接,紧接着第二个Client与Server建立连接后,Server会在控制台上
打印“xxx已上线”。当n个Client与Server建立连接之后,第n+1个Client建立连接后,Server会通知其他Client:“xxx已上线”。 ------聊天室的广播机制
2、建立IO流,Client之间互为输出流,Server作为消息转发的载体,需要同步。 ------聊天室的消息回调机制
当连接一旦建立好,相应的处理器是HandlerAdded(ChannelHandlerContext ctx),所以要先获取channel对象。但要想广播出去,Server需要保存好所有建立连
接的channel对象。如何保存?用netty提供的channelGroup,定义这个实例,用DefaultChannelGroup对象实现。生成channelGroup对象后那channel对象add到
channelGroup中。在add之前,遍历channelGroup的每个对象,就实现了广播机制。
在使用channel.remoteAddress()方法拿到连接后,重写SimpChannelHandler的子类方法channelRead0()即可。在channelRead0中,用forEach()遍历channelGroup。
如果是别的Client通过readLine()发送的消息,则打印channel.remoteAddress()和msg,如果是自己发送的消息就只打印msg,这就实现了消息回调机制。
Server
import io.netty.channel.Channel;
import io.netty.channel.ChannelHandlerContext;
import io.netty.channel.SimpleChannelInboundHandler;
import io.netty.channel.group.ChannelGroup;
import io.netty.channel.group.DefaultChannelGroup;
import io.netty.util.concurrent.GlobalEventExecutor;

/**
 * @description:    【聊天---服务器处理】
* @author: KlayHu
 * @create: 2019/10/8 17:23
 **/
public class MyChatServerHandler extends SimpleChannelInboundHandler<String>{


    //定义保存建立连接的Channel对象的实例
private static ChannelGroup channelGroup = new DefaultChannelGroup(GlobalEventExecutor.INSTANCE);


@Override
protected void channelRead0(ChannelHandlerContext ctx, String msg) throws Exception {
        Channel channel = ctx.channel();

channelGroup.forEach(ch->{
            if(channel!=ch){
                ch.writeAndFlush("【" + channel.remoteAddress() +"】" + "发送的消息:" + msg + "
");
}else{
                ch.writeAndFlush("【我:】" + msg + "
");
}
        });


}


    @Override
public void handlerAdded(ChannelHandlerContext ctx) throws Exception {
        Channel channel = ctx.channel();

channelGroup.writeAndFlush("【服务器:】-" + channel.remoteAddress() + "=======已加入!=======
");     //遍历每一个channel对象,新连接的channel的远程地址告诉别的client它加入了。
channelGroup.add(channel);
}

    @Override
public void handlerRemoved(ChannelHandlerContext ctx) throws Exception {
        Channel channel = ctx.channel();        //获取channel对象
channelGroup.writeAndFlush("【服务器:】-" + channel.remoteAddress() + "=======已离开!=======
");

System.out.println(channelGroup.size());    //当有客户端断开连接的时候,没有必要调用Remove,验证一下。
//channelGroup.remove(channel);     netty会自动调用
}


    @Override
public void channelActive(ChannelHandlerContext ctx) throws Exception {
        Channel channel = ctx.channel();
System.out.println("【" + channel.remoteAddress() + "】" + "====上线了====");
}


    @Override
public void channelInactive(ChannelHandlerContext ctx) throws Exception {
        Channel channel = ctx.channel();
System.out.println("【" + channel.remoteAddress() + "】" + "====下线了====");
}

    @Override
public void exceptionCaught(ChannelHandlerContext ctx, Throwable cause) throws Exception {

    }
}
Client
import io.netty.bootstrap.Bootstrap;
import io.netty.channel.Channel;
import io.netty.channel.EventLoopGroup;
import io.netty.channel.nio.NioEventLoopGroup;
import io.netty.channel.socket.nio.NioSocketChannel;

import java.io.BufferedReader;
import java.io.InputStreamReader;

/**
 * @description:    【聊天---客户端】
 * @author: KlayHu
 * @create: 2019/10/8 18:40
 **/
public class MyChatClient {
    public static void main(String[] args) throws Exception{
        EventLoopGroup eventLoopGroup = new NioEventLoopGroup();
        try{
            Bootstrap bootstrap = new Bootstrap();

            bootstrap.group(eventLoopGroup).channel(NioSocketChannel.class).handler(new MyChatClientInitializer());

            Channel channel = bootstrap.connect("localhost",8888).sync().channel();
            BufferedReader br = new BufferedReader(new InputStreamReader(System.in));
            for(;;){
                channel.writeAndFlush(br.readLine() + "
");
            }

        }finally {
            eventLoopGroup.shutdownGracefully();
        }
    }
}
关于Server和Client的事件循环组和启动配置类的建立在上一篇中与本篇写法大致相同。netty的独特性,就在于自定义的Handler。
【服务器】
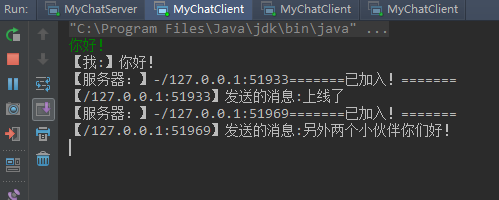
【客户端1】
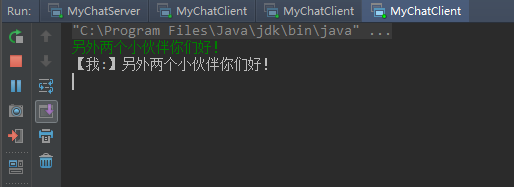
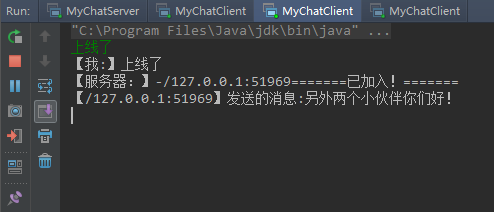
【客户端2】
【客户端3】