1. 什么是scrapy?
其官网是这样简述的,“A Fast & Powerful Scraping &Crawling Framework ”, 并且其底层以twisted作为网络架构( Python实现的基于事件驱动的网络引擎框架),所以爬取效率及性能出色。
定义·:Scrapy是一个为了爬取网站数据,提取结构性数据而编写的应用框架。 其可以应用在数据挖掘,信息处理或存储历史数据等一系列的程序中。其最初是为了页面抓取 (更确切来说, 网络抓取 )所设计的, 也可以应用在获取API所返回的数据(例如 Amazon Associates Web Services ) 或者通用的网络爬虫。Scrapy用途广泛,可以用于数据挖掘、监测和自动化测试
2. scrapy模块执行与通信流程
2.1 流程图:
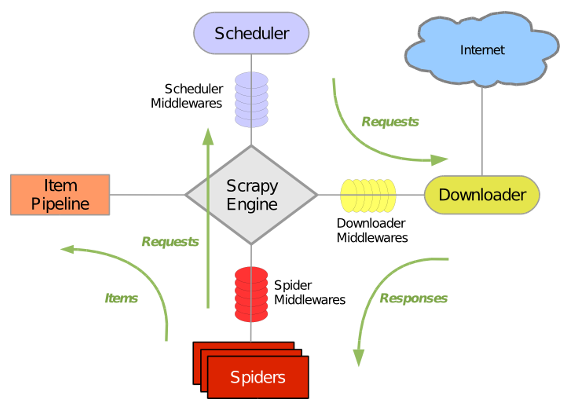
2.2 各大组件的作用:
引擎 (Scrapy Engine):用来处理整个系统的数据流,触发事物(框架核心)
调度器 (Scheduler):用来接收引擎发送的请求,压入请求队列中,并在引擎再次请求的时候返回,可以想象成一个url(待爬取网页的url)的优先队列,由他决定下一个要抓取的网址是什么,同时去除重复的网址
下载器 (Downloader):顾名思义,用于下载网页代码,并将结果返回给spider
爬虫 (Spiders): 蜘蛛呢,就是执行者,用于解析网页中的信息,即实体(Item)
项目管 道(Pipeline): 负责处理爬虫从网页中抽取的实体,主要功能是持久化实体,验证实体的有效性,清除不需要的信息。当爬虫被解析后,将被发送至项目管道,并经过几个特定次序来处理数据
下载中间件 (Downloader Middlewares): 位于Engine及Spider之间的框架,主要工作是处理scrapy engine与Downloader之间的请求及响应
爬虫中间件 (Spider Middlewares): 位于Engine及Spider之间的框架,主要工作是处理scrapy engine与spider之间的响应输入及请求输出
调度中间件 (Schedule Middlewares): 介于scrapy engine及scheduler之间的中间件,处理从scrapy engine发送到scheduler的请求响应
2.3 是不是感觉一头雾水,那我们直接上过程就很清楚啦
3. scrapy的基本使用
3.1 安装
# 这里我们用conda创建一个名为rawling_py36的虚拟环境
conda create --name crawling_py36 python=3.6

# 进入环境
activate crawling_py36

# 安装scrapy
conda install scrapy

# 退出当前环境(windows)
deactivate
说明:也可以使用pip install scrapy命令进行安装, 但是在windows平台下, scrapy依赖pypiwin32模块,在执行pip install scrapy命令前,请先执行pip install pypiwin32
3.2 开始(这里以爬取糗事百科段子为例)
a. 新建项目
# 新建一个文件夹 并进入文件夹
mkdir spider_projects
cd ./spider_projects

# 进入虚拟环境
activate crawling_py36

# 新建爬虫项目,
scrapy startproject qsbk

#提示成功
b.新建爬虫

其域名为qiushibaike.com,我们这里根据域名新建一个spider
# 一定要在项目文件夹下
cd qsbk

scrapy genspider qsbk_spider qiushibaike.com
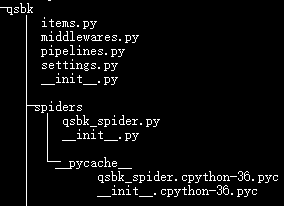
成功之后,其文件树结构为:
c. 分析网页结构(https://www.qiushibaike.com/text/)
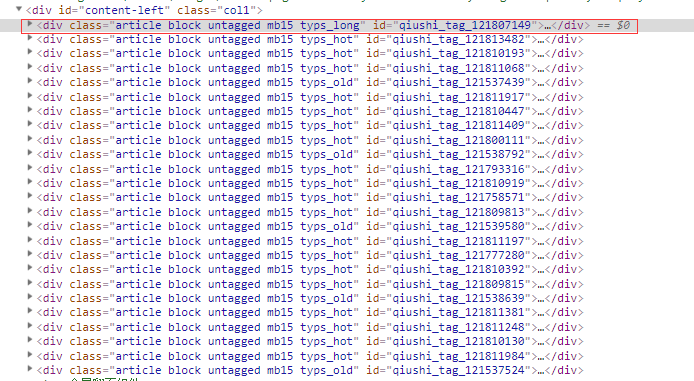
那么红圈里的div就是当前页的所有段子信息,我们使用xpath进行解析,那么每一个段子的xpath语法为 //div[@id='content-left']/div[contains(@class,'article')]

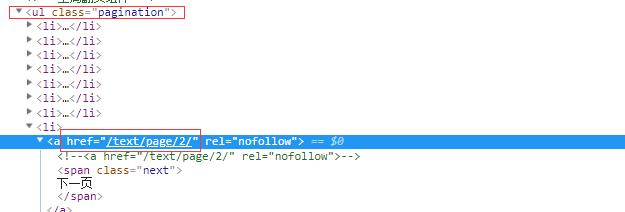
提取下一页的地址的xpath语法为 //ul[@class='pagination']/li[last()]/a/@href
d. 开始
爬虫配置 (settings.py):
 1 # Obey robots.txt rules
 2 ROBOTSTXT_OBEY = False
 3
 4 # Override the default request headers:
 5 DEFAULT_REQUEST_HEADERS = {
 6   'Accept': 'text/html,application/xhtml+xml,application/xml;q=0.9,*/*;q=0.8',
 7   'Accept-Language': 'en',
 8   'User-Agent': 'Mozilla/5.0 (Windows NT 10.0; WOW64) AppleWebKit/537.36 (KHTML, like Gecko) Chrome/72.0.3626.119 Safari/537.36',
 9 }
10
11
12 # Configure item pipelines
13 # See https://doc.scrapy.org/en/latest/topics/item-pipeline.html
14 ITEM_PIPELINES = {
15    'qsbk.pipelines.QsbkPipeline': 300,
16 }
解析数据(qsbk_spider.py):
 1 # -*- coding: utf-8 -*-
 2 import scrapy
 3 from ..items import QsbkItem
 4
 5
 6 class QsbkSpiderSpider(scrapy.Spider):
 7     name = 'qsbk_spider'
 8     allowed_domains = ['qiushibaike.com']
 9     start_urls = ['https://www.qiushibaike.com/text/page/1/']
10     base_domain = "https://www.qiushibaike.com"
11
12     def parse(self, response):
13         # 获取所有段子信息
14         texts = response.xpath("//div[@id='content-left']/div[contains(@class, 'article')]")
15         # 提取单个段子信息
16         for text in texts:
17             author_info = text.xpath("./div[contains(@class,'author')]")
18             head_img = 'http:' + author_info.xpath(".//img/@src").get().strip()
19             author_name = author_info.xpath(".//h2/text()").get().strip()
20             content_list = text.xpath(".//div[@class='content']/span/text()").getall()
21             content = ''.join(content_list).strip()
22
23             article_item = QsbkItem(author_name=author_name, head_img=head_img, content=content)
24
25             yield article_item
26
27         # 下一页的地址
28         next_page_url = response.xpath("//ul[@class='pagination']/li[last()]/a/@href").get()
29
30         if next_page_url:
31             yield scrapy.Request(url=self.base_domain+next_page_url, callback=self.parse)
32         else:
33             return
结构化实体(items.py):
# -*- coding: utf-8 -*-

# Define here the models for your scraped items
#
# See documentation in:
# https://doc.scrapy.org/en/latest/topics/items.html

import scrapy


class QsbkItem(scrapy.Item):
    # define the fields for your item here like:
    # name = scrapy.Field()
    author_name = scrapy.Field()
    head_img = scrapy.Field()
    content = scrapy.Field()
持久化数据(pipelines.py):
 1 # -*- coding: utf-8 -*-
 2
 3 # Define your item pipelines here
 4 #
 5 # Don't forget to add your pipeline to the ITEM_PIPELINES setting
 6 # See: https://doc.scrapy.org/en/latest/topics/item-pipeline.html
 7
 8 # import json
 9 # class QsbkPipeline(object):
10 #
11 #     def open_spider(self, spider):
12 #         print('start crawling....')
13 #         self.file = open('qsbk.json','w' , encoding='utf-8')
14 #
15 #     def process_item(self, item, spider):
16 #         item_json = json.dumps(dict(item), ensure_ascii=False)
17 #         self.file.write(item_json+'
')
18 #         return item
19 #
20 #     def close_spider(self, spider):
21 #         self.file.close()
22 #         print('stop crawling.....')
23
24 # 一次性写入
25 # from scrapy.exporters import JsonItemExporter, JsonLinesItemExporter
26 # class QsbkPipeline(object):
27 #
28 #     def open_spider(self, spider):
29 #         print('start crawling....')
30 #         self.file = open('qsbk.json', 'wb')
31 #         self.exporter = JsonItemExporter(self.file, ensure_ascii=False)
32 #         self.exporter.start_exporting()
33 #
34 #     def process_item(self, item, spider):
35 #         self.exporter.export_item(item)
36 #
37 #     def close_spider(self, spider):
38 #         self.exporter.finish_exporting()
39 #         self.file.close()
40 #         print('stop crawling.....')
41
42 # 分行写入,(在数据量很大的时候推荐使用)
43 from scrapy.exporters import JsonLinesItemExporter
44 class QsbkPipeline(object):
45
46     def open_spider(self, spider):
47         print('start crawling....')
48         self.file = open('qsbk.json', 'wb')
49         self.exporter = JsonLinesItemExporter(self.file, ensure_ascii=False)
50
51     def process_item(self, item, spider):
52         self.exporter.export_item(item)
53         return item
54
55     def close_spider(self, spider):
56         self.file.close()
57         print('stop crawling.....')
说明: 为了避免每次爬取使用命令行,可以在项目根目录下新建 run.py 代替命令行执行, 而scrapy也同样提供了执行cmd命令这一模块
启动爬虫(run.py)
1 from scrapy import cmdline
2
3 cmdline.execute("scrapy crawl qsbk_spider".split())
e.爬取结束(qsbk.json)
