操作系统: MAC OS X
一、准备
1、 JDK 1.8
下载地址:http://www.oracle.com/technetwork/java/javase/downloads/jdk8-downloads-2133151.html
2、Hadoop CDH
下载地址:https://archive.cloudera.com/cdh5/cdh/5/
本次安装版本:hadoop-2.6.0-cdh5.9.2.tar.gz
二、配置SSH(免密码登录)
1、打开iTerm2 终端,输入:ssh-keygen -t rsa ,回车,next -- 生成秘钥
2、cat id_rsa_xxx.pub >> authorized_keys -- 用于授权你的公钥到本地可以无密码登录
3、chmod 600 authorized_keys -- 赋权限
4、ssh localhost -- 免密码登录,如果显示最后一次登录时间,则登录成功
三、配置Hadoop&环境变量
1、创建hadoop目录&解压
mkdir -p work/install/hadoop-cdh5.9.2 -- hadoop 主目录
mkdir -p work/install/hadoop-cdh5.9.2/current/tmp work/install/hadoop-cdh5.9.2/current/nmnode work/install/hadoop-cdh5.9.2/current/dtnode -- hadoop 临时、名称节点、数据节点目录
tar -xvf hadoop-2.6.0-cdh5.9.2.tar.gz -- 解压包
2、配置 .bash_profile 环境变量


1 HADOOP_HOME="/Users/kimbo/work/install/hadoop-cdh5.9.2/hadoop-2.6.0-cdh5.9.2"
2
3 JAVA_HOME="/Library/Java/JavaVirtualMachines/jdk1.8.0_152.jdk/Contents/Home"
4 HADOOP_HOME="/Users/kimbo/work/install/hadoop-cdh5.9.2/hadoop-2.6.0-cdh5.9.2"
5
6 PATH="/usr/local/bin:~/cmd:$JAVA_HOME/bin:$HADOOP_HOME/bin:$HADOOP_HOME/sbin:$PATH"
7 CLASSPATH=".:$JAVA_HOME/lib/dt.jar:$JAVA_HOME/lib/tools.jar"
8
9 export JAVA_HOME PATH CLASSPATH HADOOP_HOME
source .bash_profile -- 生效环境变量
3、修改配置文件(重点)
cd $HADOOP_HOME/etc/hadoop
- core-site.xml
<configuration>
  <property>
    <name>hadoop.tmp.dir</name>
    <value>/Users/zhangshaosheng/work/install/hadoop-cdh5.9.2/current/tmp</value>
  </property>
  <property>
    <name>fs.defaultFS</name>
    <value>hdfs://localhost:8020</value>
  </property>
  <property>
    <name>fs.trash.interval</name>
    <value>4320</value>
    <description> 3 days = 60min*24h*3day </description>
  </property>
</configuration>
- hdfs-site.xml
 1 <configuration>
 2   <property>
 3     <name>dfs.namenode.name.dir</name>
 4     <value>/Users/zhangshaosheng/work/install/hadoop-cdh5.9.2/current/nmnode</value>
 5   </property>
 6   <property>
 7     <name>dfs.datanode.data.dir</name>
 8     <value>/Users/zhangshaosheng/work/install/hadoop-cdh5.9.2/current/dtnode</value>
 9   </property>
10   <property>
11     <name>dfs.datanode.http.address</name>
12     <value>localhost:50075</value>
13   </property>
14   <property>
15     <name>dfs.replication</name>
16     <value>1</value>
17   </property>
18   <property>
19     <name>dfs.permissions.enabled</name>
20     <value>false</value>
21   </property>
22 </configuration>
- yarn-site.xml
 1 <configuration>
 2  <property>
 3     <name>yarn.nodemanager.aux-services</name>
 4     <value>mapreduce_shuffle</value>
 5   </property>
 6   <property>
 7     <name>yarn.log-aggregation-enable</name>
 8     <value>true</value>
 9     <description>Whether to enable log aggregation</description>
10   </property>
11   <property>
12     <name>yarn.nodemanager.remote-app-log-dir</name>
13     <value>/Users/zhangshaosheng/work/install/hadoop-cdh5.9.2/current/tmp/yarn-logs</value>
14     <description>Where to aggregate logs to.</description>
15   </property>
16   <property>
17     <name>yarn.nodemanager.resource.memory-mb</name>
18     <value>8192</value>
19     <description>Amount of physical memory, in MB, that can be allocated
20       for containers.</description>
21   </property>
22   <property>
23     <name>yarn.nodemanager.resource.cpu-vcores</name>
24     <value>2</value>
25     <description>Number of CPU cores that can be allocated
26       for containers.</description>
27   </property>
28   <property>
29     <name>yarn.scheduler.minimum-allocation-mb</name>
30     <value>1024</value>
31     <description>The minimum allocation for every container request at the RM,
32       in MBs. Memory requests lower than this won't take effect,
33       and the specified value will get allocated at minimum.</description>
34   </property>
35   <property>
36     <name>yarn.scheduler.maximum-allocation-mb</name>
37     <value>2048</value>
38     <description>The maximum allocation for every container request at the RM,
39       in MBs. Memory requests higher than this won't take effect,
40       and will get capped to this value.</description>
41   </property>
42   <property>
43     <name>yarn.scheduler.minimum-allocation-vcores</name>
44     <value>1</value>
45     <description>The minimum allocation for every container request at the RM,
46       in terms of virtual CPU cores. Requests lower than this won't take effect,
47       and the specified value will get allocated the minimum.</description>
48   </property>
49   <property>
50     <name>yarn.scheduler.maximum-allocation-vcores</name>
51     <value>2</value>
52     <description>The maximum allocation for every container request at the RM,
53       in terms of virtual CPU cores. Requests higher than this won't take effect,
54       and will get capped to this value.</description>
55   </property>
56 </configuration>
- mapred-site.xml
 1  <property>
 2     <name>mapreduce.jobtracker.address</name>
 3     <value>localhost:8021</value>
 4   </property>
 5   <property>
 6     <name>mapreduce.jobhistory.done-dir</name>
 7     <value>/Users/zhangshaosheng/work/install/hadoop-cdh5.9.2/current/tmp/job-history/</value>
 8     <description></description>
 9   </property>
10   <property>
11     <name>mapreduce.framework.name</name>
12     <value>yarn</value>
13     <description>The runtime framework for executing MapReduce jobs.
14     Can be one of local, classic or yarn.
15     </description>
16   </property>
17
18   <property>
19     <name>mapreduce.map.cpu.vcores</name>
20     <value>1</value>
21     <description>
22         The number of virtual cores required for each map task.
23     </description>
24   </property>
25   <property>
26     <name>mapreduce.reduce.cpu.vcores</name>
27     <value>1</value>
28     <description>
29         The number of virtual cores required for each reduce task.
30     </description>
31   </property>
32
33   <property>
34     <name>mapreduce.map.memory.mb</name>
35     <value>1024</value>
36     <description>Larger resource limit for maps.</description>
37   </property>
38   <property>
39     <name>mapreduce.reduce.memory.mb</name>
40     <value>1024</value>
41     <description>Larger resource limit for reduces.</description>
42   </property>
43 <configuration>
44   <property>
45     <name>mapreduce.map.java.opts</name>
46     <value>-Xmx768m</value>
47     <description>Heap-size for child jvms of maps.</description>
48   </property>
49   <property>
50     <name>mapreduce.reduce.java.opts</name>
51     <value>-Xmx768m</value>
52     <description>Heap-size for child jvms of reduces.</description>
53   </property>
54
55   <property>
56     <name>yarn.app.mapreduce.am.resource.mb</name>
57     <value>1024</value>
58     <description>The amount of memory the MR AppMaster needs.</description>
59   </property>
60 </configuration>
- hadoop-env.sh
export JAVA_HOME=${JAVA_HOME} -- 添加 java环境变量
四、启动
1、格式化
hdfs namenode -format
如果hdfs命令识别不了, 检查环境变量,是否配置正确了。
2、启动
cd $HADOOP_HOME/sbin
执行命名:start-all.sh ,按照提示,输入密码
五、验证
1、在终端输入: jps
出现如下截图,说明ok了

2、登录web页面
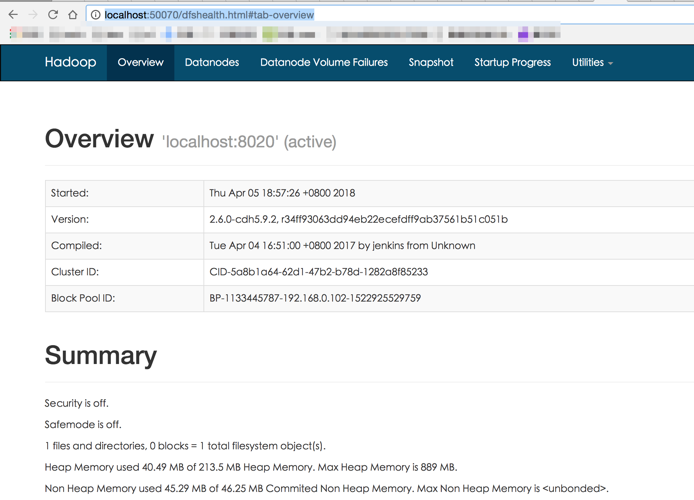
a)HDFS : http://localhost:50070/dfshealth.html#tab-overview
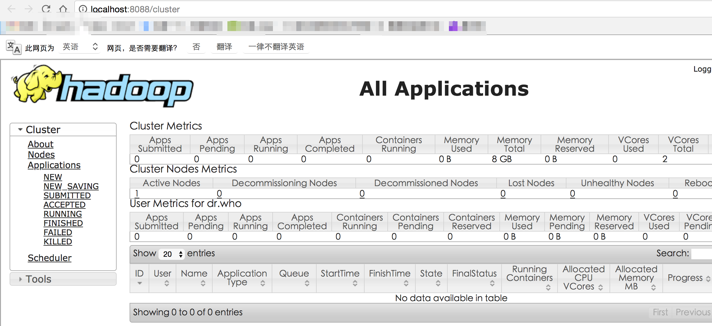
b)YARN Cluster: http://localhost:8088/cluster
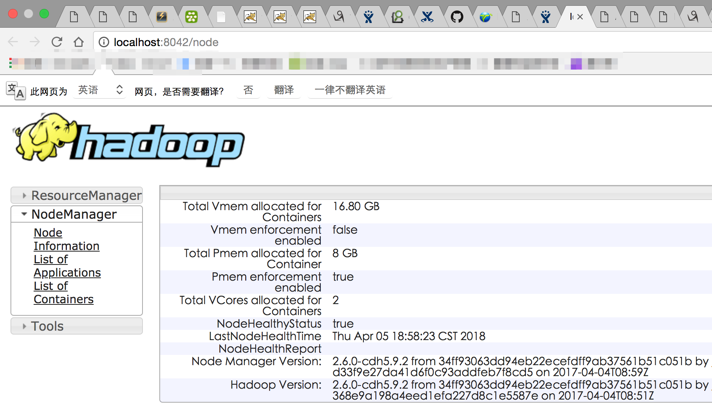
c)YARN ResourceManager/NodeManager: http://localhost:8042/node